2014 Lexus CT200h Manual
[x] Cancel search: ManualPage 155 of 622

155
3
3-4. Adjusting the steering wheel and mirrors
Operation of each component
CT200h_OM_OM76135E_(EE)
Inside rear view mirror
The height of the rear view mirror can be adjusted to suit your driving posture.
Adjust the height of the rear view mir-
ror by moving it up and down.
�XManual anti-glare inside rear view mirror
Reflected light from the headlights of vehicles behind can be reduced by operat-
ing the lever.
Normal position
Anti-glare position
The rear view mirror’s position can be adjusted to enable sufficient confirma-
tion of the rear view.
Adjusting the height of rear view mirror
Anti-glare function
1
2
CT200h_OM_OM76135E_(EE).book Page 155 Friday, May 30, 2014 1 1:14 AM
Page 159 of 622

1593-4. Adjusting the steering wheel and mirrors
3
Operation of each component
CT200h_OM_OM76135E_(EE)
■Mirror angle can be adjusted when
The power switch is in ACCESSORY or ON mode.
■Rain clearing mirrors (type B only)
The coating on the mirror has the rain clearing (hydrophilic) effect to make the rear view
clearer in raining. When water droplets collects on the mirror surface, this effect causes
the droplets to be spread out into a film.
●The rain clearing effect will be reduced temp orarily, when the dirt is adhered to the mir-
ror or after your vehicle is parked for a long time in underground or indoor parking lots,
etc., where there is no direct sunlight. Howe ver, the effect will gradually recover after 1-
or 2-day exposure to direct sunlight.
●If you want to restore the rain clearing effect immediately, conduct the restoration work
( → P. 443).
■When the mirrors are fogged up
The outside rear view mirrors can be cleared using the mirror defoggers. Turn on the
rear window defogger to turn on the outside rear view mirror defoggers.
(→ P. 4 1 2 , 4 1 9 )
■Automatic adjustment of the mirror angle (vehicles with driving position memory)
A desired mirror face angle can be entered to memory and recalled automatically by the
driving position memory. ( →P. 1 4 7 )
■Auto anti-glare function (type B only)
When the anti-glare inside rear view mirror is set to automatic mode, the outside rear
view mirrors will activate in conjunction with the anti-glare inside rear view mirror to
reduce reflected light. ( →P. 1 5 5 )
■Using automatic mode in cold weather (type B only)
When automatic mode is used in cold weather, the door mirror could freeze up and
automatic stowing and return may not be possible. In this event, remove any ice and snow
from the door mirror, then either operate the mirror using manual mode or move the mir-
ror by hand.
■Customization
The automatic mirror folding and extending operation can be changed.
(Customizable features: →P. 5 8 9 )
CT200h_OM_OM76135E_(EE).book Page 159 Friday, May 30, 2014 1 1:14 AM
Page 165 of 622

1653-5. Opening, closing the windows and moon roof
3
Operation of each component
CT200h_OM_OM76135E_(EE)
■The moon roof can be operated when
The power switch is in ON mode.
■Operating the moon roof after turning the hybrid system off
The moon roof can be operated for approximately 45 seconds even after the power
switch is turned to ACCESSORY mode or turned off. It cannot, however, be operated
once either front door is opened.
■Jam protection function
If an object is detected between the moon roof and the frame while the moon roof is clos-
ing or tilting down, travel is stoppe d and the moon roof opens slightly.
■Sunshade
The sunshade can be opened and closed manually. However, the sunshade will open
automatically to slightly before the fully op en position when the moon roof is opened.
■When the moon roof does not close normally
Perform the following procedure:
●If the moon roof closes but then re-opens slightly
Stop the vehicle.
Press and hold the “CLOSE” switch.
*1
The moon roof will close, reopen an d pause for approximately 10 seconds.*2 Then it
will close again and tilt down. Finally it w ill be adjusted slightly and then stop.
Check to make sure that the moon roof completely stops and then release the
switch.
●If the moon roof tilts down but then tilts back up
Stop the vehicle.
Press and hold the “DOWN” switch.
*1
The moon roof will close, reopen and paus e for approximately 10 seconds in the tilt
up position.
*2 Then it will close again and tilt down . Finally it will be adjusted slightly
and then stop.
Check to make sure that the moon roof has completely stopped and then release
the switch.
*1: If the switch is released at the incorrect time, the procedure will have to be per-
formed again from the beginning.
*2: If the switch is released after the above mentioned 10 second pause, automatic operation will be disabled. In that case, press and hold the “CLOSE” or “DOWN”
switch, and the moon roof will close, be adjusted slightly and then stop. Check to
make sure that the moon roof has completely stopped and then release the switch.
If the moon roof does not fully close even after performing the above procedure cor-
rectly, have the vehicle inspected by any authorized Lexus dealer or repairer, or another
duly qualified and equipped professional.
■Moon roof open warning buzzer
The buzzer sounds and a message is shown on the multi-information display in the instru-
ment cluster when the power switch is turned off and the driver’s door is opened with the
moon roof open.
1
2
3
1
2
3
CT200h_OM_OM76135E_(EE).book Page 165 Friday, May 30, 2014 1 1:14 AM
Page 190 of 622

1904-3. Operating the lights and wipers
CT200h_OM_OM76135E_(EE)
Headlight switch
Turning the end of the lever turns on the lights as follows: The daytime running lights
turn on.
The front position, tail,
license plate and instru-
ment panel lights turn on.
The headlights and all lights
listed above turn on.
The headlights, daytime
running lights and front
position lights turn on and
off automatically.
(When the power switch is
in ON mode.)
With the headlights on, push the
lever away from you to turn on the
high beams.
Pull the lever toward you to the center
position to turn the high beams off.
Pull the lever toward you and release
it to flash the high beams once.
You can flash the high beams with the
headlights on or off.
The headlights can be operated manually or automatically.
Operating instructions
1
2
3
4
Turning on the high beam headlights
1
2
CT200h_OM_OM76135E_(EE).book Page 190 Friday, May 30, 2014 1 1:14 AM
Page 191 of 622

1914-3. Operating the lights and wipers
4
Driving
CT200h_OM_OM76135E_(EE)
This system allows the headlights to be turned on for 30 seconds when the
power switch is off.
Pull the lever toward you and release it
with the light switch is in or
after turning the power switch off.
Pull the lever toward you and release it
again to turn off the lights.
The level of the headlights can be adjusted according to the number of passen-
gers and the loading condition of the vehicle.
Raises the level of the headlights
Lowers the level of the headlights
■Guide to dial settings
Follow me home system
Manual headlight leveling dial (if equipped)
1
2
Occupancy and luggage load conditionsDial positionOccupantsLuggage load
DriverNone0
Driver and front passengerNone0
All seats occupiedNone1.5
All seats occupiedFull luggage loading2.5
DriverFull luggage loading4
CT200h_OM_OM76135E_(EE).book Page 191 Friday, May 30, 2014 1 1:14 AM
Page 228 of 622

2284-5. Using the driving support systems
CT200h_OM_OM76135E_(EE)
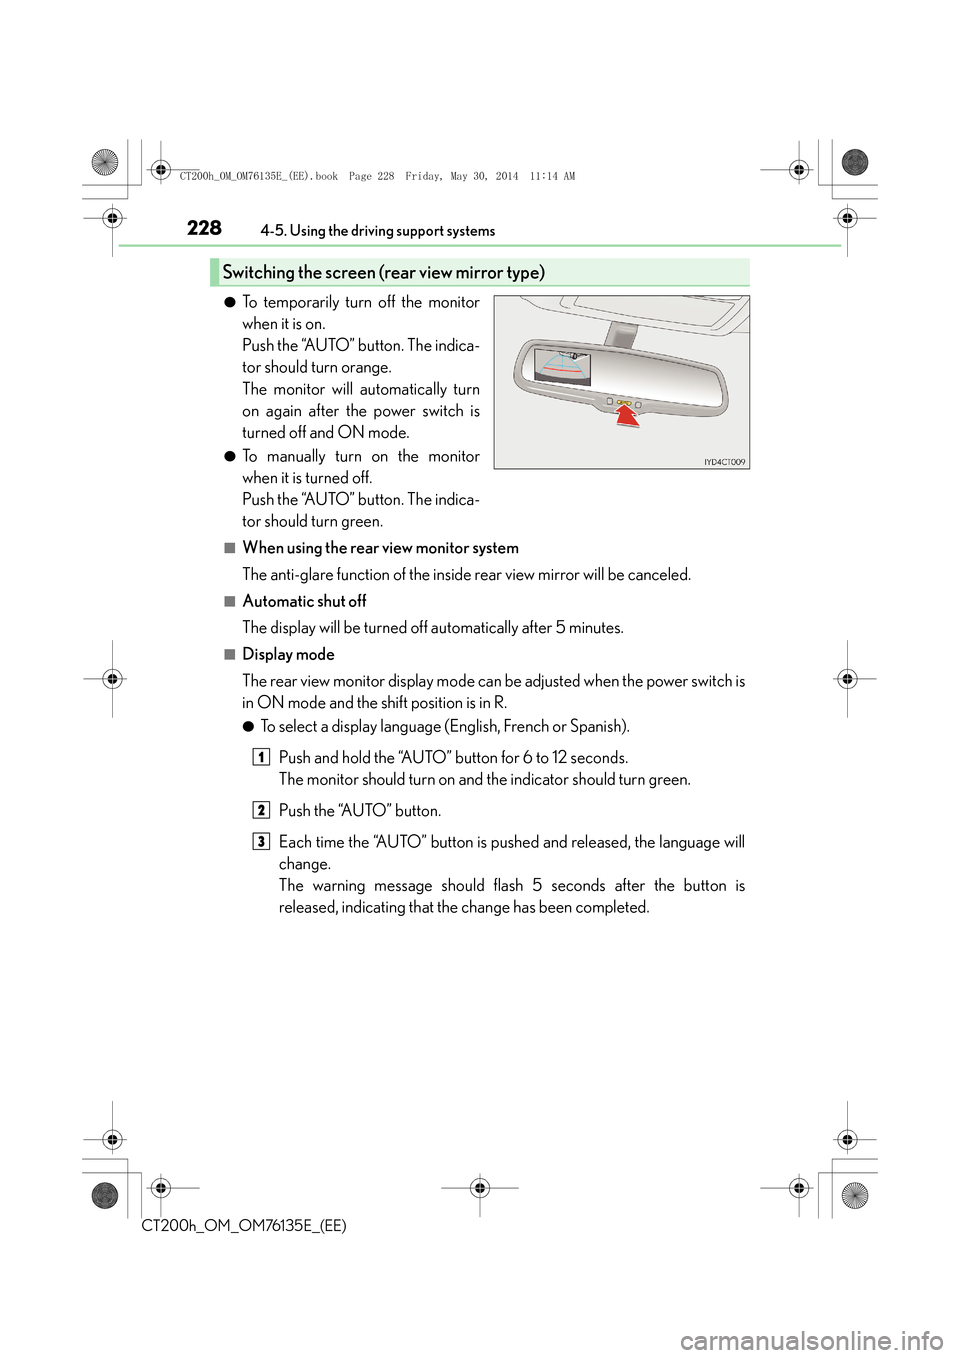
●To temporarily turn off the monitor
when it is on.
Push the “AUTO” button. The indica-
tor should turn orange.
The monitor will automatically turn
on again after the power switch is
turned off and ON mode.
●To manually turn on the monitor
when it is turned off.
Push the “AUTO” button. The indica-
tor should turn green.
■When using the rear view monitor system
The anti-glare function of the inside rear view mirror will be canceled.
■Automatic shut off
The display will be turned off automatically after 5 minutes.
■Display mode
The rear view monitor display mode can be adjusted when the power switch is
in ON mode and the shift position is in R.
●To select a display language (English, French or Spanish).
Push and hold the “AUTO” button for 6 to 12 seconds.
The monitor should turn on and the indicator should turn green.
Push the “AUTO” button.
Each time the “AUTO” button is pushed and released, the language will
change.
The warning message should flash 5 seconds after the button is
released, indicating that the change has been completed.
Switching the screen (rear view mirror type)
1
2
3
CT200h_OM_OM76135E_(EE).book Page 228 Friday, May 30, 2014 1 1:14 AM
Page 229 of 622

2294-5. Using the driving support systems
4
Driving
CT200h_OM_OM76135E_(EE)
●To permanently disable the monitor.
Push and hold the “AUTO” button for 12 to 15 seconds.
The monitor will turn off and on after 6 seconds. Continue holding the but-
ton down until the display turns back off.
The indicator should flash orange.
The monitor will not automatically turn on again after the power switch is
turned off and ON mode.
●To manually turn on the monitor when it is turned off.
Push the “AUTO” button. The indicator should turn green.
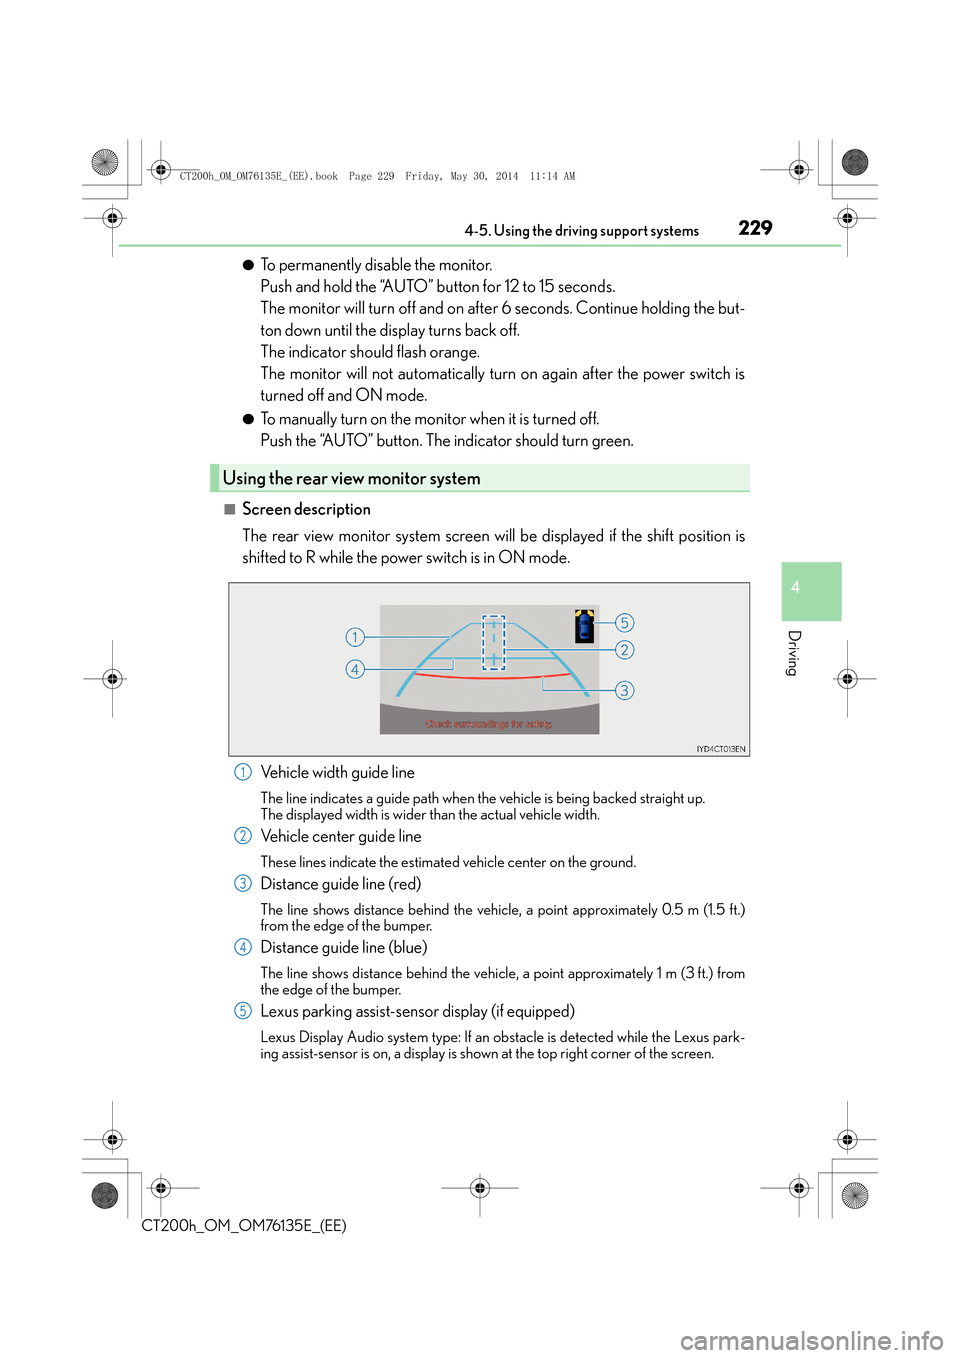
■Screen description
The rear view monitor system screen will be displayed if the shift position is
shifted to R while the power switch is in ON mode.
Vehicle width guide line
The line indicates a guide path when the vehicle is being backed straight up.
The displayed width is wider than the actual vehicle width.
Vehicle center guide line
These lines indicate the estimated vehicle center on the ground.
Distance guide line (red)
The line shows distance behind the vehicle, a point approximately 0.5 m (1.5 ft.)
from the edge of the bumper.
Distance guide line (blue)
The line shows distance behind the vehicle, a point approximately 1 m (3 ft.) from
the edge of the bumper.
Lexus parking assist-sensor display (if equipped)
Lexus Display Audio system type: If an ob stacle is detected while the Lexus park-
ing assist-sensor is on, a display is show n at the top right corner of the screen.
Using the rear view monitor system
1
2
3
4
5
CT200h_OM_OM76135E_(EE).book Page 229 Friday, May 30, 2014 1 1:14 AM
Page 260 of 622

2605-1. Basic Operations
CT200h_OM_OM76135E_(EE)
Audio system types∗
�XVehicles without a Lexus Display Audio System or navigation system
The illustration below is for left-hand drive vehicles.
The button positions and shapes may differ slightly for right-hand drive vehicles.
�XVehicles with a Lexus Display Audio System
→ P. 3 2 1
�XVehicles with a navigation system
Owners of models equipped with a navigation system should refer to the
“NAVIGATION SYSTEM OWNER’S MANUAL”.
■Portable audio device holder (if equipped)
■Using cellular phones
Interference may be heard through the audio system’s speakers if a cellular phone is
being used inside or close to the vehicle while the audio system is operating.
∗: If equipped
A portable audio device can be placed using
the portable audio device holder.
Depending on the size and shape of the porta-
ble audio device, the device may not be placed
in the holder.
CT200h_OM_OM76135E_(EE).book Page 260 Friday, May 30, 2014 1 1:14 AM