Page 385 of 622
3855-19. Bluetooth® Phone (Lexus Display Audio System)
5
Audio system
CT200h_OM_OM76135E_(EE)
Go to “Telephone display settings”: “MENU” button → “Setup” → “Telephone”
→ “Telephone display settings”
Change the incoming call display
Set the phonebook/history transfer
status notification display on/off
■To return to the default volume settings
Move the controller to the left and then select “Defaults”.
Phone display settings
1
2
CT200h_OM_OM76135E_(EE).book Page 385 Friday, May 30, 2014 1 1:14 AM
Page 386 of 622

3865-20. Phonebook (Lexus Display Audio System)
CT200h_OM_OM76135E_(EE)
Contact settings
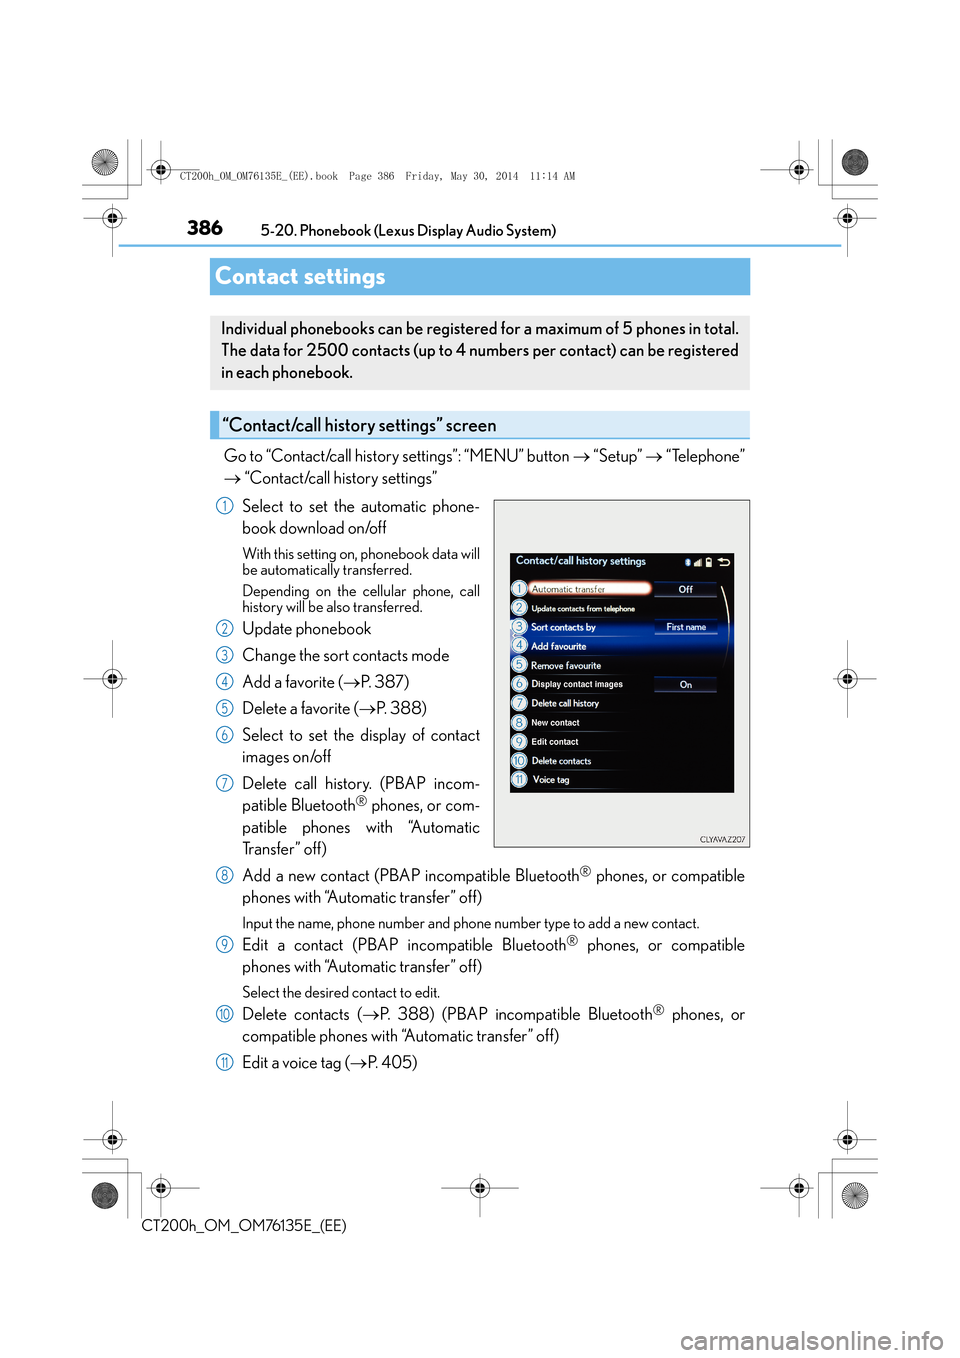
Go to “Contact/call history settings”: “MENU” button → “Setup” → “Telephone”
→ “Contact/call history settings”
Select to set the automatic phone-
book download on/off
With this setting on, phonebook data will
be automatically transferred.
Depending on the cellular phone, call
history will be also transferred.
Update phonebook
Change the sort contacts mode
Add a favorite ( →P. 3 8 7 )
Delete a favorite ( →P. 3 8 8 )
Select to set the display of contact
images on/off
Delete call history. (PBAP incom-
patible Bluetooth
® phones, or com-
patible phones with “Automatic
Tr a n s f e r ” o f f )
Add a new contact (PBAP incompatible Bluetooth
® phones, or compatible
phones with “Automatic transfer” off)
Input the name, phone number and phone number type to add a new contact.
Edit a contact (PBAP incompatible Bluetooth® phones, or compatible
phones with “Automatic transfer” off)
Select the desired contact to edit.
Delete contacts ( →P. 388) (PBAP incompatible Bluetooth® phones, or
compatible phones with “Automatic transfer” off)
Edit a voice tag ( →P. 4 0 5 )
Individual phonebooks can be registered for a maximum of 5 phones in total.
The data for 2500 contacts (up to 4 nu mbers per contact) can be registered
in each phonebook.
“Contact/call history settings” screen
1
2
3
4
5
6
7
8
9
10
11
CT200h_OM_OM76135E_(EE).book Page 386 Friday, May 30, 2014 1 1:14 AM
Page 389 of 622
389
5
5-20. Phonebook (Lexus Display Audio System)
Audio system
CT200h_OM_OM76135E_(EE)
Messaging setting
Go to “Messaging settings”: “MENU” button
→ “Setup” → “Telephone” →
“Messaging settings”
Select to set the message forward-
ing from cellular phones on/off
Select to set the new SMS/MMS
notification display on/off
Select to set the new e-mail notifica-
tion display on/off
Select to set the signature function
on/off
Select to set the cellular phone’s
message read and unread status
update function on/off.
Change the incoming SMS/MMS display.
Change the incoming e-mail display.
Change the account name to “Service name” (names from the connected
device) or “Fixed name” (pre-defined names).
■Restoring the default settings
Move the controller to the left then select “Defaults” on the “Messaging settings” screen.
1
2
3
4
5
6
7
8
CT200h_OM_OM76135E_(EE).book Page 389 Friday, May 30, 2014 1 1:14 AM
Page 392 of 622
3925-21. Bluetooth® (Lexus Display Audio System)
CT200h_OM_OM76135E_(EE)
�XIn other situations
Even though all conceivable measures have been taken, the symptom status does not
change.
The cellular phone is not close enough to this system.
→ Bring the cellular phone closer to this system.
The cellular phone is the most likely cause of the symptom.
→Turn the cellular phone off, remove and reinstall the battery pack, and then
restart the cellular phone.
→ Enable the cellular phone’s Bluetooth
® connection.
→ Stop the cellular phone’s security software and close all applications.
→ Before using an application installed on the cellular phone, carefully check its
source and how its operation might affect this system.
CT200h_OM_OM76135E_(EE).book Page 392 Friday, May 30, 2014 1 1:14 AM
Page 401 of 622

4015-22. Other function (Lexus Display Audio System)
5
Audio system
CT200h_OM_OM76135E_(EE)
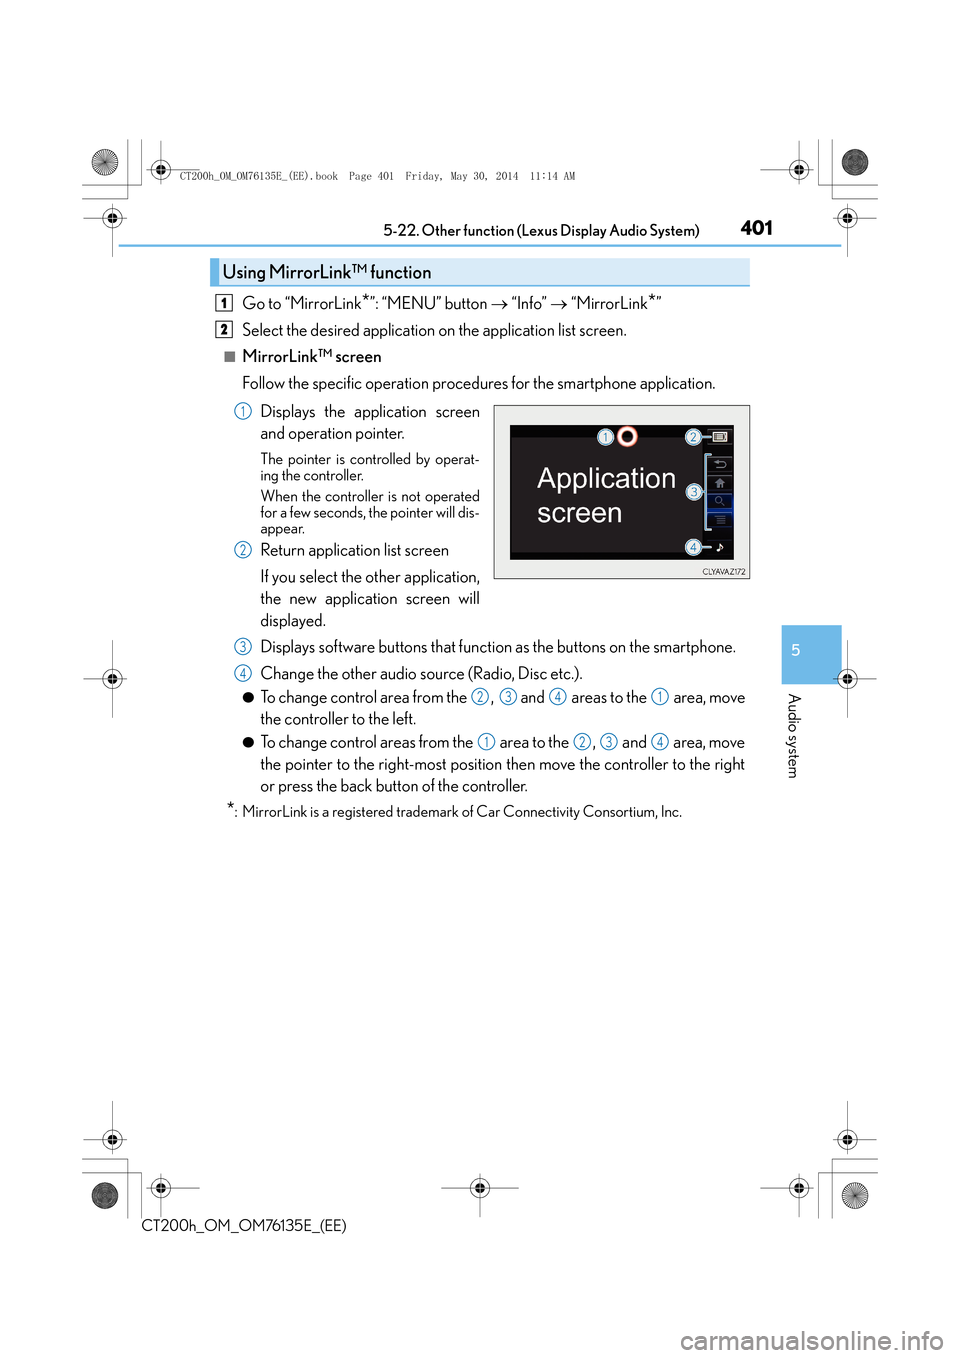
Go to “MirrorLink*”: “MENU” button → “Info” → “MirrorLink*”
Select the desired application on the application list screen.
■MirrorLink™ screen
Follow the specific operation procedures for the smartphone application.
Displays the application screen
and operation pointer.
The pointer is controlled by operat-
ing the controller.
When the controller is not operated
for a few seconds, the pointer will dis-
appear.
Return application list screen
If you select the other application,
the new application screen will
displayed.
Displays software buttons that function as the buttons on the smartphone.
Change the other audio source (Radio, Disc etc.).
●To change control area from the , and areas to the area, move
the controller to the left.
●To change control areas from the area to the , and area, move
the pointer to the right-most position then move the controller to the right
or press the back button of the controller.
*: MirrorLink is a registered trademark of Car Connectivity Consortium, Inc.
Using MirrorLink™ function
1
2
1
2
3
4
2341
1234
CT200h_OM_OM76135E_(EE).book Page 401 Friday, May 30, 2014 1 1:14 AM
Page 402 of 622

4025-22. Other function (Lexus Display Audio System)
CT200h_OM_OM76135E_(EE)
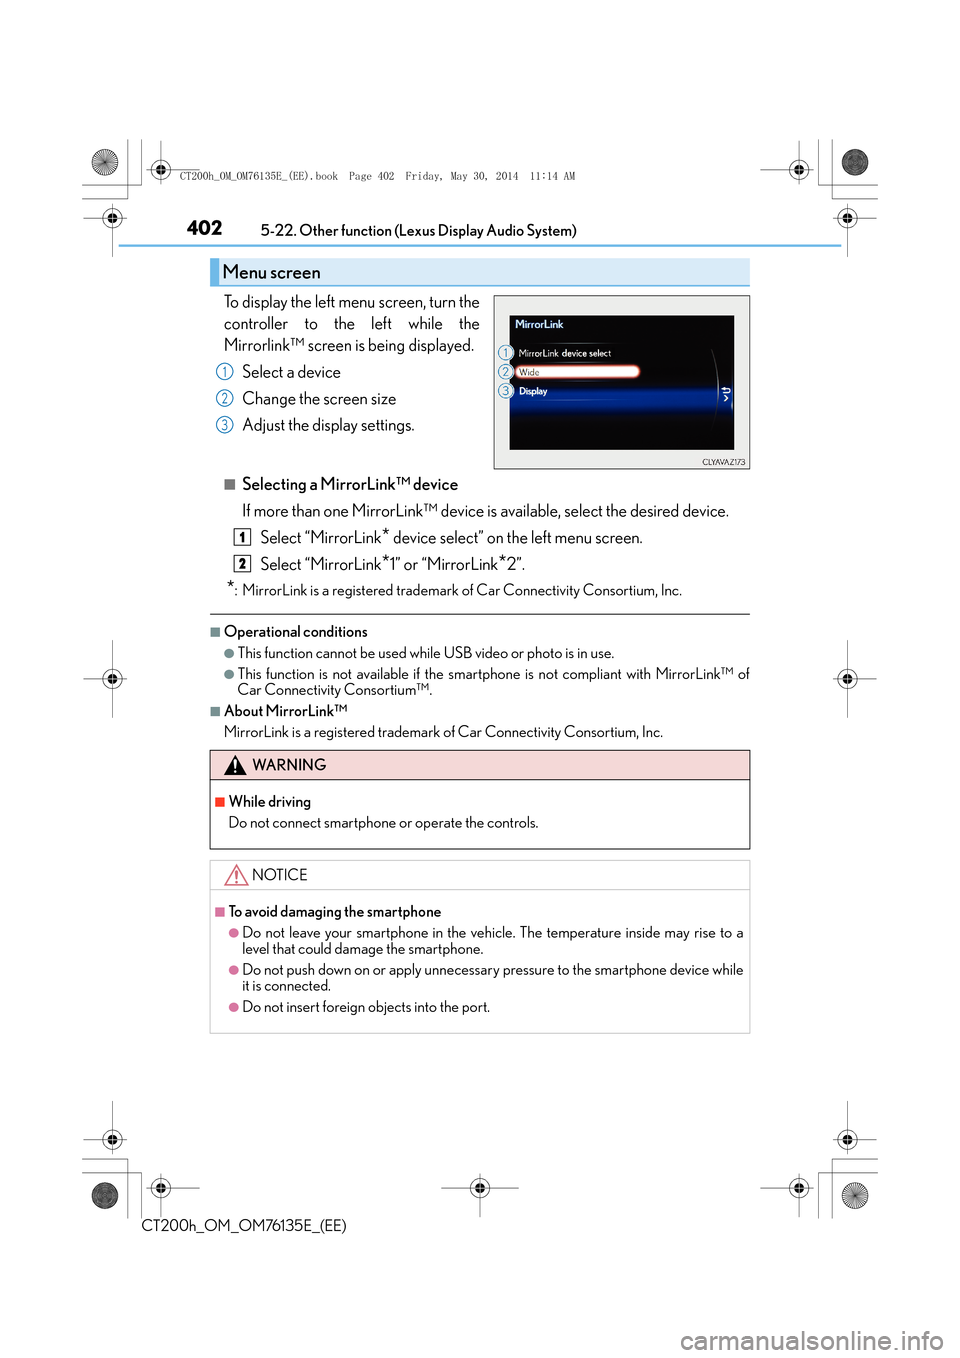
To display the left menu screen, turn the
controller to the left while the
Mirrorlink™ screen is being displayed.Select a device
Change the screen size
Adjust the display settings.
■Selecting a MirrorLink™ device
If more than one MirrorLink™ device is available, select the desired device.Select “MirrorLink
* device select” on the left menu screen.
Select “MirrorLink
*1” or “MirrorLink*2”.
*: MirrorLink is a registered trademark of Car Connectivity Consortium, Inc.
■Operational conditions
●This function cannot be used while USB video or photo is in use.
●This function is not available if the smartphone is not compliant with MirrorLink™ of
Car Connectivity Consortium™.
■About MirrorLink™
MirrorLink is a registered trademark of Car Connectivity Consortium, Inc.
Menu screen
1
2
3
WA R N I N G
■While driving
Do not connect smartphone or operate the controls.
NOTICE
■To avoid damaging the smartphone
●Do not leave your smartphone in the vehicle. The temperature inside may rise to a
level that could damage the smartphone.
●Do not push down on or apply unnecessary pressure to the smartphone device while
it is connected.
●Do not insert foreign objects into the port.
1
2
CT200h_OM_OM76135E_(EE).book Page 402 Friday, May 30, 2014 1 1:14 AM
Page 403 of 622
403
5
5-22. Other function (Lexus Display Audio System)
Audio system
CT200h_OM_OM76135E_(EE)
USB photo
Go to “USB photo”: “MENU” button
→ “Info” → “USB1 photo” or “USB2 photo”
→ P. 3 2 8
Move the controller to the left to display the menu screen. Change the full screen mode.
Select to set the slide show display
on/off.
Start the slide show at a selected folder.
Change the play speed.
Change the play mode.
Move the controller to the right and select “Browse”.
Select the desired folder, and then select a file to begin using the selected
folder.
Connecting a USB memory device enables you to enjoy photos on the Lexus
Display Audio display.
USB photo screen
Connecting a USB memory device
Menu screen
1
2
3
4
Selecting a folder
1
2
CT200h_OM_OM76135E_(EE).book Page 403 Friday, May 30, 2014 1 1:14 AM
Page 409 of 622
4096-1. Using the air conditioning system and defogger
CT200h_OM_OM76135E_(EE)
6
Interior features
■Adjusting the temperature setting
Press to increase the temperature and to decrease the tem-
perature.
■Adjusting the fan speed setting
Press to increase the fan speed and to decrease the fan
speed.
Press the “OFF” button to turn the fan off.
■Change the airflow mode
To change the air outlets, press .
The air outlets used are switched
each time the button is pressed.
Air flows to the upper body.
Air flows to the upper body and
feet.
Air flows to the feet.
Air flows to the feet and the wind-
shield defogger operates.
Control panel
1
2
3
4
CT200h_OM_OM76135E_(EE).book Page 409 Friday, May 30, 2014 1 1:14 AM