2014 Lancia Voyager lights
[x] Cancel search: lightsPage 165 of 364

To Remove The Premium Floor
Console
1. Pull up on the bottom release
handle in the front of the console.
2. Lift the rear of the console up sev-
eral inches/centimeters.
3. Pull rearward to disengage from
floor and remove console.
To Reinstall The Premium Floor
Console:
1. Position the console at a slight
angle (rear slightly higher than the
front).
2. Slide the console forward into the
floor bracket.
3. Rotate the rear of the console
down until it is resting on the floor
bracket.
4. Push down on the rear of the con-
sole until it is seated in the rear floor
bracket.
5. Pull up on the console to be sure it
is firmly latched.WARNING!
In an accident, serious injury could
result if the removable floor console
is not properly installed. Always be
sure the removable floor console is
fully latched.
SUPER CONSOLE (for
versions/markets, where
provided)
The Super Console contains multiple
storage areas, front lower pass
through, top forward bin, top rear-
ward bin and rear pull out drawer.
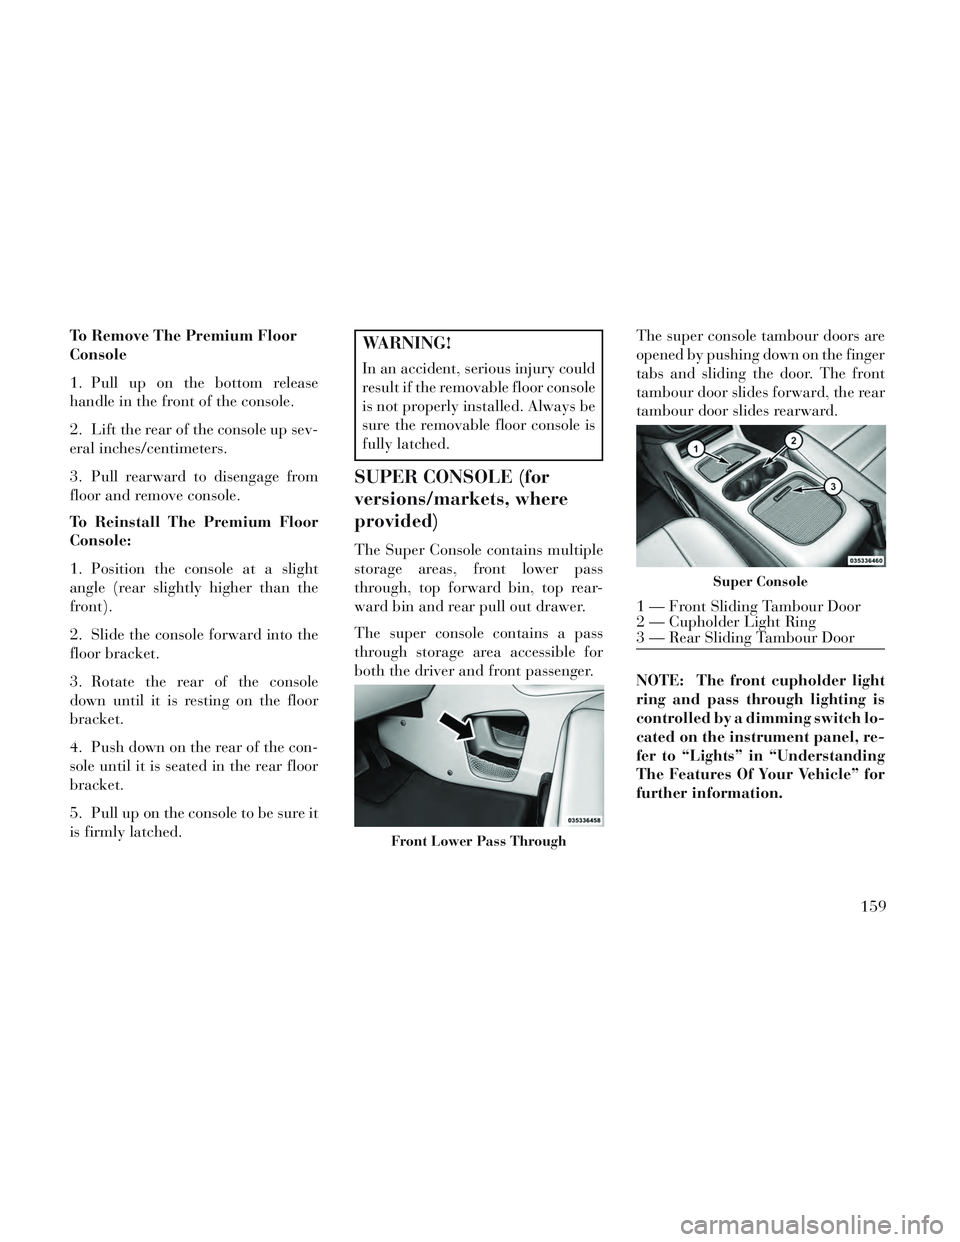
The super console contains a pass
through storage area accessible for
both the driver and front passenger.The super console tambour doors are
opened by pushing down on the finger
tabs and sliding the door. The front
tambour door slides forward, the rear
tambour door slides rearward.
NOTE: The front cupholder light
ring and pass through lighting is
controlled by a dimming switch lo-
cated on the instrument panel, re-
fer to “Lights” in “Understanding
The Features Of Your Vehicle” for
further information.
Front Lower Pass Through
Super Console
1 — Front Sliding Tambour Door
2 — Cupholder Light Ring
3 — Rear Sliding Tambour Door
159
Page 169 of 364

CAUTION!
Check deployed crossbars fre-quently and retighten thumb
screws as necessary.
To avoid damage to the roof rack and vehicle, do not exceed the
maximum roof rack load capacity
of 68 kg. Always distribute heavy
loads as evenly as possible and
secure the load appropriately.
To prevent damage to the roof of your vehicle, DO NOT carry any
loads on the roof rack without the
crossbars deployed.
(Continued)
CAUTION!(Continued)
The load should be secured andplaced on top of the crossbars, not
directly on the roof. If it is neces-
sary to place the load on the roof,
place a blanket or other protec-
tive layer between the load and
the roof surface.
Long loads which extend over the windshield, such as wood panels
or surfboards, or loads with large
frontal area should be secured to
both the front and rear of the
vehicle.
Travel at reduced speeds and turn corners carefully when carrying
large or heavy loads on the roof
rack. Wind forces, due to natural
causes or nearby truck traffic,
can add sudden upward lift to a
load. This is especially true on
large flat loads and may result in
damage to the cargo or your ve-
hicle.
WARNING!
Cargo must be securely tied before
driving your vehicle. Improperly
secured loads can fly off the vehicle,
particularly at high speeds, result-
ing in personal injury or property
damage. Follow the roof rack cau-
tions when carrying cargo on your
roof rack.
HEADLIGHT WASHER
(for versions/markets,
where provided)
The multifunction lever operates the
headlight washers when the ignition
switch is in the ON position and the
headlights are turned on. The multi-
function lever is located on the left
side of the steering column.
To use the headlight washers, push
the multifunction lever inward (to-
ward the steering column) to the sec-
ond detent and release it. The head-
light washers will spray a timed high-
pressure spray of washer fluid onto
each headlight lens. In addition, the
Rail Tie Loops
163
Page 170 of 364

windshield washers will spray the
windshield and the windshield wipers
will cycle.
NOTE: After turning the ignition
switch and headlights ON, the
headlight washers will operate on
the first spray of the windshield
washer and then every eleventh
spray after that.
SUN SCREENS (for
versions/markets, where
provided)
Sun screens are available for second
and third row seating windows. The
screens store in the sill trim panels,
and the tops of the windows are
equipped with hooks that the sun
screens attach to when pulled out.Gently pull up on the tab to raise the
sun screen. Continue pulling the sun
screen until the tab is near the top of
the window.
Once the screen is completely to the
top of the window, extend the top bar
of the sun screen over the two hooks
attached to the top of the window.
To lower the sun screen, gently lift the
tab upward to disengage the hooks,
and feed the screen back into the base
sill.
Sun Screen Retracted
Sun Screen Extended
164
Page 171 of 364

4
UNDERSTANDING YOUR INSTRUMENT
PANEL
INSTRUMENT PANEL FEATURES............169
INSTRUMENT CLUSTER — GASOLINE .......170
INSTRUMENT CLUSTER — DIESEL ..........171
INSTRUMENT CLUSTER DESCRIPTIONS .....172
ELECTRONIC VEHICLE INFORMATION CENTER (EVIC) (for versions/markets, where provided) . .178
ELECTRONIC VEHICLE INFORMATION CENTER (EVIC) DISPLAYS ...................... .179
EVIC WHITE TELLTALE LIGHTS ..........181
EVIC AMBER TELLTALE LIGHTS ..........182
EVIC RED TELLTALE LIGHTS .............182
OIL CHANGE DUE ..................... .184
FUEL ECONOMY ...................... .184
VEHICLE SPEED ...................... .185
TRIP INFO ........................... .185
TIRE BAR ............................ .186
VEHICLE INFO (CUSTOMER INFORMATION FEATURES) .......................... .186
MESSAGES ........................... .186
UNITS .............................. .186
165
Page 178 of 364

INSTRUMENT CLUSTER
DESCRIPTIONS
1. Tachometer
The red segments indicate the maxi-
mum permissible engine revolutions
per minute (RPM x 1000) for each
gear range. Before reaching the red
area, ease up on the accelerator.
2. Front Fog Light Indicator (for
versions/markets, where provided)This indicator will illumi-
nate when the front fog
lights are on.
3. Park/Headlight ON Indicator
This indicator will illumi-
nate when the park lights or
headlights are turned on.
4. Turn Signal Indicators The arrow will flash with
the exterior turn signal
when the turn signal lever is
operated.
If the vehicle is driven 1.6 km with
either turn signal on, a continuous
chime will sound to alert you to turn the signal off. If either indicator
flashes at a rapid rate, check for a
defective outside light bulb.
5. High Beam Indicator
This indicator shows that the
high beam headlights are on.
Push the multifunction lever forward
to switch the headlights to high beam,
and pull toward yourself (normal po-
sition) to return to low beam.
6. Odometer Display / Electronic
Vehicle Information Center (EVIC)
Display
Odometer Display / Trip Odometer
Display (for versions/markets,
where provided) The odometer dis-
play shows the total distance the ve-
hicle has been driven.
NOTE: Some warnings will be
displayed in the Electronic Vehicle
Information Center Display Area
located in the instrument cluster.
Refer to ”Electronic Vehicle Infor-
mation Center (EVIC) Display”
(for versions/markets, where pro-
vided) for further information. LoW tirE
When the appropriate condition ex-
ists, the odometer display will toggle
between LoW and tirE for three
cycles.
gASCAP
If the vehicle diagnostic system deter-
mines that the fuel filler cap is loose,
improperly installed, or damaged, a
“gASCAP” message will display in the
odometer display area. Tighten the
fuel filler cap properly and press the
STEP button on the steering wheel to
turn off the message. If the problem
continues, the message will appear
the next time the vehicle is started.
noFUSE
If the vehicle diagnostic system deter-
mines that the Ignition Off Draw
(IOD) fuse is improperly installed, or
damaged, a “noFUSE” message will
display in the odometer display area.
For further information on fuses and
fuse locations refer to “Fuses” in
“Maintaining Your Vehicle”.
172
Page 184 of 364

20. Temperature Gauge
The temperature gauge shows engine
coolant temperature. Any reading
within the normal range indicates
that the engine cooling system is op-
erating satisfactorily.
The gauge pointer will likely indicate
a higher temperature when driving in
hot weather, up mountain grades, or
when towing a trailer. It should not be
allowed to exceed the upper limits of
the normal operating range.
CAUTION!
Driving with a hot engine cooling
system could damage your vehicle.
If the temperature gauge reads “H”
pull over and stop the vehicle. Idle
the vehicle with the air conditioner
turned off until the pointer drops
back into the normal range. If the
pointer remains on the “H” and you
hear continuous chimes, turn the
engine off immediately and call an
authorized dealer for service.
WARNING!
A hot engine cooling system is dan-
gerous. You or others could be
badly burned by steam or boiling
coolant. You may want to call an
authorized dealer for service if your
vehicle overheats. If you decide to
look under the hood yourself, see
“Maintaining Your Vehicle”. Fol-
low the warnings under the Cooling
System Pressure Cap paragraph.
21. Rear Fog Light Indicator This indicator will illuminate
when the rear fog lights are
on. (Refer to “Lights” in “Un-
derstanding The Features Of Your Ve-
hicle” for further information).
ELECTRONIC VEHICLE
INFORMATION CENTER
(EVIC) (for versions/
markets, where provided)
The Electronic Vehicle Information
Center (EVIC) features a driver-
interactive display that is located in
the instrument cluster. This system conveniently allows the
driver to select a variety of useful in-
formation by pressing the switches
mounted on the steering wheel. The
EVIC consists of the following:
Radio Information
Fuel Economy
Vehicle Speed
Trip Info
Tire BAR
Vehicle Info
Messages
Units
System Setup (Personal Settings)
Electronic Vehicle Information
Center (EVIC)
178
Page 186 of 364

Unstored Messages
This message type is displayed indefi-
nitely or until the condition that acti-
vated the message is cleared. Ex-
amples of this message type are "Turn
Signal On" (if a turn signal is left on)
and "Lights On" (if driver leaves the
vehicle).
Unstored Messages Until RUN
This message type is displayed until
the ignition is in the RUN state. Ex-
ample of this message type is "Press
Brake Pedal and Push Button to
Start".
Five Second Unstored Messages
When the appropriate conditions oc-
cur, this type of message takes control
of the main display area for five sec-
onds and then returns to the previous
screen. Examples of this message type
are "Memory System Unavailable -
Not in Park" and "Automatic High
Beams On".
The Reconfigurable Telltales section
is divided into the white telltales area
on the right, amber telltales in the
middle, and red telltales on the left.When the appropriate conditions ex-
ist, the EVIC displays the following
messages:
Key in ignition
Ignition or Accessory On
Wrong Key
Damaged Key
Key not programmed
Vehicle Not in Park
Key Left Vehicle
Key Not Detected
Press Brake Pedal and Push Button
to Start
Liftgate Ajar (chime will sound when vehicle starts moving)
Low Tire Pressure
Service TPM System (refer to “Tire Pressure Monitoring System” in
“Starting And Operating”)
Premium system Tire Pressure dis- play screen With Low Tire(s) “In-
flate Tire to XX” Turn Signal On
RKE Battery Low
Service Keyless System
LOW WASHER FLUID
Oil Change Required
Check Gascap
Left Front Turn Signal Lamp Out
Left Rear Turn Signal Lamp Out
Right Front Turn Signal Lamp Out
Right Rear Turn Signal Lamp Out
Park Assist Disabled
Service Park Assist System
Personal Settings Not Available —
Vehicle Not in Park
Blind Spot System Off — This mes- sage is displayed when the ignition
is turned to ON to indicate the Blind
Spot System has been turned off.
Blind Spot System Not Available — This message is displayed to indi-
cate the Blind Spot Monitor (BSM)
system is temporarily unavailable
180
Page 187 of 364

due to sensor blockage, electronic
interference, or other "temporary"
conditions. When this message is
displayed both outside rear view
icons will be illuminated. If elec-
tronic interference is present, the
BSM system will illuminate the icon
only on the side of interference as
long as interference is present.
Service Blind Spot System — This message is displayed to indicate the
Blind Spot Monitor (BSM) system is
permanently unavailable. The
driver will receive an EVIC mes-
sage and the BSM display warning
in both mirrors will be permanently
illuminated. If this message is pres-
ent see an authorized dealer.
Obstacle Detected
Driver Seatbelt Unbuckled
Exhaust System — Regeneration
Required Now. Under conditions of
exclusive short duration and low
speed driving and low speed driving
cycles, the engine and exhaust after-
treatment system may never reach
the conditions required to remove
the trapped PM. If this occurs the “Exhaust System Regeneration Re-
quired Now” message will be dis-
played on the EVIC. By driving your
vehicle at highway speeds for as little
as 30 minutes, you can remedy the
condition in the particulate filter
system by allowing the trapped PM
to be removed to restore the system
to normal operating condition.
Exhaust Service Require — See
Dealer Now. The engine will be de-
rated to prevent permanent dam-
age to the after-treatment system. If
this condition occurs, it is necessary
to have your vehicle serviced by
your local authorized dealer.
Exhaust System — Regeneration Completed. Indicates that the Die-
sel Particulate Filter (DPF) self-
cleaning is completed. If this mes-
sage is displayed, you will hear one
chime to assist in alerting you of
this condition.
Exhaust System — Regeneration In Process. Indicates that the Diesel
Particulate Filter (DPF) is self-
cleaning. Maintain your current
driving condition until regenera-
tion is completed. Exhaust Filter Full — Power Re-
duced See Dealer. The PCM derates
the engine in order to limit the like-
lihood of permanent damage to the
after-treatment system. If this con-
dition is not corrected and a dealer
service is not performed, extensive
exhaust after-treatment damage
can occur. In order to correct this
condition it will be necessary to
have your vehicle serviced by your
local authorized dealer. See your
authorized dealer, as damage to the
exhaust system could occur soon
with continued operation.
Exhaust Filter % Full
EVIC WHITE TELLTALE
LIGHTS
This area will show reconfigurable
white caution telltales. These telltales
include:
Electronic Range Select (ERS)
Status
The shift lever status “6,5,4,3,2,1”
are displayed indicating the shift lever
position. Telltales “6,5,4,3,2,1” indi-
cate the Electronic Range Select
181