2014 Lancia Voyager audio
[x] Cancel search: audioPage 114 of 364

NOTE: Take care to speak into
the Voice Interface System as
calmly and normally as possible.
The ability of the Voice Interface
System to recognize user voice
commands may be negatively af-
fected by rapid speaking or a
raised voice level.
WARNING!
Any voice commanded system
should be used only in safe driving
conditions following all applicable
laws, including laws regarding
phone use. Your attention should be
focused on safely operating the ve-
hicle. Failure to do so may result in
a collision causing serious injury or
death.
When you press the Voice Command
button, you will hear a beep. The
beep is your signal to give a com-
mand.
NOTE: If you do not say a com-
mand within a few seconds, the
system will present you with a list
of options. If you ever wish to interrupt the sys-
tem while it lists options, press the
Voice Command
button, listen
for the beep, and say your command.
Pressing the Voice Command
button while the system is
speaking is known as “barging in.”
The system will be interrupted, and
after the beep, you can add or change
commands. This will become helpful
once you start to learn the options.
NOTE: At any time, you can say
the words “Cancel”, “Help” or
“Main Menu”.
These commands are universal and
can be used from any menu. All other
commands can be used depending
upon the active application.
When using this system, you should
speak clearly and at a normal speak-
ing volume.
The system will best recognize your
speech if the windows are closed, and
the heater/air conditioning fan is set
to low. At any point, if the system does not
recognize one of your commands, you
will be prompted to repeat it.
To hear the first available Menu, press
the Voice Command
button and
say “Help” or “Main Menu”.
COMMANDS
The Voice Command system under-
stands two types of commands. Uni-
versal commands are available at all
times. Local commands are available
if the supported radio mode is active.
Changing The Volume
1. Start a dialogue by pressing the
Voice Command
button.
2. Say a command (e.g., “Help”).
3. Use the ON/OFF VOLUME rotary
knob to adjust the volume to a com-
fortable level while the Voice Com-
mand system is speaking. Please note
the volume setting for Voice Com-
mand is different than the audio sys-
tem.
108
Page 146 of 364

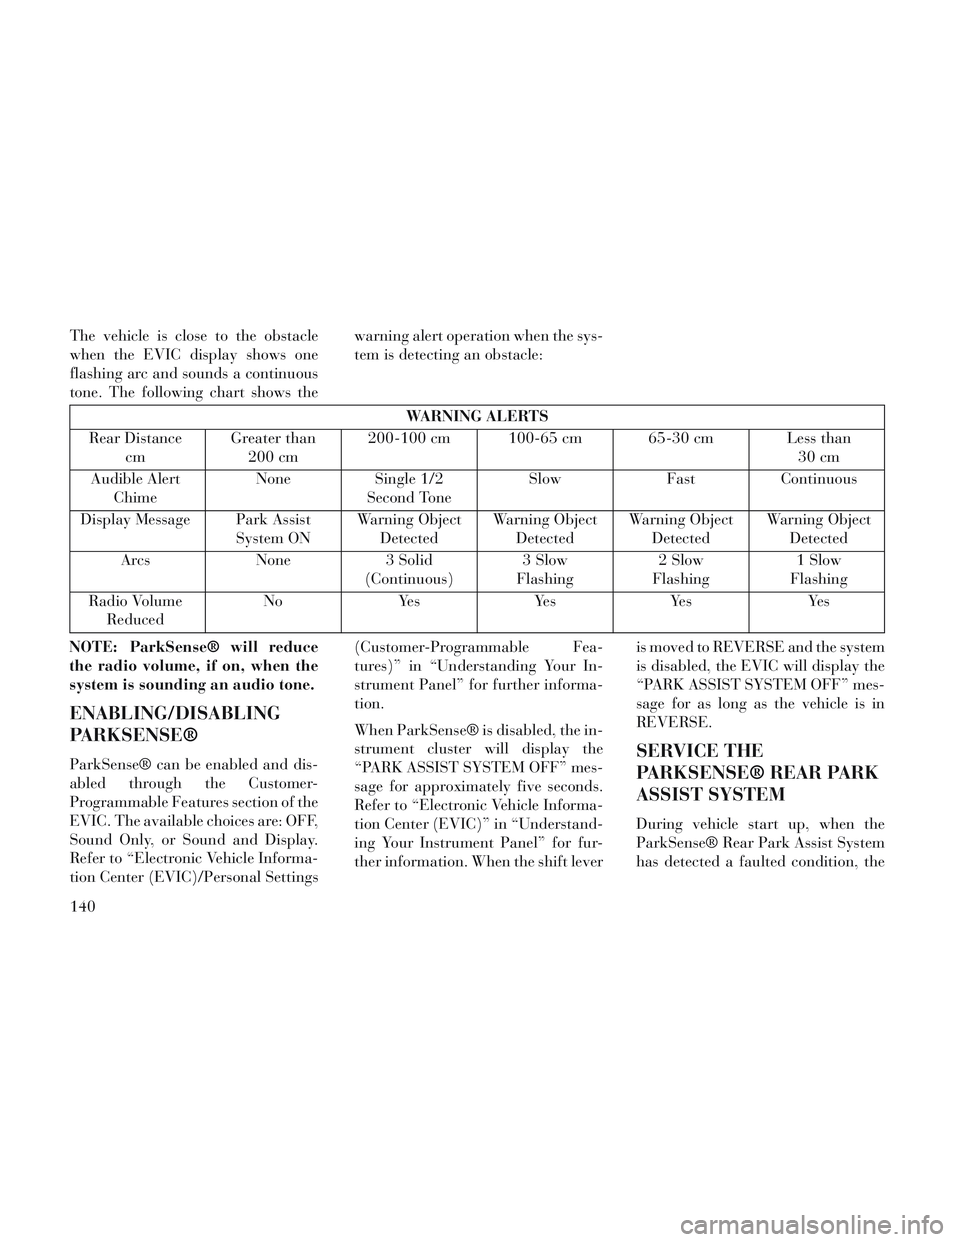
The vehicle is close to the obstacle
when the EVIC display shows one
flashing arc and sounds a continuous
tone. The following chart shows thewarning alert operation when the sys-
tem is detecting an obstacle:
WARNING ALERTS
Rear Distance cm Greater than
200 cm 200-100 cm 100-65 cm 65-30 cm Less than
30 cm
Audible Alert Chime None
Single 1/2
Second Tone Slow
FastContinuous
Display Message Park Assist System ONWarning Object
Detected Warning Object
Detected Warning Object
Detected Warning Object
Detected
Arcs None3 Solid
(Continuous) 3 Slow
Flashing 2 Slow
Flashing 1 Slow
Flashing
Radio Volume Reduced No
Yes YesYes Yes
NOTE: ParkSense® will reduce
the radio volume, if on, when the
system is sounding an audio tone.
ENABLING/DISABLING
PARKSENSE®
ParkSense® can be enabled and dis-
abled through the Customer-
Programmable Features section of the
EVIC. The available choices are: OFF,
Sound Only, or Sound and Display.
Refer to “Electronic Vehicle Informa-
tion Center (EVIC)/Personal Settings (Customer-Programmable Fea-
tures)” in “Understanding Your In-
strument Panel” for further informa-
tion.
When ParkSense® is disabled, the in-
strument cluster will display the
“PARK ASSIST SYSTEM OFF” mes-
sage for approximately five seconds.
Refer to “Electronic Vehicle Informa-
tion Center (EVIC)” in “Understand-
ing Your Instrument Panel” for fur-
ther information. When the shift lever
is moved to REVERSE and the system
is disabled, the EVIC will display the
“PARK ASSIST SYSTEM OFF” mes-
sage for as long as the vehicle is in
REVERSE.SERVICE THE
PARKSENSE® REAR PARK
ASSIST SYSTEM
During vehicle start up, when the
ParkSense® Rear Park Assist System
has detected a faulted condition, the
140
Page 149 of 364

WARNING!(Continued)
Before using ParkSense®, it isstrongly recommended that the
ball mount and hitch ball assem-
bly is disconnected from the ve-
hicle when the vehicle is not used
for towing. Failure to do so can
result in injury or damage to ve-
hicles or obstacles because the
hitch ball will be much closer to
the obstacle than the rear fascia
when the loudspeaker sounds the
continuous tone. Also, the sensors
could detect the ball mount and
hitch ball assembly, depending on
its size and shape, giving a false
indication that an obstacle is be-
hind the vehicle.
PARKVIEW® REAR
BACK UP CAMERA (for
versions/markets, where
provided)
Your vehicle may be equipped with
the ParkView® Rear Back Up Cam-
era that allows you to see an on-screen
image of the rear surroundings of
your vehicle whenever the shift lever
is put into REVERSE. The image will
be displayed on the Navigation/
Multimedia radio display screen along
with a caution note to “check entire
surroundings” across the top of the
screen. After five seconds this note
will disappear. The ParkView® cam-
era is located on the rear of the vehicle
above the rear License plate. When the vehicle is shifted out of RE-
VERSE, the rear camera mode is ex-
ited and the navigation or audio
screen appears again.
When displayed, static grid lines will
illustrate the width of the vehicle
while a dashed center-line will indi-
cate the center of the vehicle to assist
with aligning to a hitch/receiver. The
static grid lines will show separate
zones that will help indicate the dis-
tance to the rear of the vehicle. The
following table shows the approxi-
mate distances for each zone:
Zone
Distance to the rear of the vehicle
Red 0-30cm
Yellow 30 cm-1m
Green 1 m or greater
143
Page 172 of 364

KEYLESS ENTER-N-GO™ DISPLAY (forversions/markets, where provided) .........186
COMPASS / TEMPERATURE DISPLAY (for versions/markets, where provided) .........186
CUSTOMER-PROGRAMMABLE FEATURES (SYSTEM SETUP) ..................... .189
SOUND SYSTEMS ....................... .193
NAVIGATION SYSTEM (for versions/markets, where provided) .............................. .193
iPod®/USB/MP3 CONTROL (for versions/markets, where equipped) ........................ .193
CONNECTING THE iPod® OR EXTERNAL USB DEVICE ............................. .194
USING THIS FEATURE ...................194
CONTROLLING THE iPod® OR EXTERNAL USB DEVICE USING RADIO BUTTONS ..........194
PLAY MODE .......................... .194
LIST OR BROWSE MODE ................195
BLUETOOTH STREAMING AUDIO (BTSA) . . . .197
Uconnect® MULTIMEDIA VIDEO ENTERTAINMENT SYSTEM (VES™) (for versions/markets, where
provided) .............................. .197
GETTING STARTED .................... .197
Blu-ray® PLAYER ..................... .197
PLAY VIDEO GAMES ................... .198
LISTEN TO AN AUDIO SOURCE ON CHANNEL 2
WHILE A VIDEO IS PLAYING ON CHANNEL 1 . .198
DUAL VIDEO SCREEN ...................198
166
Page 173 of 364

PLAY A DVD USING THE TOUCH-SCREENRADIO .............................. .198
PLAY A DVD USING THE VES™ PLAYER (for versions/markets, where provided) ..........200
PLAY A Blu-ray DISC USING THE BLU-RAY PLAYER (for versions/markets, where
provided) ............................ .201
LISTEN TO AN AUDIO SOURCE WHILE A VIDEO IS PLAYING .......................... .202
THIRD ROW SWIVEL SCREEN (for versions/markets, where provided) ..........202
IMPORTANT NOTES FOR DUAL VIDEO SCREEN SYSTEM ............................. .202
VES™ REMOTE CONTROL (for versions/markets, where provided) ....................... .202
Blu-ray PLAYER REMOTE CONTROL (for versions/markets, where provided) ..........204
REMOTE CONTROL STORAGE ............205
LOCKING THE REMOTE CONTROL. . . ......205
REPLACING THE REMOTE CONTROL BATTERIES .......................... .206
HEADPHONES OPERATION ...............206
Blu-ray HEADPHONES OPERATION ........206
CONTROLS .......................... .207
REPLACING THE HEADPHONE BATTERIES . .207
UNWIRED® STEREO HEADPHONE LIFETIME LIMITED WARRANTY ...................207
SYSTEM INFORMATION .................208
SHARED MODES ...................... .208
167
Page 174 of 364

INFORMATION MODE DISPLAY...........209
NUMERIC KEYPAD MENU ................209
DISC MENU .......................... .209
DISPLAY SETTINGS ................... .209
LISTENING TO AUDIO WITH THE SCREEN CLOSED ............................. .210
DISC FORMATS ....................... .210
DISPLAY ............................ .213
PRODUCT AGREEMENT .................215
STEERING WHEEL AUDIO CONTROLS .......217
RADIO OPERATION .................... .218
CDPLAYER...........................218
CD/DVD DISC MAINTENANCE ..............218
RADIO OPERATION AND MOBILE PHONES . . . .218
CLIMATE CONTROLS .................... .219
AUTOMATIC TEMPERATURE CONTROL (ATC) ............................... .219
SUMMER OPERATION ...................224
WINTER OPERATION ...................225
VACATION/STORAGE ...................225
WINDOW FOGGING ................... .225
OUTSIDE AIR INTAKE ...................225
A/CAIRFILTER .......................225
OPERATING TIPS ..................... .225
168
Page 199 of 364

NOTE: If your vehicle has experi-
enced any damage in the area
where the sensor is located, even if
the fascia is not damaged, the sen-
sor may have become misaligned.
Take your vehicle to an authorized
dealer to verify sensor alignment.
Having a sensor that is misaligned
will result in the BSM not operat-
ing to specification.
Calibrate Compass (for
versions/markets, where
provided)
Refer to “Compass Display” for more
information.
Compass Variance (for
versions/markets, where
provided)
Refer to “Compass Display” for more
information.
Turn Menu Off
Press and release SELECT to turn the
menu off.SOUND SYSTEMS
Refer to your Sound Systems Booklet.
NAVIGATION SYSTEM
(for versions/markets,
where provided)
Refer to your Uconnect® User Manual.
iPod®/USB/MP3
CONTROL (for
versions/markets, where
equipped)
NOTE: This section is for sales
code RES and REQ/REL/RET ra-
dios only with Uconnect®. For
sales code RBZ/RHB, RHR, RHP,
RHW or RB2 touch-screen radio
iPod®/USB/MP3 control feature,
refer to the separate RBZ/RHB,
RHR, RHP, RHW or RB2 User's
Manual. iPod®/USB/MP3 control
is available only for versions/
markets, where provided with
these radios.This feature allows an iPod® or exter-
nal USB device to be plugged into the
USB port, located in the glove com-
partment.
iPod® control supports Mini, 4G,
Photo, Nano, 5G iPod® and iPhone®
devices. Some iPod® software ver-
sions may not fully support the iPod®
control features. Please visit Apple’s
website for software updates.
NOTE:
If the radio has a USB port, refer
to the appropriate Uconnect®
Multimedia radio User’s Manual
for iPod® or external USB de-
vice support capability.
Connecting an iPod® or con- sumer electronic audio device to
the AUX port located in the ra-
dio faceplate, plays media, but
does not use the iPod® /MP3
control feature to control the
connected device.
193
Page 200 of 364

CONNECTING THE iPod®
OR EXTERNAL USB
DEVICE
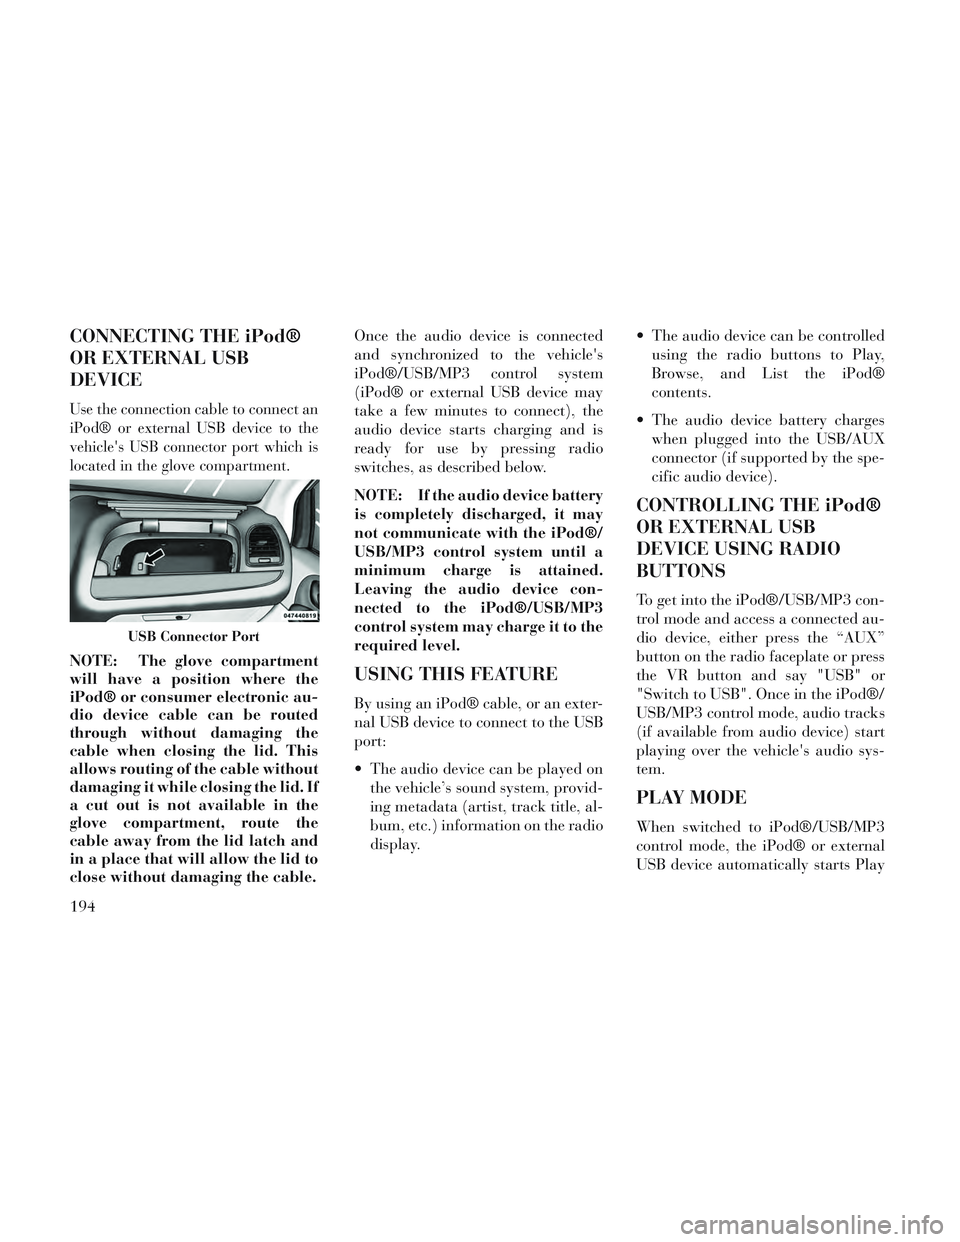
Use the connection cable to connect an
iPod® or external USB device to the
vehicle's USB connector port which is
located in the glove compartment.
NOTE: The glove compartment
will have a position where the
iPod® or consumer electronic au-
dio device cable can be routed
through without damaging the
cable when closing the lid. This
allows routing of the cable without
damaging it while closing the lid. If
a cut out is not available in the
glove compartment, route the
cable away from the lid latch and
in a place that will allow the lid to
close without damaging the cable.Once the audio device is connected
and synchronized to the vehicle's
iPod®/USB/MP3 control system
(iPod® or external USB device may
take a few minutes to connect), the
audio device starts charging and is
ready for use by pressing radio
switches, as described below.
NOTE: If the audio device battery
is completely discharged, it may
not communicate with the iPod®/
USB/MP3 control system until a
minimum charge is attained.
Leaving the audio device con-
nected to the iPod®/USB/MP3
control system may charge it to the
required level.USING THIS FEATURE
By using an iPod® cable, or an exter-
nal USB device to connect to the USB
port:
The audio device can be played on
the vehicle’s sound system, provid-
ing metadata (artist, track title, al-
bum, etc.) information on the radio
display. The audio device can be controlled
using the radio buttons to Play,
Browse, and List the iPod®
contents.
The audio device battery charges when plugged into the USB/AUX
connector (if supported by the spe-
cific audio device).
CONTROLLING THE iPod®
OR EXTERNAL USB
DEVICE USING RADIO
BUTTONS
To get into the iPod®/USB/MP3 con-
trol mode and access a connected au-
dio device, either press the “AUX”
button on the radio faceplate or press
the VR button and say "USB" or
"Switch to USB". Once in the iPod®/
USB/MP3 control mode, audio tracks
(if available from audio device) start
playing over the vehicle's audio sys-
tem.
PLAY MODE
When switched to iPod®/USB/MP3
control mode, the iPod® or external
USB device automatically starts Play
USB Connector Port
194