2014 Lancia Thema radio controls
[x] Cancel search: radio controlsPage 19 of 332

NOTE: You can insert the
double-sided emergency key into
the lock cylinders with either side
up.
IGNITION OR ACCESSORY
ON MESSAGE
Opening the driver's door when the
ignition is in ACC or ON (engine not
running), a chime will sound to re-
mind you to cycle the ignition to OFF.
In addition to the chime, the ignition
or accessory on message will display
in the cluster.
NOTE: With the Uconnect® sys-
tem, the power window switches,
radio, power sunroof (for versions/
markets, where provided), and
power outlets will remain activefor up to 10 minutes after the igni-
tion is cycled to the OFF position.
Opening either front door will can-
cel this feature. The time for this
feature is programmable. Refer to
“Uconnect® Settings” in “Under-
standing Your Instrument Panel”
for further information.
WARNING!
When leaving the vehicle, always
remove the Key Fob from the ve-
hicle and lock your vehicle.
Never leave children alone in a vehicle, or with access to an un-
locked vehicle.
Allowing children to be in a ve- hicle unattended is dangerous for
a number of reasons. A child or
others could be seriously or fa-
tally injured. Children should be
warned not to touch the parking
brake, brake pedal or the shift
lever.
(Continued)
WARNING!(Continued)
Do not leave the Key Fob in ornear the vehicle, or in a location
accessible to children, and do not
leave the ignition of a vehicle
equipped with Keyless Enter-N-
Go™ in the ACC or ON/RUN
mode. A child could operate
power windows, other controls, or
move the vehicle.
Do not leave children or animals inside parked vehicles in hot
weather. Interior heat build-up
may cause serious injury or
death.
CAUTION!
An unlocked car is an invitation to
thieves. Always remove the Key
Fob from vehicle, cycle the ignition
OFF and lock all doors when leav-
ing the vehicle unattended.
Emergency Key Removal
13
Page 123 of 332

To protect the battery, the interior
lights will turn off automatically 10
minutes after the ignition switch is
moved to the LOCK position. This
will occur if the interior lights were
switched on manually or are on be-
cause a door is open. This includes the
glove box light, but not the trunk
light. To restore interior light opera-
tion, either turn the ignition switch
ON or cycle the light switch.
Dimmer Controls
The dimmer control is part of the
headlight switch and is located on the
left side of the instrument panel.
With the parking lights or headlights
on, rotating the left dimmer controlupward will increase the brightness of
the instrument panel lights and
lighted cupholders.
Ambient Light Control
Rotate the right dimmer control up-
ward or downward to increase or de-
crease the brightness of the door
handle lights and ambient light lo-
cated in the overhead console.
Dome Light Position
Rotate the left dimmer control com-
pletely upward to the second detent to
turn on the interior lights. The inte-
rior lights will remain on when the
dimmer control is in this position.
Interior Light Defeat (OFF)
Rotate the left dimmer control to the
extreme bottom OFF position. The
interior lights will remain off when
the doors are open.
Parade Mode (Daytime Brightness
Feature)
Rotate the left dimmer control up-
ward to the first detent. This feature
brightens all text displays such as the
odometer, EVIC (for versions/
markets, where provided), and radio
when the parking lights or headlights
are on.
WINDSHIELD WIPERS
AND WASHERS
The multifunction lever operates the
windshield wipers and washer when
the ignition is placed in the ON/RUN
Dimmer Controls
Instrument Panel Dimmer
Door Handle/Ambient Light Dimmer
117
Page 162 of 332

VEHICLE INFO (CUSTOMER INFORMATIONFEATURES) (for versions/markets, where
provided) .............................174
MESSAGES # ..........................174
TURN MENU OFF .......................174
Uconnect® SETTINGS .....................174
HARD-KEYS ..........................175
SOFT-KEYS ...........................175
CUSTOMER PROGRAMMABLE FEATURES — Uconnect® 8.4 SETTINGS ................175
SOUND SYSTEMS ........................183
NAVIGATION SYSTEM (for versions/markets, where provided) .........................183
SETTING THE ANALOG CLOCK .............184
iPod®/USB/MP3 CONTROL (for vehicles/markets, where provided) .........................184
HARMAN KARDON® Logic7® HIGH PERFORMANCE MULTICHANNEL SURROUND
SOUND SYSTEM WITH DRIVER-SELECTABLE
SURROUND (DSS) (for versions/markets, where
required) ...............................184
STEERING WHEEL AUDIO CONTROLS .......185
RADIO OPERATION .....................185
CDPLAYER...........................185
CD/DVD DISC MAINTENANCE ..............186
RADIO OPERATION AND MOBILE PHONES . . . .186
CLIMATE CONTROLS .....................186
156
Page 191 of 332

Selecting “Audio Surround” through
the DSS modes activates the Harman
Kardon® Logic7® multichannel
surround-sound technology in your
vehicle. The “Video Surround” mode
is described under Driver-Selectable
Surround (DSS). The Video Surround
Mode will only be available for video
media sources (DVDs, Video CDs, or
other video media supported by the
radio). Some audio will sound better
in DSS modes, others in Stereo mode.
When in “Audio Surround” mode,
balance is set automatically. Fader
control is available in surround mode
but should be set to the center position
for optimal surround performance.
STEERING WHEEL
AUDIO CONTROLS
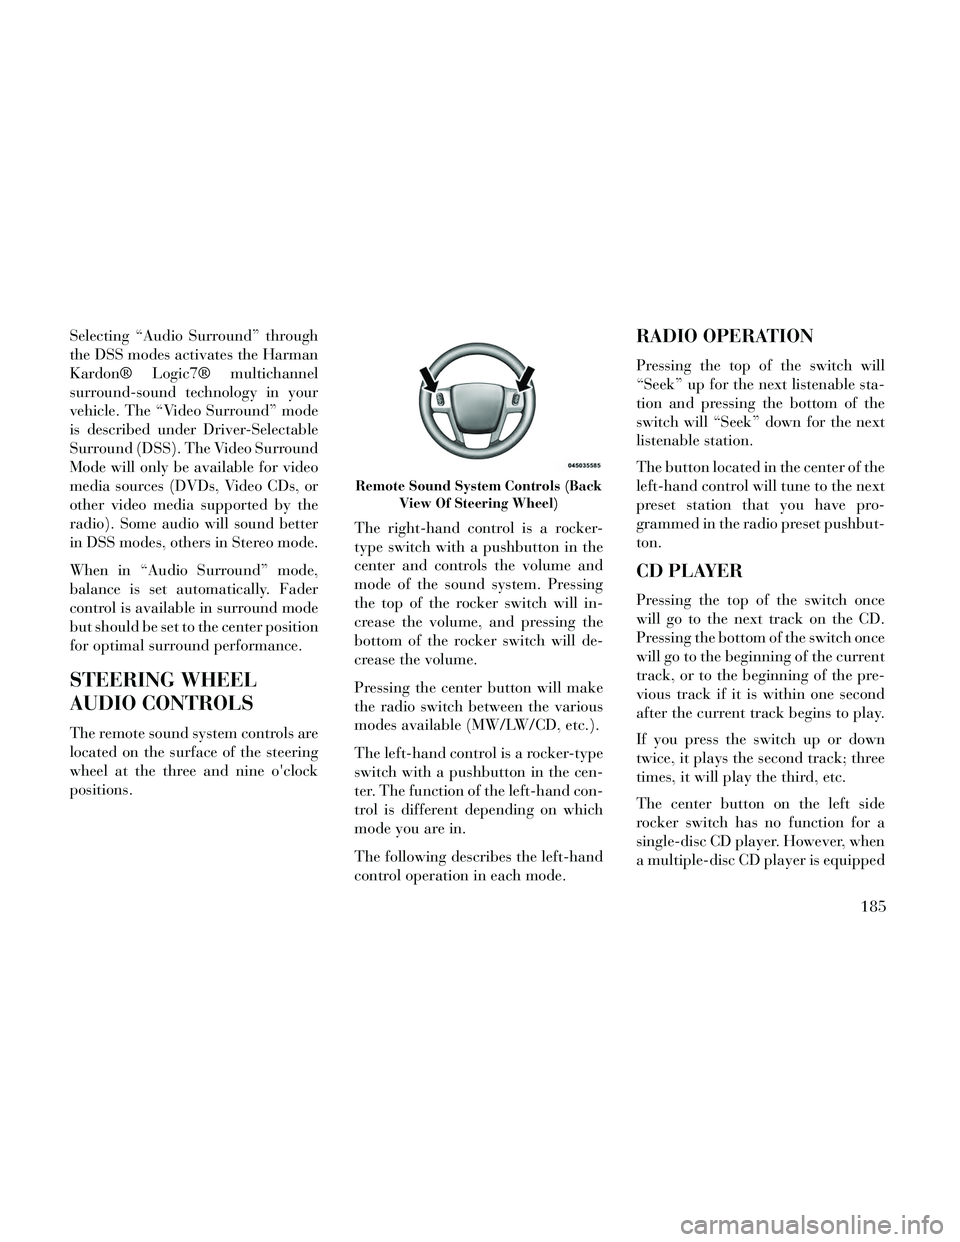
The remote sound system controls are
located on the surface of the steering
wheel at the three and nine o'clock
positions.The right-hand control is a rocker-
type switch with a pushbutton in the
center and controls the volume and
mode of the sound system. Pressing
the top of the rocker switch will in-
crease the volume, and pressing the
bottom of the rocker switch will de-
crease the volume.
Pressing the center button will make
the radio switch between the various
modes available (MW/LW/CD, etc.).
The left-hand control is a rocker-type
switch with a pushbutton in the cen-
ter. The function of the left-hand con-
trol is different depending on which
mode you are in.
The following describes the left-hand
control operation in each mode.
RADIO OPERATION
Pressing the top of the switch will
“Seek” up for the next listenable sta-
tion and pressing the bottom of the
switch will “Seek” down for the next
listenable station.
The button located in the center of the
left-hand control will tune to the next
preset station that you have pro-
grammed in the radio preset pushbut-
ton.
CD PLAYER
Pressing the top of the switch once
will go to the next track on the CD.
Pressing the bottom of the switch once
will go to the beginning of the current
track, or to the beginning of the pre-
vious track if it is within one second
after the current track begins to play.
If you press the switch up or down
twice, it plays the second track; three
times, it will play the third, etc.
The center button on the left side
rocker switch has no function for a
single-disc CD player. However, when
a multiple-disc CD player is equipped
Remote Sound System Controls (Back
View Of Steering Wheel)
185
Page 192 of 332

on the vehicle, the center button will
select the next available CD in the
player.
CD/DVD DISC
MAINTENANCE
To keep a CD/DVD in good condition,
take the following precautions:
1. Handle the disc by its edge; avoid
touching the surface.
2. If the disc is stained, clean the
surface with a soft cloth, wiping from
center to edge.
3. Do not apply paper or tape to the
disc; avoid scratching the disc.
4. Do not use solvents such as ben-
zene, thinner, cleaners, or anti-static
sprays.
5. Store the disc in its case after play-
ing.
6. Do not expose the disc to direct
sunlight.
7. Do not store the disc where tem-
peratures may become too high.NOTE: If you experience diffi-
culty in playing a particular disc, it
may be damaged (i.e., scratched,
reflective coating removed, a hair,
moisture or dew on the disc) over-
sized, or have protection encoding.
Try a known good disc before con-
sidering disc player service.
RADIO OPERATION AND
MOBILE PHONES
Under certain conditions, the mobile
phone being on in your vehicle can
cause erratic or noisy performance
from your radio. This condition may
be lessened or eliminated by relocat-
ing the mobile phone antenna. This
condition is not harmful to the radio.
If your radio performance does not
satisfactorily “clear” by the reposi-
tioning of the antenna, it is recom-
mended that the radio volume be
turned down or off during mobile
phone operation.
CLIMATE CONTROLS
The air conditioning and heating sys-
tem is designed to make you comfort-
able in all types of weather. This sys-
tem can be operated through either
the controls on the instrument panel
or through the Uconnect® system dis-
play.
When the Uconnect® system is in dif-
ferent modes (Radio, Player, Settings,
More, etc.) the driver and passenger
temperature settings will be indicated
at the top of the display.
GENERAL OVERVIEW
Hard-Keys
The hard-keys are located below the
Uconnect® screen, in the center of the
instrument panel.
186
Page 325 of 332

Multi-Function Control Lever. . . .115
Navigation System(Uconnect® gps)
.......142, 183
New Vehicle Break-In Period.....58
Occupant Restraints.....28, 41, 44
Occupant Restraints(Sedan)
............40, 41, 43
Octane Rating, Gasoline(Fuel)
..............236, 300
Odometer.................160
Oil Change Indicator......160, 171
Oil Change Indicator, Reset. .160, 171
Oil, Engine............272, 300
Capacity...............299
Change Interval.......171, 272
Diesel.................273
Dipstick................272
Filter..............273, 300
Materials Added to........273
Recommendation. .272, 273, 299
Synthetic...............273
Viscosity...............299
Oil Filter, Selection...........273
Onboard Diagnostic System.....271
Operating Precautions.........271
Operator Manual (Owner's Manual)...6
Outside Rearview Mirrors.......70
Overdrive.................211
Overdrive OFF Switch.........211
Overhead Console............143
Overheating, Engine......165, 252
Owner's Manual (Operator Manual)...6
Paint Care.................286
Parking Brake..............216
ParkSense System, Rear.......137
Passing Light...............116
Pedals, Adjustable...........122
Pets......................58
PowerDeck Lid Release
..........27
Distribution Center
(Fuses)
............290, 292
Door Locks..............21
Mirrors.................71
Outlet (Auxiliary Electrical
Outlet)
................147
Seats..................103
Steering................215
Sunroof................144
Tilt/Telescoping Steering
Column
................120
Windows................25
Power Steering Fluid..........301
Pregnant Women and Seat Belts. . .38
PretensionersSeat Belts
................35
Programming Transmitters(Remote Keyless Entry)
.......18
Radial Ply Tires.............226
Radiator Cap (Coolant PressureCap)
...................281
Radio Operation.............186
Radio Remote Controls........185
Radio (Sound Systems)........183
Rain Sensitive Wiper System. . . .119
Rear Axle (Differential)........286
Rear Camera...............142
Rear Cupholder.............150
Rear Fog Lights.............115
Rear ParkSense System........137
Rear Seat, Folding...........108
Rear Window Defroster........153
Rear Window Features........153
Recorder, Event Data..........46
Recreational Towing..........250
Refrigerant................275
Reminder, Lights On..........114
Reminder, Seat Belt...........37
Remote Keyless Entry (RKE).....18
Remote Sound System (Radio)Controls
................185
Remote Trunk Release..........27
319
Page 326 of 332

Replacement Bulbs...........296
Replacement Keys............14
Replacement Parts...........271
Replacement Tires...........230
Resetting Oil ChangeIndicator
............160, 171
Restraint, Head.............107
Restraints, Child.............47
Restraints, Occupant...........28
Rocking Vehicle When Stuck. . . .261
Rotation, Tires..............232
Safety Checks Inside Vehicle.....60
Safety Checks Outside Vehicle....61
Safety, Exhaust Gas...........59
Safety Tips.................59
Schedule, Maintenance. . . .306, 309
Seat Belt Maintenance.........289
Seat Belt Reminder............37
Seat Belts.............28, 31, 60
Adjustable Upper Shoulder
Anchorage
...............33
And Pregnant Women.......38
Child Restraint............47
Front Seat...............31
Inspection...............60
Operating Instructions.......31
Pretensioners.............35
Rear Seat................31
Untwisting Procedure.......33
Seats....................103
Adjustment.............103
Easy Entry..............111
Head Restraints..........107
Height Adjustment........103
Memory................109
Power.................103
Rear Folding............108
Seatback Release..........108
Tilting.................103
Selection of Coolant(Antifreeze)
..........280, 300
Selection of Oil.............273
Sentry Key (Immobilizer).......14
Sentry Key Programming.......14
Sentry Key Replacement........14
Service Engine Soon Light(Malfunction Indicator)
......162
Setting the Clock............184
Shifting..................201
Automatic Transmission.....201
Shift Lever Override..........263
Shoulder Belts...............31
Shoulder Belt Upper Anchorage. . .33
Side Airbag.................43
Side View Mirror Adjustment.....70
Signals, Turn........61, 115, 160
SmartBeams...............113
Snow Chains (Tire Chains).....231
Snow Tires................227
Sound SystemKicker
.................184
Sound Systems..............183
Sound Systems (Radio)........183
Spare Tire.............228, 229
Spark Plugs................300
SpecificationsFuel (Gasoline)
.......236, 300
Oil...............273, 300
Speed Control(Cruise Control)
.......123, 125
Speedometer...............162
Starting..................197
Cold Weather............198
Engine Fails to Start.......198
Starting and Operating........197
Starting Procedures..........197
SteeringColumn Controls
..........115
Column Lock............120
Power.................215
Tilt Column.............120
Wheel, Heated...........121
Wheel, Tilt..............120
Steering Wheel Audio Controls. . .185
Steering Wheel Mounted SoundSystem Controls
...........185
320