Page 25 of 212

This is located behind the interior rear
view mirror, in contact with the
windscreen and can detect the
presence of rain and, consequently,
manage the cleaning of the winds")
RAIN SENSOR(where provided)
This is located behind the interior rear
view mirror, in contact with the
windscreen and can detect the
presence of rain and, consequently,
manage the cleaning of the windscreen
in accordance with the amount of
water on the screen.
Activation/deactivation
9) 10)
By acting on the display menu or on the
Uconnect™system you can
activate/deactivate the rain sensor. The
sensor can also be deactivated by
bringing the ignition device to STOP.
The activation of the sensor is signalled
by a "stroke" to show that the
command has been acquired.
If the ignition device is moved to STOP
position, leaving the ring nut A fig. 29
in1
or2, when the vehicle is
next started (ignition device at MAR),
no wiping cycle occurs even if it rains.
REAR WINDOW
WIPER/WASHER
Activation
Turn ring nut B fig. 29 from positionO
to position
to operate the rear
window wiper as follows:
❒in intermittent mode when the
windscreen wiper is not operating;❒in synchronous mode (at half the
speed of the windscreen wiper) when
the windscreen wiper is operating;
❒in continuous mode with reverse gear
engaged and the control active.
Position1
: intermittent operation
(low speed).
Position2
: continuous slow
operation.
With reverse gear engaged and
windscreen wiper on, the rear window
wiper is activated in continuous mode.
Pushing the stalk towards the
dashboard (unstable position) will
activate the rear window washer jet.
Keep the stalk pushed for more than
half a second to activate the rear
window wiper as well. Releasing the
stalk will activate the smart washing
function, as described for the
windscreen wiper.
Deactivation
Release the lever.
WARNING
20)Make sure the device is switched off
whenever the windscreen must be
cleaned.
WARNING
7)Do not use the screen wiper to remove
layers of snow or ice from the windscreen.
In such conditions, the windscreen wiper
may be subjected to excessive stress
and the motor cut-out switch, which
prevents operation for a few seconds, may
intervene. If operation is not subsequently
restored, even after the vehicle is restarted,
contact a Jeep Dealership.
8)Do not operate the windscreen wiper
with blades lifted from the windscreen.
9)Do not activate the rain sensor while
washing the vehicle in an automatic
washing system.
10)If ice is found on the windscreen, make
sure that the device was disconnected
properly.
23
Page 26 of 212
CLIMATE CONTROL
2).
MANUAL CLIMATE CONTROL SYSTEM
Controls
A - fan activation/adjustment knob:
❒0 = fan off
❒
= fan speed (7 different speeds can be chosen)
B - air recirculation activation/deactivation button (LED on: internal air recirculation on / LED off: internal air recirculation off);
C - air temperature adjustment and MAX A/C function activation knob (to obtain maximum cooling of the passenger
compartment move the knob to the position marked by wording MAX A/C): blue section = cold air / red section = hot air
D - climate control system compressor on/off button;
30J0A0053C
24
GETTING TO KNOW YOUR CAR
Page 27 of 212

E - air distribution knob:
air from central outlets and side vents
air from central outlets, side vents and front and rear footwell vents
air outlet from the front and rear footwell vents and a light air flow also from the side vents on the dashboard
air outlet from the front and rear footwell vents, to the windscreen, the side windows and a light air flow also at the side
vents on the dashboard
air outlet to the windscreen, the side windows and a light air flow also at the side vents on the dashboard
4 further intermediate positions are also possible in the 5 main distributions described above.
F - heated rear window on/off button and, where provided, door mirror electric heating;
IMPORTANT Do not affix stickers to the inside of the heated rear window over the heating filaments, to avoid damage that
might cause them to stop working properly.
IMPORTANT Internal air recirculation makes it possible to reach the required heating or cooling conditions more quickly
depending on the mode selected. Do not use the internal air recirculation function on rainy/cold days as it would considerably
increase the possibility of the windows misting.
Additional heater(where provided)
The additional heater ensures more
rapid passenger compartment heating.
It activates in cold weather conditions,
if the following conditions are verified:
❒outside temperature low;
❒engine coolant temperature low;
❒engine on;
❒fan speed set at least to 1st speed;
❒knob C turned completely clockwise
to red section.
The heater is switched off when at least
one of the conditions above is no
longer verified.NoteThe power of the electric heater is
modulated according to the battery
voltage.
WARNING
2)The system uses R1234YF coolant,
which does not pollute the environment in
the event of accidental leakage. Under
no circumstances use R134a and R12
fluids, which are incompatible with the
components of the system.
25
Page 28 of 212
AUTOMATIC DUAL ZONE CLIMATE CONTROL SYSTEM
Controls
A - driver side temperature adjustment knob;
B - internal air recirculation on/off button;
C - climate control system compressor on/off button;
D - MAX-DEF function activation button (rapid defrosting/demisting of front windows);
E - climate control on/off button;
F - fan speed adjustment knob;
G - Fan speed indicator LED; (maximum fan speed = all LEDs lit; minimum fan speed = one LED lit);
H - air distribution selection buttons;
Air flow to the windscreen and front side window diffusers to demist/defrost them.
Air flow at central and side dashboard vents to ventilate the chest and the face during the hot season.
31J0A0054C
26
GETTING TO KNOW YOUR CAR
Page 29 of 212

Air flow to the front and rear footwell diffusers. This air distribution setting heats the passenger compartment most quickly,
giving a prompt sensation of warmth.
+Air flow distributed between footwell diffusers (hotter air) and central and side dashboard vents (cooler air). This
distribution setting is useful in spring and autumn on sunny days.
+Air flow distributed between footwell diffusers and windscreen and front side window defrosting/demisting diffusers.
This distribution setting allows the passenger compartment to be warmed up efficiently and prevents the windows
from misting up.
+Air flow distribution between windscreen demisting/defrosting diffusers and side and central dashboard vents. This
allows air to be sent to the windscreen in conditions of strong sunlight.
++Air flow distribution to all diffusers on the vehicle.
I - heated rear window on/off button; (where this function is provided, pressing the button also activates demisting/defrosting of
the door mirrors);
L - passenger side temperature adjustment knob;
M - SYNC function activation button (alignment of set temperatures) driver/passenger side;
N - AUTO function activation button (automatic operation).
In AUTO mode, the climate control
system automatically manages air
distribution (the LEDs on buttons H are
off). When set manually, the air
distribution is shown by the LEDs on
the selected buttons.
In combined function mode the relevant
function is enabled simultaneously
with those already set by pressing the
corresponding button. If a button
whose function is already active is
pressed, its operation is cancelled and
the corresponding LED switches off.
To restore automatic control of the
air distribution after a manual selection,
press the AUTO button.NOTES
The automatic climate control manages
the Stop/Start system (engine off and
vehicle at a standstill) in order to
guarantee sufficient comfort inside the
vehicle. In particularly severe climate
conditions it is recommended to limit
the use of the Stop/Start system to
prevent the compressor from
continuously switching on and off, with
consequent rapid misting of the
windows and accumulation of humidity
with unpleasant smells in the passenger
compartment.When the Stop/Start system is on
(engine off and vehicle at a standstill),
the automatic recirculation
management is turned off always taking
air in from outside, to reduce the
probability of the windows misting up
(as the compressor is off).
27
Page 30 of 212
They operate with the ignition device at
MAR and for nearly 3 minutes after
the ignition device switches to STOP (or
also after the mechanical key has
been extract")
ELECTRIC WINDOWS
ELECTRIC WINDOWS
21)They operate with the ignition device at
MAR and for nearly 3 minutes after
the ignition device switches to STOP (or
also after the mechanical key has
been extracted, for vehicles equipped
with mechanical key with remote
control). When one of the front doors is
opened this operation is disabled.
Driver side front door
controls
The buttons are located on the door
panel trim. All windows can be
controlled from the driver side door
panel fig. 32.
❒A: front left window opening/closing.
"Continuous automatic" operation
during window opening/closing stage
and anti-pinch system activated.❒B: right front window opening/
closing. "Continuous automatic"
operation during window opening/
closing stage and anti-pinch system
activated.
❒C: enabling/disabling of rear door
electric window controls;
❒D: left rear window opening/closing (if
present). "Automatic continuous"
operation during window opening/
closing, manual electric operation
during window closing;
❒E: right rear window opening/closing
(if present). "Automatic continuous"
operation during window opening/
closing, manual electric operation
during window closing.
Window opening
Push the buttons to open the desired
window.
When any of the opening buttons on
front or rear doors is pressed briefly, the
window moves in stages; if the button
is held down, "continuous automatic"
operation is activated.
If the button is pressed again, the
window will stop in the desired position.
Window closing
Lift the buttons to close the desired
window.
The window closing stage occurs
following the same logic described for
the opening stage, for the front door
windows only.
The rear door windows can only be
closed "in stages".
Front window anti-pinch
safety device
(where provided)
This safety system can recognise the
presence of any obstacle during the
window closing movement. If this
occurs, the system stops the window's
movement and reverts it by a few
centimetres, depending on its position.
The anti-crush safety function is
activated both during the manual and
the automatic operation of the window.
Electric window system
initialisation
If power supply is interrupted, the
electric window automatic operation
must be reinitialised.
The initialisation procedure described
below must be carried out with the
doors closed and for each door:
❒fully close the window to be
initialised, with manual operation;
32J0A0078C
28
GETTING TO KNOW YOUR CAR
Page 31 of 212
Incorrect use of the electric windows
may be dangerous. Before and during their
oper")
❒after the window has reached the
upper end of travel, hold the up button
down for at least 3 seconds.
WARNING
21)Incorrect use of the electric windows
may be dangerous. Before and during their
operation, ensure that any passengers
are not at risk from the moving glass either
by personal objects getting caught in the
mechanism or by being hit by it directly.
When leaving the vehicle (equipped with
mechanical key with remote control),
always remove the key from the ignition
device to prevent accidental operation of
the electric windows from being a hazard
for those still on board.
ELECTRIC SUN
ROOF
22)11)The electric sun roof comprises two
glass panels (the front one is mobile
and the rear one fixed) and is fitted with
an electrically operated sun blind.
The sun roof and the blind can
be operated only with the ignition
device turned to MAR.
CONTROL BUTTONS
Button Afig. 33: pressing the button
on the front glass panel, it will
completely open. From the position of
complete opening, pull the button:
the front panel will completely close.
During the automatic opening and
closing stages, press button A again to
interrupt the blind movement.
Button Bfig. 33: pressing this button,
the blind will mode towards the rear
part of the vehicle, until it is fully open.
With blind fully open press button B:
the blind will move towards the front
part of the vehicle, until it is fully closed.
During the automatic opening and
closing stages, press button B again to
interrupt the blind movement.Button Cfig. 33: press and release the
button to move the roof to "spoiler"
position (swivel opening). This type of
swivel opening can be activated
irrespective of the position of the sun
roof. During the spoiler opening, any
pressure on button C stops the roof
closing.
33J0A0224C
29
Page 32 of 212

ANTI-PINCH DEVICE
The sun roof and the electric blind are
equipped with an anti-pinch safety
system capable of detecting the
presence of an obstacle whilst the roof
is closing: if this happens, the system
intervenes and the movement of the
glass is immediately reversed.
EMERGENCY OPERATION
If the control buttons fail to operate, the
sun blind and the sun roof can be
moved manually, proceeding as
described below:
❒Sun blind movement: remove
protective cap A fig. 34 on the internal
trim;
❒Sun roof movement: remove
protective cap B fig. 34 on the internal
trim;
❒take the supplied spanner C fig. 34
from the luggage compartment;❒insert key C in housing A (for blind
movement) or B (for sun roof
movement) and turn it clockwise to
open the roof (or the blind) or
anticlockwise to close the roof (or the
blind).
INITIALISATION
PROCEDURE
Following an automatic movement
malfunction while opening/closing or
after an emergency manoeuvre (see
description in the previous paragraph),
the automatic operation of the sun
roof must be initialised again.
Proceed as follows:
❒move the roof to fully closed position;
❒move the ignition device to STOP
and keep it there for 10 seconds;
❒move the ignition device to MAR;
❒press button A in closing position;
❒press the button for at least 10
seconds, then you should hear the
mechanical stop of the roof motor;
❒press the button A in the "closing"
position again within 5 seconds;
❒hold down button A: in this position,
the roof will perform an automatic
opening and closing cycle. Otherwise,
repeat the operations starting from
the beginning;❒hold down button A until the roof is
completely closed: the initialisation
procedure has ended.
WARNING
22)When leaving the vehicle (equipped
with mechanical key with a remote control),
always remove the key from the ignition
device to avoid the risk of injury to those
still inside the vehicle due to accidental
operation of the sun roof. Improper use of
the roof can be dangerous. Before and
during operation, always check that
nobody is at risk of being injured by the
moving sun roof or by objects getting
caught or hit by it.
WARNING
11)Do not open the sun roof if a
transverse roof rack is fitted. Do not open
the sun roof if there is snow or ice on it:
you may damage it.
34J0A00390C
30
GETTING TO KNOW YOUR CAR
 1
1 2
2 3
3 4
4 5
5 6
6 7
7 8
8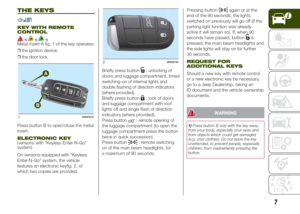 9
9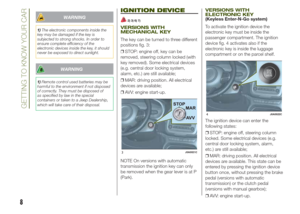 10
10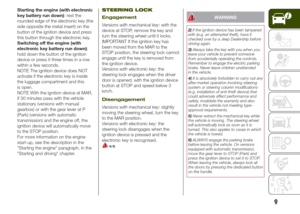 11
11 12
12 13
13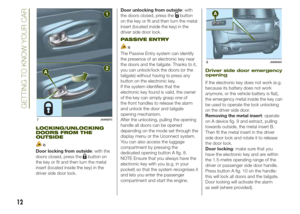 14
14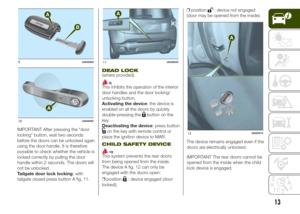 15
15 16
16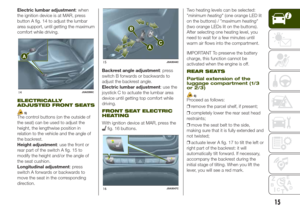 17
17 18
18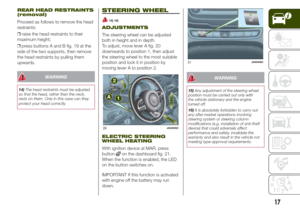 19
19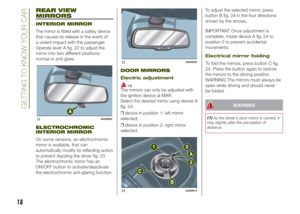 20
20 21
21 22
22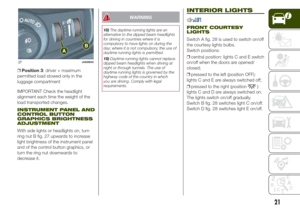 23
23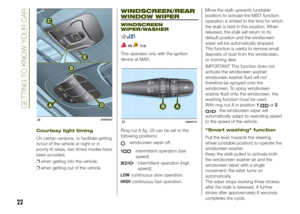 24
24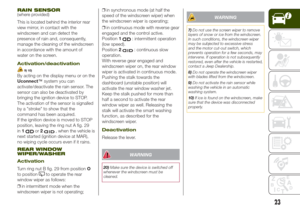 25
25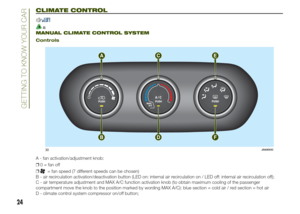 26
26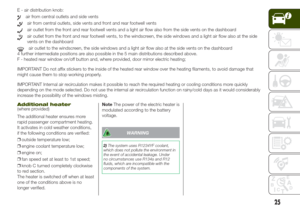 27
27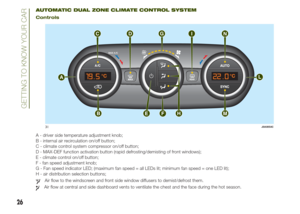 28
28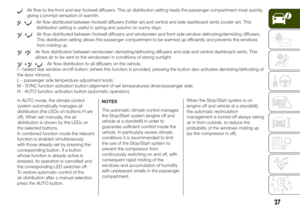 29
29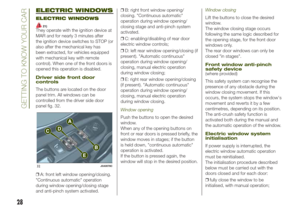 30
30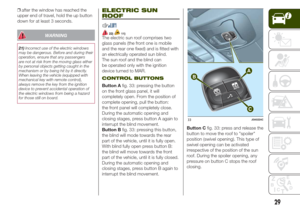 31
31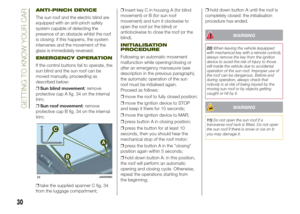 32
32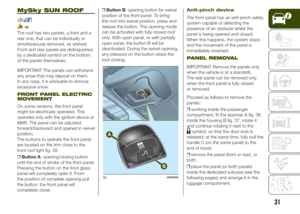 33
33 34
34 35
35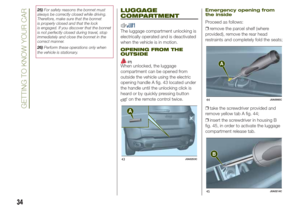 36
36 37
37 38
38 39
39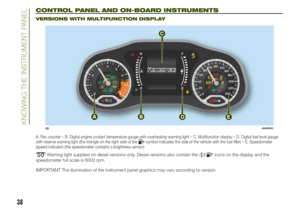 40
40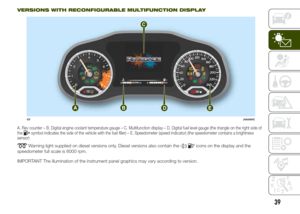 41
41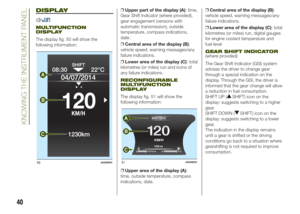 42
42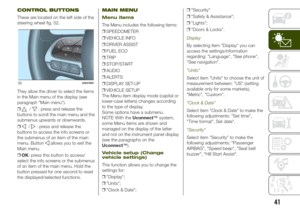 43
43 44
44 45
45 46
46 47
47 48
48 49
49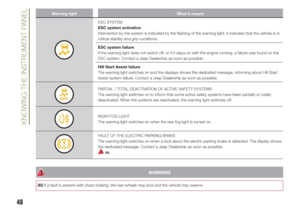 50
50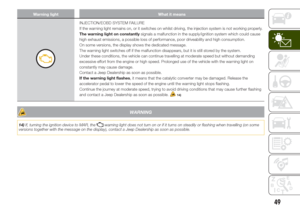 51
51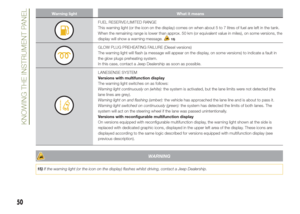 52
52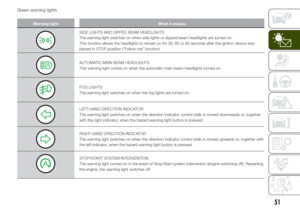 53
53 54
54 55
55 56
56 57
57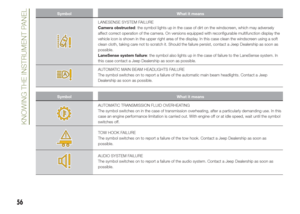 58
58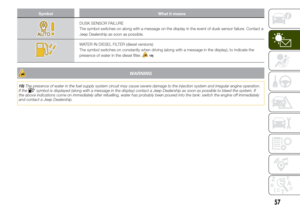 59
59 60
60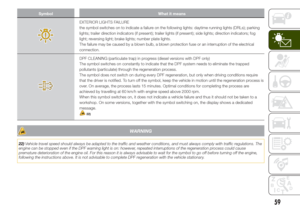 61
61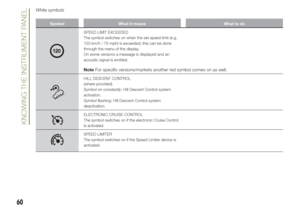 62
62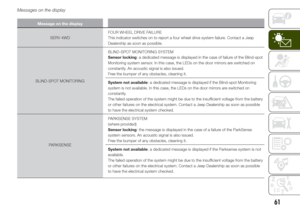 63
63 64
64 65
65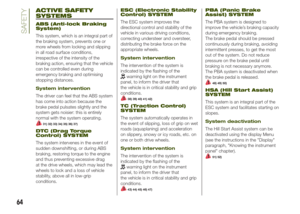 66
66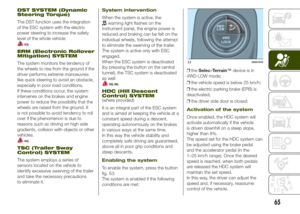 67
67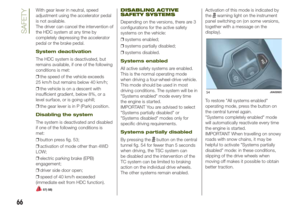 68
68 69
69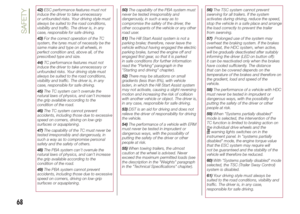 70
70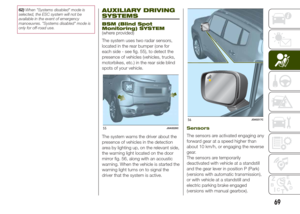 71
71 72
72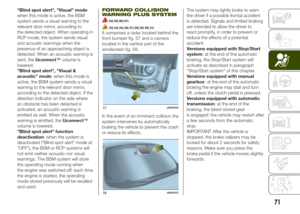 73
73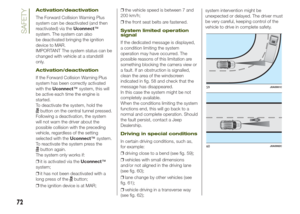 74
74 75
75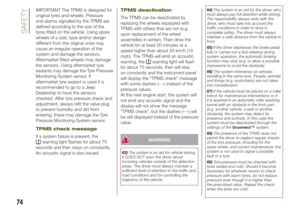 76
76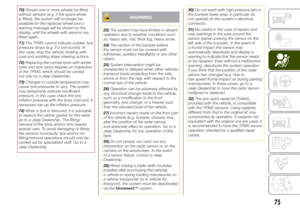 77
77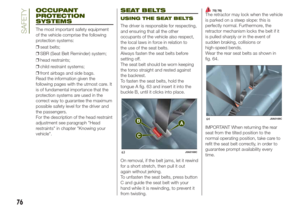 78
78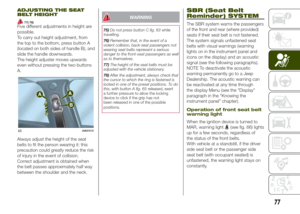 79
79 80
80 81
81 82
82 83
83 84
84 85
85 86
86 87
87 88
88 89
89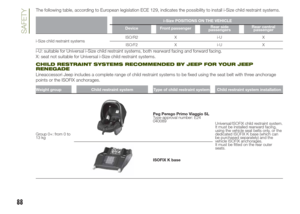 90
90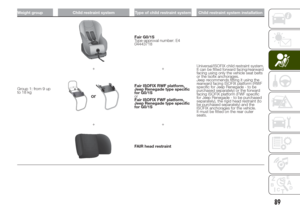 91
91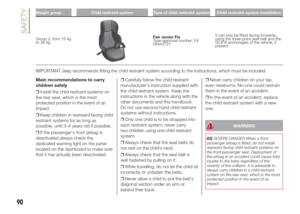 92
92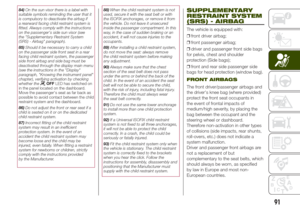 93
93 94
94 95
95 96
96 97
97 98
98 99
99 100
100 101
101 102
102 103
103 104
104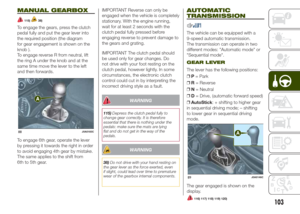 105
105 106
106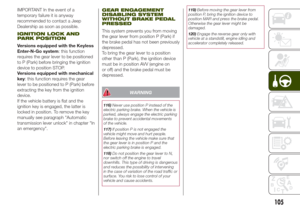 107
107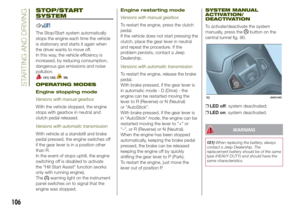 108
108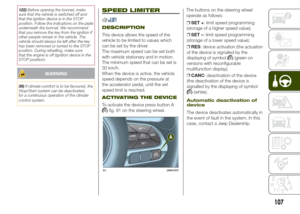 109
109 110
110 111
111 112
112 113
113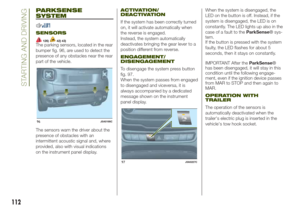 114
114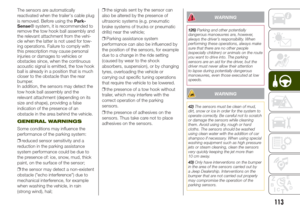 115
115 116
116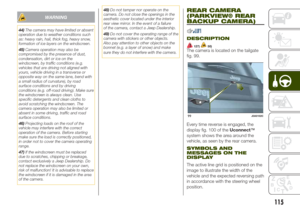 117
117 118
118 119
119 120
120 121
121 122
122 123
123 124
124 125
125 126
126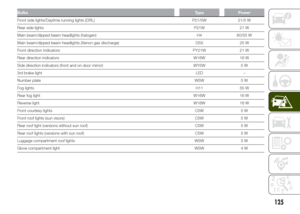 127
127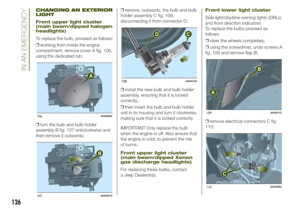 128
128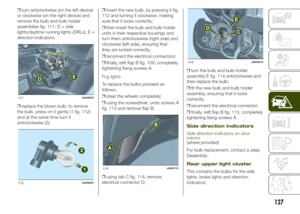 129
129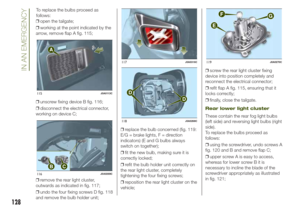 130
130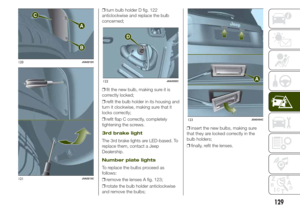 131
131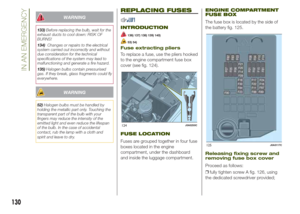 132
132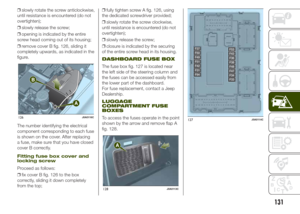 133
133 134
134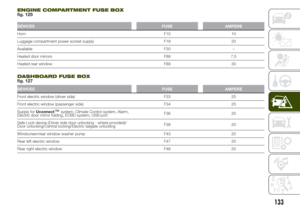 135
135 136
136 137
137 138
138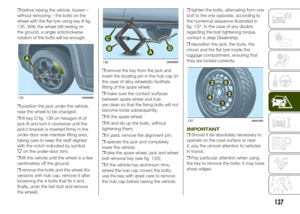 139
139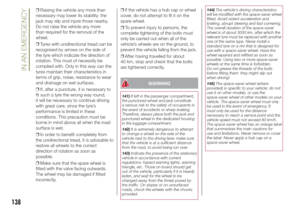 140
140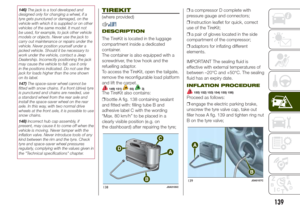 141
141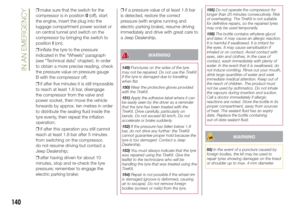 142
142 143
143 144
144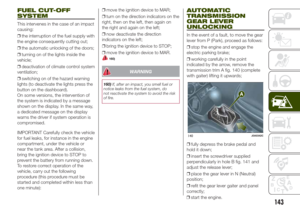 145
145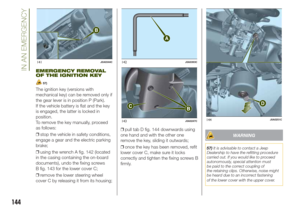 146
146 147
147 148
148 149
149 150
150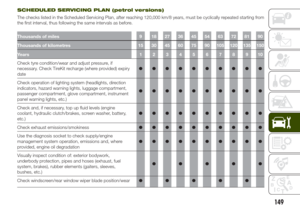 151
151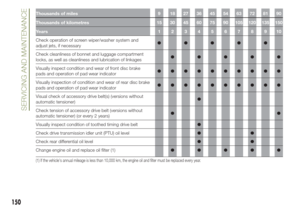 152
152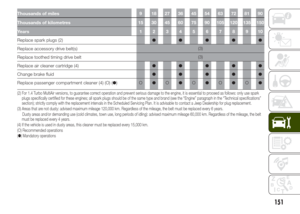 153
153 154
154 155
155 156
156 157
157 158
158 159
159 160
160 161
161 162
162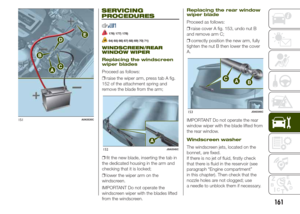 163
163 164
164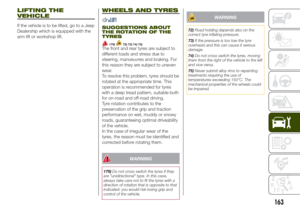 165
165 166
166 167
167 168
168 169
169 170
170 171
171 172
172 173
173 174
174 175
175 176
176 177
177 178
178 179
179 180
180 181
181 182
182 183
183 184
184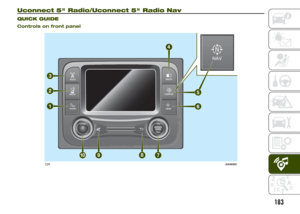 185
185 186
186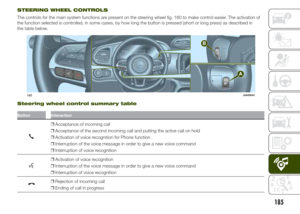 187
187 188
188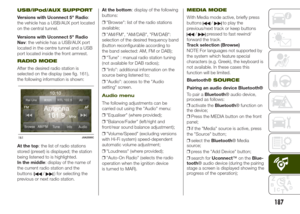 189
189 190
190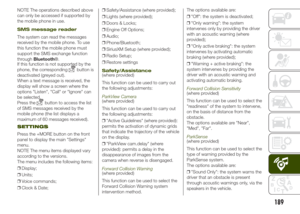 191
191 192
192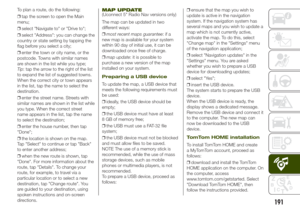 193
193 194
194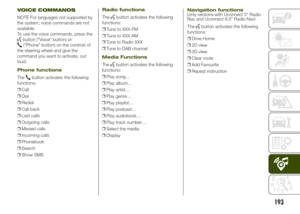 195
195 196
196 197
197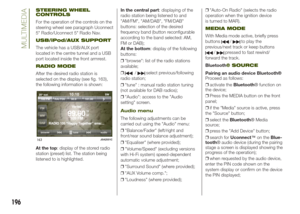 198
198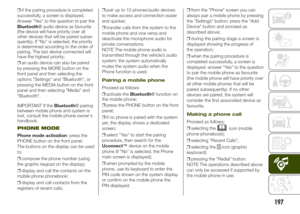 199
199 200
200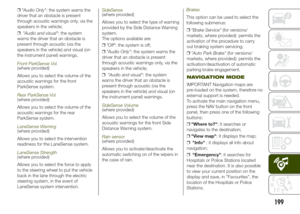 201
201 202
202 203
203 204
204 205
205 206
206 207
207 208
208 209
209 210
210 211
211.
MANUAL CLIMATE CONTROL SYSTEM
Controls
A - fan activation/adjustment knob:
❒0 = fan off
❒
= fan speed (7 different speeds can be chosen)
B - air recirculation activation/deacti")
