Page 63 of 267

INFO:
If they are registered in the map data, the brand
icons will be displayed on the map instead of
the general map icons listed below.
Map icons that can be displayed
The following map items can be displayed..
Restaurant
.
Gas Station
.
Hotel
.
AT M
.
Rest Area
Other settings
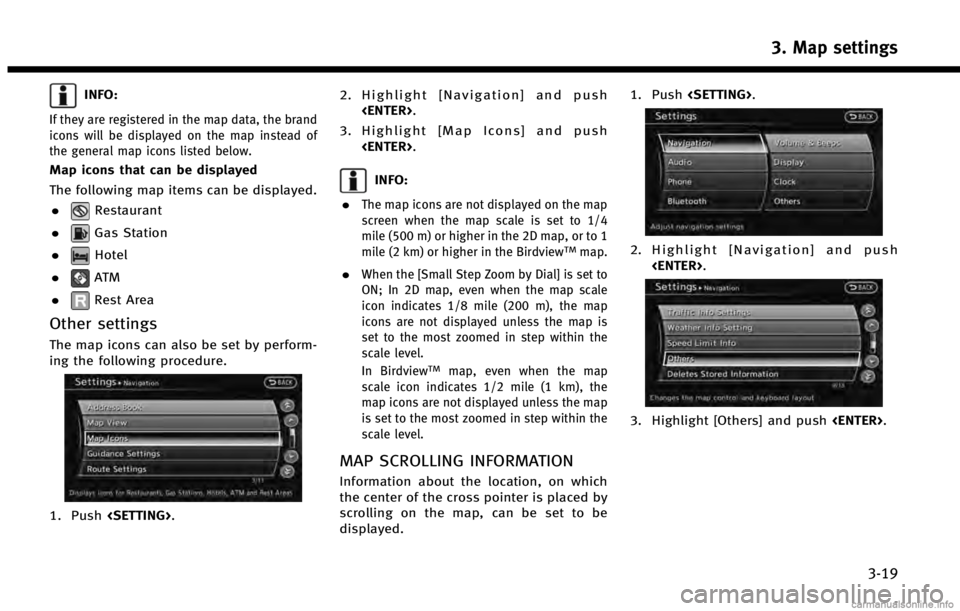
The map icons can also be set by perform-
ing the following procedure.
1. Push . 2. Highlight [Navigation] and push
.
3. Highlight [Map Icons] and push .
INFO:
.
The map icons are not displayed on the map
screen when the map scale is set to 1/4
mile (500 m) or higher in the 2D map, or to 1
mile (2 km) or higher in the Birdview
TMmap.
.When the [Small Step Zoom by Dial] is set to
ON; In 2D map, even when the map scale
icon indicates 1/8 mile (200 m), the map
icons are not displayed unless the map is
set to the most zoomed in step within the
scale level.
In Birdview
TMmap, even when the map
scale icon indicates 1/2 mile (1 km), the
map icons are not displayed unless the map
is set to the most zoomed in step within the
scale level.
MAP SCROLLING INFORMATION
Information about the location, on which
the center of the cross pointer is placed by
scrolling on the map, can be set to be
displayed. 1. Push
.
2. Highlight [Navigation] and push
.
3. Highlight [Others] and push .
3. Map settings
3-19
Page 64 of 267
3. Map settings
3-20
4. Highlight [Map Scrolling Information]and push .
5. Highlight the preferred information
item and push . The indicator
of the selected information item illumi-
nates.
The following information items are
available.
.[Address Book Icons]
.[Destination/Waypoint Icons]
.[Latitude/Longitude Info]
6. Push
Page 65 of 267
MAP SYMBOLS
This navigation system uses symbols to display facilities.
3. Map settings
3-21
Page 66 of 267
3. Map settings
3-22
ROAD COLOR
The road types are differentiated by colors.
Freeway:
(Red or light red (zoomed in))
Main road:
(Brown or dark yellow)
Narrow street:
(Gray)
Road with incomplete map data:
(Dark green)
TRAFFIC INFORMATION ON MAP
With a subscription to the NavTraffic
service, traffic information is displayed.
“Viewing available traffic information”
(page 7-16)
Free Flow:
(Green)
Moderate traffic:
(Yellow)
Heavy traffic:
(Red)
Section affected by serious traffic event:
(Purple)
The following traffic information icons may be displayed
: Accident
: Closed road
: Information
: Road work
: Slippery road
: Weather
: Incident
Page 70 of 267
![INFINITI QX60 HYBRID 2014 Navigation Manual 4. Setting destination
4-4
2. Enter the name of the city, highlight[List] and push <ENTER>.
A list screen is displayed.
INFO:
.The same screen will be displayed when a location is searched by “Stree INFINITI QX60 HYBRID 2014 Navigation Manual 4. Setting destination
4-4
2. Enter the name of the city, highlight[List] and push <ENTER>.
A list screen is displayed.
INFO:
.The same screen will be displayed when a location is searched by “Stree](/manual-img/42/35043/w960_35043-69.png)
4. Setting destination
4-4
2. Enter the name of the city, highlight[List] and push .
A list screen is displayed.
INFO:
.The same screen will be displayed when a location is searched by “Street Ad-
dress”, “Freeway Entrance/Exit” or“In-
tersection” , and when [City] is
highlighted and is pushed.
“Finding address” (page 4-4)
.Highlight [Last 5 Cities] and push
to display the last 5 cities
recently set as destinations.
3. Highlight the city of the destination from the list and push .
INFO:
There are instances when the destination
list screen number will be less than what
was shown in the matches screen, but this
is due to the system automatically deter-
mining that some destinations are dupli-
cates. The“Matches” destinations includes
duplicates. When the [LIST] is highlighted
and is pushed, the system does a
further analysis to remove the duplicates,
so the number is sometimes less.
FINDING ADDRESS
When the address of the destination is
known, use the following method to enter
the address and then have the system
calculate a route. A location near the
preferred destination can also be searched
by entering the house number if the map
data contains the relevant data.
1. Push , highlight [Street Address]
and push . A character input
screen is displayed.
Page 71 of 267
![INFINITI QX60 HYBRID 2014 Navigation Manual 2. Enter the house number, highlight [OK]and push <ENTER>. If the house number
is not available, highlight [No House #]
and push <ENTER>. A street name input
screen is displayed.
3. Enter the name of INFINITI QX60 HYBRID 2014 Navigation Manual 2. Enter the house number, highlight [OK]and push <ENTER>. If the house number
is not available, highlight [No House #]
and push <ENTER>. A street name input
screen is displayed.
3. Enter the name of](/manual-img/42/35043/w960_35043-70.png)
2. Enter the house number, highlight [OK]and push . If the house number
is not available, highlight [No House #]
and push . A street name input
screen is displayed.
3. Enter the name of the street. After
finishing the entry, highlight [List] and
push . A list of streets is
displayed.
INFO:
When [City] is highlighted and is
pushed, a city can be specified by typing the
city name.
“Specifying city” (page 4-3)
4. Highlight the correct street of the
destination from the list and push
.
INFO:
In some cases, when a street name has
been entered, the number of matching
destinations in the “Matches”column may
be different from the number displayed on
the list screen. If this occurs, enter more
characters to further reduce the number of
matches.
5. The entire route is shown on the map. Highlight [Start] after confirming the
location of the displayed destination,
and push . The system sets the
destination to the selected location and
starts calculating a route.
INFO:
Even after setting a destination, the location
of the destination can be adjusted, the route
can be stored, etc.
“Procedures after setting destination”
(page 5-2)
Voice command
1. Push
>located on the steering
wheel.
2. After the tone sounds, speak a com- mand.
To set the destination from a street
address:
“Navigation”“ Address”(Standard
Mode)
“Address” (Alternate Command Mode)
4. Setting destination
4-5
Page 72 of 267

4. Setting destination
4-6
INFO:
When using a voice command to set a street
name, it is recommended that the complete
street name is stated.
Examples:Correct input –North Elm Street
East Jefferson Boulevard
Incorrect input –Elm Street
East Jefferson
FINDING PLACE
There are 3 methods that can be used to
set the destination to places of interest:
typing the name, choosing a category or
selecting a ZAGAT reviewed location. To
help improve searching, different start
points can be chosen to search from such
as near current location, near the destina-
tion or city center.
Finding nearby place
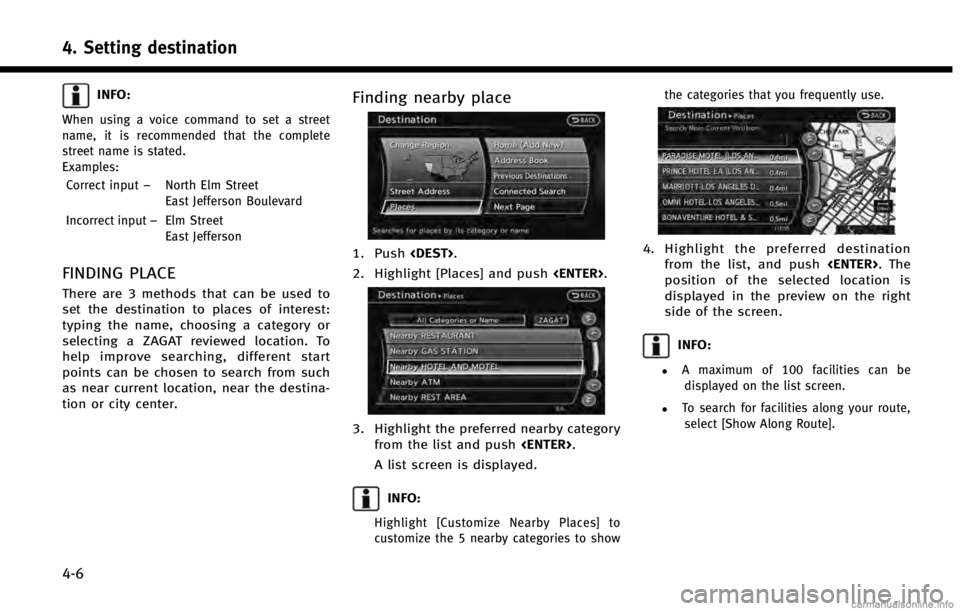
1. Push .
2. Highlight [Places] and push .
3. Highlight the preferred nearby category
from the list and push .
A list screen is displayed.
INFO:
Highlight [Customize Nearby Places] to
customize the 5 nearby categories to show the categories that you frequently use.
4. Highlight the preferred destination
from the list, and push . The
position of the selected location is
displayed in the preview on the right
side of the screen.
INFO:
.A maximum of 100 facilities can be displayed on the list screen.
.To search for facilities along your route, select [Show Along Route].
Page 73 of 267
5. The entire route is shown on the map.Highlight [Start] after confirming the
location of the displayed destination,
and push . The system sets the
destination to the selected location and
starts calculating a route.
INFO:
.
If there is a route already set, the newly
selected location can substitute a previously
set destination or can be added to a route
already set.
.To review the destination location again,
highlight [Move Location] and push
.
Other settings:
The destination can also be set by pushing
in the current or scrolled location
map screen and selecting [Nearby Places].
Voice command
1. Push
>located on the steering
wheel.
2. After the tone sounds, speak a com- mand.
To display the nearby category list and
select the destination from it:
“Navigation”“ Places”(Standard Mode)
“Places” (Alternate Command Mode)
Searching by other methods
1. Push.
2. Highlight [Places] and push .
3. Highlight [All Categories or Name] and
push .
4. Setting destination
4-7