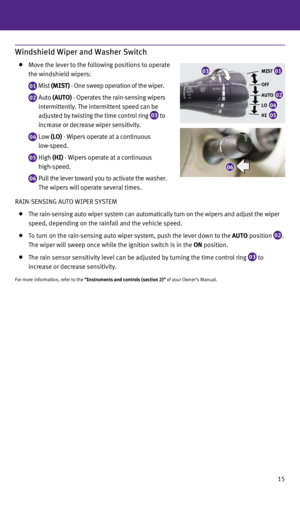
Page 9 of 32
 -Used for standard or normal driving.
02 SPOR t -")
7
Infiniti Drive Mode Selector
Turn the switch to the following position to select the
corresponding drive mode:
01 Standard (•) -Used for standard or normal driving.
02 SPOR t - The engine and transmission will adjust,
resulting in higher engine rpm and a more aggressive
shift pattern. In this mode, fuel economy may
be reduced.
03 SNOW – Used on snowy roads or slippery areas. In this mode, engine output\
is controlled to
avoid wheel spin.
04 ECO – Adjusts engine and transmission points to enhance fuel economy.
ECO PEDAL SYSTEM (if so equipped)
w ith the Infiniti Drive Mode Selector switch in the ECO Mode, the ECO pedal system
assists the driver in improving fuel economy.
The ECO pedal system applies force to make the
accelerator pedal heavier, depending on the
accelerator pedal operation.
To change the ECO pedal reaction force:
1. Push the
SE tt ING button on the control panel.
2. Touch the
ECO DRIVE key.
3. Touch the
ECO pedal key and select one of the options below:
•
OFF
- Turns the ECO pedal system off.
•
Soft
- Softens the reaction force.
•
Standard
- Reaction force is normal.
For more information, refer to the “Starting and driving (section 5)” of your Owner’s Manual.
0102
03
04
1276459_14_M_Hybrid_QRG_112213.indd 711/22/13 9:38 AM
Page 10 of 32

The warning systems switch 01 will turn on or off any
enabled warning systems including Lane Departure
w
arning (LD
w
), Blind")
8
essential information
Warning Systems Switch (if so equipped)
The warning systems switch 01 will turn on or off any
enabled warning systems including Lane Departure
w
arning (LD
w
), Blind Spot
w
arning (BS w ), and
Forward Collision
w
arning (FC
w
). Systems that are not
enabled will always remain off.
w hen the warning systems switch is turned off, the
indicator light
02 on the switch extinguishes. If the
warning systems switch is illuminated, the system is
on. The indicator will also be off if all of the warning
systems are deactivated using the Settings menu.
To enable or disable these systems, perform the
following steps:
1.
Press the
SE tt ING button
03 on the control panel.
2.
Using the INFINITI Controller
04 , highlight the
“Driver Assistance” key
05 on the display. Then
press the EN
t
ER button 06 .
3.
Highlight the corresponding warning system key
07 , select ON (enabled) or OFF (disabled) and
press the EN t ER button
06 .
For more information, refer to the “Starting and driving (section 5)” of your
Owner’s Manual.
01
02
03
04
06
05
07
Loose Fuel Cap
A LOOSE FUEL CAP warning message will appear in the
vehicle information display
01 when the fuel-filler
cap is not tightened correctly.
To tighten, turn the cap clockwise until a single click
is heard.
The warning message will disappear when the vehicle
detects the fuel-filler cap is properly tightened and the
reset button
02 is pressed for more than 1 second.
If the cap is not properly tightened, the Malfunction
Indicator Light
may illuminate.
For more information, refer to the “Instruments and controls (section 2)” and
the “Pre-driving checks and adjustments (section 3)” of your Owner’s Manual.
01
02
1276459_14_M_Hybrid_QRG_112213.indd 811/22/13 9:39 AM
Page 11 of 32
” of your Owner’s Ma")
9
Accessing the Front Cup Holders
To open the cup holders, push the lid 01 down
and release.
For more information, refer to the “Instruments and
controls (section 2)” of your Owner’s Manual.01
Clock Set/Adjustment
DIGITAL CLOCk ADJUSTMENT
To adjust the time and the appearance of the clock
on the display:
1.
Press the SE
tt ING button on the control panel.
2.
Touch the Others key.
3.
Touch the Clock key.
The following settings can be adjusted:
•
On-screen Clock
: The clock in the upper right corner of the display can be turned ON or O\
FF.
•
Clock Format (24h)
: The clock can be set to 12 hours or 24 hours.
•
Offset (hour)
: The time can be adjusted by increasing or decreasing per hour.
•
Offset (min)
: The time can be adjusted by increasing or decreasing per minute.
•
Daylight Savings
t ime: The application of daylight savings time can be turned ON or OFF.
•
t
ime Zone: Adjust the time zone. Choose a time zone from the available list.
Press the BAC k button to return to the previous screen.
For more information, refer to the “Monitor, climate, audio, phone and voice recognition systems (secti\
on 4)” of your
Owner’s Manual.
Fuel-filler Door
The fuel-filler door is located on the passenger’s side of
the vehicle.
w hen the doors of the vehicle are locked or unlocked,
the fuel-filler door is automatically locked or unlocked
at the same time.
To open the door, push the upper left side of
the door.
For more information, refer to the “Pre-driving checks and adjustments (section 3)” of your Owner’s Manual.
1276459_14_M_Hybrid_QRG_112213.indd 911/22/13 9:39 AM
Page 12 of 32
.
The INFINITI Intelligent k ey system")
10
first drive features
INFINITI Intelligent Key System
It is important to make sure the Intelligent k ey is
withyou (that is, in your pocket or purse).
The INFINITI Intelligent k ey system allows you to
lock or unlock your vehicle, open your trunk and
start the engine.
The operating range of the Intelligent ke y is within
31.5 in (80 cm) from each request switch.
To lock the vehicle, push either door handle request
switch
01 once or press the
button
02 on the key fob.
To unlock the vehicle, perform one of the following procedures:
•
Push
either door handle request switch
01 once;
the corresponding
door will unlock. Push the door handle request switch 01 again
within 1 minute; all other doors will unlock, or
•
Press
the
button
03 on the key fob to unlock the driver’s side
door. Press the
button again; all other doors will unlock.
To open the trunk, press the
button
04 for more than 1 second.
The Intelligent k ey can also be used to activate the panic alarm by pressing and holding
the
button
05 for more than 1 second. Once activated, the panic alarm and headlights
will stay on for a period of time.
INTELLIGENT
k
EY BATTERY DISCHARGE
If the battery of the Intelligent k ey is discharged or
environmental conditions interfere with the Intelligent
k
ey operation, start the engine according to the
following procedure:
1.
Move the shift lever to the
P (P AR k) position.
2.
Firmly apply the foot brake.
3.
Touch the ignition switch with the Intelligent
k ey and a chime will sound.
4.
w ithin 10 seconds after the chime sounds, push the ignition switch while \
depressing the
brake pedal and the engine will start.
For more information, refer to the “Pre-driving checks and adjustments (section 3)”, “Starting a\
nd driving (section 5)” and the
“Maintenance and do-it yourself (section 8)” of your Owner’s Manual.
01
02
03
04
05
1276459_14_M_Hybrid_QRG_112213.indd 1011/22/13 9:39 AM
Page 13 of 32

11
Trunk Lid Release
Use one of the following methods to unlatch the trunk lid
then lift the lid to open the trunk:
Push the trunk open request switch 01 under the
trunk handle while carrying the INFINITI Intelligent
k
ey with you.
Press the HOLD button
02 on the key fob for
more than one second.
From inside the vehicle, push the trunk lid release
switch
03 .
For more information, refer to the “Pre-driving checks and adjustments
(section 3)” of your Owner’s Manual.
01
02
03
010203
Seat Adjustments
To slide the seat forward or backward, push the
switch
01 forward or backward.
To recline the seatback, push the switch
02
forward or backward.
SEAT LIFTER
To adjust the angle of the front seat cushion or height
of the seat, push the front or rear end of the switch
01 up or down.
LUMBAR SUPPORT (if so equipped)
To adjust the seat lumbar support, push the front or back end of the swi\
tch 03 .
For more information, refer to the “Safety —— Seats, seat belts and supplemental restraint system (section 1)”\
of your
Owner’s Manual.
1276459_14_M_Hybrid_QRG_112213.indd 1111/22/13 9:39 AM
Page 14 of 32

12
first drive features
Automatic Drive Positioner
Two positions for the driver’s seat, steering column
and outside mirrors can be stored in the automatic
drive positioner
01 memory. Follow these steps to set the memory positions:
• Confirm the shift lever is in the P (PAR k ) position.
•
Push the ignition switch to the ON position.
•
Adjust
the driver’s seat, steering column and
outside mirrors to the desired positions, using the adjusting switches f\
or each feature.
•
Push
the SE t switch and within 5 seconds push the memory switch (1 or 2) for at least
1 second.
•
The indicator light on the memory switch you select will illuminate for \
approximately
5 seconds.
•
The
driver’s seat, steering column and outside mirror positions are now set to your preference.
These memorized positions can also be linked to your INFINITI Intelligen\
t k ey. To link a
memorized position to your INFINITI Intelligent k ey, press the unlock button on the key fob
after completing the previous step.
For more information, refer to the “Pre-driving checks and adjustments (section 3)” of your Owner’s Manual.
01
Outside Mirror Control Switch
To select the right or left side mirror, move the
switch
01 right or left.
Adjust each mirror to the desired position using the
switch
02 .
To fold the outside rearview mirrors, push the
switch
03 to the
position. To unfold the outside
rearviewmirrors, push the switch
03 to the
position.
RE
v
ERSE TILT-DO
w
N FEATURE
w hen backing up the vehicle, the right or left outside mirror can be sele\
cted to automatically
t
urn downward.
1.
Push the ignition switch to the
ON position.
2.
Move the shift lever to the
R (REVERSE) position.
3.
Choose the right or left outside mirror by operating the outside mirror \
control switch 01 .
4.
The outside mirror surface moves downward.
01
0203
1276459_14_M_Hybrid_QRG_112213.indd 1211/22/13 9:39 AM
Page 15 of 32

13
Assist Charge Gauge
This shows the power consumed 02 or generated
01 by the electric motor.
For more information, refer to the “Hybrid System Overview” section and
the “Instruments and controls (section 2)” of your Owner’s Manual.
Starting/Stopping the Hybrid System
It is important to make sure the INFINITI Intelligent key is
with you (that is, in your pocket or purse).
Depress the brake pedal.
Press the ignition switch S t AR t /S t OP button to start
the hybrid system.
The ready-to-drive indicator light 01 will illuminate
in the meter and you may begin driving the vehicle.
TURNING THE HYBRID SYSTEM OFF
Move the shift lever to the P (PAR k ) position and
apply the parking brake.
Press the ignition switch S t AR t /S t OP button to
turn the hybrid system off.
For more information, refer to the “Starting and driving (section 5)” of your Owner’s Manual.
01
02
01
w hen one of the following conditions has occurred, the outside mirror sur\
face will return to
its original position.
•
The shift lever is moved to any position other than the
R (REVERSE) position.
•
The outside mirror control switch is set to the central or (neutral) p\
osition.
•
The ignition switch is pushed to the
OFF position.
For more information, refer to the “Pre-driving checks and adjustments (section 3)” of your Owner’s Manual.
1276459_14_M_Hybrid_QRG_112213.indd 1311/22/13 9:39 AM
Page 16 of 32

14
first drive features
Headlight Control Switch
HEADLIGHT CONTROL
Turn the headlight control switch to the position
01 to turn on the front parking, side marker, tail, license
plate and instrument panel lights. Turn the switch to
the
position
02 to turn on the headlights.
AUTOLIGHT SYSTEM
The autolight system will automatically turn the headlights on when it i\
s dark and off when it is
light. The system will keep the headlights on for a period of time after\
you turn the ignition off
and all doors are closed.
To activate the autolight system, turn the headlight control switch to t\
he AU t O position
03
then push the ignition switch to the ON position. To deactivate the autolight system, turn the
headlight control switch to the OFF,
position
01 or
position
02 .
HIGH BEAM SELECT
Push the headlight control switch forward
04 to
select the high beam function. The blue indicator light
illuminates in the instrument panel. Pull the
headlight switch back to the original position to select
the low beam. The blue indicator light will extinguish.
Pull and release the headlight control switch
05 to
flash the headlight high beams on and off.
FOG LIGHT S
w
ITCH
The headlights must be on and the low beams
selected for the fog lights to operate.
Turn the switch (inside collar) to the position
06
to turn the fog lights on.
Turn the switch (inside collar)
to the
OFF position to
turn the fog lights off.
For more information, refer to the “Instruments and controls (section 2)” of
your Owner’s Manual.
03
01
02
04
05
06
1276459_14_M_Hybrid_QRG_112213.indd 1411/22/13 9:39 AM