Page 962 of 1534
797
Maintenance
Front fog light aiming
The front fog lamp can be aimed as the same manner of the head lamps aiming.
With the front fog lamps and battery nor-
mal condition, aim the front fog lamps. To
aim the front fog lamp up or down, turn
the driver clockwise or counterclockwise.
OEL073256
EL(FL) Eng 7.QXP 10/7/2013 9:32 AM Page 97
Page 968 of 1534

7 103
Maintenance
Outside light
1. Open the tailgate.
2. Loosen the light assembly retainingscrews with a cross-tip screwdriver.
3. Remove the rear combination light assembly from the body of the vehicle. 4. Remove the socket from the assembly
by turning the socket counterclockwise
until the tabs on the socket align with
the slots on the assembly.
5. Remove the bulb from the socket by pressing it in and rotating it counter-
clockwise until the tabs on the bulb
align with the slots in the socket. Pull
the bulb out of the socket.
6. Insert a new bulb by inserting it into the socket and rotating it until it locks
into place.
7. Install the socket in the assembly by aligning the tabs on the socket with the
slots in the assembly. Push the socket
into the assembly and turn the socket
clockwise.
8. Reinstall the light assembly to the body of the vehicle.
Inside light
1. Open the tailgate.
2. Remove the service cover using a flat- blade screwdriver.
3. Remove the socket from the assembly by turning the socket counterclockwise
until the tabs on the socket align with
the slots on the assembly.
OLM079034
OLM079035
OLM079036
OLM079047
OEL079038
EL(FL) Eng 7.QXP 10/7/2013 9:33 AM Page 103
Page 969 of 1534

Maintenance
104
7
4. Remove the bulb from the socket by
pressing it in and rotating it counter-
clockwise until the tabs on the bulb
align with the slots in the socket. Pull
the bulb out of the socket.
5. Insert a new bulb by inserting it into the socket and rotating it until it locks
into place.
6. Install the socket in the assembly by aligning the tabs on the socket with the
slots in the assembly. Push the socket
into the assembly and turn the socket
clockwise.
7. Install the service cover by putting it into the service hole.
Stop and tail light (LED type)
If the light does not operate, we recom-
mend that the system be checked by an
authorized HYUNDAI dealer. Rear fog light (if equipped)
1. Remove the socket from the assembly
by turning the socket counterclockwise
until the tabs on the socket align with
the slots on the assembly.
2. Remove the bulb from the socket by pressing it in and rotating it counter-
clockwise until the tabs on the bulb
align with the slots in the socket. Pull
the bulb out of the socket.
3. Insert a new bulb in the socket.
4. Reinstall the light assembly to the body of the vehicle. High mounted stop light bulb replacement (if equipped)
If the light does not operate, we recom-
mend that the system be checked by an
authorized HYUNDAI dealer.
OLM079039
EL(FL) Eng 7.QXP 10/7/2013 9:33 AM Page 104
Page 1002 of 1534

23
Your vehicle at a glance
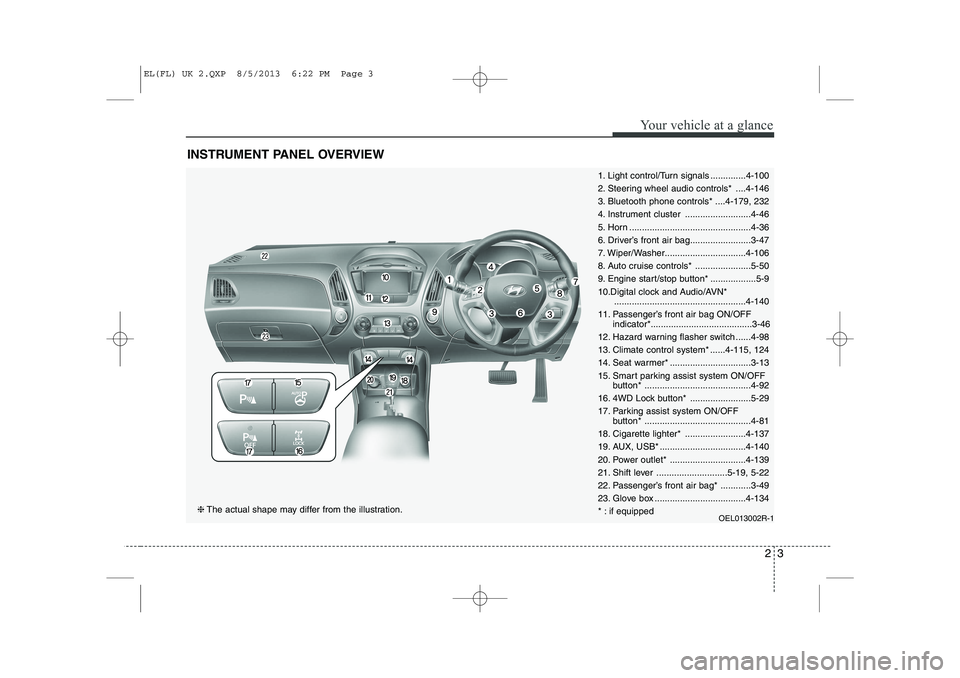
INSTRUMENT PANEL OVERVIEW
1. Light control/Turn signals ..............4-100
2. Steering wheel audio controls* ....4-146
3. Bluetooth phone controls* ....4-179, 232
4. Instrument cluster ..........................4-46
5. Horn ................................................4-36
6. Driver’s front air bag........................3-47
7. Wiper/Washer................................4-106
8. Auto cruise controls* ......................5-50
9. Engine start/stop button* ..................5-9
10.Digital clock and Audio/AVN*....................................................4-140
11. Passenger’s front air bag ON/OFF indicator*........................................3-46
12. Hazard warning flasher switch ......4-98
13. Climate control system* ......4-115, 124
14. Seat warmer* ................................3-13
15. Smart parking assist system ON/OFF button* ..........................................4-92
16. 4WD Lock button* ........................5-29
17. Parking assist system ON/OFF button* ..........................................4-81
18. Cigarette lighter* ........................4-137
19. AUX, USB* ..................................4-140
20. Power outlet* ..............................4-139
21. Shift lever ............................5-19, 5-22
22. Passenger’s front air bag* ............3-49
23. Glove box ....................................4-134
* : if equipped OEL013002R-1
❈The actual shape may differ from the illustration.
EL(FL) UK 2.QXP 8/5/2013 6:22 PM Page 3
Page 1098 of 1534

427
Features of your vehicle
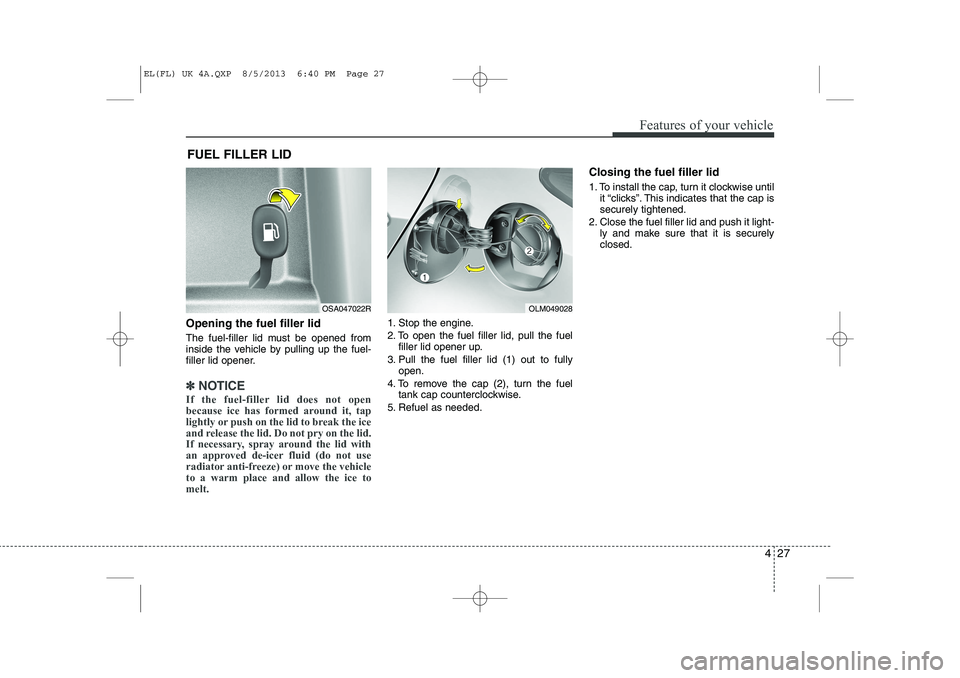
Opening the fuel filler lid
The fuel-filler lid must be opened from
inside the vehicle by pulling up the fuel-
filler lid opener.
✽✽NOTICE
If the fuel-filler lid does not open
because ice has formed around it, tap
lightly or push on the lid to break the ice
and release the lid. Do not pry on the lid.
If necessary, spray around the lid with
an approved de-icer fluid (do not use
radiator anti-freeze) or move the vehicleto a warm place and allow the ice tomelt.
1. Stop the engine.
2. To open the fuel filler lid, pull the fuel filler lid opener up.
3. Pull the fuel filler lid (1) out to fully open.
4. To remove the cap (2), turn the fuel tank cap counterclockwise.
5. Refuel as needed. Closing the fuel filler lid
1. To install the cap, turn it clockwise until
it “clicks”. This indicates that the cap is securely tightened.
2. Close the fuel filler lid and push it light- ly and make sure that it is securelyclosed.
FUEL FILLER LID
OSA047022ROLM049028
EL(FL) UK 4A.QXP 8/5/2013 6:40 PM Page 27
Page 1211 of 1534

Features of your vehicle
140
4
Digital clock (if equipped)
Whenever the battery terminals or relat-
ed fuses are disconnected, you must
reset the time.
When the ignition switch is in the ACC or
ON position, the clock buttons operate as
follows:
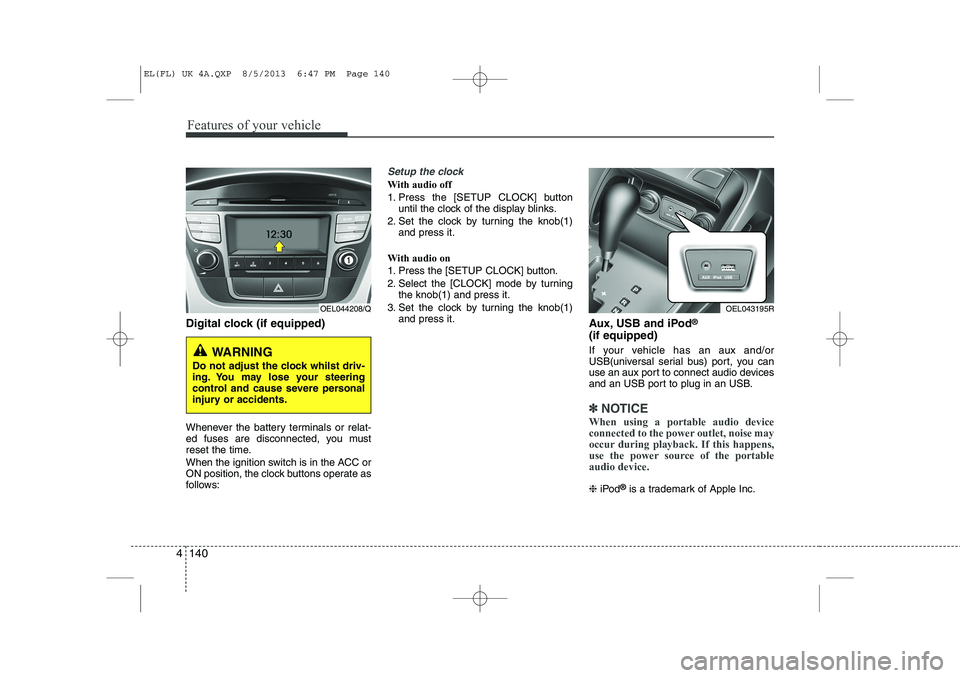
Setup the clock
With audio off
1. Press the [SETUP CLOCK] button
until the clock of the display blinks.
2. Set the clock by turning the knob(1) and press it.
With audio on
1. Press the [SETUP CLOCK] button.
2. Select the [CLOCK] mode by turning the knob(1) and press it.
3. Set the clock by turning the knob(1) and press it. Aux, USB and iPod®
(if equipped)
If your vehicle has an aux and/or
USB(universal serial bus) port, you can
use an aux port to connect audio devices
and an USB port to plug in an USB.
✽✽ NOTICE
When using a portable audio device
connected to the power outlet, noise may
occur during playback. If this happens,
use the power source of the portableaudio device.
❈ iPod ®
is a trademark of Apple Inc.
WARNING
Do not adjust the clock whilst driv-
ing. You may lose your steering
control and cause severe personal
injury or accidents.
OEL044208/QOEL043195R
EL(FL) UK 4A.QXP 8/5/2013 6:47 PM Page 140
Page 1228 of 1534

4 157
Features of your vehicle
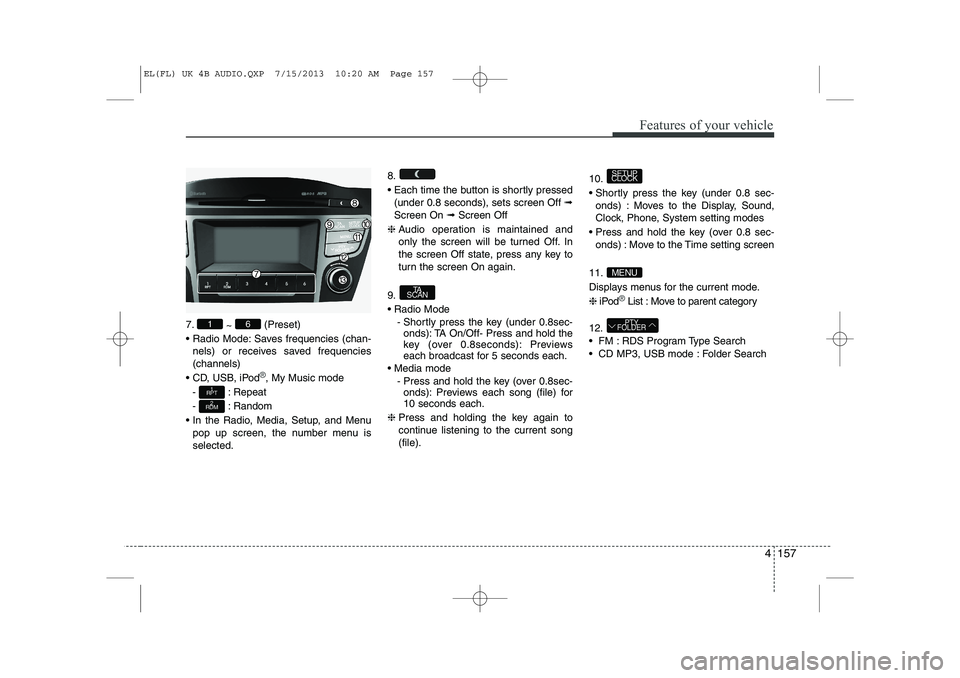
7.~ (Preset)
Radio Mode: Saves frequencies (chan- nels) or receives saved frequencies (channels)
CD, USB, iPod
®, My Music mode
- : Repeat
- : Random
In the Radio, Media, Setup, and Menu pop up screen, the number menu is selected. 8.
Each time the button is shortly pressed
(under 0.8 seconds), sets screen Off ➟
Screen On ➟Screen Off
❈ Audio operation is maintained and
only the screen will be turned Off. In
the screen Off state, press any key to
turn the screen On again.
9. Radio Mode - Shortly press the key (under 0.8sec-onds): TA On/Off- Press and hold the
key (over 0.8seconds): Previews
each broadcast for 5 seconds each.
Media mode - Press and hold the key (over 0.8sec-onds): Previews each song (file) for10 seconds each.
❈ Press and holding the key again to
continue listening to the current song(file). 10.
Shortly press the key (under 0.8 sec-
onds) : Moves to the Display, Sound,
Clock, Phone, System setting modes
Press and hold the key (over 0.8 sec- onds) : Move to the Time setting screen
11.
Displays menus for the current mode.❈ iPod
®List : Move to parent category
12.
FM : RDS Program Type Search
CD MP3, USB mode : Folder Search
PTY
FOLDER
MENU
SETUP
CLOCK
TA
SCAN
2
RDM
1
RPT
61
EL(FL) UK 4B AUDIO.QXP 7/15/2013 10:20 AM Page 157
Page 1230 of 1534
4 159
Features of your vehicle
SETUP
- AC100ELEE, AC110ELEE
Display Settings
Press the key Select [Display]
through TUNE knob or key
Select menu through TUNE knobMode Pop up
[Mode Pop up] Changes . selec- tion mode
During On state, press the or
key to display the mode
change pop up screen.
When the pop up screen is displayed, use the TUNE knob or keys
~ to select the desired mode.
Scroll text
[Scroll text] Set /
: Maintains scroll
: Scrolls only one (1) time.
Song Info
When playing an MP3 file, select the
desired display info from ‘Folder/File’ or
‘Album/Artist/Song’. Sound Settings
Press the key Select [Sound]
through TUNE knob or key
Select menu through TUNE knob
2
RDM
SETUP
CLOCK
Off
On
OffOn
6
1
MEDIA
RADIO
On
1
RPT
SETUP
CLOCK
EL(FL) UK 4B AUDIO.QXP 7/15/2013 10:20 AM Page 159