2014 HYUNDAI IX35 clock
[x] Cancel search: clockPage 368 of 1534

Maintenance
74
7
4. Remove the bulb from the socket by
pressing it in and rotating it counter-
clockwise until the tabs on the bulb
align with the slots in the socket. Pull
the bulb out of the socket.
5. Insert a new bulb by inserting it into the socket and rotating it until it locks
into place.
6. Install the socket in the assembly by aligning the tabs on the socket with the
slots in the assembly. Push the socket
into the assembly and turn the socket
clockwise.
7. Install the service cover by putting it into the service hole.
Stop and tail light (LED type)
If the light does not operate, we recom-
mend that the system be checked by an
authorised HYUNDAI dealer. Rear fog light (if equipped)
1. Remove the socket from the assembly
by turning the socket counterclockwise
until the tabs on the socket align with
the slots on the assembly.
2. Remove the bulb from the socket by pressing it in and rotating it counter-
clockwise until the tabs on the bulb
align with the slots in the socket. Pull
the bulb out of the socket.
3. Insert a new bulb in the socket.
4. Reinstall the light assembly to the body of the vehicle. High mounted stop light bulb replacement (if equipped)
If the light does not operate, we recom-
mend that the system be checked by an
authorised HYUNDAI dealer.
OLM079039
EL(FL) Aust 7.QXP 7/26/2013 2:26 PM Page 74
Page 401 of 1534

Index
4
I
Crankcase emission control system ................................7-83
Cruise control system ......................................................5-46
Cup holder......................................................................4-127
Curtain air bag ................................................................3-49 Dashboard illumination, see instrument panel
illumination ..................................................................4-47
Dashboard, see instrument cluster ..................................4-46
Day/night rearview mirror ..............................................4-39
Daytime running light ......................................................4-93
Declaration of conformity ................................................8-11
Defogging (Windscreen) ................................................4-120
Defroster (Rear window) ..............................................4-102
Defrosting (Windscreen) ................................................4-120
Digital clock ..................................................................4-129
Dimensions ........................................................................8-2Display illumination, see instrument panel illumination ..................................................................4-47
Displays, see instrument cluster ......................................4-46
Door locks ........................................................................4-15 Central door lock switch ............................................4-16
Child-protector rear door lock....................................4-18
Downhill brake control (DBC) ........................................5-41
Drinks holders, see cup holders ....................................4-127
Driver’s and passenger’s front air bag ............................3-45
Driving at night ................................................................5-54 Driving in flooded areas ..................................................5-55
Driving in the rain ............................................................5-55
Economical operation ......................................................5-51
Electric chromic mirror (ECM) ......................................4-39
Electric chromic mirror (ECM) with compass ................4-40
Electric power steering ....................................................4-34
Electronic stability control (ESC) ....................................5-36
Emergency starting ............................................................6-5
Jump starting ................................................................6-5
Emergency Stop Signal (ESS) ........................................5-43
Emission control system ..................................................7-83 Crankcase emission control system ..........................7-83
Evaporative emission control system ........................7-83
Exhaust emission control system ..............................7-84
Engine ................................................................................8-2
Engine compartment ..........................................................2-4
Engine coolant ................................................................7-23
Engine Coolant Temperature gauge ................................4-49
Engine number ................................................................8-10
Engine oil ........................................................................7-22
Engine overheats ................................................................6-7
Engine start/stop button ....................................................5-9
Evaporative emission control system ..............................7-83
Exhaust emission control system ....................................7-84
Explanation of scheduled maintenance items ..................7-19
E
D
EL(FL) Aust Index.qxp 7/26/2013 2:14 PM Page 4
Page 403 of 1534

Index
6
I
Icy Road Warning Light ..................................................4-51
If the engine will not start ..................................................6-4
In case of an emergency whilst driving ............................6-3
Information Mode ............................................................4-54
Inside rearview mirror ....................................................4-39
Instrument cluster ............................................................4-46
Gauges ........................................................................4-48
Instrument panel illumination ....................................4-47
LCD Display Control ................................................4-47
Transaxle Shift Indicator ............................................4-52
Instrument panel fuse ......................................................7-52
Instrument panel overview ................................................2-3
Interior care ......................................................................7-82
Interior features ..............................................................4-126 Ashtray ....................................................................4-126Aux, USB and iPod ®
................................................4-129
Cargo security screen ..............................................4-131
Cigarette lighter ........................................................4-126
Cup holder ................................................................4-127
Digital clock ............................................................4-129
Floor mat anchor(s) ..................................................4-130
Luggage net (holder) ................................................4-130
Power outlet..............................................................4-128
Sun visor ..................................................................4-127
Interior light ....................................................................4-99 Glove box lamp ........................................................4-101 Luggage room lamp ................................................4-100
Map lamp....................................................................4-99
Room lamp ..............................................................4-100
Vanity mirror lamp ..................................................4-100
Interior overview ................................................................2-2
ISOFIX system ................................................................3-36
Jack and tools ....................................................................6-8
Jump starting ......................................................................6-5
Key positions ....................................................................5-5
Keys ..................................................................................4-4
I
J
K
EL(FL) Aust Index.qxp 7/26/2013 2:14 PM Page 6
Page 420 of 1534

Your vehicle at a glance
4
2
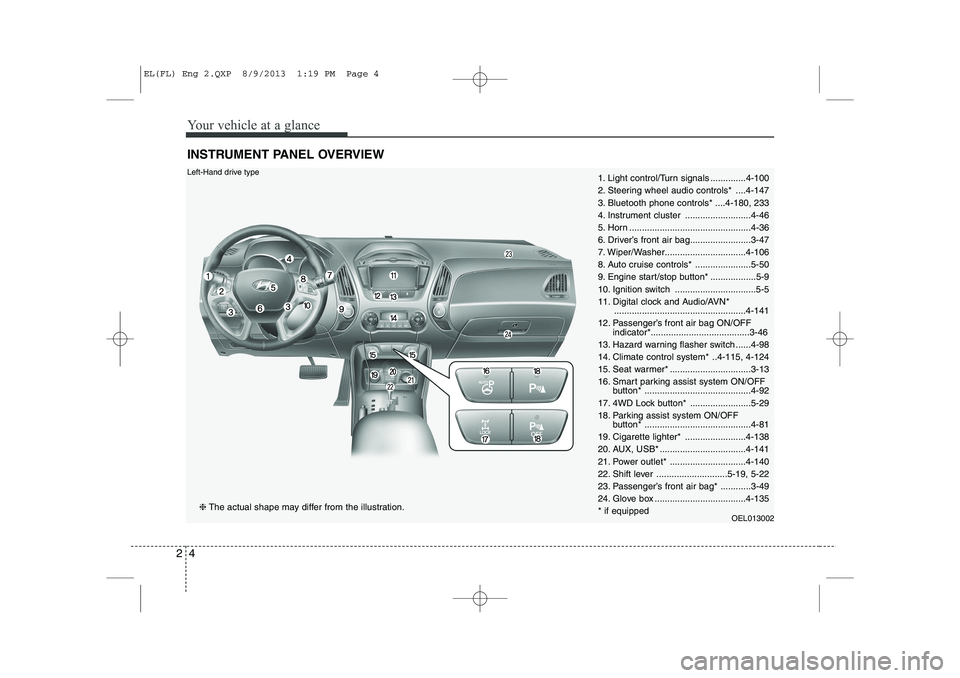
INSTRUMENT PANEL OVERVIEW
1. Light control/Turn signals ..............4-100
2. Steering wheel audio controls* ....4-147
3. Bluetooth phone controls* ....4-180, 233
4. Instrument cluster ..........................4-46
5. Horn ................................................4-36
6. Driver’s front air bag........................3-47
7. Wiper/Washer................................4-106
8. Auto cruise controls* ......................5-50
9. Engine start/stop button* ..................5-9
10. Ignition switch ................................5-5
11. Digital clock and Audio/AVN*
....................................................4-141
12. Passenger’s front air bag ON/OFF indicator*.......................................3-46
13. Hazard warning flasher switch ......4-98
14. Climate control system* ..4-115, 4-124
15. Seat warmer* ................................3-13
16. Smart parking assist system ON/OFF button* ..........................................4-92
17. 4WD Lock button* ........................5-29
18. Parking assist system ON/OFF button* ..........................................4-81
19. Cigarette lighter* ........................4-138
20. AUX, USB* ..................................4-141
21. Power outlet* ..............................4-140
22. Shift lever ............................5-19, 5-22
23. Passenger’s front air bag* ............3-49
24. Glove box ....................................4-135* if equipped OEL013002Left-Hand drive type
❈The actual shape may differ from the illustration.
EL(FL) Eng 2.QXP 8/9/2013 1:19 PM Page 4
Page 421 of 1534

25
Your vehicle at a glance
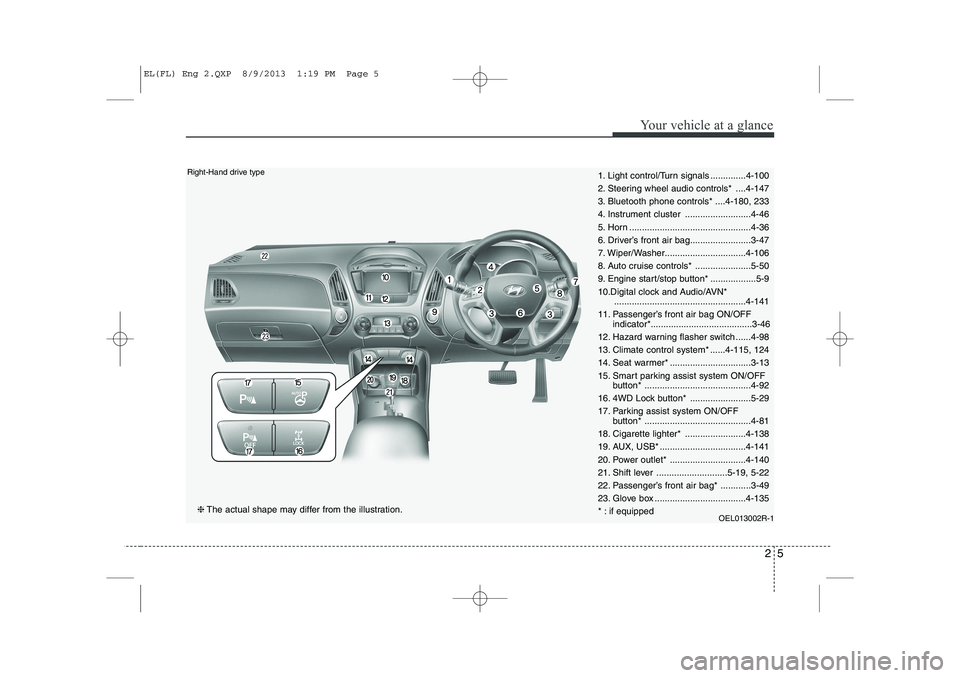
1. Light control/Turn signals ..............4-100
2. Steering wheel audio controls* ....4-147
3. Bluetooth phone controls* ....4-180, 233
4. Instrument cluster ..........................4-46
5. Horn ................................................4-36
6. Driver’s front air bag........................3-47
7. Wiper/Washer................................4-106
8. Auto cruise controls* ......................5-50
9. Engine start/stop button* ..................5-9
10.Digital clock and Audio/AVN*....................................................4-141
11. Passenger’s front air bag ON/OFF indicator*........................................3-46
12. Hazard warning flasher switch ......4-98
13. Climate control system* ......4-115, 124
14. Seat warmer* ................................3-13
15. Smart parking assist system ON/OFF button* ..........................................4-92
16. 4WD Lock button* ........................5-29
17. Parking assist system ON/OFF button* ..........................................4-81
18. Cigarette lighter* ........................4-138
19. AUX, USB* ..................................4-141
20. Power outlet* ..............................4-140
21. Shift lever ............................5-19, 5-22
22. Passenger’s front air bag* ............3-49
23. Glove box ....................................4-135
* : if equipped OEL013002R-1Right-Hand drive type
❈The actual shape may differ from the illustration.
EL(FL) Eng 2.QXP 8/9/2013 1:19 PM Page 5
Page 517 of 1534

427
Features of your vehicle
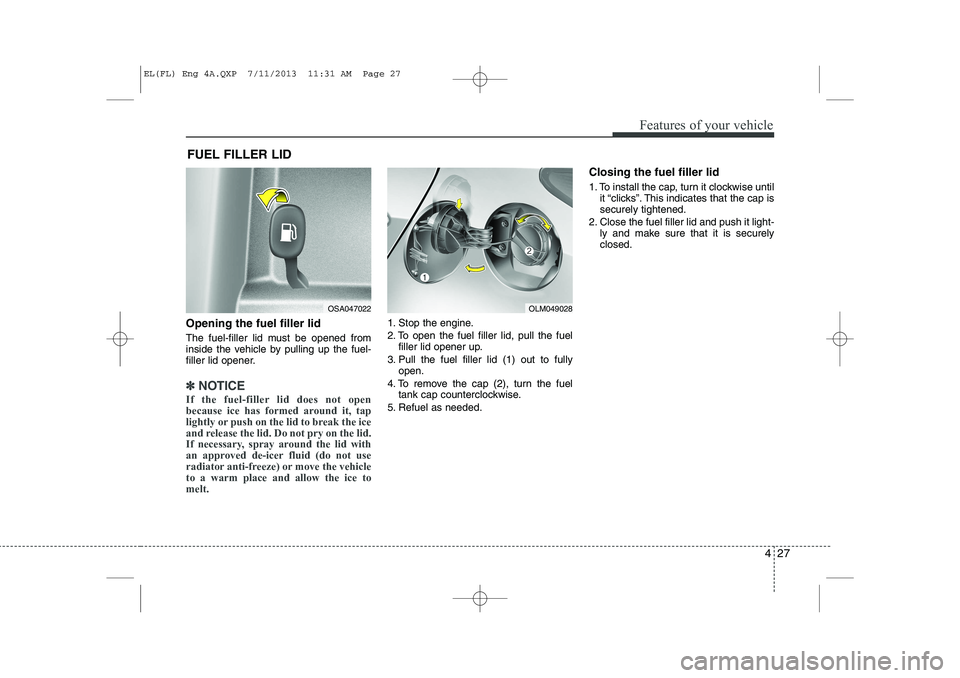
Opening the fuel filler lid
The fuel-filler lid must be opened from
inside the vehicle by pulling up the fuel-
filler lid opener.
✽✽NOTICE
If the fuel-filler lid does not open
because ice has formed around it, tap
lightly or push on the lid to break the ice
and release the lid. Do not pry on the lid.
If necessary, spray around the lid with
an approved de-icer fluid (do not use
radiator anti-freeze) or move the vehicleto a warm place and allow the ice tomelt.
1. Stop the engine.
2. To open the fuel filler lid, pull the fuel filler lid opener up.
3. Pull the fuel filler lid (1) out to fully open.
4. To remove the cap (2), turn the fuel tank cap counterclockwise.
5. Refuel as needed. Closing the fuel filler lid
1. To install the cap, turn it clockwise until
it “clicks”. This indicates that the cap is securely tightened.
2. Close the fuel filler lid and push it light- ly and make sure that it is securelyclosed.
FUEL FILLER LID
OSA047022OLM049028
EL(FL) Eng 4A.QXP 7/11/2013 11:31 AM Page 27
Page 631 of 1534

Digital clock (if equipped)
Whenever the battery terminals or relat-
ed fuses are disconnected, you must
reset the time.
When the ignition switch is in the ACC or
ON position, the clock buttons operate as
follows:
Setup the clock
With audio off
1. Press the [SETUP CLOCK] buttonuntil the clock of the display blinks.
2. Set the clock by turning the knob(1) and press it.
With audio on
1. Press the [SETUP CLOCK] button.
2. Select the [CLOCK] mode by turning the knob(1) and press it.
3. Set the clock by turning the knob(1) and press it. Aux, USB and iPod®
(if equipped)
If your vehicle has an aux and/or
USB(universal serial bus) port, you can
use an aux port to connect audio devices
and an USB port to plug in an USB.
✽✽ NOTICE
When using a portable audio device
connected to the power outlet, noise may
occur during playback. If this happens,
use the power source of the portableaudio device.
❈ iPod ®
is a trademark of Apple Inc.
Features of your vehicle
141
4
OEL044208/Q
WARNING
Do not adjust the clock while driv-
ing. You may lose your steering
control and cause severe personal
injury or accidents.
OEL043195
EL(FL) Eng 4A.QXP 7/11/2013 11:39 AM Page 141
Page 648 of 1534

Features of your vehicle
158
4
7.
~ (Preset)
Radio Mode: Saves frequencies (chan- nels) or receives saved frequencies (channels)
CD, USB, iPod
®, My Music mode
- : Repeat
- : Random
In the Radio, Media, Setup, and Menu pop up screen, the number menu is selected. 8.
Each time the button is shortly pressed
(under 0.8 seconds), sets screen Off ➟
Screen On ➟Screen Off
❈ Audio operation is maintained and
only the screen will be turned Off. In
the screen Off state, press any key to
turn the screen On again.
9. Radio Mode - Shortly press the key (under 0.8sec-onds): TA On/Off- Press and hold the
key (over 0.8seconds): Previews
each broadcast for 5 seconds each.
Media mode - Press and hold the key (over 0.8sec-onds): Previews each song (file) for10 seconds each.
❈ Press and holding the key again to
continue listening to the current song(file). 10.
Shortly press the key (under 0.8 sec-
onds) : Moves to the Display, Sound,
Clock, Phone, System setting modes
Press and hold the key (over 0.8 sec- onds) : Move to the Time setting screen
11.
Displays menus for the current mode.❈ iPod
®List : Move to parent category
12.
FM : RDS Program Type Search
CD MP3, USB mode : Folder Search
PTY
FOLDER
MENU
SETUP
CLOCK
TA
SCAN
2
RDM
1
RPT
61
EL(FL) Eng 4B AUDIO.QXP 7/11/2013 11:20 AM Page 158