Page 424 of 1534
Your vehicle at a glance
8
2
OEL070302
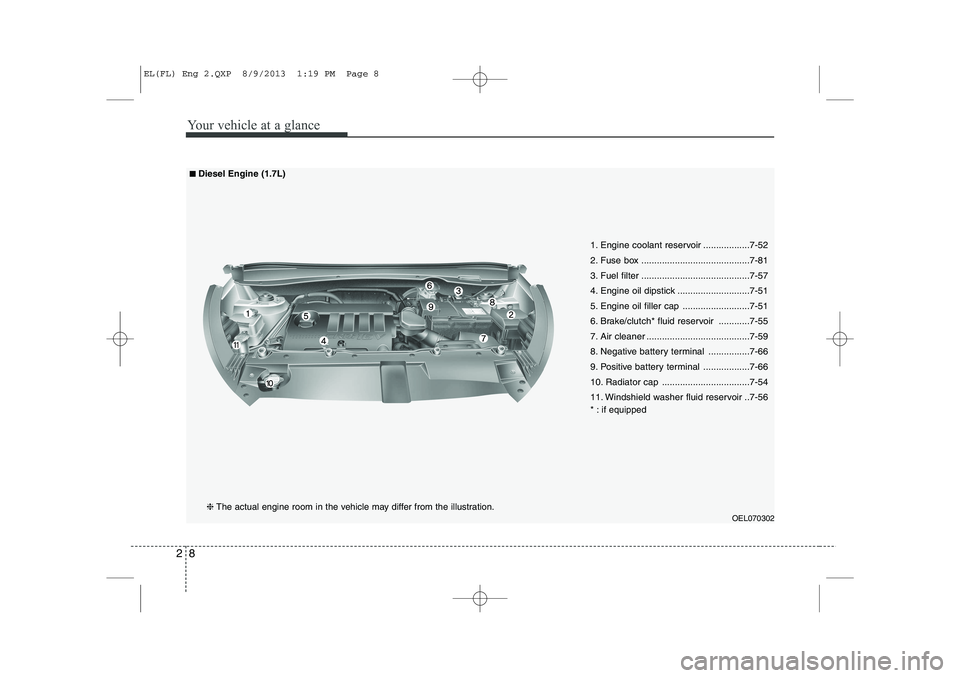
1. Engine coolant reservoir ..................7-52
2. Fuse box ..........................................7-81
3. Fuel filter ..........................................7-57
4. Engine oil dipstick ............................7-51
5. Engine oil filler cap ..........................7-51
6. Brake/clutch* fluid reservoir ............7-55
7. Air cleaner ........................................7-59
8. Negative battery terminal ................7-66
9. Positive battery terminal ..................7-66
10. Radiator cap ..................................7-54
11. Windshield washer fluid reservoir ..7-56
* : if equipped
■■
Diesel Engine (1.7L)
❈ The actual engine room in the vehicle may differ from the illustration.
EL(FL) Eng 2.QXP 8/9/2013 1:19 PM Page 8
Page 425 of 1534
29
Your vehicle at a glance
OLM079002
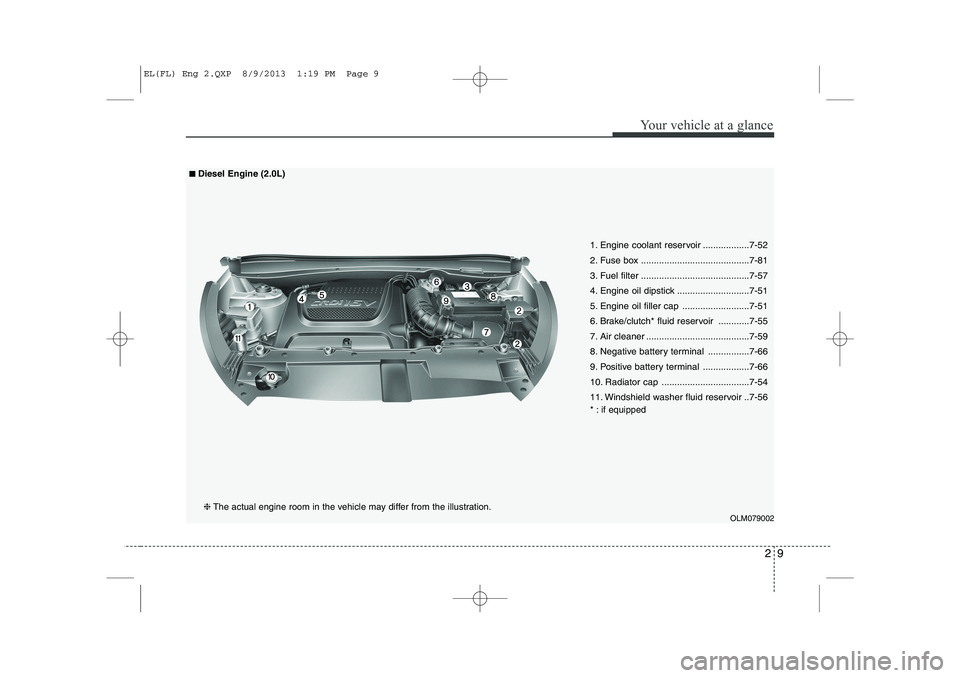
1. Engine coolant reservoir ..................7-52
2. Fuse box ..........................................7-81
3. Fuel filter ..........................................7-57
4. Engine oil dipstick ............................7-51
5. Engine oil filler cap ..........................7-51
6. Brake/clutch* fluid reservoir ............7-55
7. Air cleaner ........................................7-59
8. Negative battery terminal ................7-66
9. Positive battery terminal ..................7-66
10. Radiator cap ..................................7-54
11. Windshield washer fluid reservoir ..7-56
* : if equipped
■■Diesel Engine (2.0L)
❈ The actual engine room in the vehicle may differ from the illustration.
EL(FL) Eng 2.QXP 8/9/2013 1:19 PM Page 9
Page 517 of 1534
427
Features of your vehicle
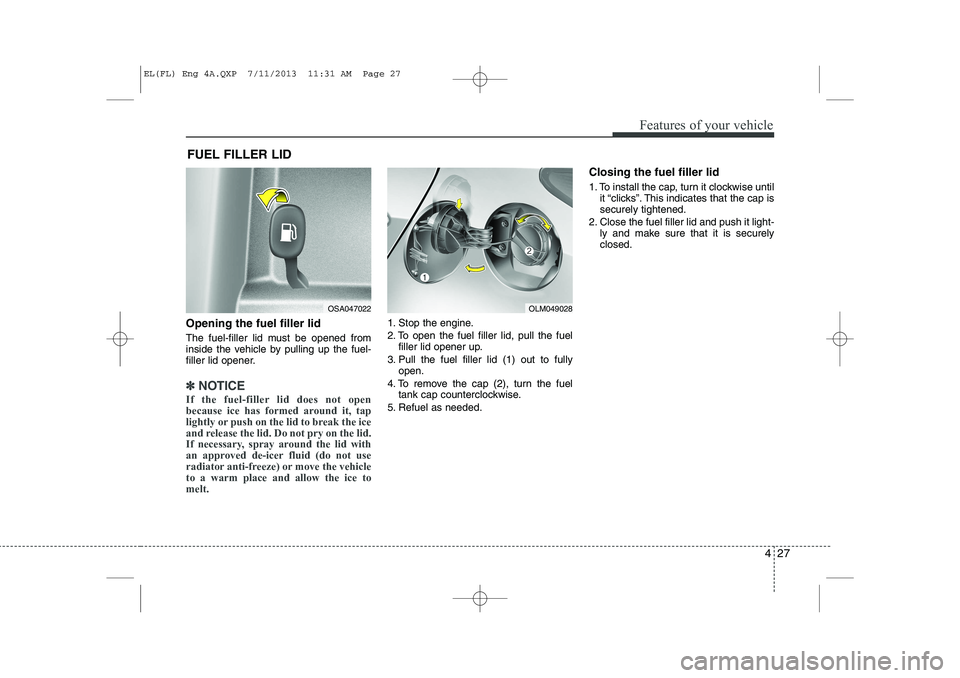
Opening the fuel filler lid
The fuel-filler lid must be opened from
inside the vehicle by pulling up the fuel-
filler lid opener.
✽✽NOTICE
If the fuel-filler lid does not open
because ice has formed around it, tap
lightly or push on the lid to break the ice
and release the lid. Do not pry on the lid.
If necessary, spray around the lid with
an approved de-icer fluid (do not use
radiator anti-freeze) or move the vehicleto a warm place and allow the ice tomelt.
1. Stop the engine.
2. To open the fuel filler lid, pull the fuel filler lid opener up.
3. Pull the fuel filler lid (1) out to fully open.
4. To remove the cap (2), turn the fuel tank cap counterclockwise.
5. Refuel as needed. Closing the fuel filler lid
1. To install the cap, turn it clockwise until
it “clicks”. This indicates that the cap is securely tightened.
2. Close the fuel filler lid and push it light- ly and make sure that it is securelyclosed.
FUEL FILLER LID
OSA047022OLM049028
EL(FL) Eng 4A.QXP 7/11/2013 11:31 AM Page 27
Page 518 of 1534
Features of your vehicle
28
4
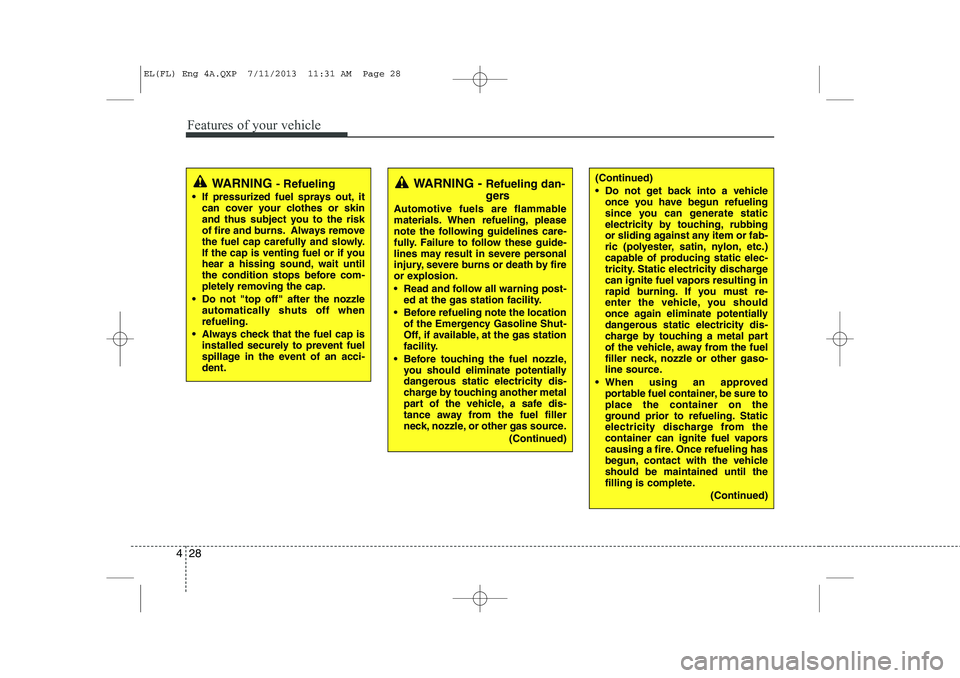
WARNING - Refueling
If pressurized fuel sprays out, it can cover your clothes or skin
and thus subject you to the risk
of fire and burns. Always remove
the fuel cap carefully and slowly.
If the cap is venting fuel or if you
hear a hissing sound, wait until
the condition stops before com-
pletely removing the cap.
Do not "top off" after the nozzle automatically shuts off whenrefueling.
Always check that the fuel cap is installed securely to prevent fuel
spillage in the event of an acci-dent.(Continued)
Do not get back into a vehicle once you have begun refueling
since you can generate static
electricity by touching, rubbing
or sliding against any item or fab-
ric (polyester, satin, nylon, etc.)
capable of producing static elec-
tricity. Static electricity discharge
can ignite fuel vapors resulting in
rapid burning. If you must re-
enter the vehicle, you should
once again eliminate potentially
dangerous static electricity dis-
charge by touching a metal part
of the vehicle, away from the fuel
filler neck, nozzle or other gaso-
line source.
When using an approved portable fuel container, be sure toplace the container on the
ground prior to refueling. Static
electricity discharge from the
container can ignite fuel vapors
causing a fire. Once refueling has
begun, contact with the vehicleshould be maintained until the
filling is complete.
(Continued)WARNING - Refueling dan-
gers
Automotive fuels are flammable
materials. When refueling, please
note the following guidelines care-
fully. Failure to follow these guide-
lines may result in severe personal
injury, severe burns or death by fire
or explosion.
Read and follow all warning post- ed at the gas station facility.
Before refueling note the location of the Emergency Gasoline Shut-
Off, if available, at the gas station
facility.
Before touching the fuel nozzle, you should eliminate potentially
dangerous static electricity dis-
charge by touching another metal
part of the vehicle, a safe dis-
tance away from the fuel filler
neck, nozzle, or other gas source.
(Continued)
EL(FL) Eng 4A.QXP 7/11/2013 11:31 AM Page 28
Page 519 of 1534

429
Features of your vehicle
(Continued)Use only portable plastic fuel
containers designed to carry and
store gasoline.
Do not use cellular phones while refueling. Electric current and/or
electronic interference from cel-
lular phones can potentially
ignite fuel vapors causing a fire.
When refueling, always shut the engine off. Sparks produced byelectrical components related to
the engine can ignite fuel vapors
causing a fire. Once refueling is
complete, check to make sure thefiller cap and filler door are
securely closed, before starting
the engine.
DO NOT use matches or a lighter and DO NOT SMOKE or leave a lit
cigarette in your vehicle while at
a gas station especially during
refueling. Automotive fuel is
highly flammable and can, when
ignited, result in fire.
(Continued)(Continued)
If a fire breaks out during refuel-ing, leave the vicinity of the vehi-
cle, and immediately contact the
manager of the gas station and
then contact the local fire depart-
ment. Follow any safety instruc-
tions they provide.CAUTION
Make sure to refuel your vehicle
according to the "Fuel require-
ments" suggested in section 1.
If the fuel filler cap requires replacement, we recommend thatyou use parts for replacement
from an authorized HYUNDAIdealer. An incorrect fuel filler cap can result in a serious malfunc-tion of the fuel system or emis-
sion control system.
Do not spill fuel on the exterior surfaces of the vehicle. Any typeof fuel spilled on painted surfaces
may damage the paint.
After refueling, make sure the fuel cap is installed securely to pre-vent fuel spillage in the event ofan accident.
EL(FL) Eng 4A.QXP 7/11/2013 11:31 AM Page 29
Page 540 of 1534
Features of your vehicle
50
4
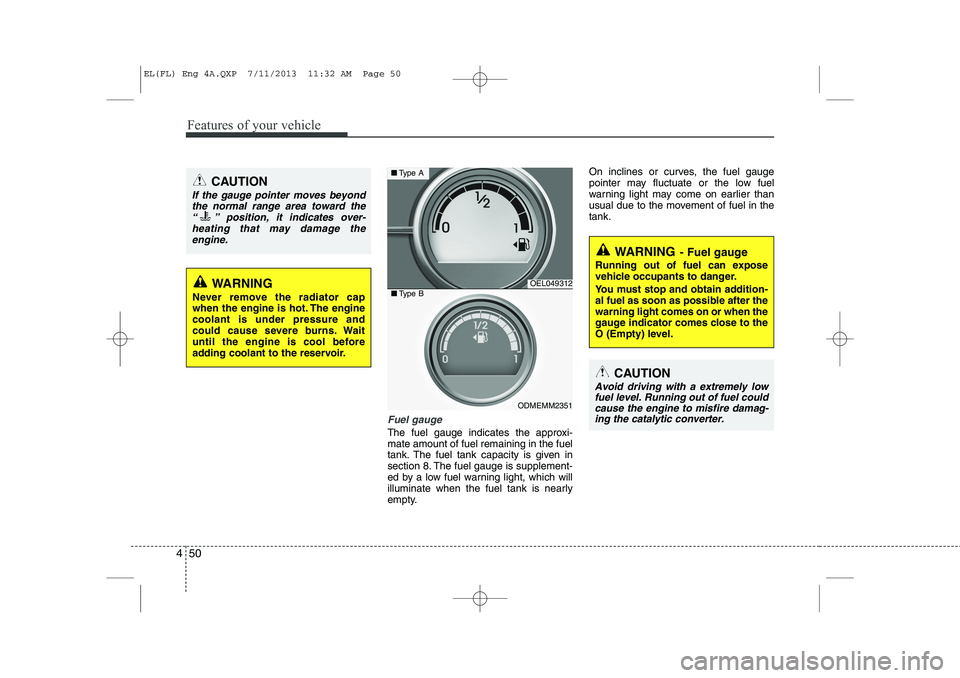
Fuel gauge
The fuel gauge indicates the approxi- mate amount of fuel remaining in the fuel
tank. The fuel tank capacity is given in
section 8. The fuel gauge is supplement-
ed by a low fuel warning light, which will
illuminate when the fuel tank is nearly
empty. On inclines or curves, the fuel gauge
pointer may fluctuate or the low fuel
warning light may come on earlier than
usual due to the movement of fuel in thetank.
CAUTION
If the gauge pointer moves beyond
the normal range area toward the
“ ” position, it indicates over-heating that may damage theengine.
WARNING
Never remove the radiator cap
when the engine is hot. The enginecoolant is under pressure and
could cause severe burns. Wait
until the engine is cool before
adding coolant to the reservoir.OEL049312
ODMEMM2351
■ Type A
■Type B
WARNING - Fuel gauge
Running out of fuel can expose
vehicle occupants to danger.
You must stop and obtain addition-
al fuel as soon as possible after thewarning light comes on or when the
gauge indicator comes close to the
O (Empty) level.
CAUTION
Avoid driving with a extremely low fuel level. Running out of fuel could cause the engine to misfire damag-ing the catalytic converter.
EL(FL) Eng 4A.QXP 7/11/2013 11:32 AM Page 50
Page 828 of 1534
This section will guide you in the proper
loading of your vehicle and/or trailer, to
keep your loaded vehicle weight within its
design rating capability, with or without a
trailer. Properly loading your vehicle will
provide maximum return of the vehicle
design performance. Before loading your
vehicle, familiarize yourself with the fol-
lowing terms for determining your vehi-
cle's weight ratings, with or without a
trailer, from the vehicle's specifications
and the certification label: Base curb weight
This is the weight of the vehicle including a full tank of fuel and all standard equip-
ment. It does not include passengers,
cargo, or optional equipment.
Vehicle curb weight
This is the weight of your new vehicle
when you picked it up from your dealer
plus any aftermarket equipment.
Cargo weight
This figure includes all weight added to
the Base Curb Weight, including cargoand optional equipment.GAW (Gross axle weight)
This is the total weight placed on each
axle (front and rear) - including vehicle
curb weight and all payload.
GAWR (Gross axle weight rating)
This is the maximum allowable weight
that can be carried by a single axle (front
or rear). These numbers are shown on
the certification label.
The total load on each axle must never
exceed its GAWR.
GVW (Gross vehicle weight)
This is the Base Curb Weight plus actual
Cargo Weight plus passengers.
GVWR (Gross vehicle weight rat- ing)
This is the maximum allowable weight of
the fully loaded vehicle (including all
options, equipment, passengers and
cargo). The GVWR is shown on the cer-tification label.
Overloading
VEHICLE WEIGHT
WARNING -
Vehicle weight
The gross axle weight rating
(GAWR) and the gross vehicle
weight rating (GVWR) for your vehi-
cle are on the certification label
attached to the driver's (or front
passenger’s) door. Exceedingthese ratings can cause an acci-
dent or vehicle damage. You can
calculate the weight of your load byweighing the items (and people)
before putting them in the vehicle.
Be careful not to overload your
vehicle.
574
Driving your vehicle
EL(FL) Eng 5.QXP 7/11/2013 11:05 AM Page 74
Page 870 of 1534
75
Maintenance
OEL070302
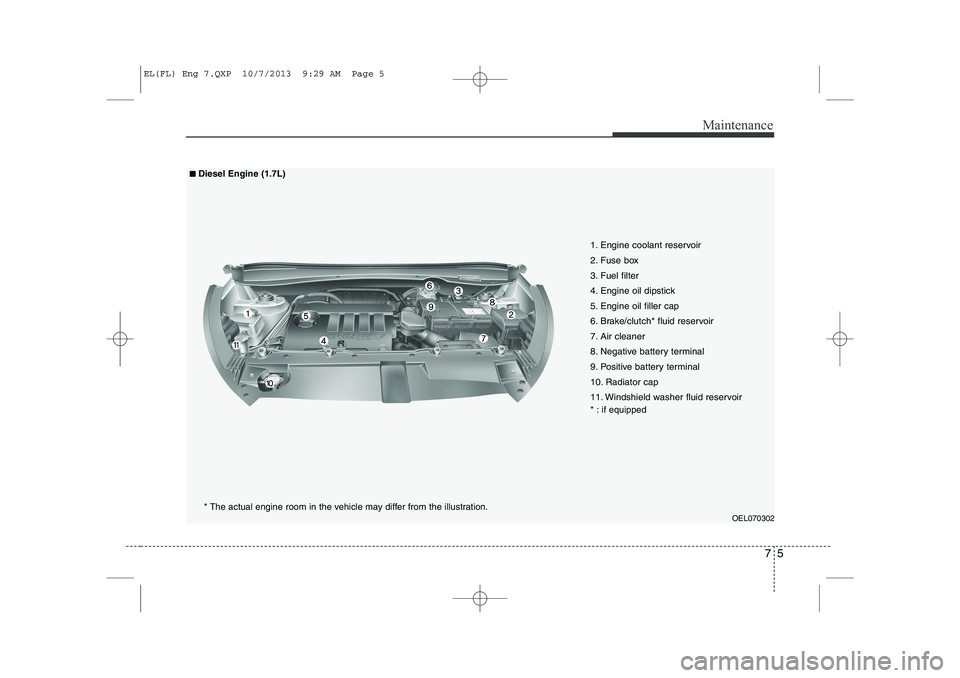
1. Engine coolant reservoir
2. Fuse box
3. Fuel filter
4. Engine oil dipstick
5. Engine oil filler cap
6. Brake/clutch* fluid reservoir
7. Air cleaner
8. Negative battery terminal
9. Positive battery terminal
10. Radiator cap
11. Windshield washer fluid reservoir
* : if equipped
■■Diesel Engine (1.7L)
* The actual engine room in the vehicle may differ from the illustration.
EL(FL) Eng 7.QXP 10/7/2013 9:29 AM Page 5