Page 462 of 573

461
Maintenance
This chapter discusses basic maintenance.
Before Performing Maintenance
Inspection and Maintenance ............ 462Safety When Performing Maintenance..... 463Parts and Fluids Used in Maintenance
Service ........................................... 464
Maintenance Minder
TM..................... 465
Maintenance Under the Hood
Maintenance Items Under the Hood ..... 469Opening the Hood ........................... 471
Recommended Engine Oil ................ 472
Oil Check ......................................... 473
Adding Engine Oil ............................ 475Changing the Engine Oil and Oil Filter ....476
Engine Coolant ................................ 478
Transmission Fluid ............................ 480
Brake Fluid ....................................... 481
Power Steering Fluid Check
*............ 482
Refilling Window Washer Fluid......... 483
Replacing Light Bulbs....................... 484
Checking and Maintaining Wiper Blades
... 493
Checking and Maintaining Tires
Checking Tires ................................. 497Tire and Loading Information Label ...... 498Tire Labeling .................................... 498DOT Tire Quality Grading (U.S. Vehicles)....... 500Wear Indicators................................ 502Tire Service Life ................................ 502
Tire and Wheel Replacement ........... 503
Tire Rotation .................................... 504
Winter Tires ..................................... 505
Battery............................................... 506
Remote Transmitter Care................. 507
Replacing the Button Battery ........... 507
Heating and Cooling System
*/Climate
Control System
* Maintenance....... 509
Cleaning
Interior Care .................................... 510
Exterior Care.................................... 512
* Not available on all models
Page 463 of 573

462Maintenance
Before Performing MaintenanceInspection and MaintenanceFor your safety, perform all listed inspections and maintenance to keep your vehicle
in good condition. If you become aware of any abnormality (noise, smell, insufficient
brake fluid, oil residue on the ground, etc.), have your vehicle inspected by a dealer.
(Note, however, that service at a dealer is not mandatory to keep your warranties in
effect.) Refer to the separate maintenance booklet for detailed maintenance and
inspection information.■Daily inspections
Perform inspections before long distance trips, when washing the vehicle, or when
refueling.■Periodic inspections
•Check the brake fluid level monthly.2Checking the Brake Fluid P. 481
•Check the tire pressure monthly. Examine the tread for wear and foreign objects.
2Checking and Maintaining Tires P. 497
•Check the operation of the exterior lights monthly.
2Replacing Light Bulbs P. 484
•Check the condition of the wiper blades at least every six months.
2Checking and Maintaining Wiper Blades P. 493
■Types of Inspection and Maintenance
1Inspection and Maintenance
Maintenance, replacement, or repair of
emissions control devices and systems may be
done by any automotive repair establishment or
individuals using parts that are “certified” to
EPA standards.
According to state and federal regulations, failure to
perform maintenance on the maintenance main
items marked with # will not void your emissions
warranties. However, all maintenance services should
be performed in accordance with the intervals
indicated by the information display.
2Maintenance Service Items P. 467
If you want to perform complex maintenance tasks
that require more skills and tools, you can purchase a
subscription to the Service Express website at
www.techinfo.honda.com.
2Authorized Manuals P. 557
If you want to perform maintenance yourself, make
sure that you have the necessary tools and skills first.
After performing maintenance, update the records in
the separate maintenance booklet.U.S. models
Page 466 of 573

465
Continued
Maintenance
Maintenance Minder
TM
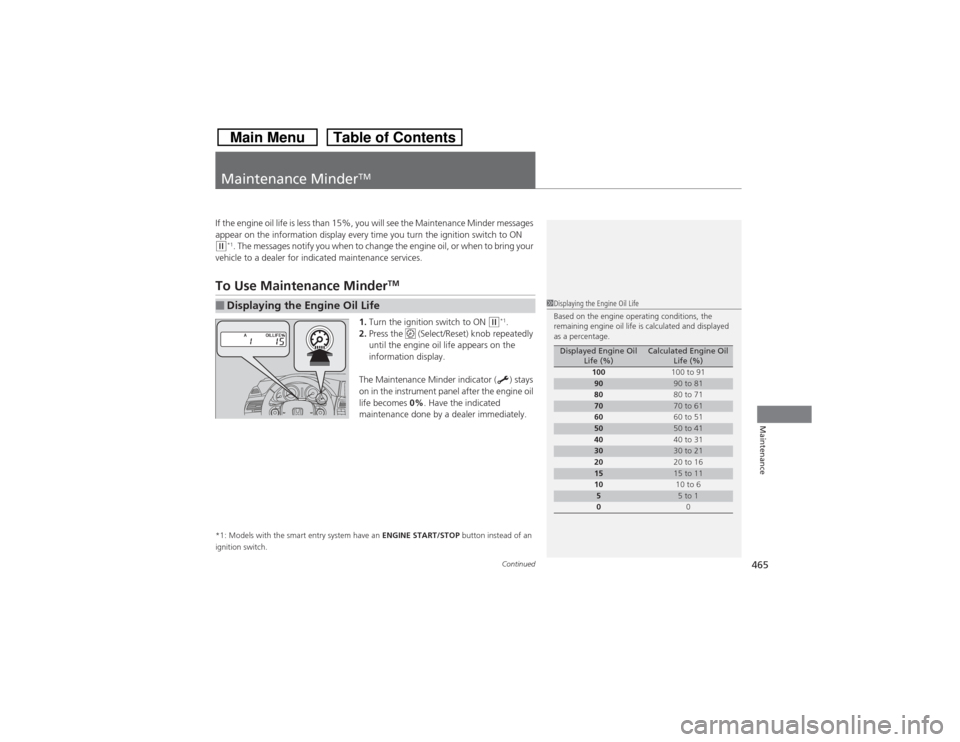
If the engine oil life is less than 15%, you will see the Maintenance Minder messages
appear on the information display every time you turn the ignition switch to ON (w*1. The messages notify you when to change the engine oil, or when to bring your
vehicle to a dealer for indicated maintenance services.
To Use Maintenance Minder
TM
1.Turn the ignition switch to ON
(w*1.
2.Press the (Select/Reset) knob repeatedly
until the engine oil life appears on the
information display.
The Maintenance Minder indicator ( ) stays
on in the instrument panel after the engine oil
life becomes 0%. Have the indicated
maintenance done by a dealer immediately.
*1: Models with the smart entry system have an ENGINE START/STOP button instead of an
ignition switch.■Displaying the Engine Oil Life
1Displaying the Engine Oil Life
Based on the engine operating conditions, the
remaining engine oil life is calculated and displayed
as a percentage.
Displayed Engine Oil
Life (%)
Calculated Engine Oil
Life (%)
100100 to 91
90
90 to 81
8080 to 71
70
70 to 61
6060 to 51
50
50 to 41
4040 to 31
30
30 to 21
2020 to 16
15
15 to 11
1010 to 6
5
5 to 1
00
Page 467 of 573

466
uuMaintenance Minder
TMuTo Use Maintenance Minder
TM
Maintenance
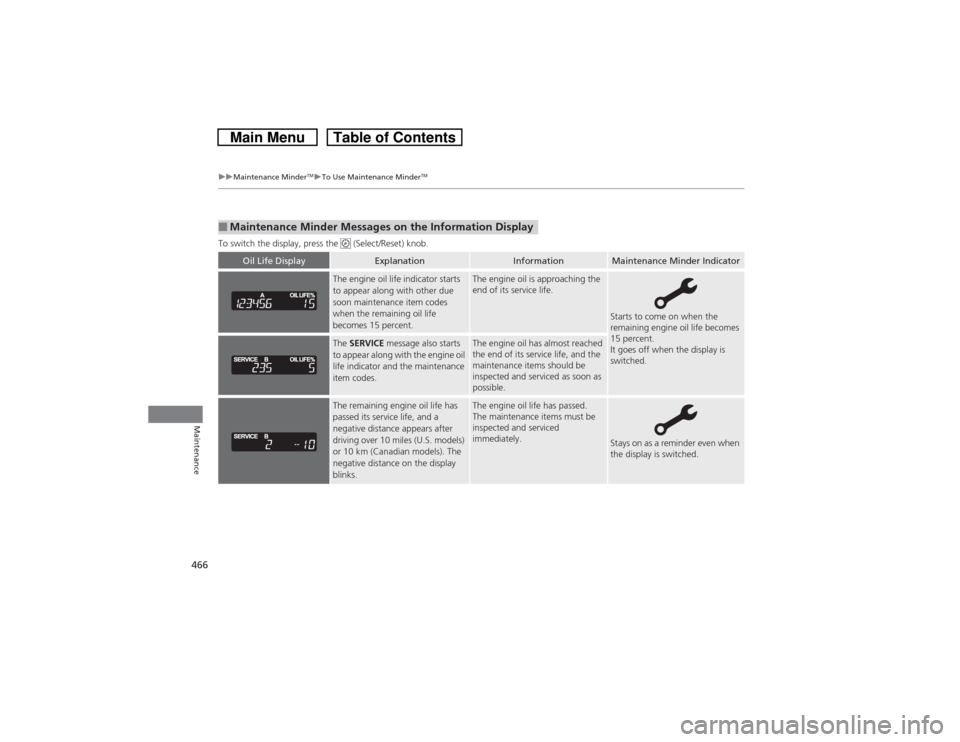
To switch the display, press the (Select/Reset) knob.■Maintenance Minder Messages on the Information Display
Oil Life Display
Explanation
Information
Maintenance Minder Indicator
The engine oil life indicator starts
to appear along with other due
soon maintenance item codes
when the remaining oil life
becomes 15 percent.
The engine oil is approaching the
end of its service life.
Starts to come on when the
remaining engine oil life becomes
15 percent.
It goes off when the display is
switched.
The SERVICE message also starts
to appear along with the engine oil
life indicator and the maintenance
item codes.
The engine oil has almost reached
the end of its service life, and the
maintenance items should be
inspected and serviced as soon as
possible.
The remaining engine oil life has
passed its service life, and a
negative distance appears after
driving over 10 miles (U.S. models)
or 10 km (Canadian models). The
negative distance on the display
blinks.
The engine oil life has passed.
The maintenance items must be
inspected and serviced
immediately.
Stays on as a reminder even when
the display is switched.
Page 469 of 573

uuMaintenance Minder
TMuTo Use Maintenance Minder
TM
468Maintenance
Reset the engine oil life display if you have performed the maintenance service.
1.Turn the ignition switch to ON
(w*1.
2.Display the engine oil life by repeatedly
pressing the (Select/Reset) knob.
3.Press and hold the knob for ten seconds
or more.
uThe engine oil life indicator and the
maintenance item codes blink.
4.Press the knob for five seconds or more.
uThe displayed maintenance items
disappear, and the engine oil life display
returns to 100%.
*1: Models with the smart entry system have an ENGINE START/STOP button instead of an
ignition switch.■Resetting the Display
1Resetting the DisplayNOTICEFailure to reset the engine oil life after a maintenance
service results in the system showing incorrect
maintenance intervals, which can lead to serious
mechanical problems.
The dealer will reset the engine oil life display after
completing the required maintenance service. If
someone other than a dealer performs maintenance
service, reset the engine oil life display yourself.
You can reset the engine oil life display using the
audio/information screen.
2Customized Features
* P. 281
Models with audio/information screen
* Not available on all models
Page 474 of 573
473
uuMaintenance Under the HooduOil Check
Continued
Maintenance
Oil CheckWe recommend that you check the engine oil level every time you refuel.
Park the vehicle on level ground.
Wait approximately three minutes after turning the engine off before you check the
oil.
1.Remove the dipstick (orange handle).
2.Wipe the dipstick with a clean cloth or
paper towel.
3.Insert the dipstick back all the way into its
hole.
1Oil Check
If the oil level is near or below the lower mark, slowly
add oil being careful not to overfill.
4-cylinder models6-cylinder models
Page 478 of 573

477
uuMaintenance Under the HooduChanging the Engine Oil and Oil Filter
Maintenance
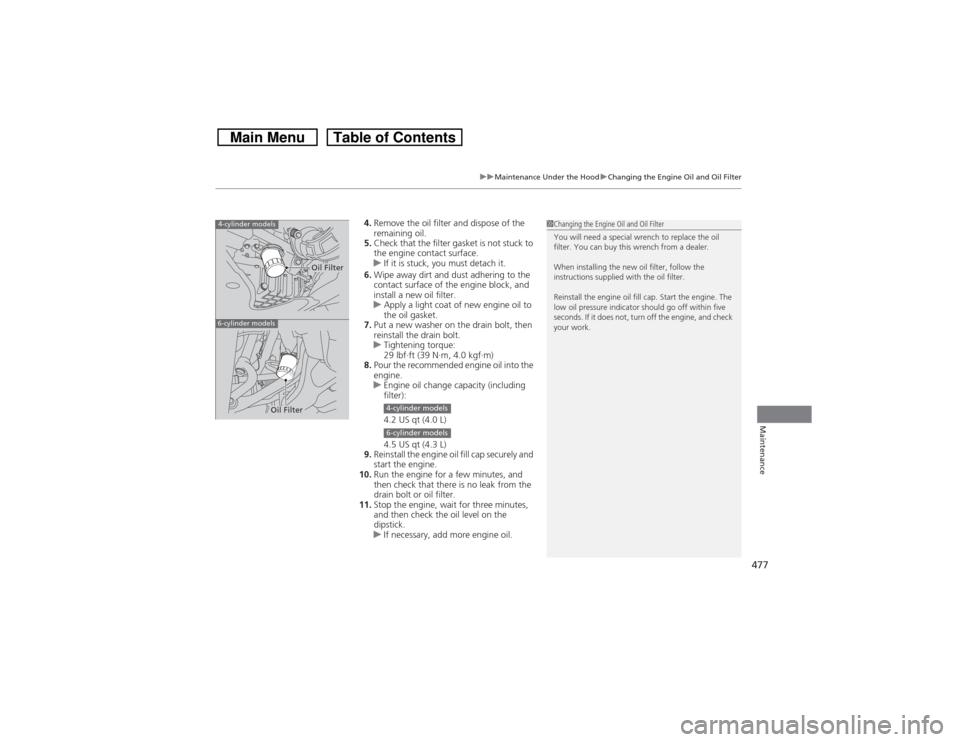
4.Remove the oil filter and dispose of the
remaining oil.
5.Check that the filter gasket is not stuck to
the engine contact surface.
uIf it is stuck, you must detach it.
6.Wipe away dirt and dust adhering to the
contact surface of the engine block, and
install a new oil filter.
uApply a light coat of new engine oil to
the oil gasket.
7.Put a new washer on the drain bolt, then
reinstall the drain bolt.
uTightening torque:
29 lbf∙ft (39 N∙m, 4.0 kgf∙m)
8.Pour the recommended engine oil into the
engine.
uEngine oil change capacity (including
filter):
4.2 US qt (4.0 L)
4.5 US qt (4.3 L)
9.Reinstall the engine oil fill cap securely and
start the engine.
10.Run the engine for a few minutes, and
then check that there is no leak from the
drain bolt or oil filter.
11.Stop the engine, wait for three minutes,
and then check the oil level on the
dipstick.
uIf necessary, add more engine oil.
1Changing the Engine Oil and Oil Filter
You will need a special wrench to replace the oil
filter. You can buy this wrench from a dealer.
When installing the new oil filter, follow the
instructions supplied with the oil filter.
Reinstall the engine oil fill cap. Start the engine. The
low oil pressure indicator should go off within five
seconds. If it does not, turn off the engine, and check
your work.
4-cylinder models6-cylinder models
Oil Filter
Oil Filter
4-cylinder models6-cylinder models
Page 479 of 573

478
uuMaintenance Under the HooduEngine Coolant
Maintenance
Engine CoolantThis coolant is premixed with 50% antifreeze and 50% water. Do not add any
straight antifreeze or water.
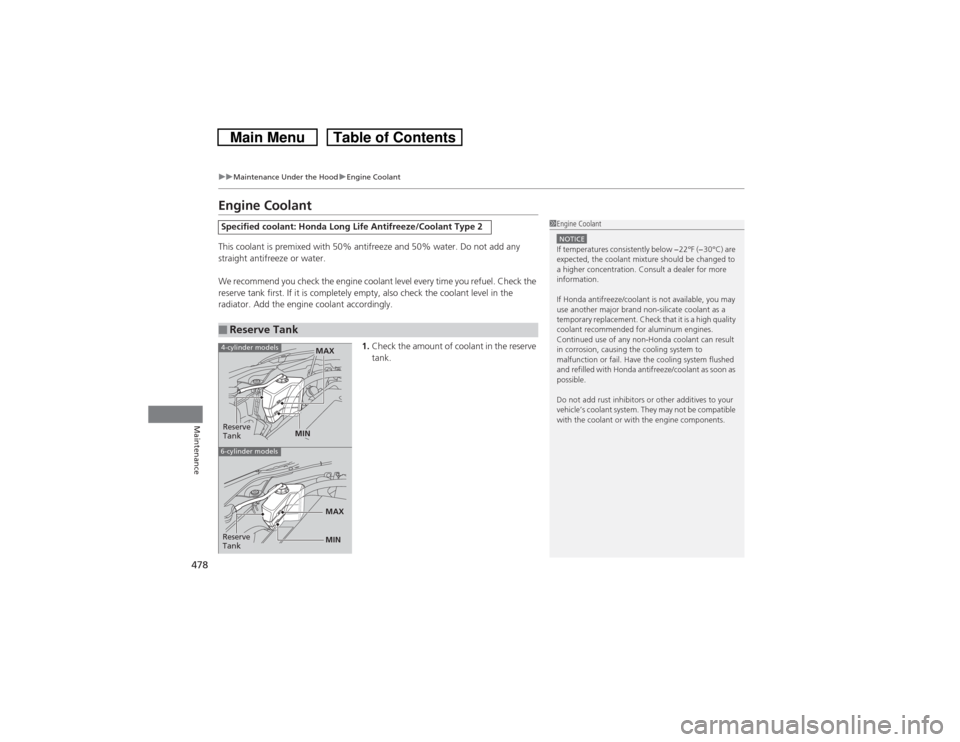
We recommend you check the engine coolant level every time you refuel. Check the
reserve tank first. If it is completely empty, also check the coolant level in the
radiator. Add the engine coolant accordingly.
1.Check the amount of coolant in the reserve
tank.Specified coolant: Honda Long Life Antifreeze/Coolant Type 2■Reserve Tank
1Engine CoolantNOTICEIf temperatures consistently below −22°F (−30°C) are
expected, the coolant mixture should be changed to
a higher concentration. Consult a dealer for more
information.
If Honda antifreeze/coolant is not available, you may
use another major brand non-silicate coolant as a
temporary replacement. Check that it is a high quality
coolant recommended for aluminum engines.
Continued use of any non-Honda coolant can result
in corrosion, causing the cooling system to
malfunction or fail. Have the cooling system flushed
and refilled with Honda antifreeze/coolant as soon as
possible.
Do not add rust inhibitors or other additives to your
vehicle’s coolant system. They may not be compatible
with the coolant or with the engine components.
Reserve
Tank
MAX
MIN
4-cylinder models6-cylinder models
MIN MAX
Reserve
Tank