Page 6 of 573
5Quick Reference Guide
❙Seat Belt (Installing a Child Seat)
(P 61)
❙Moonroof Switch
(P113 )
❙Map Lights
(P 143)
❙Front Seat
(P 133)
❙Seat Belts
(P 32)
❙Side Airbags
(P 46)
❙LATCH to Secure a Child Seat
(P 59)
❙Ceiling Light
(P 142)
❙Side Curtain Airbags
(P 49)
❙Grab Handle
❙Cargo Area Light
(P 143)
❙Seat Belt to Secure a Child Seat
(P 62)
❙Sunglasses Holder
(P 152)
❙Accessory Power Socket
(P 147)
❙USB Adapter Cable
(P 165)
❙Accessory Power Socket
(P 147)
❙Auxiliary Input Jack
(P 165)
❙Coat Hook
(P 148)
❙Center Pocket
* (P 152)
❙Rear Seat
(P 139)
❙Sun Visors❙Vanity Mirrors
❙Accessory Power Socket
(P 148)
* Not available on all models
Page 16 of 573
15Quick Reference Guide
Features
(P 163)
Audio Remote Controls (P 168)
●(+ / (- Button
Press and release to adjust the volume up/
down.
●SOURCE Button
Press and release to change the audio
mode: FM/AM/CD/XM®
*/HDD
*/USB/iPod/
Bluetooth/Pandora®
*/Aha
TM */AUX.
● / Button
Radio: Press and release to change the
preset station.
Press and hold to select the next or
previous strong station.
CD/HDD
*/USB device:
Press and release to skip to the
beginning of the next song or
return to the beginning of the
current song.
Press and hold to change a folder.(+ / (- / / Button
SOURCE
Button
Audio System
(P169, 182, 215)
(P169)
Audio system without touch screenRETURN Button FM Button
SCAN Button
Selector Knob AM Button VOL/PWR
(Volume/Power)
Knob
CD ButtonAUX Button CD Slot
(CD Eject)
Button
Preset Buttons
(1-6) TITLE Button
/ (Skip)
BarMENU Button
LOAD ButtonFOLDER BarA.SEL (Auto Select)
Button
* Not available on all models
Page 164 of 573
163
Features
This chapter describes how to operate technology features.
Audio System
About Your Audio System................ 164
USB Adapter Cable .......................... 165
Auxiliary Input Jack .......................... 165
Audio System Theft Protection ......... 166
Region Setting
*............................... 167
Audio Remote Controls.................... 168
Audio System Basic Operation........ 169
Audio System Basic Operation........ 182
Models without navigation systemAudio system without touch screenAudio system with touch screen
Audio System Basic Operation........ 215
Audio Error Messages...................... 268
General Information on the Audio
System............................................. 276
Customized Features
*...................... 281
HomeLink® Universal Transceiver
*.. 318
Bluetooth
® HandsFreeLink
®....320
, 332, 367
Compass
*.................................. 405, 407
Models with navigation system
* Not available on all models
Page 166 of 573

165
uuAudio SystemuUSB Adapter Cable
Features
USB Adapter Cable
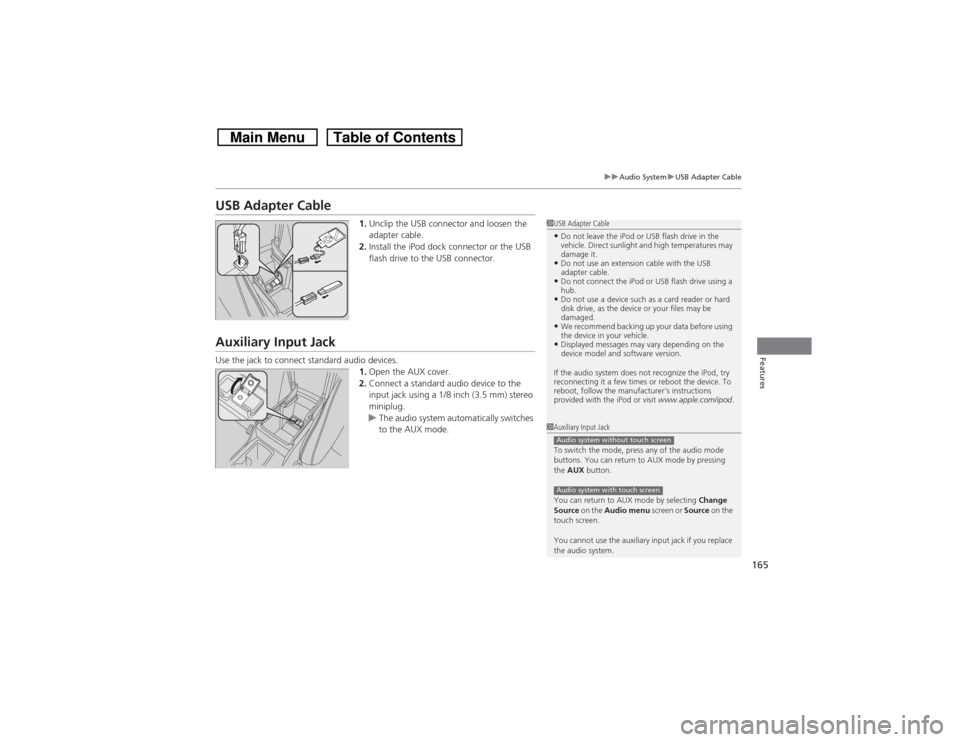
1.Unclip the USB connector and loosen the
adapter cable.
2.Install the iPod dock connector or the USB
flash drive to the USB connector.
Auxiliary Input JackUse the jack to connect standard audio devices.
1.Open the AUX cover.
2.Connect a standard audio device to the
input jack using a 1/8 inch (3.5 mm) stereo
miniplug.
uThe audio system automatically switches
to the AUX mode.
1USB Adapter Cable•Do not leave the iPod or USB flash drive in the
vehicle. Direct sunlight and high temperatures may
damage it.•Do not use an extension cable with the USB
adapter cable.•Do not connect the iPod or USB flash drive using a
hub.•Do not use a device such as a card reader or hard
disk drive, as the device or your files may be
damaged.•We recommend backing up your data before using
the device in your vehicle.•Displayed messages may vary depending on the
device model and software version.
If the audio system does not recognize the iPod, try
reconnecting it a few times or reboot the device. To
reboot, follow the manufacturer's instructions
provided with the iPod or visit www.apple.com/ipod.
1Auxiliary Input Jack
To switch the mode, press any of the audio mode
buttons. You can return to AUX mode by pressing
the AUX button.
You can return to AUX mode by selecting Change
Source on the Audio menu screen or Source on the
touch screen.
You cannot use the auxiliary input jack if you replace
the audio system.Audio system without touch screenAudio system with touch screen
Page 169 of 573

168
uuAudio SystemuAudio Remote Controls
Features
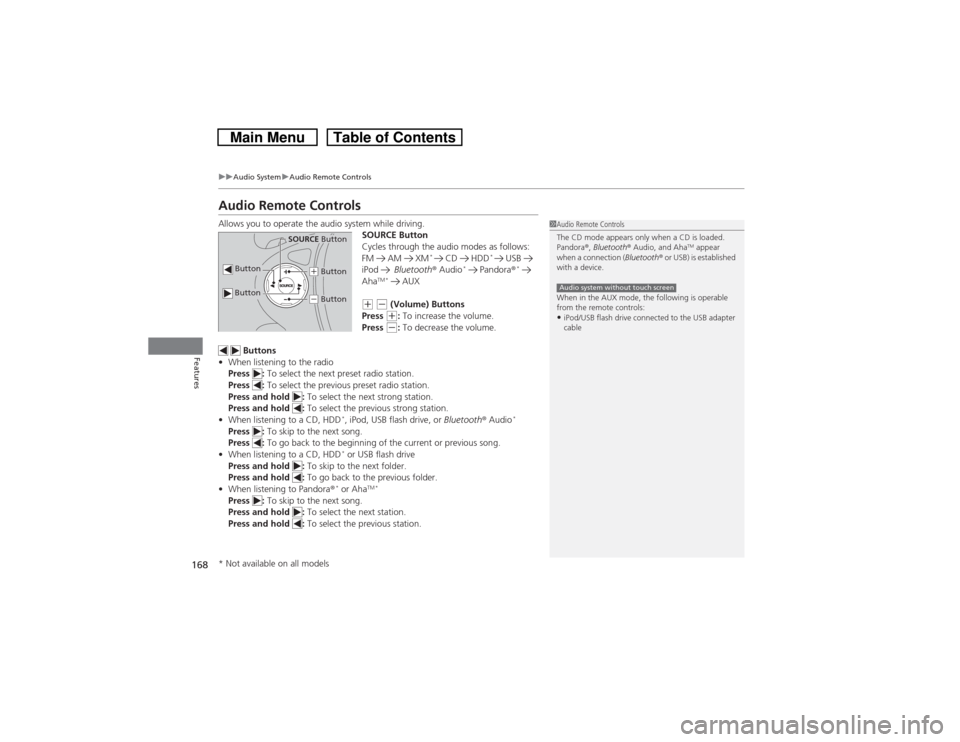
Audio Remote ControlsAllows you to operate the audio system while driving.
SOURCE Button
Cycles through the audio modes as follows:
FM AM XM
*
CD HDD
*
USB
iPod Bluetooth® Audio
* Pandora®
*
Aha
TM * AUX
(+ (- (Volume) Buttons
Press (+: To increase the volume.
Press (-: To decrease the volume.
Buttons
•When listening to the radio
Press : To select the next preset radio station.
Press : To select the previous preset radio station.
Press and hold : To select the next strong station.
Press and hold : To select the previous strong station.
•When listening to a CD, HDD
*, iPod, USB flash drive, or Bluetooth® Audio
*
Press : To skip to the next song.
Press : To go back to the beginning of the current or previous song.
•When listening to a CD, HDD
* or USB flash drive
Press and hold : To skip to the next folder.
Press and hold : To go back to the previous folder.
•When listening to Pandora®* or Aha
TM *
Press : To skip to the next song.
Press and hold : To select the next station.
Press and hold : To select the previous station.
1Audio Remote Controls
The CD mode appears only when a CD is loaded.
Pandora®, Bluetooth® Audio, and Aha
TM appear
when a connection (Bluetooth® or USB) is established
with a device.
When in the AUX mode, the following is operable
from the remote controls:
•iPod/USB flash drive connected to the USB adapter
cableAudio system without touch screen
Button
SOURCE Button
Button
(+ Button(- Button
* Not available on all models
Page 177 of 573
176
uuAudio System Basic OperationuPlaying an iPod
Features
Playing an iPodConnect the iPod using your dock connector to the USB adapter cable, then press
the AUX button.2USB Adapter Cable P. 165VOL/ (Volume/Power) Knob
Press to turn the audio system
on and off.
Turn to adjust the volume.
SKIP Bar
Press or to change songs.Selector Knob
Turn to select a song, file, menu
item, or play mode. Press to set
your selection. AUX Button
Press to select iPod (if connected).
TITLE Button
Press to display the text data.
RETURN Button
Press to go back to the previous display.MENU Button
Press to display menu items.
Page 180 of 573

179
uuAudio System Basic OperationuPlaying a USB Flash Drive
Continued
Features
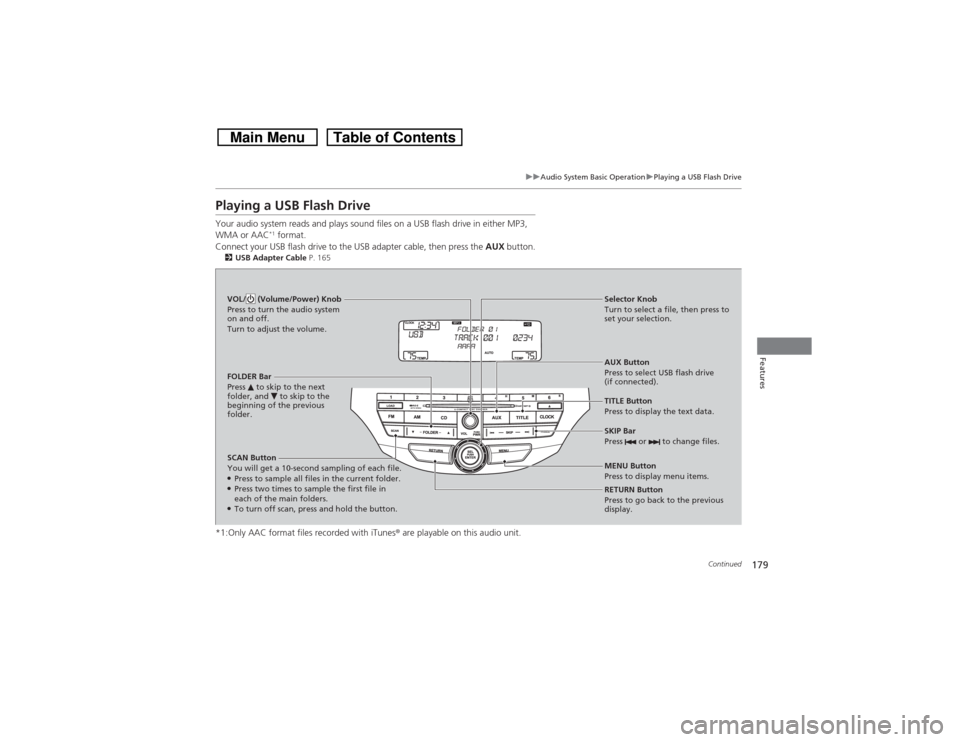
Playing a USB Flash DriveYour audio system reads and plays sound files on a USB flash drive in either MP3,
WMA or AAC
*1 format.
Connect your USB flash drive to the USB adapter cable, then press the AUX button.
2USB Adapter Cable P. 165*1:Only AAC format files recorded with iTunes® are playable on this audio unit.SCAN Button
You will get a 10-second sampling of each file.●Press to sample all files in the current folder.●Press two times to sample the first file in
each of the main folders.●To turn off scan, press and hold the button.RETURN Button
Press to go back to the previous
display. Selector Knob
Turn to select a file, then press to
set your selection.
AUX Button
Press to select USB flash drive
(if connected). VOL/ (Volume/Power) Knob
Press to turn the audio system
on and off.
Turn to adjust the volume.
SKIP Bar
Press or to change files.MENU Button
Press to display menu items. TITLE Button
Press to display the text data. FOLDER Bar
Press to skip to the next
folder, and to skip to the
beginning of the previous
folder.
Page 229 of 573

228
uuAudio System Basic OperationuVoice Control Operation
Features
■iPod commands
•iPod play
•iPod play track # (#: 1 to 30)
•iPod skip forward
•iPod skip back
•iPod track shuffle
*1
•iPod album shuffle
*1
•iPod track repeat
*1
•iPod normal play
•What am I listening to?
•Who am I listening to?
•Who is this?
•What’s playing?
•Who’s playing?
•What album is this?
*1: These commands toggle the function
on and off, so the command may not match
your intended action.
■USB commands
•USB play
•USB play track # (#: 1 to 30)
•USB skip forward
•USB skip back
•USB track random
*1
•USB track repeat
*1
•USB track scan
*1
•USB folder up
•USB folder down
•USB folder random
*1
•USB folder repeat
*1
•USB folder scan
*1
•USB normal play
*1: These commands toggle the function
on and off, so the command may not match
your intended action.
■Bluetooth® Audio commands
•Bluetooth Audio play
•Bluetooth Audio skip forward
•Bluetooth Audio skip back
•Bluetooth Audio group up
•Bluetooth Audio group down
•Bluetooth Audio pause
•Bluetooth Audio resume
•Bluetooth Audio track random
•Bluetooth Audio track repeat
NOTE:
Bluetooth® Audio commands may not work
on some phones or Bluetooth® Audio
devices.■AUX commands
•Auxiliary play