2014 FORD SUPER DUTY ECO mode
[x] Cancel search: ECO modePage 201 of 458
BREAKING-IN
You need to break in new tires for
approximately 300 miles (480
kilometers). During this time, your vehicle
may exhibit some unusual driving
characteristics.
Avoid driving too fast during the first 1000
miles (1600 kilometers). Vary your speed
frequently and change up through the
gears early. Do not labor the engine.
Do not tow during the first 1000 miles
(1600 kilometers).
ECONOMICAL DRIVING
Your fuel economy is affected by several
things, such as how you drive, the
conditions you drive under, and how you
maintain your vehicle.
You may improve your fuel economy by
keeping these things in mind:
•
Accelerate and slow down in a smooth,
moderate fashion.
• Drive at steady speeds without
stopping.
• Anticipate stops; slowing down may
eliminate the need to stop.
• Combine errands and minimize
stop-and-go driving.
• Close the windows for high-speed
driving.
• Drive at reasonable speeds (traveling
at 55 mph [88 km/h] uses 15% less
fuel than traveling at 65 mph [105
km/h]).
• Keep the tires properly inflated and use
only the recommended size.
• Use the recommended engine oil.
• Perform all regularly scheduled
maintenance. Avoid these actions; they reduce your fuel
economy:
•
Sudden accelerations or hard
accelerations.
• Revving the engine before turning it off.
• Idle for periods longer than one minute.
• Warm up your vehicle on cold
mornings.
• Use the air conditioner or front
defroster.
• Use the speed control in hilly terrain.
• Rest your foot on the brake pedal while
driving.
• Drive a heavily loaded vehicle or tow a
trailer.
• Carry unnecessary weight
(approximately 1 mpg [0.4 km/L] is
lost for every 400 lb [180 kilogram] of
weight carried).
• Driving with the wheels out of
alignment.
Conditions
• Heavily loading a vehicle or towing a
trailer may reduce fuel economy at any
speed.
• Adding certain accessories to your
vehicle (for example bug deflectors,
rollbars, light bars, running boards, ski
racks or luggage racks) may reduce
fuel economy.
• To maximize the fuel economy, drive
with the tonneau cover installed (if
equipped).
• Using fuel blended with alcohol may
lower fuel economy.
• Fuel economy may decrease with lower
temperatures during the first 8– 10
miles (12 –16 kilometers) of driving.
• Driving on flat terrain offers improved
fuel economy as compared to driving
on hilly terrain.
198
Super Duty (TFA) Driving Hints
Page 207 of 458
HAZARD WARNING FLASHERS
Note:
The hazard warning flashers will
operate when the ignition is in any position
or if the key is not in the ignition. If used
when the engine is not running, the battery
will lose charge. As a result, there may be
insufficient power to restart your engine. In some models, the hazard
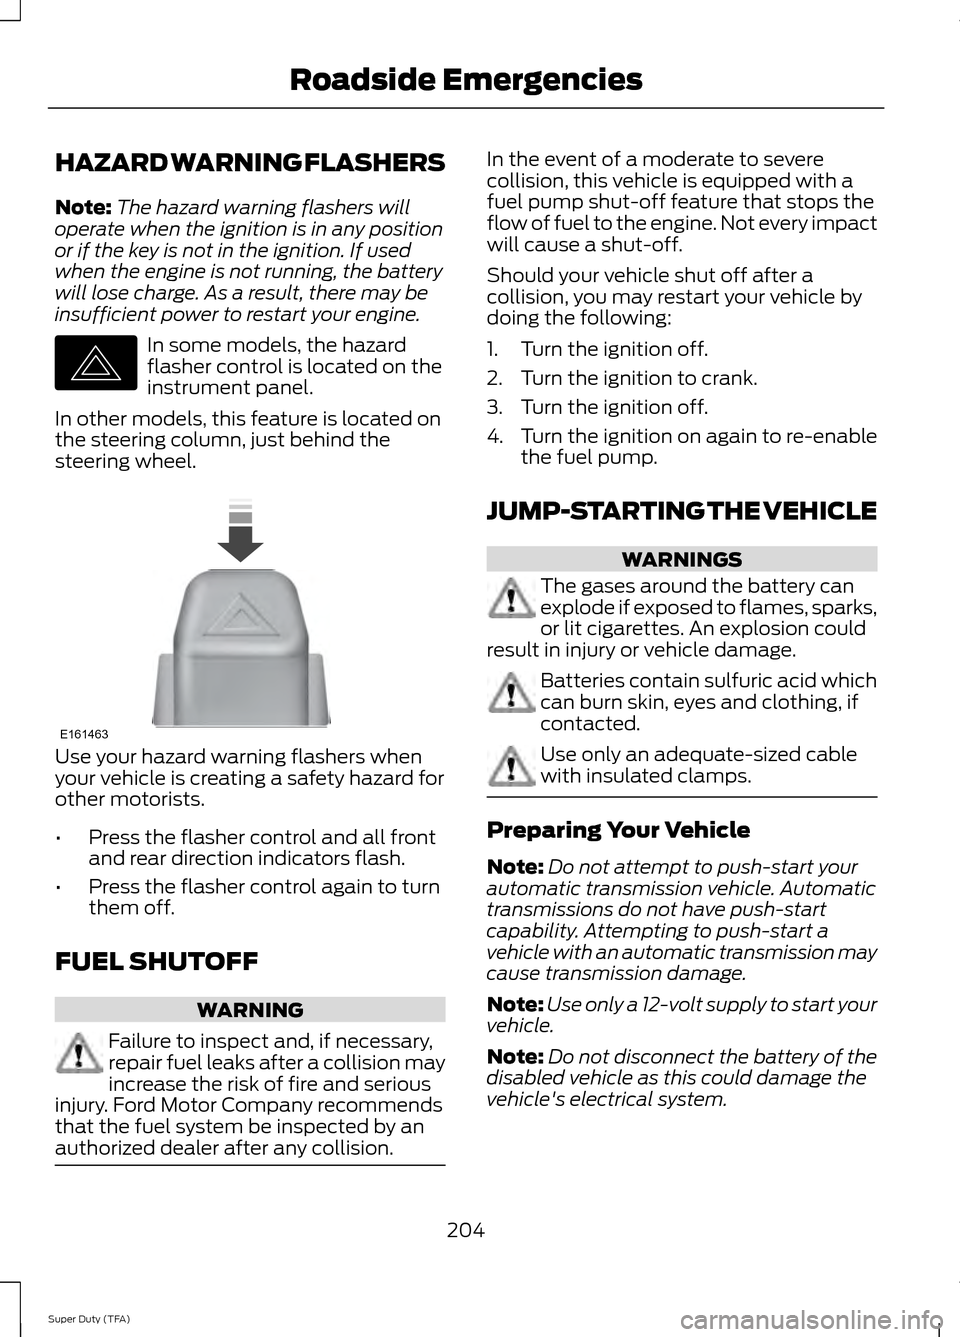
flasher control is located on the
instrument panel.
In other models, this feature is located on
the steering column, just behind the
steering wheel. Use your hazard warning flashers when
your vehicle is creating a safety hazard for
other motorists.
•
Press the flasher control and all front
and rear direction indicators flash.
• Press the flasher control again to turn
them off.
FUEL SHUTOFF WARNING
Failure to inspect and, if necessary,
repair fuel leaks after a collision may
increase the risk of fire and serious
injury. Ford Motor Company recommends
that the fuel system be inspected by an
authorized dealer after any collision. In the event of a moderate to severe
collision, this vehicle is equipped with a
fuel pump shut-off feature that stops the
flow of fuel to the engine. Not every impact
will cause a shut-off.
Should your vehicle shut off after a
collision, you may restart your vehicle by
doing the following:
1. Turn the ignition off.
2. Turn the ignition to crank.
3. Turn the ignition off.
4.
Turn the ignition on again to re-enable
the fuel pump.
JUMP-STARTING THE VEHICLE WARNINGS
The gases around the battery can
explode if exposed to flames, sparks,
or lit cigarettes. An explosion could
result in injury or vehicle damage. Batteries contain sulfuric acid which
can burn skin, eyes and clothing, if
contacted.
Use only an adequate-sized cable
with insulated clamps.
Preparing Your Vehicle
Note:
Do not attempt to push-start your
automatic transmission vehicle. Automatic
transmissions do not have push-start
capability. Attempting to push-start a
vehicle with an automatic transmission may
cause transmission damage.
Note: Use only a 12-volt supply to start your
vehicle.
Note: Do not disconnect the battery of the
disabled vehicle as this could damage the
vehicle's electrical system.
204
Super Duty (TFA) Roadside EmergenciesE142663 E161463
Page 208 of 458
Park the booster vehicle close to the hood
of the disabled vehicle, making sure the
two vehicles do not touch. Turn all
accessories off.
Connecting the Jumper Cables
WARNING
Do not attach the cables to fuel lines,
engine rocker covers, the intake
manifold or electrical components
as grounding points. Stay clear of moving
parts. To avoid reverse polarity
connections, make sure that you correctly
identify the positive (+) and negative (-)
terminals on both the disabled and booster
vehicles before connecting the cables. Note:
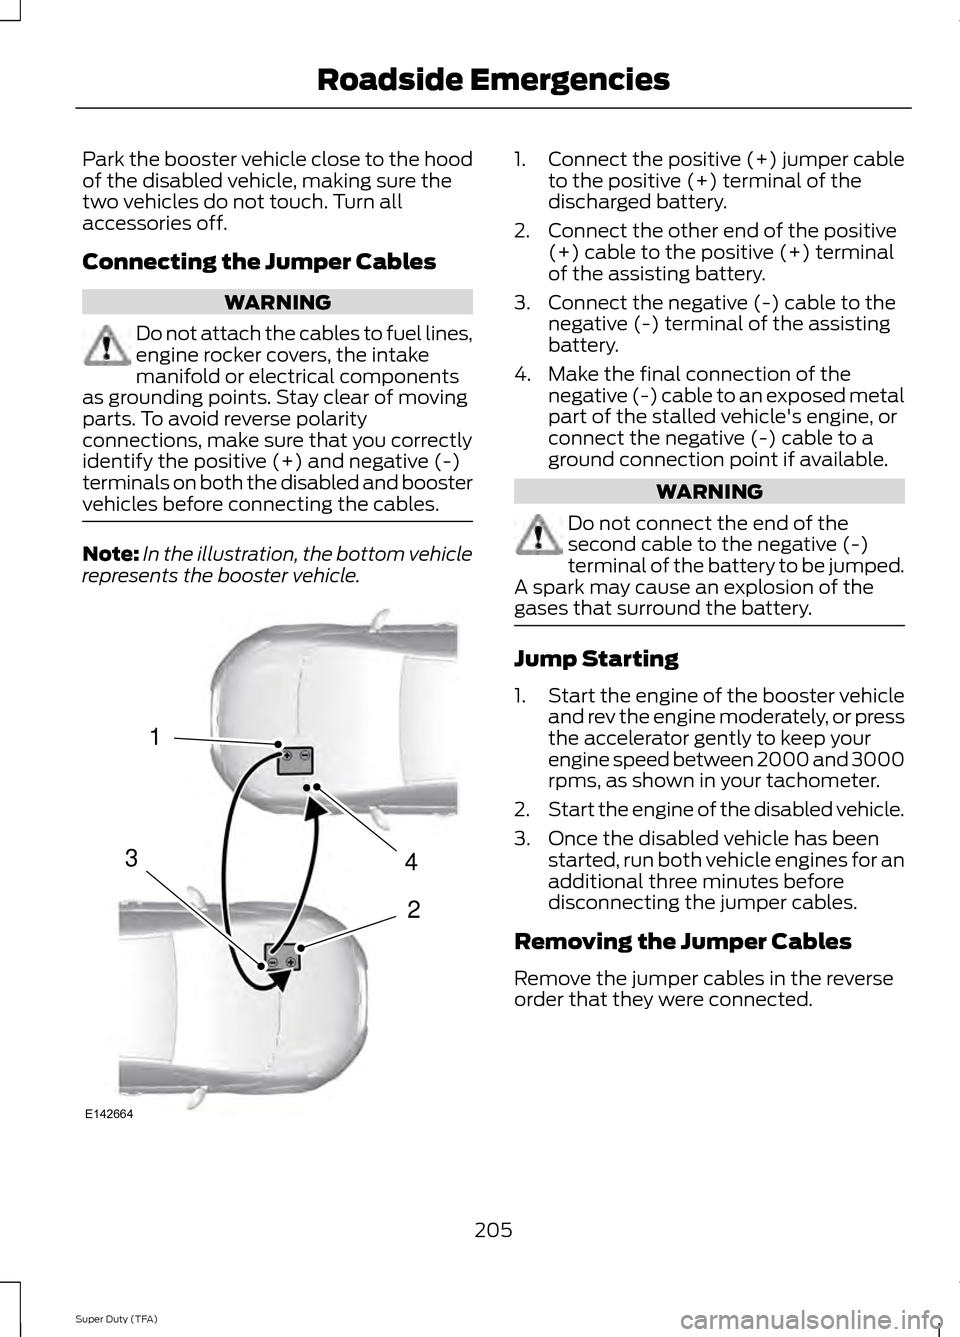
In the illustration, the bottom vehicle
represents the booster vehicle. 1.
Connect the positive (+) jumper cable
to the positive (+) terminal of the
discharged battery.
2. Connect the other end of the positive (+) cable to the positive (+) terminal
of the assisting battery.
3. Connect the negative (-) cable to the negative (-) terminal of the assisting
battery.
4. Make the final connection of the negative (-) cable to an exposed metal
part of the stalled vehicle's engine, or
connect the negative (-) cable to a
ground connection point if available. WARNING
Do not connect the end of the
second cable to the negative (-)
terminal of the battery to be jumped.
A spark may cause an explosion of the
gases that surround the battery. Jump Starting
1.
Start the engine of the booster vehicle
and rev the engine moderately, or press
the accelerator gently to keep your
engine speed between 2000 and 3000
rpms, as shown in your tachometer.
2. Start the engine of the disabled vehicle.
3. Once the disabled vehicle has been started, run both vehicle engines for an
additional three minutes before
disconnecting the jumper cables.
Removing the Jumper Cables
Remove the jumper cables in the reverse
order that they were connected.
205
Super Duty (TFA) Roadside Emergencies4
2
1
3
E142664
Page 281 of 458

•
To reduce the chances of interference
from another vehicle, perform the
system reset procedure at least three
feet (one meter) away from another
Ford Motor Company vehicle
undergoing the system reset procedure
at the same time.
• Do not wait more than two minutes
between resetting each tire sensor or
the system will time-out and the entire
procedure will have to be repeated on
all four wheels.
• A double horn will sound indicating the
need to repeat the procedure.
Performing the System Reset Procedure
Read the entire procedure before
attempting.
1. Drive the vehicle above 20 mph (32 km/h) for at least two minutes, then
park in a safe location where you can
easily get to all four tires and have
access to an air pump.
2. Place the ignition in the off position and
keep the key in the ignition.
3. Cycle the ignition to the on position with the engine off.
4. Turn the hazard flashers on then off three times. You must accomplish this
within 10 seconds. If the reset mode
has been entered successfully, the horn
will sound once, the system indicator
will flash and a message is shown in
the information display. If this does not
occur, please try again starting at Step
2. If after repeated attempts to enter
the reset mode, the horn does not
sound, the system indicator does not
flash and no message is shown in the
information display, seek service from
your authorized dealer. 5. Train the tire pressure monitoring
system sensors in the tires using the
following system reset sequence
starting with the left front tire in the
following clockwise order: Left front
(driver's side front tire), Right front
(passenger's side front tire), Right rear
(passenger's side rear tire), Left rear
(driver's side rear tire)
6. Remove the valve cap from the valve stem on the left front tire. Decrease the
air pressure until the horn sounds.
Note: The single horn chirp confirms
that the sensor identification code has
been learned by the module for this
position. If a double horn is heard, the
reset procedure was unsuccessful, and
you must repeat it.
7. Remove the valve cap from the valve stem on the right front tire. Decrease
the air pressure until the horn sounds.
8. Remove the valve cap from the valve stem on the right rear tire. Decrease the
air pressure until the horn sounds.
9. Remove the valve cap from the valve stem on the left rear tire. Decrease the
air pressure until the horn sounds.
Training is complete after the horn
sounds for the last tire trained (driver's
side rear tire), the system indicator
stops flashing, and a message is shown
in the information display.
10. Turn the ignition off. If two short horn
beeps are heard, the reset procedure
was unsuccessful and you must
repeat it. If after repeating the
procedure and two short beeps are
heard when the ignition is turned to
off, seek assistance from your
authorized dealer.
278
Super Duty (TFA) Wheels and Tires
Page 303 of 458
GENERAL INFORMATION
Radio Frequencies and Reception
Factors
AM and FM frequencies are established by
the Federal Communications Commission
(FCC) and the Canadian Radio and
Telecommunications Commission (CRTC).
Those frequencies are:
•
AM: 530, 540-1700, 1710 kHz
• FM: 87.9-107.7, 107.9 MHz Radio Reception Factors
The further you travel from an FM station, the weaker the
signal and the weaker the reception.
Distance and strength
Hills, mountains, tall buildings, bridges, tunnels, freeway
overpasses, parking garages, dense tree foliage and
thunderstorms can interfere with the reception.
Terrain
When you pass a ground-based broadcast repeating
tower, a stronger signal may overtake a weaker one and
result in the audio system muting.
Station overload
CD and CD Player Information
Note: CD units play commercially pressed
4.75-inch (12 centimeter) audio compact
discs only. Due to technical incompatibility,
certain recordable and re-recordable
compact discs may not function correctly
when used in Ford CD players.
Note: Do not insert CDs with homemade
paper (adhesive) labels into the CD player
as the label may peel and cause the CD to
become jammed. You should use a
permanent felt tip marker rather than
adhesive labels on your homemade CDs.
Ballpoint pens may damage CDs. Please
contact an authorized dealer for further
information.
Note: Do not use any irregularly shaped
discs or discs with a scratch protection film
attached.
Always handle discs by their edges only.
Clean the disc with an approved CD
cleaner only. Wipe it from the center of the
disc toward the edge. Do not clean in a
circular motion. Do not expose discs to direct sunlight or
heat sources for extended periods.
MP3 Track and Folder Structure
Audio systems capable of recognizing and
playing MP3 individual tracks and folder
structures work as follows:
•
There are two different modes for MP3
disc playback: MP3 track mode
(system default) and MP3 folder
mode.
• MP3 track mode ignores any folder
structure on the MP3 disc. The player
numbers each MP3 track on the disc
(noted by the .mp3 file extension) from
T001 to a maximum of T255. The
maximum number of playable MP3
files may be less depending on the
structure of the CD and exact model
of radio present.
300
Super Duty (TFA) Audio System
Page 304 of 458
•
MP3 folder mode represents a folder
structure consisting of one level of
folders. The CD player numbers all MP3
tracks on the disc (noted by the .mp3
file extension) and all folders
containing MP3 files, from F001
(folder) T001 (track) to F253 T255.
• Creating discs with only one level of
folders helps with navigation through
the disc files.
If you are burning your own MP3 discs, it is
important to understand how the system
reads the structures you create. While
various files may be present, (files with
extensions other than mp3), only files with
the .mp3 extension are played; other files
are ignored by the system. This enables
you to use the same MP3 disc for a variety
of tasks on your work computer, home
computer and your in-vehicle system. In track mode, the system displays and
plays the structure as if it were only one
level deep (all .mp3 files play, regardless
of being in a specific folder). In folder
mode, the system only plays the .mp3 files
in the current folder.
AUDIO UNIT - VEHICLES WITH:
AM/FM WARNING
Driving while distracted can result in
loss of vehicle control, crash and
injury. We strongly recommend that
you use extreme caution when using any
device that may take your focus off the
road. Your primary responsibility is the safe
operation of your vehicle. We recommend
against the use of any hand-held device
while driving and encourage the use of
voice-operated systems when possible.
Make sure you are aware of all applicable
local laws that may affect the use of
electronic devices while driving. 301
Super Duty (TFA) Audio SystemE163157
Page 305 of 458
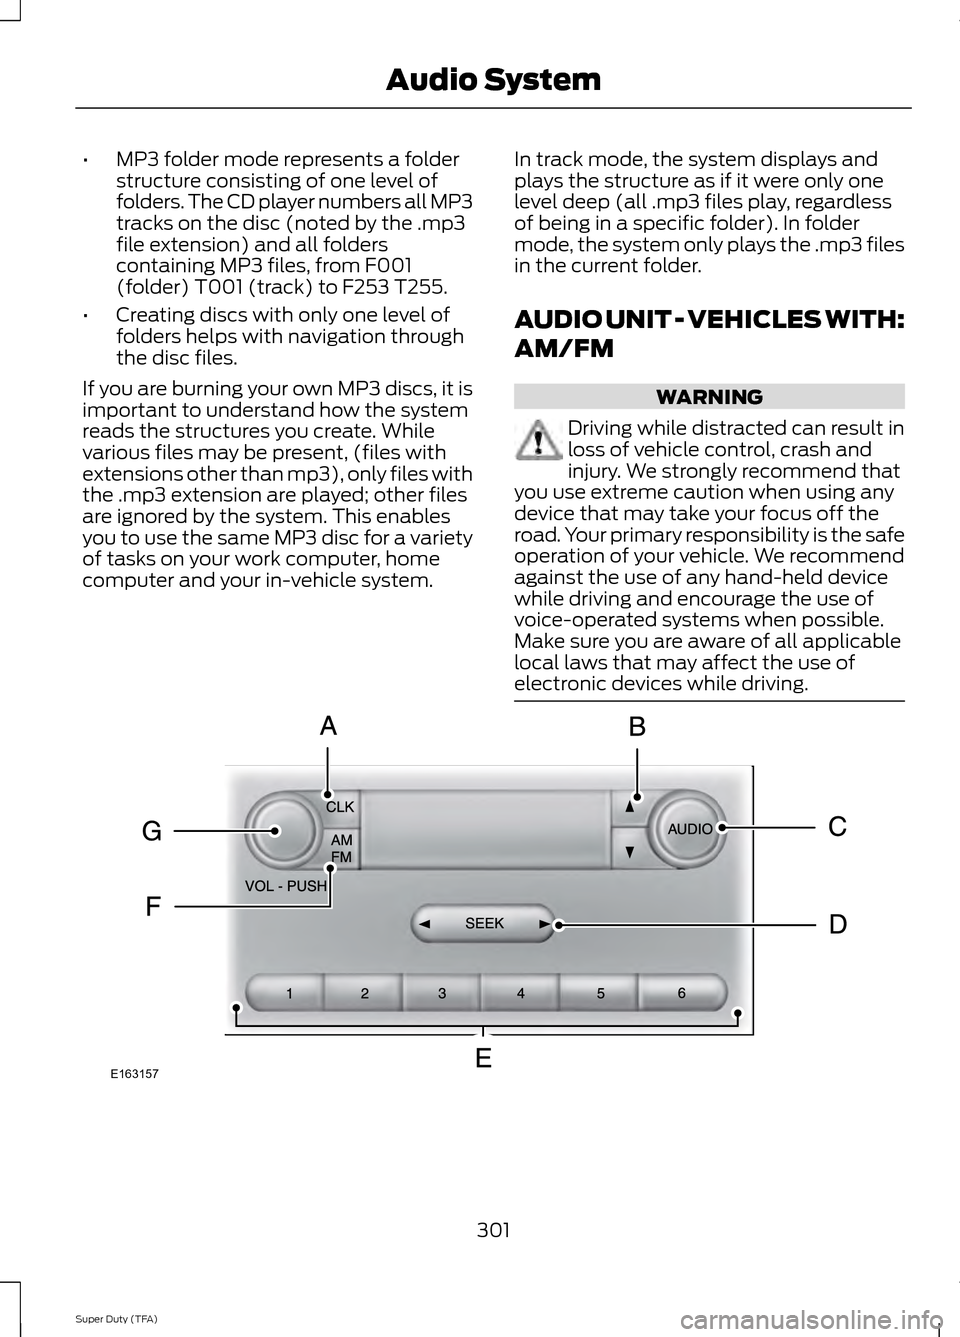
CLK: Press this button to switch the display between the clock and radio
frequency. To set the time, press and hold the button until the hours start to
flash. Press the arrow buttons (B) to adjust he hours, then repeat to set the
minutes. Press
CLK again to exit clock mode.
A
Tune: Press these arrow buttons to manually search through the radio frequency
band. Press and hold for a fast search. In AUDIO mode, press the buttons to
adjust different sound settings.
B
AUDIO:
Press this button to access settings for Treble, Middle, Bass, Fade and
Balance.
C
SEEK:
Press this button to go to the previous or next strong station on the
frequency band.
D
Memory presets:
Store your favorite radio stations. To store a radio station,
tune to the station, then press and hold a preset button until sound returns.
E
AM/FM:
Press this button to select a frequency band.
F
VOL-PUSH:
Press this button to switch the system off and on. Turn the control
to adjust the volume.
G
AUDIO UNIT - VEHICLES WITH:
AM/FM/CD/SYNC WARNING
Driving while distracted can result in
loss of vehicle control, crash and
injury. We strongly recommend that
you use extreme caution when using any
device that may take your focus off the
road. Your primary responsibility is the safe
operation of your vehicle. We recommend
against the use of any hand-held device
while driving and encourage the use of
voice-operated systems when possible.
Make sure you are aware of all applicable
local laws that may affect the use of
electronic devices while driving. 302
Super Duty (TFA) Audio System
Page 307 of 458

•
Track/Folder is only available on MP3
files when in CD mode. In track mode,
pressing the SEEK arrows allows you
to scroll through all the tracks on the
disc. In folder mode, pressing the SEEK
arrows allows you to scroll through all
the tracks within the selected folder.
Press the
FOLDER buttons to access
other folders.
• COMPRESS
(Compression) is only
available in CD and MP3 modes.
Switching compression on brings the
soft and loud passages together for a
more consistent listening level. Use the
SEEK
buttons and up and down arrow
buttons to switch it on and off.
F
AUX: Press to access the media features
of the SYNC system. See SYNC™ (page
312).
G
SEEK: In radio mode, press and release
these buttons to go to the next (or
previous) preset radio station or disc track.
In CD and MP3 modes, press these buttons
to select the next (or previous) track, or
press and hold to advance (or reverse)
within the same track.
H
Play, Pause and OK: Play and Pause
allow you to play or pause a track when
listening to a CD. OK
allows you to confirm
commands with phone and media features
of the SYNC system. See
SYNC™ (page
312).
I
SHUFFLE: Play music on the selected
CD or MP3 folder in random order.
J
FOLDER: Press to access the next folder
on an MP3 disc.
K
FOLDER: Press to access the previous
folder on an MP3 disc.
L
FF: Press to fast forward in a CD track or
MP3 file manually.
M
REW: Press to rewind in a CD track or
MP3 file manually. N
Memory presets: Store your favorite
radio stations. To store a radio station, tune
to the station, then press and hold a preset
button until sound returns.
O
TEXT/SCAN: In radio, CD and MP3
modes, press and hold to hear a brief
sampling of radio stations, CD tracks or
MP3 files. In CD and MP3 modes, press and
release to display track title, artist name
and disc title. In text mode, sometimes the
display requires additional text to show.
When the < / > indicator is on, press TEXT
and then use the
SEEK buttons to view
the additional display text.
P
AM/FM: Press to select a frequency
band.
Q
VOL-PUSH: Press to switch the system
off and on. Turn it to adjust the volume.
R
CD: Press to enter CD or MP3 mode.
AUDIO UNIT - VEHICLES WITH:
SONY AM/FM/CD WARNING
Driving while distracted can result in
loss of vehicle control, crash and
injury. We strongly recommend that
you use extreme caution when using any
device that may take your focus off the
road. Your primary responsibility is the safe
operation of your vehicle. We recommend
against the use of any hand-held device
while driving and encourage the use of
voice-operated systems when possible.
Make sure you are aware of all applicable
local laws that may affect the use of
electronic devices while driving. Note:
The MyFord Touch system controls
most of the audio features. See
MyFord
Touch ™ (page 348).
304
Super Duty (TFA) Audio System