2014 FORD SUPER DUTY key
[x] Cancel search: keyPage 60 of 458

PASSIVE ANTI-THEFT
SYSTEM (IF EQUIPPED)
Note: The system is not compatible with
non-Ford aftermarket remote start systems.
Use of these systems may result in vehicle
starting problems and a loss of security
protection.
Note: Metallic objects, electronic devices
or a second coded key on the same key
chain may cause vehicle starting problems
if they are too close to the key when starting
the engine. Prevent these objects from
touching the coded key while starting the
engine. Switch the ignition off, move all
objects on the key chain away from the
coded key and restart the engine if a
problem occurs.
Note: Do not leave a duplicate coded key
in the vehicle. Always take your keys and
lock all doors when leaving the vehicle.
SecuriLock ™
The system is an engine immobilization
system. It helps prevent the engine from
starting unless you use a coded key
programmed to your vehicle. Using the
wrong key may prevent the engine from
starting. A message may appear in the
information display.
If you are unable to start the engine with a
correctly coded key, a malfunction has
happened and a message may appear in
the information display.
Automatic Arming
The system arms immediately after you
switch the ignition off.
Automatic Disarming
Switching the ignition on with a coded key
disarms the system. Replacement Keys
Note:
Your vehicle may have two integrated
keyhead transmitters.
The integrated keyhead transmitter
functions as a programmed ignition key. It
operates all the locks, starts the vehicle
and acts as a remote control.
If your programmed transmitters or
standard SecuriLock coded keys are lost
or stolen and you do not have an extra
coded key, you will need to have your
vehicle towed to an authorized dealer. You
need to erase the key codes from your
vehicle and program new coded keys.
Store an extra programmed key away from
your vehicle in a safe place to help prevent
any inconveniences. See an authorized
dealer to purchase additional spare or
replacement keys.
Programming a Spare Key
Note: You can program a maximum of eight
coded keys to your vehicle. Only four of
these can be integrated keyhead
transmitters.
You can program your own integrated
keyhead transmitter or standard
SecuriLock coded keys to your vehicle. This
procedure will program both the engine
immobilizer keycode and the remote entry
portion of the remote control to your
vehicle.
Only use integrated keyhead transmitters
or standard SecuriLock keys.
You must have two previously
programmed coded keys and the new
unprogrammed key readily accessible. See
an authorized dealer to have the spare key
programmed if two previously
programmed coded keys are not available.
Read and understand the entire procedure
before you begin.
57
Super Duty (TFA) Security
Page 61 of 458

1.
Insert the first previously programmed
coded key into the ignition.
2. Switch the ignition from off to on. Keep
the ignition on for at least three
seconds, but no more than 10 seconds.
3. Switch the ignition off and remove the
first coded key from the ignition.
4. After three seconds but within 10 seconds of switching the ignition off,
insert the second previously coded key
into the ignition.
5. Switch the ignition from off to on. Keep
the ignition on for at least three
seconds, but no more than 10 seconds.
6. Switch the ignition off and remove the
second previously programmed coded
key from the ignition.
7. After three seconds but within 10 seconds of switching the ignition off
and removing the previously
programmed coded key, insert the new
unprogrammed key into the ignition.
8. Switch the ignition from off to on. Keep
the ignition on for at least six seconds
until you hear the door locks cycle.
9. Remove the newly programmed coded
key from the ignition.
The key will start the engine if
programming is successful. You can
operate the remote entry system if the new
key is an integrated keyhead transmitter.
If programming was not successful, wait
20 seconds and repeat Steps 1 through 8.
If you are still unsuccessful, take your
vehicle to an authorized dealer.
ANTI-THEFT ALARM (IF EQUIPPED)
The system warns you of an unauthorized
entry to your vehicle. It triggers if any door
or the hood opens without using the key,
remote control or keyless entry keypad. The direction indicators flash and the horn
sounds if the system triggers while the
alarm is armed.
Take all remote controls to an authorized
dealer if there is any potential alarm
problem with your vehicle.
Arming the Alarm
The alarm is ready to arm when there is
not a key in the ignition. Electronically lock
the vehicle to arm the alarm.
The direction indicators flash once after
you lock the vehicle. This indicates the
alarm is in the pre-armed mode. It will fully
arm in 20 seconds.
Disarming the Alarm
Disarm the alarm by any of the following
actions:
•
Press the power door unlock button
within the 20-second pre-armed mode.
• Unlock the doors with the remote
control or keyless entry keypad.
• Switch the ignition on or start the
vehicle.
• Use a key in the driver door to unlock
the vehicle, then switch the ignition on
within 12 seconds.
Note: Pressing the panic button on the
remote control will stop the horn and signal
indicators, but will not disarm the system.
58
Super Duty (TFA) Security
Page 82 of 458
Water in fuel
For more information see your
diesel supplement.
AUDIBLE WARNINGS AND
INDICATORS
Headlamps On Warning Chime
Sounds when you remove the key from the
ignition and open the driver's door and you
have left the headlamps or parking lamps
on.
Key in Ignition Warning Chime
Sounds when you open the driver's door
and you have left the key in the ignition
with it in the off or accessory position.
Parking Brake On Warning Chime
Sounds when you have left the parking
brake on and drive your vehicle. If the
warning chime remains on after you have
released the parking brake, have the
system checked by your authorized dealer
immediately.
79
Super Duty (TFA) Instrument Cluster
Page 83 of 458
GENERAL INFORMATION
WARNING
Driving while distracted can result in
loss of vehicle control, crash and
injury. We strongly recommend that
you use extreme caution when using any
device that may take your focus off the
road. Your primary responsibility is the safe
operation of your vehicle. We recommend
against the use of any hand-held device
while driving and encourage the use of
voice-operated systems when possible.
Make sure you are aware of all applicable
local laws that may affect the use of
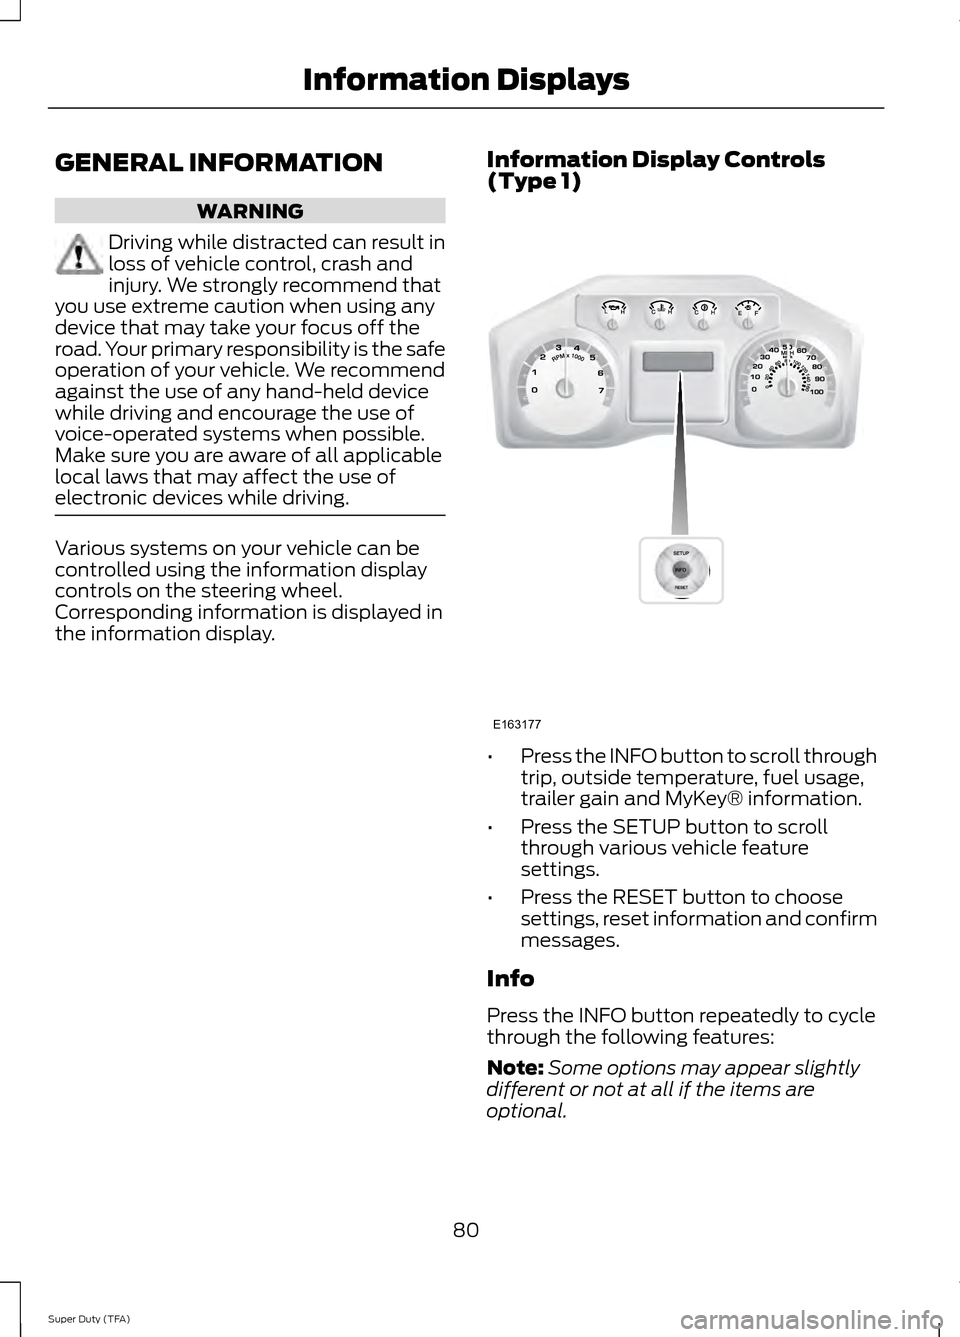
electronic devices while driving. Various systems on your vehicle can be
controlled using the information display
controls on the steering wheel.
Corresponding information is displayed in
the information display.
Information Display Controls
(Type 1) •
Press the INFO button to scroll through
trip, outside temperature, fuel usage,
trailer gain and MyKey® information.
• Press the SETUP button to scroll
through various vehicle feature
settings.
• Press the RESET button to choose
settings, reset information and confirm
messages.
Info
Press the INFO button repeatedly to cycle
through the following features:
Note: Some options may appear slightly
different or not at all if the items are
optional.
80
Super Duty (TFA) Information DisplaysE163177
Page 84 of 458
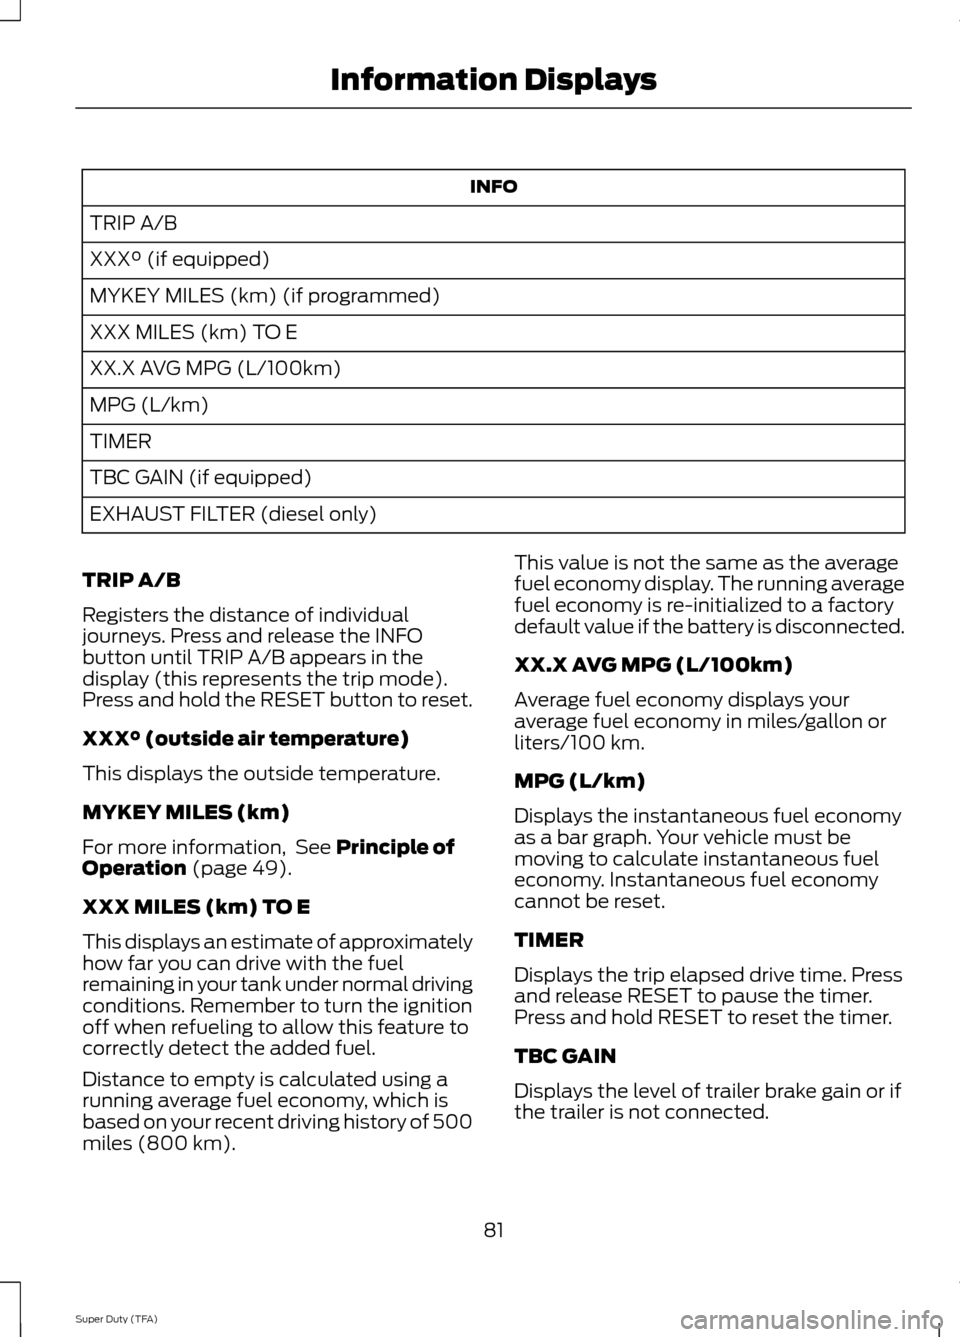
INFO
TRIP A/B
XXX° (if equipped)
MYKEY MILES (km) (if programmed)
XXX MILES (km) TO E
XX.X AVG MPG (L/100km)
MPG (L/km)
TIMER
TBC GAIN (if equipped)
EXHAUST FILTER (diesel only)
TRIP A/B
Registers the distance of individual
journeys. Press and release the INFO
button until TRIP A/B appears in the
display (this represents the trip mode).
Press and hold the RESET button to reset.
XXX° (outside air temperature)
This displays the outside temperature.
MYKEY MILES (km)
For more information, See Principle of
Operation (page 49).
XXX MILES (km) TO E
This displays an estimate of approximately
how far you can drive with the fuel
remaining in your tank under normal driving
conditions. Remember to turn the ignition
off when refueling to allow this feature to
correctly detect the added fuel.
Distance to empty is calculated using a
running average fuel economy, which is
based on your recent driving history of 500
miles (800 km). This value is not the same as the average
fuel economy display. The running average
fuel economy is re-initialized to a factory
default value if the battery is disconnected.
XX.X AVG MPG (L/100km)
Average fuel economy displays your
average fuel economy in miles/gallon or
liters/100 km.
MPG (L/km)
Displays the instantaneous fuel economy
as a bar graph. Your vehicle must be
moving to calculate instantaneous fuel
economy. Instantaneous fuel economy
cannot be reset.
TIMER
Displays the trip elapsed drive time. Press
and release RESET to pause the timer.
Press and hold RESET to reset the timer.
TBC GAIN
Displays the level of trailer brake gain or if
the trailer is not connected.
81
Super Duty (TFA) Information Displays
Page 85 of 458
EXHAUST FILTER
For more information, refer to the Diesel
supplement.
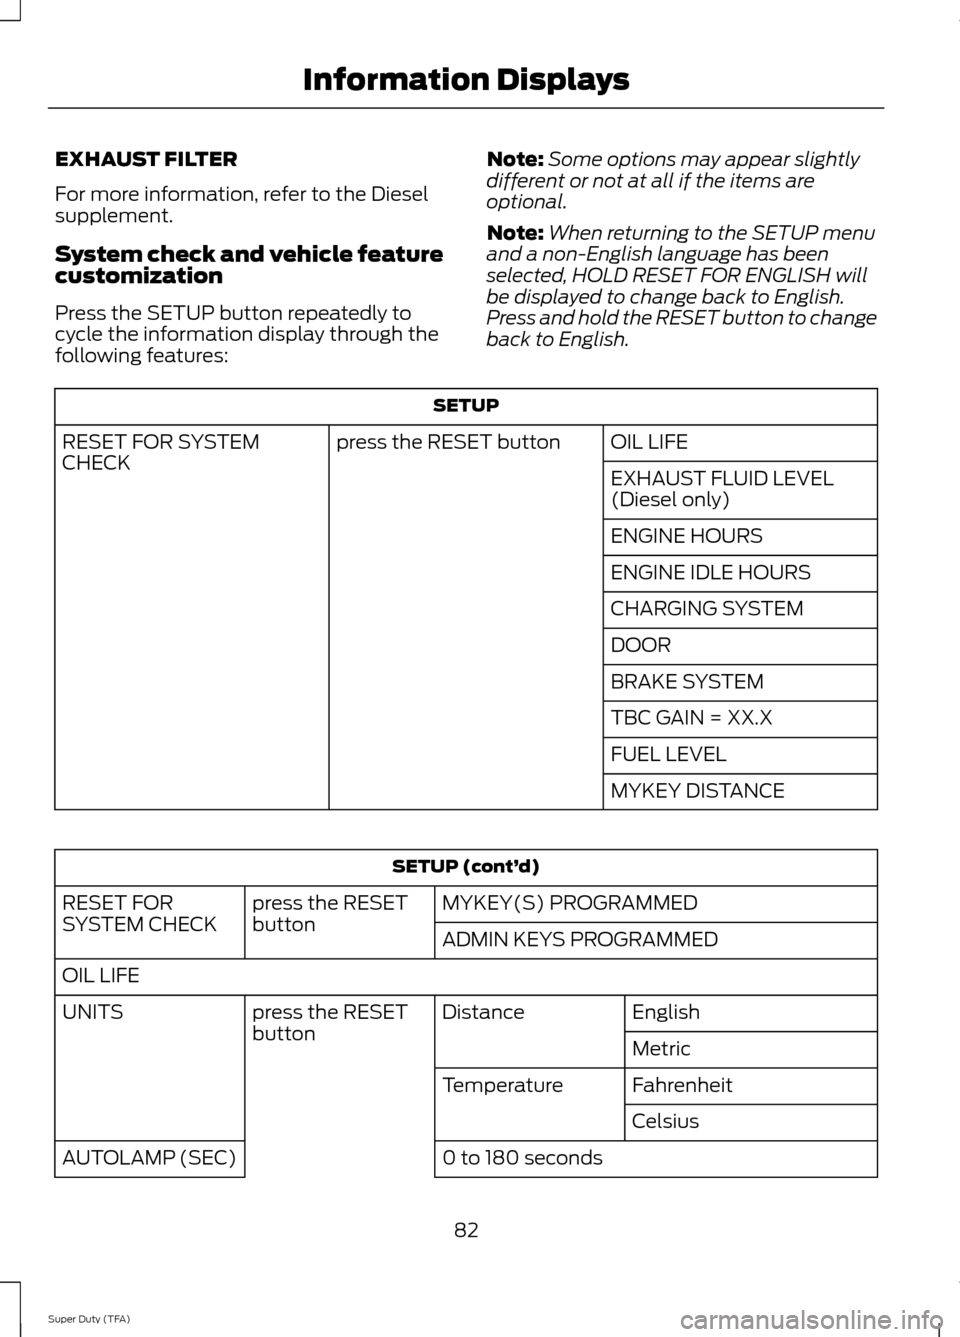
System check and vehicle feature
customization
Press the SETUP button repeatedly to
cycle the information display through the
following features:
Note:
Some options may appear slightly
different or not at all if the items are
optional.
Note: When returning to the SETUP menu
and a non-English language has been
selected, HOLD RESET FOR ENGLISH will
be displayed to change back to English.
Press and hold the RESET button to change
back to English. SETUP
OIL LIFE
press the RESET button
RESET FOR SYSTEM
CHECK
EXHAUST FLUID LEVEL
(Diesel only)
ENGINE HOURS
ENGINE IDLE HOURS
CHARGING SYSTEM
DOOR
BRAKE SYSTEM
TBC GAIN = XX.X
FUEL LEVEL
MYKEY DISTANCESETUP (cont’
d)
MYKEY(S) PROGRAMMED
press the RESET
button
RESET FOR
SYSTEM CHECK
ADMIN KEYS PROGRAMMED
OIL LIFE English
Distance
press the RESET
button
UNITS
Metric
Fahrenheit
Temperature
Celsius
0 to 180 seconds
AUTOLAMP (SEC)
82
Super Duty (TFA) Information Displays
Page 86 of 458
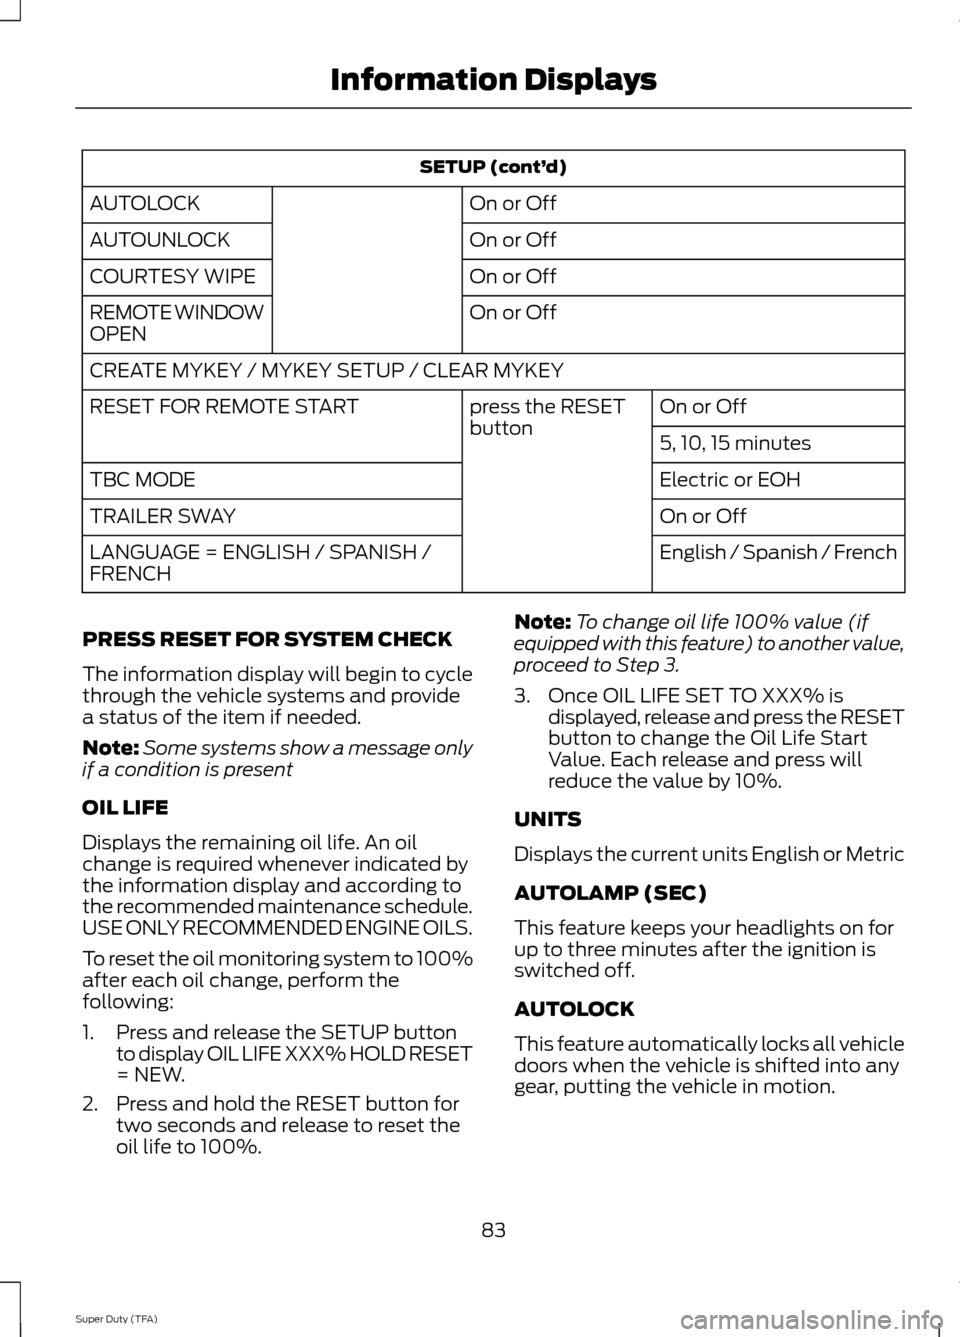
SETUP (cont’
d)
On or Off
AUTOLOCK
On or Off
AUTOUNLOCK
On or Off
COURTESY WIPE
On or Off
REMOTE WINDOW
OPEN
CREATE MYKEY / MYKEY SETUP / CLEAR MYKEY
On or Off
press the RESET
button
RESET FOR REMOTE START
5, 10, 15 minutes
Electric or EOH
TBC MODE
On or Off
TRAILER SWAY
English / Spanish / French
LANGUAGE = ENGLISH / SPANISH /
FRENCH
PRESS RESET FOR SYSTEM CHECK
The information display will begin to cycle
through the vehicle systems and provide
a status of the item if needed.
Note: Some systems show a message only
if a condition is present
OIL LIFE
Displays the remaining oil life. An oil
change is required whenever indicated by
the information display and according to
the recommended maintenance schedule.
USE ONLY RECOMMENDED ENGINE OILS.
To reset the oil monitoring system to 100%
after each oil change, perform the
following:
1. Press and release the SETUP button to display OIL LIFE XXX% HOLD RESET
= NEW.
2. Press and hold the RESET button for two seconds and release to reset the
oil life to 100%. Note:
To change oil life 100% value (if
equipped with this feature) to another value,
proceed to Step 3.
3. Once OIL LIFE SET TO XXX% is displayed, release and press the RESET
button to change the Oil Life Start
Value. Each release and press will
reduce the value by 10%.
UNITS
Displays the current units English or Metric
AUTOLAMP (SEC)
This feature keeps your headlights on for
up to three minutes after the ignition is
switched off.
AUTOLOCK
This feature automatically locks all vehicle
doors when the vehicle is shifted into any
gear, putting the vehicle in motion.
83
Super Duty (TFA) Information Displays
Page 87 of 458
AUTOUNLOCK
This feature automatically unlocks all
vehicle doors when the driver
’s door is
opened within 10 minutes of the ignition
being turned off.
COURTESY WIPE
This feature allows for an extra swipe of
the wipers after a wipe/wash cycle.
CREATE MYKEY / MYKEY SETUP /
CLEAR MYKEY
For more information, See Creating a
MyKey (page 49).
RESET FOR REMOTE START (if
equipped)
REAR PARK AID
This feature sounds a warning tone to warn
the driver of obstacles near the rear
bumper, and functions only when R
(Reverse) gear is selected.
TBC MODE (if equipped)
Allows you to choose the trailer brake
mode.
TRAILER SWAY (if equipped)
This feature uses the electronic stability
control to mitigate trailer sway.
LANGUAGE = ENGLISH / SPANISH /
FRENCH
Allows you to choose which language the
message center will display in.
Waiting four seconds or pressing the
RESET button cycles the message center
through each of the language choices.
Press the RESET button to set the
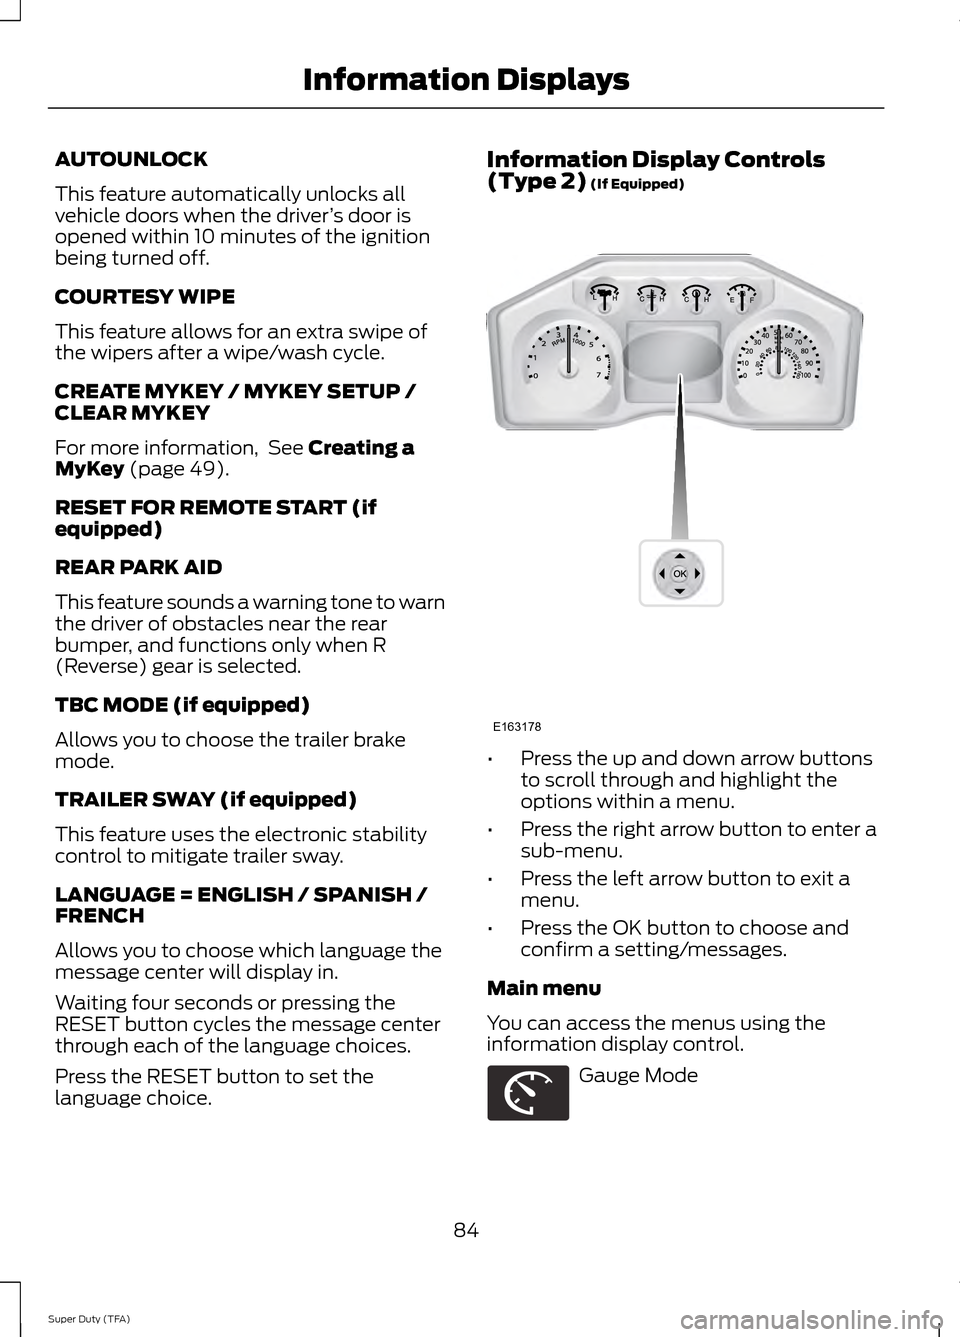
language choice. Information Display Controls
(Type 2)
(If Equipped)
•
Press the up and down arrow buttons
to scroll through and highlight the
options within a menu.
• Press the right arrow button to enter a
sub-menu.
• Press the left arrow button to exit a
menu.
• Press the OK button to choose and
confirm a setting/messages.
Main menu
You can access the menus using the
information display control. Gauge Mode
84
Super Duty (TFA) Information DisplaysE163178 E163179