Page 174 of 461
MANUAL TRANSMISSION (IF EQUIPPED)
Using the Clutch
Manual transmission vehicles have a starter interlock that prevents
starting the engine unless the clutch pedal is fully pressed.
To start the vehicle:
1. Make sure the parking brake is fully set.
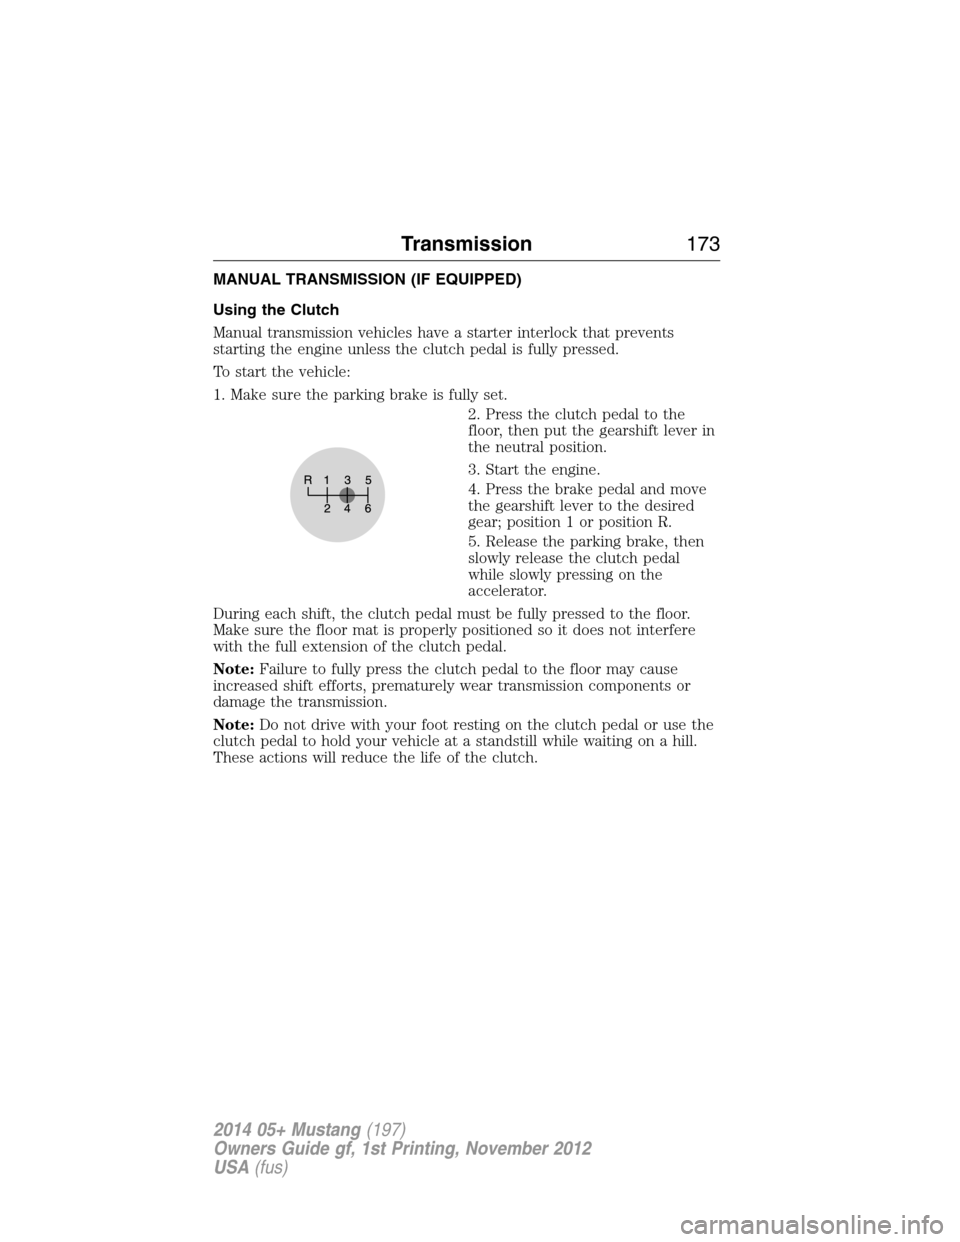
2. Press the clutch pedal to the
floor, then put the gearshift lever in
the neutral position.
3. Start the engine.
4. Press the brake pedal and move
the gearshift lever to the desired
gear; position 1 or position R.
5. Release the parking brake, then
slowly release the clutch pedal
while slowly pressing on the
accelerator.
During each shift, the clutch pedal must be fully pressed to the floor.
Make sure the floor mat is properly positioned so it does not interfere
with the full extension of the clutch pedal.
Note:Failure to fully press the clutch pedal to the floor may cause
increased shift efforts, prematurely wear transmission components or
damage the transmission.
Note:Do not drive with your foot resting on the clutch pedal or use the
clutch pedal to hold your vehicle at a standstill while waiting on a hill.
These actions will reduce the life of the clutch.
Transmission173
2014 05+ Mustang(197)
Owners Guide gf, 1st Printing, November 2012
USA(fus)
Page 176 of 461
Reverse
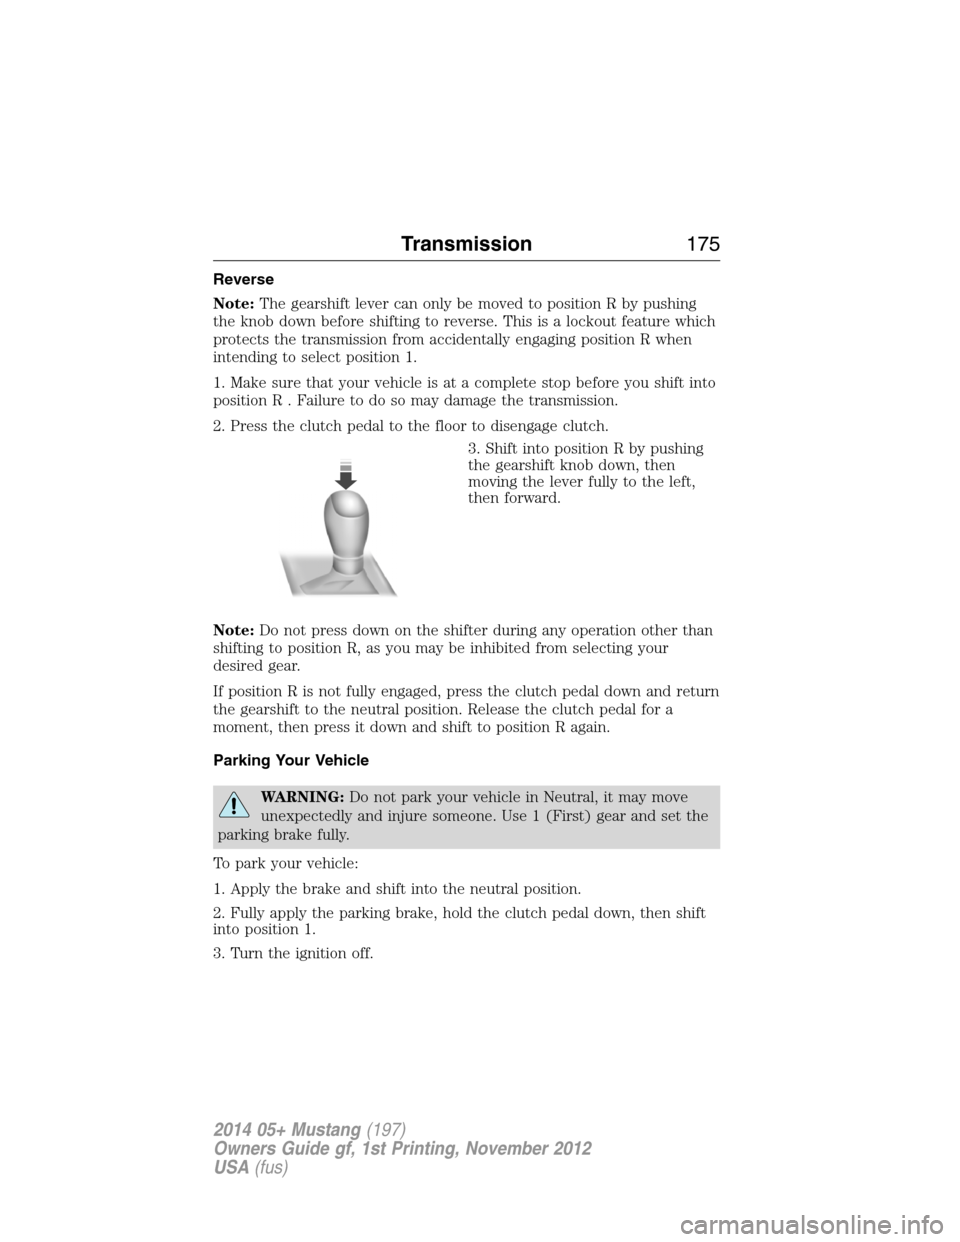
Note:The gearshift lever can only be moved to position R by pushing
the knob down before shifting to reverse. This is a lockout feature which
protects the transmission from accidentally engaging position R when
intending to select position 1.
1. Make sure that your vehicle is at a complete stop before you shift into
position R . Failure to do so may damage the transmission.
2. Press the clutch pedal to the floor to disengage clutch.
3. Shift into position R by pushing
the gearshift knob down, then
moving the lever fully to the left,
then forward.
Note:Do not press down on the shifter during any operation other than
shifting to position R, as you may be inhibited from selecting your
desired gear.
If position R is not fully engaged, press the clutch pedal down and return
the gearshift to the neutral position. Release the clutch pedal for a
moment, then press it down and shift to position R again.
Parking Your Vehicle
WARNING:Do not park your vehicle in Neutral, it may move
unexpectedly and injure someone. Use 1 (First) gear and set the
parking brake fully.
To park your vehicle:
1. Apply the brake and shift into the neutral position.
2. Fully apply the parking brake, hold the clutch pedal down, then shift
into position 1.
3. Turn the ignition off.
Transmission175
2014 05+ Mustang(197)
Owners Guide gf, 1st Printing, November 2012
USA(fus)
Page 180 of 461
GENERAL INFORMATION
Note:Occasional brake noise is normal. If a metal-to-metal, continuous
grinding or continuous squeal sound is present, the brake linings may
be worn out and should be inspected by an authorized dealer. If your
vehicle has continuous vibration or shudder in the steering wheel while
braking, you should take it to an authorized dealer for inspection.
Note:Brake dust may accumulate on the wheels, even under normal
driving conditions. Some dust is inevitable as the brakes wear and does
not contribute to brake noise. See theVehicle Carechapter for wheel
cleaning instructions.
See theInstrument Clusterchapter for information on the
brake system warning light.
Wet brakes result in reduced braking efficiency. Gently press the brake
pedal a few times when driving from a car wash or standing water to dry
the brakes.
Brake Over Accelerator
If the accelerator pedal becomes stuck or entrapped, apply steady and firm
pressure to the brake pedal to slow your vehicle and reduce engine power.
If you experience this condition, apply the brakes and bring your vehicle to
a safe stop. Turn the engine off, shift to positionPand apply the parking
brake, then inspect the accelerator pedal for any interferences. If none are
found and the condition persists, have your vehicle towed to the nearest
authorized dealer.
Anti-Lock Brake System
This system helps you maintain steering control during emergency stops
by keeping the brakes from locking.
The anti-lock brake system lamp momentarily illuminates when
the ignition is turned on. If the light does not illuminate during
start-up, remains on or flashes, the anti-lock brake system may
be disabled and may need to be serviced.
If the anti-lock brake system is disabled, normal braking is still
effective. If the brake warning lamp illuminates with the parking
brake released, have your brake system serviced immediately.
Brakes179
2014 05+ Mustang(197)
Owners Guide gf, 1st Printing, November 2012
USA(fus)
Page 181 of 461
HINTS ON DRIVING WITH ANTI-LOCK BRAKES
When the system is operating, the brake pedal will pulse and may travel
further. Maintain pressure on the brake pedal. You may also hear a noise
from the system. This is normal.
The anti-lock braking system will not eliminate the dangers inherent
when:
•you drive too closely to the vehicle in front of you.
•your vehicle is hydroplaning.
•you take corners too fast.
•the road surface is poor.
PARKING BRAKE
WARNING:If the parking brake is fully released, but the brake
warning lamp remains illuminated, the brakes may not be
working properly. See your authorized dealer as soon as possible.
WARNING:Always set the parking brake fully and make sure
that the transmission selector lever is securely latched in position
P(automatic transmission) or position1(manual transmission).
To set the parking brake, pull the parking brake handle up as far as
possible.
To release the parking brake:
1. Press and hold the button located at the end of the parking brake
handle.
2. Pull the handle up slightly, then push the handle down.
180Brakes
2014 05+ Mustang(197)
Owners Guide gf, 1st Printing, November 2012
USA(fus)
Page 186 of 461

SENSING SYSTEM (IF EQUIPPED)
WARNING:To help avoid personal injury, please read and
understand the limitations of the system as contained in this
section. Sensing is only an aid for some (generally large and fixed)
objects when moving in reverse on a flat surface at parking speeds.
Traffic control systems, inclement weather, air brakes, and external
motors and fans may also affect the function of the sensing system;
this may include reduced performance or a false activation.
WARNING:To help avoid personal injury, always use caution
when the transmission is inRand when using the sensing
system.
WARNING:This system is not designed to prevent contact with
small or moving objects. The system is designed to provide a
warning to assist the driver in detecting large stationary objects to
avoid damaging the vehicle. The system may not detect smaller objects,
particularly those close to the ground.
WARNING:Certain add-on devices, such as large trailer hitches,
bike or surfboard racks and any device that may block the normal
detection zone of the system, may create false beeps.
Note:Keep the sensors (located on the bumper/fascia) free from snow,
ice and large accumulations of dirt. If the sensors are covered, the
system’s accuracy can be affected. Do not clean the sensors with sharp
objects.
Note:If your vehicle sustains damage to the bumper/fascia, leaving it
misaligned or bent, the sensing zone may be altered causing inaccurate
measurement of obstacles or false alarms.
The sensing system warns the driver of obstacles within a certain range
of the bumper area. The system turns on automatically whenever the
ignition is switched on.
When receiving a detection warning, the radio volume is reduced to a
predetermined level. After the warning goes away, the radio volume
returns to the previous level.
Parking Aids185
2014 05+ Mustang(197)
Owners Guide gf, 1st Printing, November 2012
USA(fus)
Page 216 of 461
WARNING(Continued)
•Check attachment of floor mats on a regular basis. Always properly
reinstall and secure floor mats that have been removed for cleaning
or replacement.
•Always make sure that objects cannot fall into the driver footwell
while the vehicle is moving. Objects that are loose can become
trapped under the pedals causing a loss of vehicle control.
•Failure to properly follow floor mat installation or attachment
instructions can potentially cause interference with pedal operation
causing loss of control of vehicle.
•To install floor mats, position the floor mat so that the eyelet is over
the retention post and press down to lock in.
•To remove the floor mat, reverse the installation procedure.
Driving Hints215
2014 05+ Mustang(197)
Owners Guide gf, 1st Printing, November 2012
USA(fus)
Page 217 of 461
ROADSIDE ASSISTANCE
Vehicles Sold in the U.S.: Getting Roadside Assistance
To fully assist you should you have a vehicle concern, Ford Motor
Company offers a complimentary roadside assistance program.
This program is separate from the New Vehicle Limited Warranty.
The service is available:
•24 hours a day, seven days a week
•for the coverage period listed on the Roadside Assistance Card
included in your owner’s manual portfolio.
Roadside assistance will cover:
•a flat tire change with a good spare (except vehicles that have been
supplied with a tire inflation kit).
•battery jump start.
•lock-out assistance (key replacement cost is the customer’s
responsibility).
•fuel delivery – Independent Service Contractors, if not prohibited by
state, local or municipal law, shall deliver up to 2.0 gallons (7.5 liters)
of gasoline or 5.0 gallons (18.9 liters) of diesel fuel to a disabled
vehicle. Fuel delivery service is limited to two no-charge occurrences
within a 12-month period.
•winch out – available within 100 feet (30.5 meters) of a paved or
county maintained road, no recoveries.
•towing – Ford and Lincoln eligible vehicles towed to an authorized
dealer within 35 miles (56 kilometers) of the disablement location or
to the nearest authorized dealer. If a member requests to be towed
to an authorized dealer more than 35 miles (56 kilometers) from the
disablement location, the member shall be responsible for any mileage
costs in excess of 35 miles (56 kilometers).
Trailers shall be covered up to $200 if the disabled eligible vehicle
requires service at the nearest authorized dealer. If the trailer is disabled,
but the towing vehicle is operational, the trailer does not qualify for any
roadside services.
216Roadside Emergencies
2014 05+ Mustang(197)
Owners Guide gf, 1st Printing, November 2012
USA(fus)
Page 233 of 461

Fuse or relay
numberFuse amp
ratingProtected components
3 — Not used
4 30A* Blower motor relay
5 20A* Power point (body)
6 40A* Rear defroster relay
7 40A* Cooling fan relay
8 40A* Anti-lock brake system pump
9 30A* Wipers
10 30A* Anti-lock brake system valve
11 — Not used
12 20A* Differential fluid pump
(Shelby only)
13 20A** Fuel pump relay (non-Shelby)
25A** Fuel pump relay (Shelby only)
14 20A** Fuel pump relay #2 (Shelby only)
15 10A** Intercooler pump relay
(Shelby only)
16 20A** Heated seats
17 10A** Alternator sense
18 20A* Auxiliary body module
19 30A* Starter relay
20 30A* Rear amplifier (Shaker Pro radio)
21 30A* Powertrain relay
22 20A* Power point (instrument panel)
23 10A** Powertrain control module
keep-alive power
24 10A** Brake on/off power
25 10A** A/C compressor relay
26 20A** Left high intensity discharge
headlamp relay
27 20A** Right high intensity discharge
headlamp relay
28 — Not used
232Fuses
2014 05+ Mustang(197)
Owners Guide gf, 1st Printing, November 2012
USA(fus)