2014 FORD FUSION (AMERICAS) manual transmission
[x] Cancel search: manual transmissionPage 180 of 458

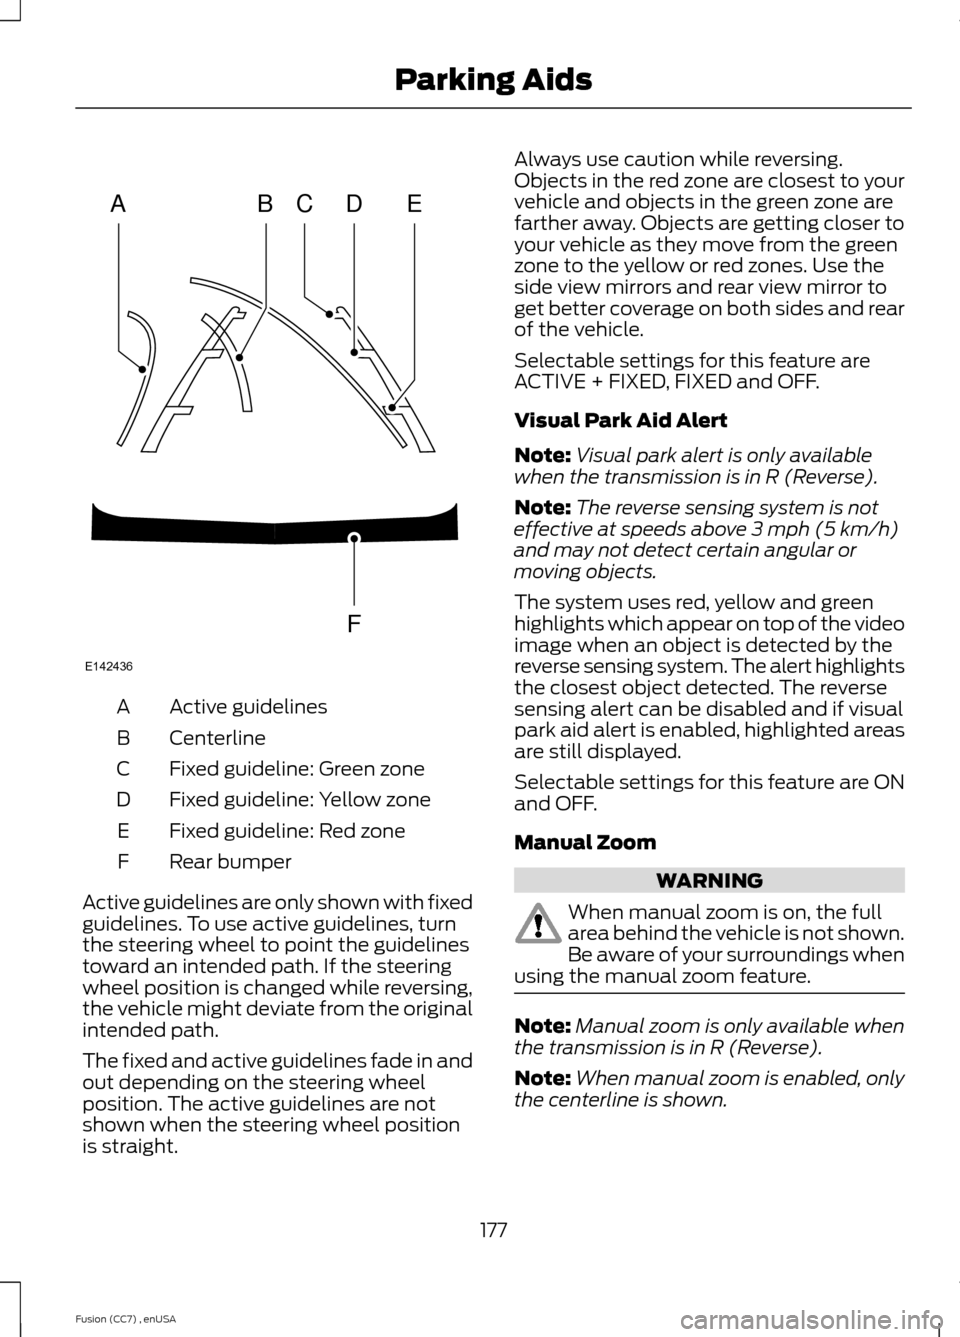
Active guidelinesA
CenterlineB
Fixed guideline: Green zoneC
Fixed guideline: Yellow zoneD
Fixed guideline: Red zoneE
Rear bumperF
Active guidelines are only shown with fixedguidelines. To use active guidelines, turnthe steering wheel to point the guidelinestoward an intended path. If the steeringwheel position is changed while reversing,the vehicle might deviate from the originalintended path.
The fixed and active guidelines fade in andout depending on the steering wheelposition. The active guidelines are notshown when the steering wheel positionis straight.
Always use caution while reversing.Objects in the red zone are closest to yourvehicle and objects in the green zone arefarther away. Objects are getting closer toyour vehicle as they move from the greenzone to the yellow or red zones. Use theside view mirrors and rear view mirror toget better coverage on both sides and rearof the vehicle.
Selectable settings for this feature areACTIVE + FIXED, FIXED and OFF.
Visual Park Aid Alert
Note:Visual park alert is only availablewhen the transmission is in R (Reverse).
Note:The reverse sensing system is noteffective at speeds above 3 mph (5 km/h)and may not detect certain angular ormoving objects.
The system uses red, yellow and greenhighlights which appear on top of the videoimage when an object is detected by thereverse sensing system. The alert highlightsthe closest object detected. The reversesensing alert can be disabled and if visualpark aid alert is enabled, highlighted areasare still displayed.
Selectable settings for this feature are ONand OFF.
Manual Zoom
WARNING
When manual zoom is on, the fullarea behind the vehicle is not shown.Be aware of your surroundings whenusing the manual zoom feature.
Note:Manual zoom is only available whenthe transmission is in R (Reverse).
Note:When manual zoom is enabled, onlythe centerline is shown.
177Fusion (CC7) , enUSAParking AidsABCDFEE142436
Page 194 of 458

BLIND SPOT INFORMATION
SYSTEM
Blind Spot Information System(BLIS®) with Cross Traffic Alert (If
Equipped)
WARNING
To help avoid injuries, NEVER use theBlind Spot Information System as areplacement for using the interiorand exterior mirrors and looking over yourshoulder before changing lanes. The BlindSpot Information System is not areplacement for careful driving.
The Blind Spot Information System aidsyou in detecting vehicles that may haveentered the blind spot zone (A). Thedetection area is on both sides of yourvehicle, extending rearward from theexterior mirrors to approximately 10 ft(3 m)beyond the bumper. The systemalerts you if certain vehicles enter the blindspot zone while driving.
Cross Traffic Alert warns you of vehiclesapproaching from the sides when thetransmission is in reverse (R).
Note:The Blind Spot Information Systemdoes not prevent contact with other vehiclesor objects; nor detect parked vehicles,people, animals or infrastructure (fences,guardrails, trees, etc.). It only alerts you tovehicles in the blind zones.
Note:When a vehicle passes quicklythrough the blind zone, typically fewer thantwo seconds, the system does not trigger.
Using the Systems
The Blind Spot Information System turnson when you start the engine and you driveyou vehicle forward above 5 mph(8 km/h); it remains on while thetransmission is in drive (D) or neutral (N).If shifted out of drive (D) or neutral (N),the system enters cross traffic alert mode.Once shifted back into drive (D), the BlindSpot Information System turns back onwhen you drive your vehicle above 5 mph(8 km/h).
Note:The Blind Spot Information Systemdoes not function in reverse (R) or park (P)or provide any additional warning when aturn signal is on.
Note:Cross Traffic Alert detectsapproaching vehicles from up to 46 ft(14 m) away though coverage decreaseswhen the sensors are blocked. Reversingslowly helps increase the coverage area andeffectiveness.
Note:For manual transmission vehicles,the cross traffic alert will be active only ifthe transmission is in reverse (R). If yourvehicle is rolling backwards and thetransmission is not in reverse (R) then CrossTraffic Alert will not be active.
191Fusion (CC7) , enUSADriving AidsAAE124788
Page 213 of 458

Trailer lamps are required on most towedvehicles. Make sure all running lights, brakelights, turn signals and hazard lights areworking.
Before Towing a Trailer
Practice turning, stopping and backing-upto get the feel of your vehicle-trailercombination before starting on a trip.When turning, make wider turns so thetrailer wheels clear curbs and otherobstacles.
When Towing a Trailer
•Do not drive faster than 70 mph (113km/h) during the first 500 miles (800kilometers).
•Do not make full-throttle starts.
•Check your hitch, electrical connectionsand trailer wheel lug nuts thoroughlyafter you have traveled 50 miles (80kilometers).
•When stopped in congested or heavytraffic during hot weather, place thegearshift in position P (automatictransmission) or neutral (manualtransmission) to aid engine andtransmission cooling and to help A/Cperformance.
•Turn off the speed control with heavyloads or in hilly terrain. The speedcontrol may turn off automaticallywhen you are towing on long, steepgrades.
•Shift to a lower gear when driving downa long or steep hill. Do not apply thebrakes continuously, as they mayoverheat and become less effective.
•If your transmission is equipped with aGrade Assist or Tow/Haul feature, usethis feature when towing. This providesengine braking and helps eliminateexcessive transmission shifting foroptimum fuel economy andtransmission cooling.
•Allow more distance for stopping witha trailer attached. Anticipate stops andbrake gradually.
•Avoid parking on a grade. However, ifyou must park on a grade:
1.Turn the steering wheel to point yourvehicle tires away from traffic flow.
2.Set your vehicle parking brake.
3.Place the automatic transmission inposition P or manual transmission in alow gear.
4.Place wheel chocks in front and backof the trailer wheels. (Chocks notincluded with vehicle.)
Launching or Retrieving a Boat orPersonal Watercraft (PWC)
Note:Disconnect the wiring to the trailerbefore backing the trailer into the water.
Note:Reconnect the wiring to the trailerafter removing the trailer from the water.
When backing down a ramp during boatlaunching or retrieval:
•Do not allow the static water level torise above the bottom edge of the rearbumper.
•Do not allow waves to break higherthan 6 inches (15 centimeters) abovethe bottom edge of the rear bumper.
Exceeding these limits may allow water toenter vehicle components:
•Causing internal damage to thecomponents.
•Affecting drivability, emissions, andreliability.
Replace the rear axle lubricant anytimethe rear axle has been submerged in water.Water may have contaminated the rearaxle lubricant, which is not normallychecked or changed unless a leak issuspected or other axle repair is required.
210Fusion (CC7) , enUSATowing
Page 214 of 458

TRANSPORTING THE VEHICLE
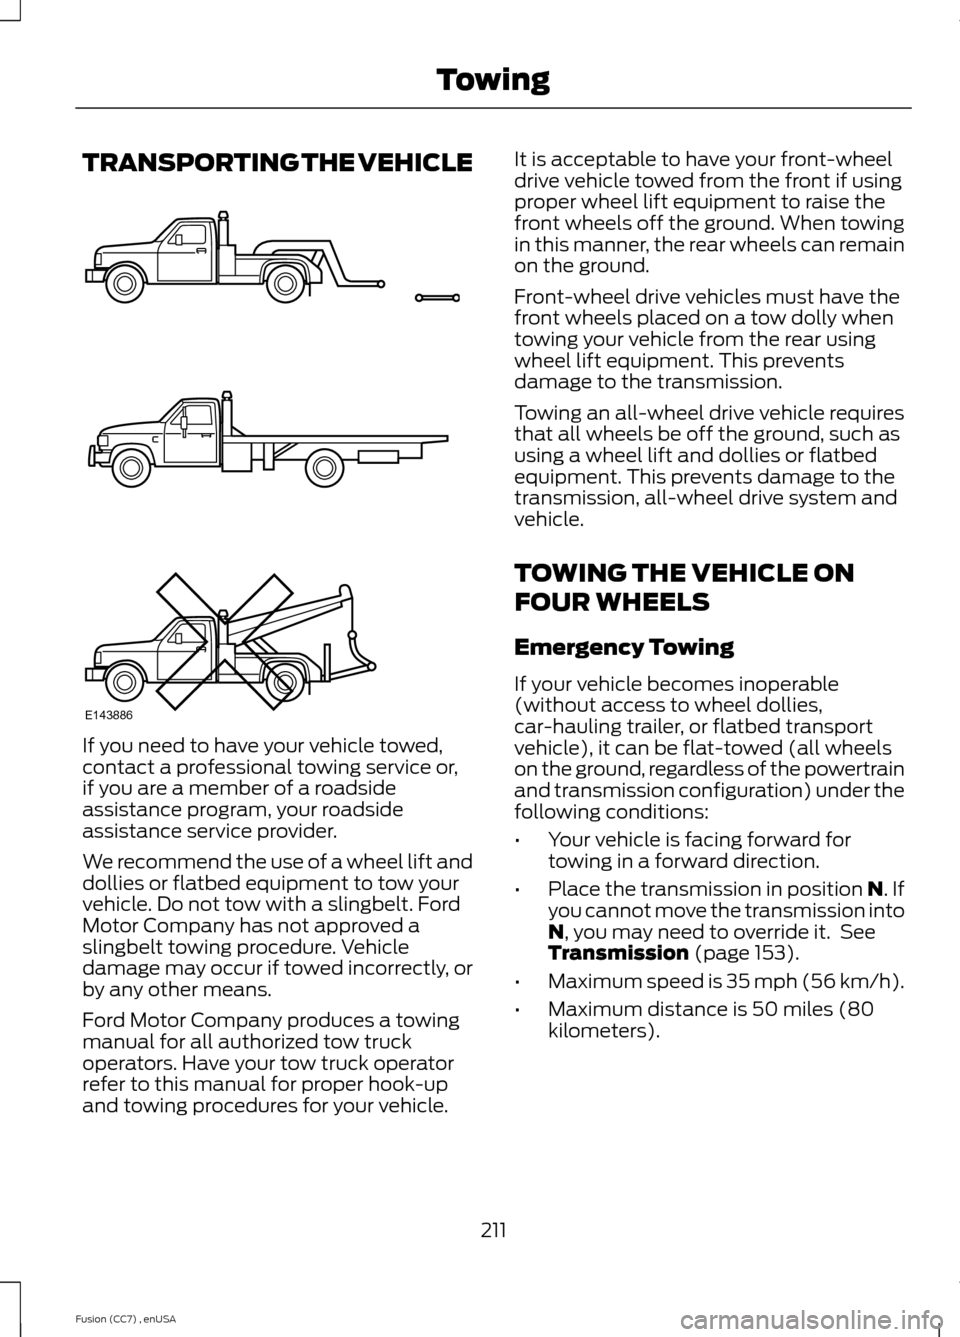
If you need to have your vehicle towed,contact a professional towing service or,if you are a member of a roadsideassistance program, your roadsideassistance service provider.
We recommend the use of a wheel lift anddollies or flatbed equipment to tow yourvehicle. Do not tow with a slingbelt. FordMotor Company has not approved aslingbelt towing procedure. Vehicledamage may occur if towed incorrectly, orby any other means.
Ford Motor Company produces a towingmanual for all authorized tow truckoperators. Have your tow truck operatorrefer to this manual for proper hook-upand towing procedures for your vehicle.
It is acceptable to have your front-wheeldrive vehicle towed from the front if usingproper wheel lift equipment to raise thefront wheels off the ground. When towingin this manner, the rear wheels can remainon the ground.
Front-wheel drive vehicles must have thefront wheels placed on a tow dolly whentowing your vehicle from the rear usingwheel lift equipment. This preventsdamage to the transmission.
Towing an all-wheel drive vehicle requiresthat all wheels be off the ground, such asusing a wheel lift and dollies or flatbedequipment. This prevents damage to thetransmission, all-wheel drive system andvehicle.
TOWING THE VEHICLE ON
FOUR WHEELS
Emergency Towing
If your vehicle becomes inoperable(without access to wheel dollies,car-hauling trailer, or flatbed transportvehicle), it can be flat-towed (all wheelson the ground, regardless of the powertrainand transmission configuration) under thefollowing conditions:
•Your vehicle is facing forward fortowing in a forward direction.
•Place the transmission in position N. Ifyou cannot move the transmission intoN, you may need to override it. SeeTransmission (page 153).
•Maximum speed is 35 mph (56 km/h).
•Maximum distance is 50 miles (80kilometers).
211Fusion (CC7) , enUSATowingE143886
Page 250 of 458

5.Run the engine until it reaches normaloperating temperature. While theengine is warming up, complete thefollowing: Reset the clock. See AudioSystem (page 294). Reset the powerwindows bounce-back feature. SeeWindows and Mirrors (page 75).Reset the radio station presets. SeeAudio System (page 294).
6.Allow the engine to idle for at least oneminute. If the engine turns off, step onthe accelerator to start the engine.
7.While the engine is running, step on thebrake pedal and shift the transmissionto N.
8.Allow the engine to run for at least oneminute by pressing on the acceleratorpedal.
9.Drive the vehicle at least 10 miles (16kilometers) to completely relearn theidle and fuel trim strategy.
Note:If you do not allow the engine torelearn the idle and fuel trim strategy, theidle quality of your vehicle may be adverselyaffected until the engine computereventually relearns the idle trim and fueltrim strategy.
Note:Always dispose of automotivebatteries in a responsible manner. Followyour local authorized standards for disposal.Call your local authorized recycling centerto find out more about recycling automotivebatteries.
Note:It is recommended that the negativebattery cable terminal be disconnected fromthe battery if you plan to store your vehiclefor an extended period of time.
CHECKING THE WIPER
BLADES
Run the tip of your fingers over the edge ofthe blade to check for roughness.
Clean the wiper blades with washer fluidor water applied with a soft sponge orcloth.
CHANGING THE WIPER
BLADES
The wiper arms can be manually movedwhen the ignition is off. This allows for easeof blade replacement and cleaning underthe blades.
1.Pull the wiper blade and arm awayfrom the glass.
2.Press the locking buttons together.
3.Rotate and remove the wiper blade.
4.Install in the reverse order.
247Fusion (CC7) , enUSAMaintenanceE142463 E129990112
Page 287 of 458

WARNINGS
Never get underneath a vehicle thatis supported only by a jack. If yourvehicle slips off the jack, you orsomeone else could be seriously injured.
Do not attempt to change a tire onthe side of the vehicle close tomoving traffic. Pull far enough off theroad to avoid the danger of being hit whenoperating the jack or changing the wheel.
Always use the jack provided asoriginal equipment with your vehicle.If using a jack other than the oneprovided as original equipment with yourvehicle, make sure the jack capacity isadequate for the vehicle weight, includingany vehicle cargo or modifications.
Note:Passengers should not remain in thevehicle when the vehicle is being jacked.
1.Park on a level surface, set the parkingbrake and activate the hazard flashers.
2.Place the transmission selector leverin position P (automatic transmission)or position R (manual transmission)and turn the engine off.
3.Remove the carpeted wheel cover.
4.Remove the spare tire bolt securing thespare tire by turning itcounterclockwise.
5.Remove the spare tire from the sparetire compartment.
6.Remove the lug wrench and jack fromthe foam holder.
7.Block the diagonally opposite wheel.
8.Loosen each wheel lug nut one-halfturn counterclockwise but do notremove them until the wheel is raisedoff the ground.
Note:Jack at the specified locations toavoid damage to the vehicle.
9.The vehicle jacking points are shownhere, and are depicted on the yellowwarning label on the jack.
10.Small arrow-shaped marks on thesills show the location of the jackingpoints.
284Fusion (CC7) , enUSAWheels and TiresE142550 E142551 E145908
Page 293 of 458

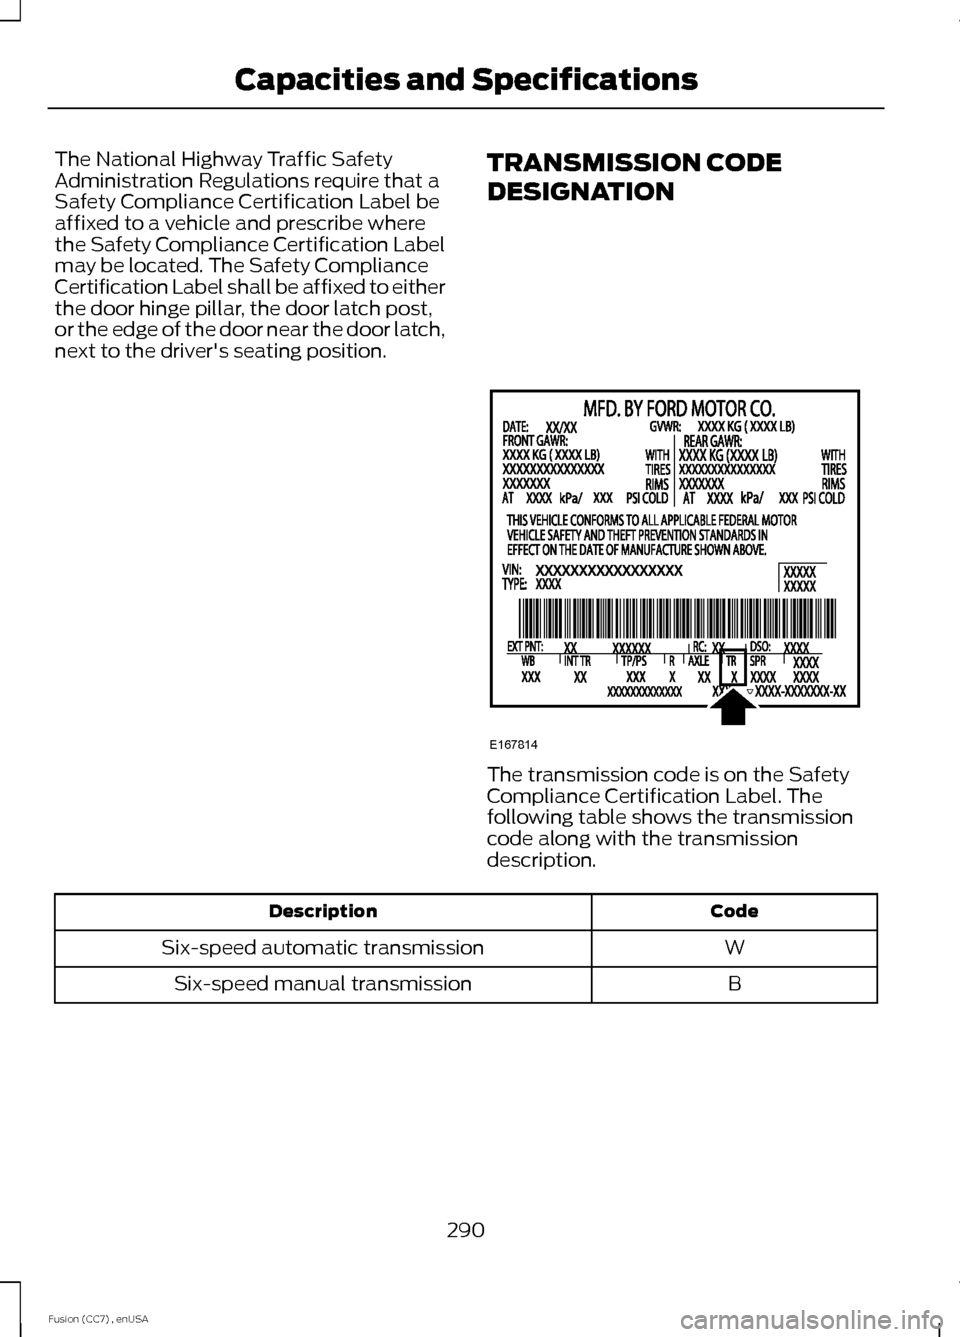
The National Highway Traffic SafetyAdministration Regulations require that aSafety Compliance Certification Label beaffixed to a vehicle and prescribe wherethe Safety Compliance Certification Labelmay be located. The Safety ComplianceCertification Label shall be affixed to eitherthe door hinge pillar, the door latch post,or the edge of the door near the door latch,next to the driver's seating position.
TRANSMISSION CODE
DESIGNATION
The transmission code is on the SafetyCompliance Certification Label. Thefollowing table shows the transmissioncode along with the transmissiondescription.
CodeDescription
WSix-speed automatic transmission
BSix-speed manual transmission
290Fusion (CC7) , enUSACapacities and SpecificationsE167814
Page 294 of 458

TECHNICAL SPECIFICATIONS
Ford part number /Ford specificationFord part name orequivalentCapacityItem
PM-1-C / WSS-M6C65-A2Motorcraft DOT 4 LVHigh PerformanceBrake Fluid
Between MIN andMAX on reservoirBrake fluid 1
Motorcraft XL-5(aerosol) or CRCSL3151ESB / ESB-M1C93-B
Multi-PurposeGrease Spray(lithium grease)
Not applicableDoor latch, hoodlatch, trunk latchand seat tracks
XL-1 (U.S.) /Motorcraft Penet-rating and LockLubricant (U.S.)
Not applicableLock cylinder--
CXC-51-A (Canada)/Motorcraft Penet-rating fluid (Canada)--
XT-10-QLV MERCONLVMotorcraft MERCONLV ATF9.0 qt (8.5 L)Automatic trans-
mission fluid 2, 3
WSS-M2C200-D2Motorcraft DualClutch TransmissionFluid XT-11-QDC
1.7 qt (1.67 L)6-Speed Manualtransaxle fluid
XY-80W90-QL /WSP-M2C197-AMotorcraft SAE80W-90 PremiumRear Axle Lubricant
1.2 qt (1.15 L)Rear differential(All Wheel Drive)fluid
XY-75W140-QL /WSL-M2C192-AMotorcraft SAE75W-140 SyntheticRear Axle Lubricant
11.8 fl oz (0.35 L)Power TransferUnit (PTU) fluid
(All Wheel Drive) 4
WSS-M2C945-AMotorcraft SAE 5W-20 Motor Oil4.3 qt (4.1 L)1.5L EcoBoost
engine oil 5, 6,7
4.3 qt (4.1 L)1.6L EcoBoost
engine oil 5, 6,7
WSS-M2C946-AMotorcraft SAE 5W-30 Motor Oil5.7 qt (5.4 L)2.0L EcoBoost
engine oil 5, 6,7
WSS-M2C945-AMotorcraft SAE 5W-20 Motor Oil5.7 qt (5.4 L)2.5L engine oil 5, 6,7
291Fusion (CC7) , enUSACapacities and Specifications