2014 FORD FUSION (AMERICAS) turn signal
[x] Cancel search: turn signalPage 194 of 458

BLIND SPOT INFORMATION
SYSTEM
Blind Spot Information System(BLIS®) with Cross Traffic Alert (If
Equipped)
WARNING
To help avoid injuries, NEVER use theBlind Spot Information System as areplacement for using the interiorand exterior mirrors and looking over yourshoulder before changing lanes. The BlindSpot Information System is not areplacement for careful driving.
The Blind Spot Information System aidsyou in detecting vehicles that may haveentered the blind spot zone (A). Thedetection area is on both sides of yourvehicle, extending rearward from theexterior mirrors to approximately 10 ft(3 m)beyond the bumper. The systemalerts you if certain vehicles enter the blindspot zone while driving.
Cross Traffic Alert warns you of vehiclesapproaching from the sides when thetransmission is in reverse (R).
Note:The Blind Spot Information Systemdoes not prevent contact with other vehiclesor objects; nor detect parked vehicles,people, animals or infrastructure (fences,guardrails, trees, etc.). It only alerts you tovehicles in the blind zones.
Note:When a vehicle passes quicklythrough the blind zone, typically fewer thantwo seconds, the system does not trigger.
Using the Systems
The Blind Spot Information System turnson when you start the engine and you driveyou vehicle forward above 5 mph(8 km/h); it remains on while thetransmission is in drive (D) or neutral (N).If shifted out of drive (D) or neutral (N),the system enters cross traffic alert mode.Once shifted back into drive (D), the BlindSpot Information System turns back onwhen you drive your vehicle above 5 mph(8 km/h).
Note:The Blind Spot Information Systemdoes not function in reverse (R) or park (P)or provide any additional warning when aturn signal is on.
Note:Cross Traffic Alert detectsapproaching vehicles from up to 46 ft(14 m) away though coverage decreaseswhen the sensors are blocked. Reversingslowly helps increase the coverage area andeffectiveness.
Note:For manual transmission vehicles,the cross traffic alert will be active only ifthe transmission is in reverse (R). If yourvehicle is rolling backwards and thetransmission is not in reverse (R) then CrossTraffic Alert will not be active.
191Fusion (CC7) , enUSADriving AidsAAE124788
Page 213 of 458

Trailer lamps are required on most towedvehicles. Make sure all running lights, brakelights, turn signals and hazard lights areworking.
Before Towing a Trailer
Practice turning, stopping and backing-upto get the feel of your vehicle-trailercombination before starting on a trip.When turning, make wider turns so thetrailer wheels clear curbs and otherobstacles.
When Towing a Trailer
•Do not drive faster than 70 mph (113km/h) during the first 500 miles (800kilometers).
•Do not make full-throttle starts.
•Check your hitch, electrical connectionsand trailer wheel lug nuts thoroughlyafter you have traveled 50 miles (80kilometers).
•When stopped in congested or heavytraffic during hot weather, place thegearshift in position P (automatictransmission) or neutral (manualtransmission) to aid engine andtransmission cooling and to help A/Cperformance.
•Turn off the speed control with heavyloads or in hilly terrain. The speedcontrol may turn off automaticallywhen you are towing on long, steepgrades.
•Shift to a lower gear when driving downa long or steep hill. Do not apply thebrakes continuously, as they mayoverheat and become less effective.
•If your transmission is equipped with aGrade Assist or Tow/Haul feature, usethis feature when towing. This providesengine braking and helps eliminateexcessive transmission shifting foroptimum fuel economy andtransmission cooling.
•Allow more distance for stopping witha trailer attached. Anticipate stops andbrake gradually.
•Avoid parking on a grade. However, ifyou must park on a grade:
1.Turn the steering wheel to point yourvehicle tires away from traffic flow.
2.Set your vehicle parking brake.
3.Place the automatic transmission inposition P or manual transmission in alow gear.
4.Place wheel chocks in front and backof the trailer wheels. (Chocks notincluded with vehicle.)
Launching or Retrieving a Boat orPersonal Watercraft (PWC)
Note:Disconnect the wiring to the trailerbefore backing the trailer into the water.
Note:Reconnect the wiring to the trailerafter removing the trailer from the water.
When backing down a ramp during boatlaunching or retrieval:
•Do not allow the static water level torise above the bottom edge of the rearbumper.
•Do not allow waves to break higherthan 6 inches (15 centimeters) abovethe bottom edge of the rear bumper.
Exceeding these limits may allow water toenter vehicle components:
•Causing internal damage to thecomponents.
•Affecting drivability, emissions, andreliability.
Replace the rear axle lubricant anytimethe rear axle has been submerged in water.Water may have contaminated the rearaxle lubricant, which is not normallychecked or changed unless a leak issuspected or other axle repair is required.
210Fusion (CC7) , enUSATowing
Page 221 of 458

Jump Starting
1.Start the engine of the booster vehicleand rev the engine moderately, or pressthe accelerator gently to keep yourengine speed between 2000 and 3000rpms, as shown in your tachometer.
2.Start the engine of the disabled vehicle.
3.Once the disabled vehicle has beenstarted, run both vehicle engines for anadditional three minutes beforedisconnecting the jumper cables.
Removing the Jumper Cables
Remove the jumper cables in the reverseorder that they were connected.
1.Remove the jumper cable from theground metal surface or connectingpoint, if available.
2.Remove the jumper cable on thenegative (-) terminal of the boostervehicle's battery.
3.Remove the jumper cable from thepositive (+) terminal of the boostervehicle's battery.
4.Remove the jumper cable from thepositive (+) terminal of the disabledvehicle's battery.
After the disabled vehicle has been startedand the jumper cables removed, allow itto idle for several minutes so the batterycan recharge.
POST-CRASH ALERT SYSTEM
The system flashes the turn signal lampsand sounds the horn (intermittently) in theevent of a serious impact that deploys anairbag (front, side, side curtain or SafetyCanopy) or the safety belt pretensioners.
The horn and lamps will turn off when:
•The hazard control button is pressed
•The panic button (if equipped) ispressed on the remote entrytransmitter
•Your vehicle runs out of power
Spinout Detection
If a spinout is detected, the vehicle comesto a stop and the hazard warning flasherscome on. The message Spinout DetectedHazards Activated will also appear onthe instrument cluster. The message maynot appear if your vehicle runs out ofpower.
Once the hazard warning flashers havebeen activated, you can turn them off by:
•Pressing the hazard warning flasherbutton
•Pressing the remote control unlockbutton
218Fusion (CC7) , enUSARoadside Emergencies4132E142665
Page 254 of 458

11.Carefully lift the headlamp andremove it from the vehicle.
12.Disconnect the electrical connector.
CHANGING A BULB
Lamp Assembly Condensation
Exterior lamps are vented toaccommodate normal changes in pressure.Condensation can be a natural by-productof this design. When moist air enters thelamp assembly through the vents, there isa possibility that condensation can occurwhen the temperature is cold. Whennormal condensation occurs, a thin film ofmist can form on the interior of the lens.The thin mist eventually clears and exitsthrough the vents during normal operation.Clearing time may take as long as 48 hoursunder dry weather conditions.
Examples of acceptable condensation are:
•Presence of thin mist (no streaks, dripmarks or droplets).
•Fine mist covers less than 50% of thelens.
Examples of unacceptable moisture(usually caused by a lamp water leak) are:
•Water puddle inside the lamp.
•Large water droplets, drip marks orstreaks present on the interior of thelens.
Take your vehicle to an authorized dealerfor service if any of the above conditionsof unacceptable moisture are present.
Replacing the Headlamp Bulbs
WARNING
Handle a halogen headlamp bulbcarefully and keep out of children’sreach. Grasp the bulb by only itsplastic base and do not touch the glass.The oil from your hand could cause thebulb to break the next time the headlampsare operated.
Note:If the bulb is accidentally touched, itshould be cleaned with rubbing alcoholbefore being used.
Headlamp assembly:
A.Side marker lamp bulb
B.High beam headlamp bulb
C.Low beam headlamp bulb
D.Front parking/Turn signal lamp bulb
Replacing the High Beam HeadlampBulb
1.Remove the headlamp assembly.
2.Remove the service cap.
3.Disconnect the electrical connector.
4.Turn the bulb counterclockwise andremove it from the headlampassembly.
5.Install the new bulb in reverse order.
251Fusion (CC7) , enUSAMaintenanceABCDE159753
Page 255 of 458

Replacing the Low Beam HeadlampBulb
1.Remove the headlamp assembly.
2.Remove the service cap.
3.Disconnect the electrical connector.
4.Release the retainer spring and removeit from the headlamp assembly.
5.Install the new bulb in reverse order.
Replacing the Front Parking/TurnSignal Lamp Bulb
1.Remove the headlamp assembly.
2.Turn the bulb assemblycounterclockwise and remove it fromthe headlamp assembly.
3.Separate the bulb from the bulbsocket.
4.Install the new bulb in reverse order.
Replacing the Side Marker Lamp Bulb
1.Remove the headlamp assembly.
2.Remove the service cap.
3.Depress the tabs on the socket andremove the socket and bulb together.
4.Separate the bulb from the bulbsocket.
5.Install the new bulb in reverse order.
Replacing the Tail, Brake, High-Mount Brake Lamp, and TurnSignal Lamp Bulbs
These lamps are designed with LED lightsources. For replacement, see yourauthorized dealer.
Replacing a Reverse Lamp Bulb
1.Make sure the lighting control is in theoff position.
2.Open the trunk deck lid.
3.Remove the push pins and repositionthe inner body side trim.
4.Remove the three lamp assembly nuts.
5.Gently pull the lamp assembly awayfrom the vehicle.
252Fusion (CC7) , enUSAMaintenanceE145777 E145778
Page 306 of 458

The multicast indicator appears in FMmode (only) if the current station isbroadcasting multiple digital broadcasts.The highlighted numbers signify availabledigital channels where new or differentcontent is available. HD1 signifies the mainprogramming status and is available inanalog and digital broadcasts. Othermulticast stations (HD2 through HD7) areonly available digitally.
When HD Radio broadcasts are active, youcan access the following functions:
When HD Radio broadcasts are active, youcan access the following functions:
•Scan allows you to hear a briefsampling of all available stations. Thisfeature still works when HD Radioreception is on, although it does notscan for HD2-HD7 channels. You maysee the HD logo appear if the stationhas a digital broadcast.
•Memory presets allow you to save anactive channel as a memory preset.Touch and hold a memory preset slotuntil the sound returns. There is a briefmute while the radio saves the station.Sound returns when finished. Whenswitching to an HD2 or HD3 memorypreset, the sound mutes before thedigital audio plays, because the systemhas to reacquire the digital signal.
Note:As with any saved radio station, youcannot access the saved station if yourvehicle is outside the station’s receptionarea.
HD Radio Reception and Station Troubleshooting
Potential reception issues
If you are listening to a multicast station and you are onthe fringe of the reception area, the station may mute dueto weak signal strength.
Reception area
If you are listening to HD1, the system switches back tothe analog broadcast until the digital broadcast is availableagain. However, if you are listening to any of the possibleHD2-HD7 multicast channels, the station mutes and staysmuted unless it is able to connect to the digital signalagain.
When the system first receives a station (aside from HD2-HD7 multicast stations), it first plays the station in theanalog version. Once the receiver verifies the station is anHD Radio station, it shifts to the digital version. Dependingon the station quality, you may hear a slight sound changewhen the station changes from analog to digital. Blendingis the shift from analog to digital sound or digital back toanalog sound.
Station blending
303Fusion (CC7) , enUSAAudio System
Page 309 of 458

SIRIUS satellite radio is asubscription-based satellite radio servicethat broadcasts a variety of music, sports,news, weather, traffic and entertainmentprogramming. Your factory-installedSIRIUS satellite radio system includeshardware and a limited subscription term,which begins on the date of sale or leaseof your vehicle. See an authorized dealerfor availability.
For more information on extendedsubscription terms (a service fee isrequired), the online media player and acomplete list of SIRIUS satellite radiochannels, and other features, please visitwww.siriusxm.com in the United States,www.sirius.ca in Canada, or call SIRIUS at1-888-539-7474.
Satellite Radio Electronic SerialNumber (ESN)
You need your ESN to activate, modify ortrack your satellite radio account. When insatellite radio mode, press Options.
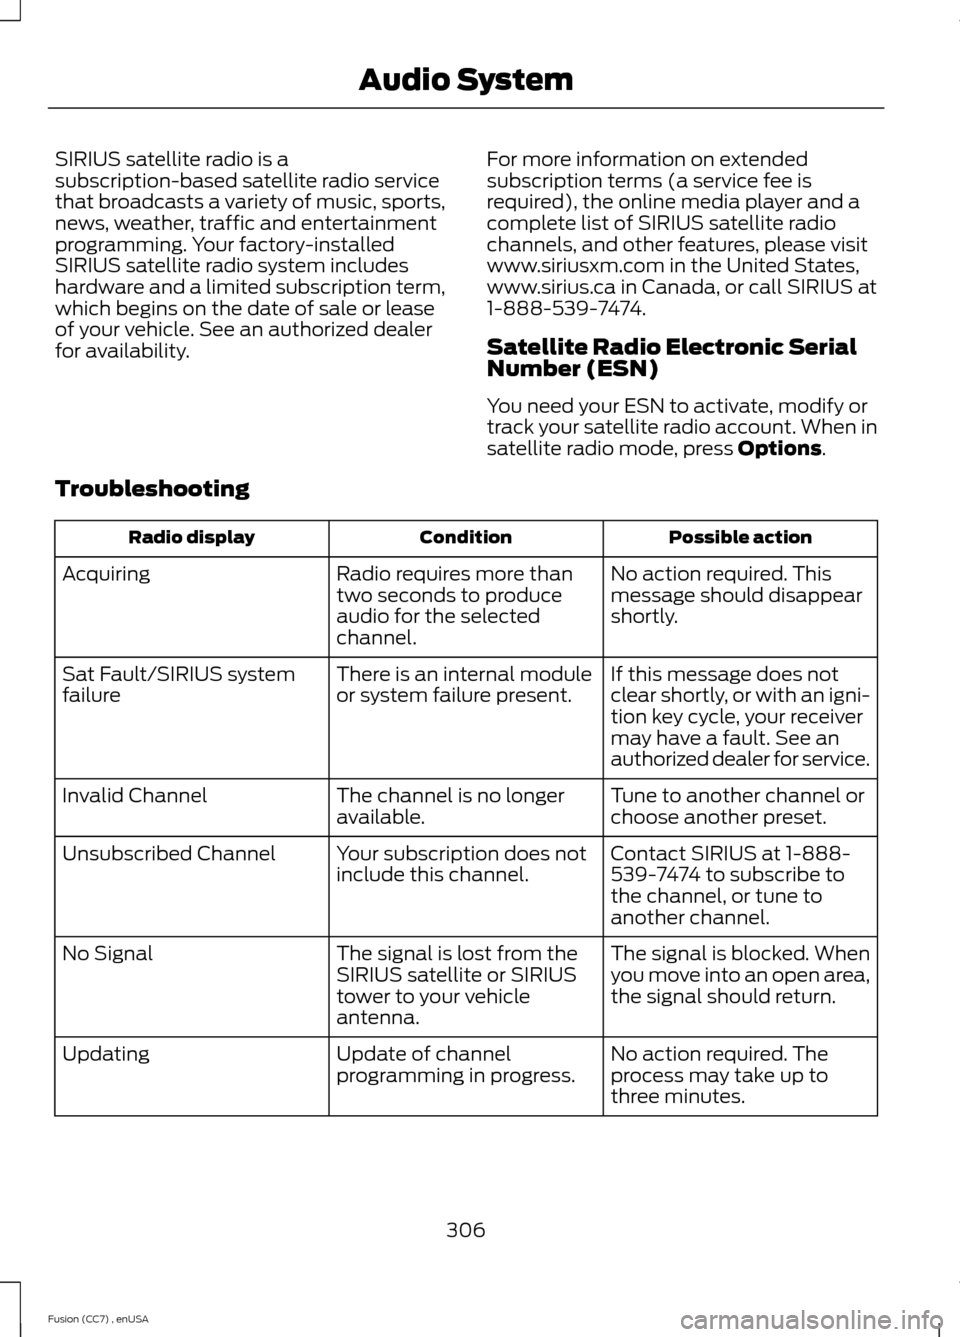
Troubleshooting
Possible actionConditionRadio display
No action required. Thismessage should disappearshortly.
Radio requires more thantwo seconds to produceaudio for the selectedchannel.
Acquiring
If this message does notclear shortly, or with an igni-tion key cycle, your receivermay have a fault. See anauthorized dealer for service.
There is an internal moduleor system failure present.Sat Fault/SIRIUS systemfailure
Tune to another channel orchoose another preset.The channel is no longeravailable.Invalid Channel
Contact SIRIUS at 1-888-539-7474 to subscribe tothe channel, or tune toanother channel.
Your subscription does notinclude this channel.Unsubscribed Channel
The signal is blocked. Whenyou move into an open area,the signal should return.
The signal is lost from theSIRIUS satellite or SIRIUStower to your vehicleantenna.
No Signal
No action required. Theprocess may take up tothree minutes.
Update of channelprogramming in progress.Updating
306Fusion (CC7) , enUSAAudio System
Page 324 of 458

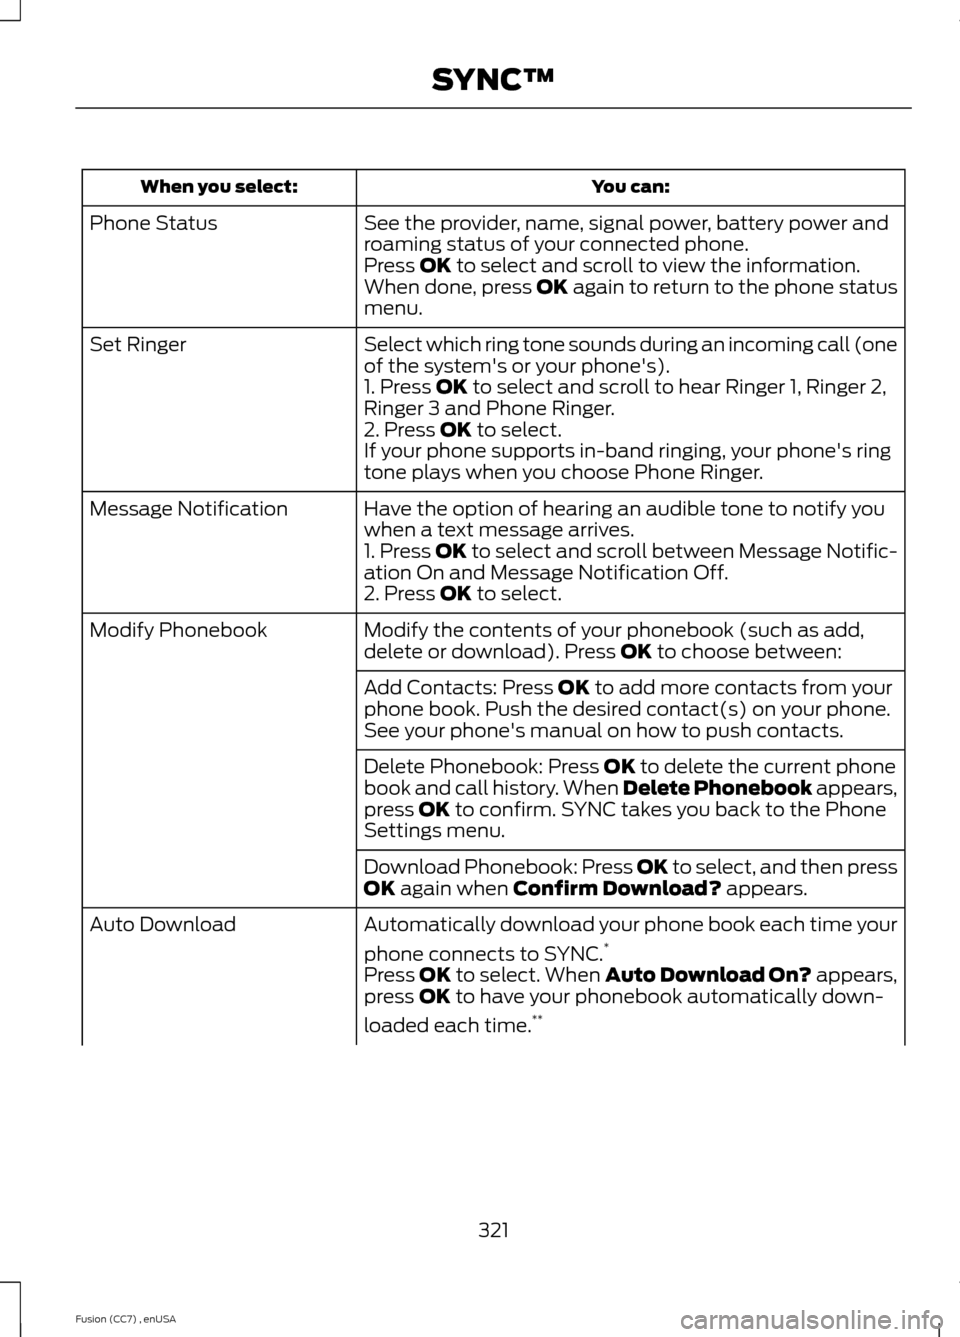
You can:When you select:
See the provider, name, signal power, battery power androaming status of your connected phone.Phone Status
Press OK to select and scroll to view the information.When done, press OK again to return to the phone statusmenu.
Select which ring tone sounds during an incoming call (oneof the system's or your phone's).Set Ringer
1. Press OK to select and scroll to hear Ringer 1, Ringer 2,Ringer 3 and Phone Ringer.2. Press OK to select.If your phone supports in-band ringing, your phone's ringtone plays when you choose Phone Ringer.
Have the option of hearing an audible tone to notify youwhen a text message arrives.Message Notification
1. Press OK to select and scroll between Message Notific-ation On and Message Notification Off.2. Press OK to select.
Modify the contents of your phonebook (such as add,delete or download). Press OK to choose between:Modify Phonebook
Add Contacts: Press OK to add more contacts from yourphone book. Push the desired contact(s) on your phone.See your phone's manual on how to push contacts.
Delete Phonebook: Press OK to delete the current phonebook and call history. When Delete Phonebook appears,press OK to confirm. SYNC takes you back to the PhoneSettings menu.
Download Phonebook: Press OK to select, and then pressOK again when Confirm Download? appears.
Automatically download your phone book each time your
phone connects to SYNC.*Auto Download
Press OK to select. When Auto Download On? appears,press OK to have your phonebook automatically down-
loaded each time.**
321Fusion (CC7) , enUSASYNC™