2014 FORD FUSION (AMERICAS) remove seats
[x] Cancel search: remove seatsPage 19 of 458

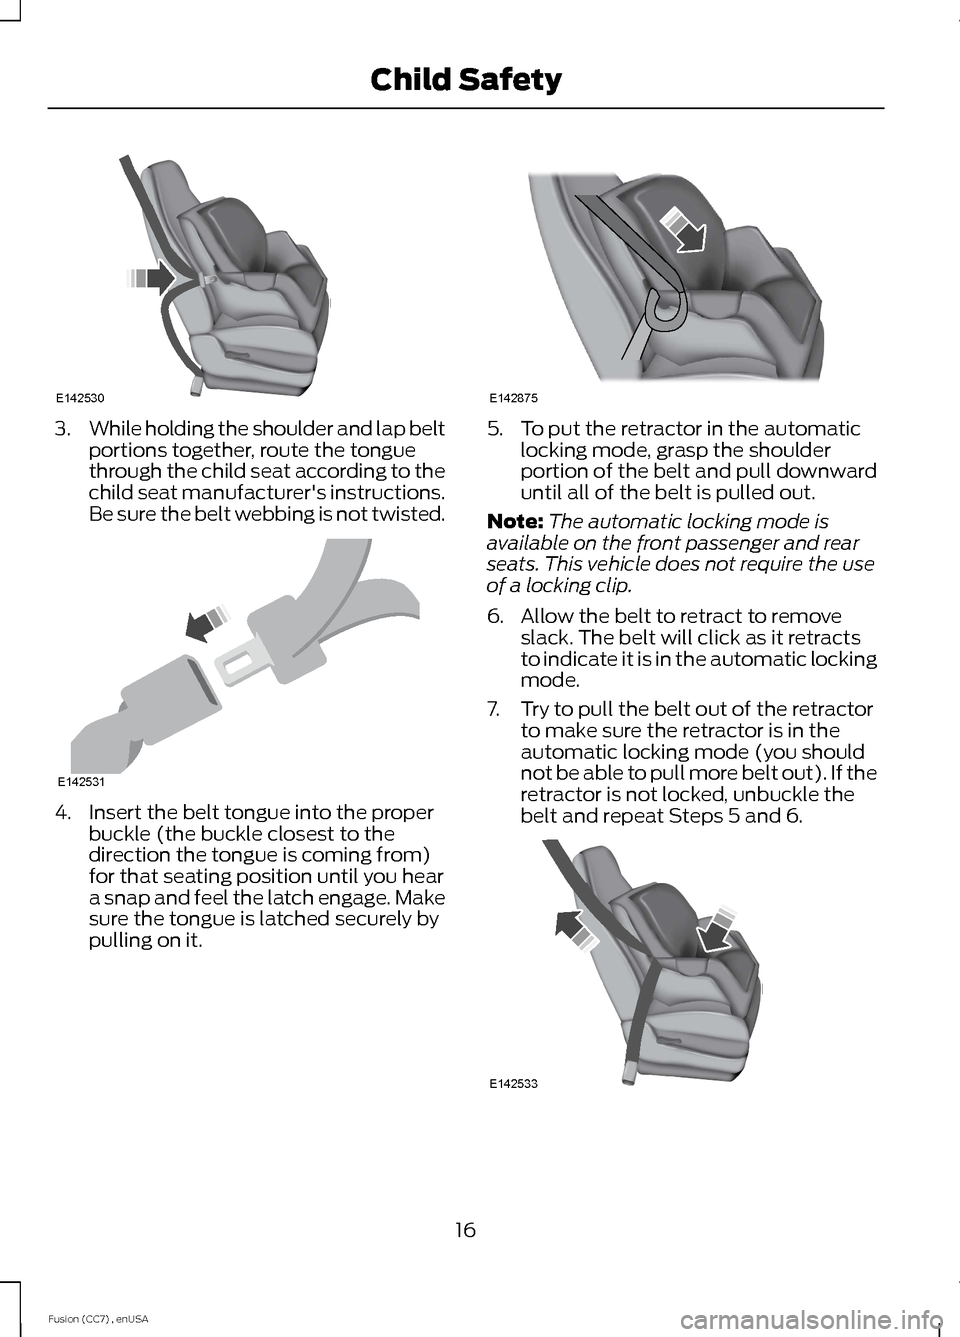
3.While holding the shoulder and lap beltportions together, route the tonguethrough the child seat according to thechild seat manufacturer's instructions.Be sure the belt webbing is not twisted.
4.Insert the belt tongue into the properbuckle (the buckle closest to thedirection the tongue is coming from)for that seating position until you heara snap and feel the latch engage. Makesure the tongue is latched securely bypulling on it.
5.To put the retractor in the automaticlocking mode, grasp the shoulderportion of the belt and pull downwarduntil all of the belt is pulled out.
Note:The automatic locking mode isavailable on the front passenger and rearseats. This vehicle does not require the useof a locking clip.
6.Allow the belt to retract to removeslack. The belt will click as it retractsto indicate it is in the automatic lockingmode.
7.Try to pull the belt out of the retractorto make sure the retractor is in theautomatic locking mode (you shouldnot be able to pull more belt out). If theretractor is not locked, unbuckle thebelt and repeat Steps 5 and 6.
16Fusion (CC7) , enUSAChild SafetyE142530 E142531 E142875 E142533
Page 20 of 458

8.Remove remaining slack from the belt.Force the seat down with extra weight,for example, by pressing down orkneeling on the child restraint whilepulling up on the shoulder belt in orderto force slack from the belt. This isnecessary to remove the remainingslack that will exist once the extraweight of the child is added to the childrestraint. It also helps to achieve theproper snugness of the child seat toyour vehicle. Sometimes, a slight leantoward the buckle will additionally helpto remove remaining slack from thebelt.
9.Attach the tether strap (if the child seatis equipped).
10.Before placing the child in the seat,forcibly move the seat forward andback to make sure the seat is securelyheld in place. To check this, grab theseat at the belt path and attempt tomove it side to side and forward andback. There should be no more than1 inch (2.5 centimeters) of movementfor proper installation.
Ford recommends checking with a NHTSACertified Child Passenger SafetyTechnician to make certain the childrestraint is properly installed. In Canada,check with your local St. John Ambulanceoffice for referral to a Certified PassengerSeat Technician.
Using Lower Anchors and Tethersfor CHildren (LATCH)
WARNINGS
Never attach two child safety seatsto the same anchor. In a crash, oneanchor may not be strong enough tohold two child safety seat attachmentsand may break, causing serious injury ordeath.
Depending on where you secure achild restraint, and depending on thechild restraint design, you may blockaccess to certain safety belt buckleassemblies or LATCH lower anchors,rendering those features potentiallyunusable. To avoid risk of injury, occupantsshould only use seating positions wherethey are able to be properly restrained.
The LATCH system is composed of threevehicle anchor points: two lower anchorslocated where seat back and seat cushionmeet (called the seat bight) and one toptether anchor located behind that seatingposition.
LATCH compatible child safety seats havetwo rigid or webbing mountedattachments that connect to the two loweranchors at the LATCH equipped seatingpositions in your vehicle. This type ofattachment method eliminates the needto use safety belts to attach the child seat,however the safety belt can still be usedto attach the child seat. For forward-facingchild seats, the top tether strap must alsobe attached to the proper top tetheranchor, if a top tether strap has beenprovided with your child seat.
17Fusion (CC7) , enUSAChild SafetyE142534
Page 22 of 458

Combining Safety Belt and LATCHLower Anchors for Attaching ChildSafety Seats
When used in combination, either thesafety belt or the LATCH lower anchorsmay be attached first, provided a properinstallation is achieved. Attach the tetherstrap afterward, if included with the childseat.
Using Tether Straps
Many forward-facing child safetyseats include a tether strapwhich extends from the back ofthe child safety seat and hooks to ananchoring point called the top tetheranchor. Tether straps are available as anaccessory for many older safety seats.
Contact the manufacturer of your childseat for information about ordering atether strap, or to obtain a longer tetherstrap if the tether strap on your safety seatdoes not reach the appropriate top tetheranchor in your vehicle.
Once the child safety seat has beeninstalled using either the safety belt, thelower anchors of the LATCH system, orboth, you can attach the top tether strap.
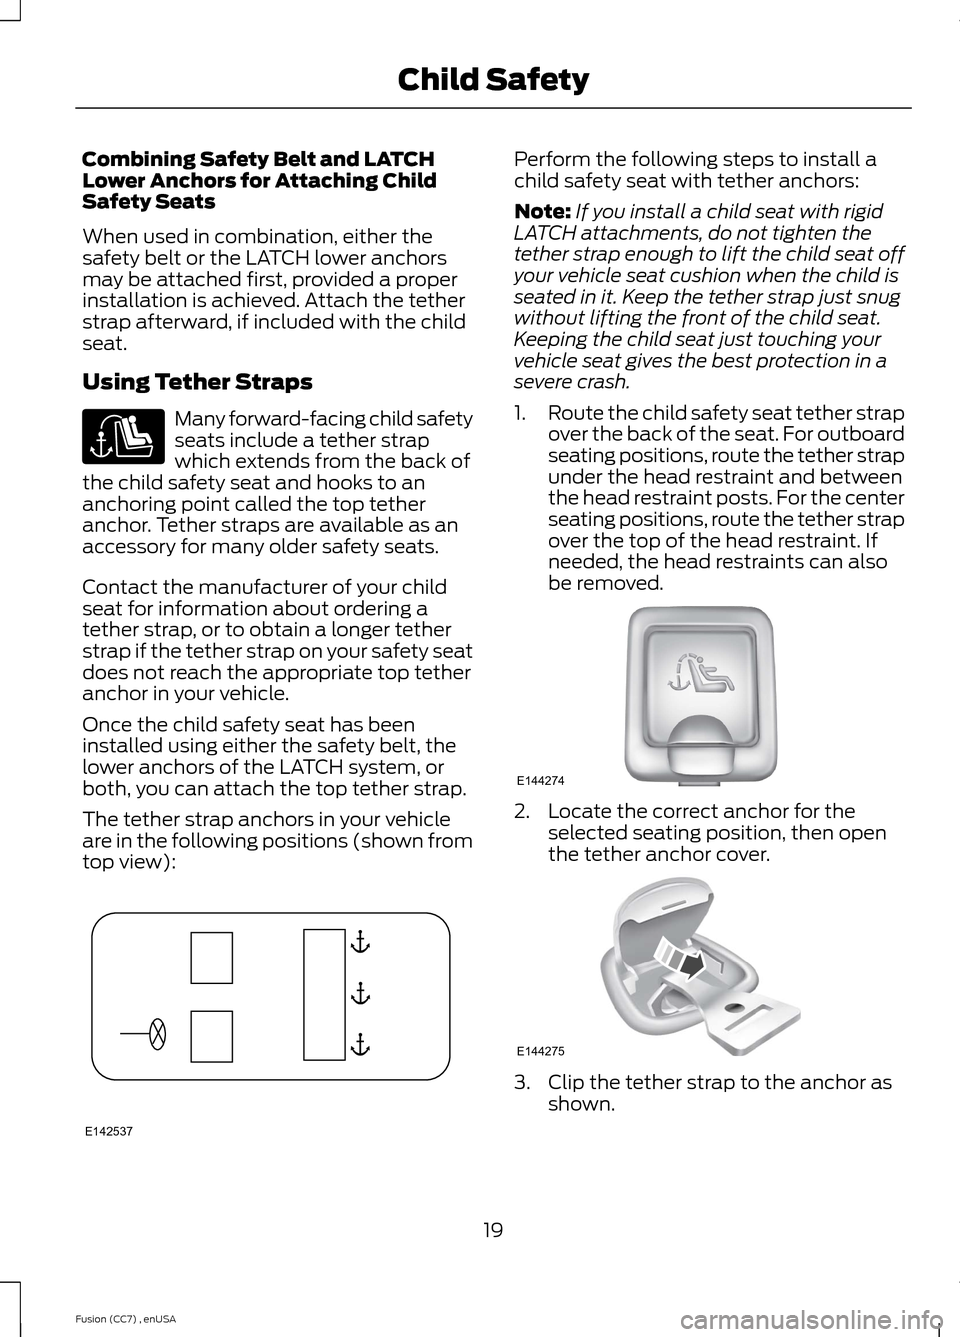
The tether strap anchors in your vehicleare in the following positions (shown fromtop view):
Perform the following steps to install achild safety seat with tether anchors:
Note:If you install a child seat with rigidLATCH attachments, do not tighten thetether strap enough to lift the child seat offyour vehicle seat cushion when the child isseated in it. Keep the tether strap just snugwithout lifting the front of the child seat.Keeping the child seat just touching yourvehicle seat gives the best protection in asevere crash.
1.Route the child safety seat tether strapover the back of the seat. For outboardseating positions, route the tether strapunder the head restraint and betweenthe head restraint posts. For the centerseating positions, route the tether strapover the top of the head restraint. Ifneeded, the head restraints can alsobe removed.
2.Locate the correct anchor for theselected seating position, then openthe tether anchor cover.
3.Clip the tether strap to the anchor asshown.
19Fusion (CC7) , enUSAChild Safety E142537 E144274 E144275
Page 24 of 458

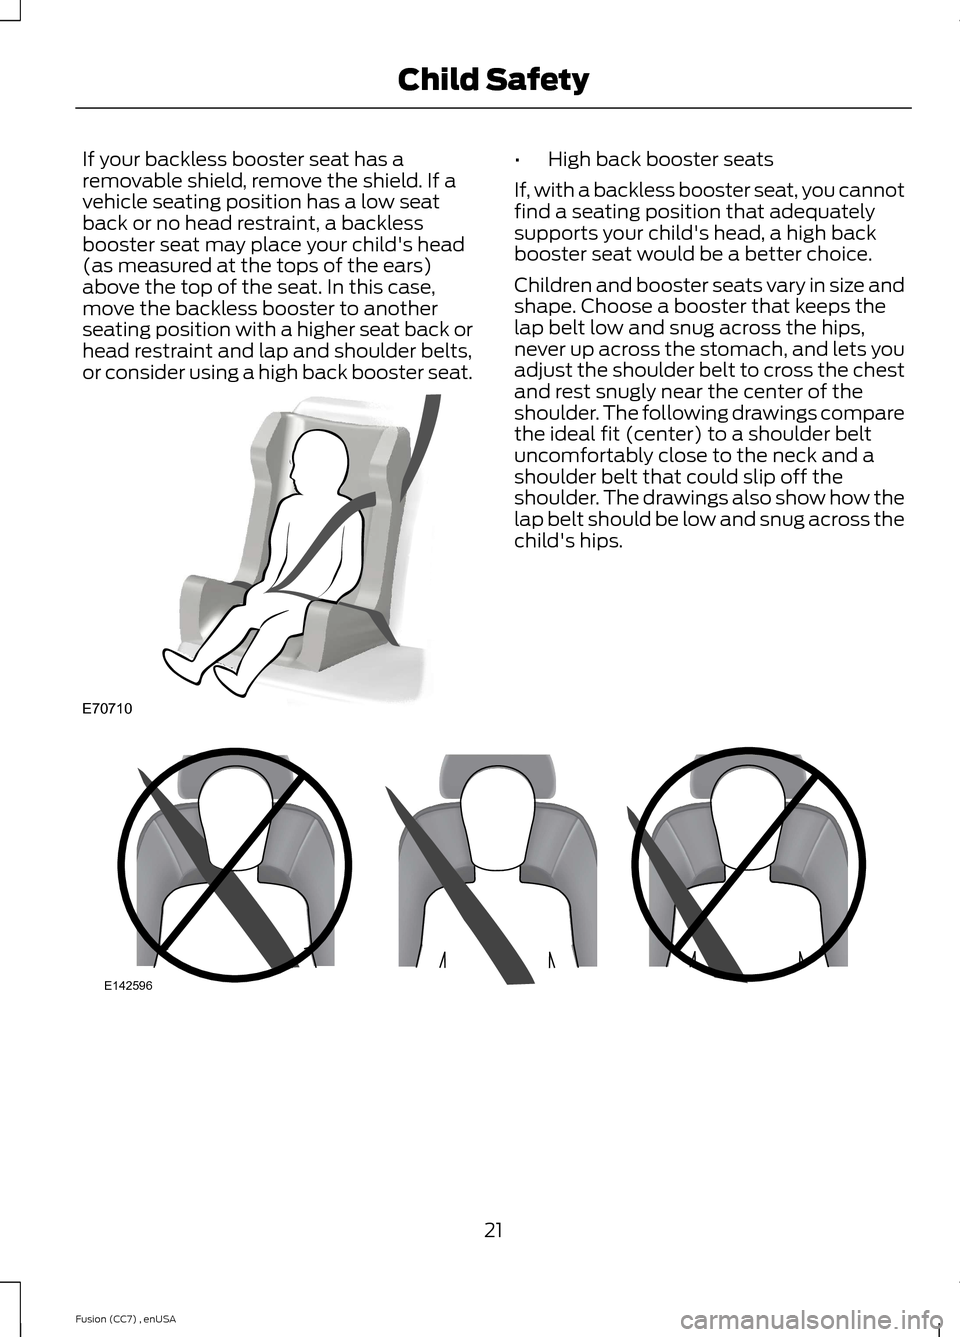
If your backless booster seat has aremovable shield, remove the shield. If avehicle seating position has a low seatback or no head restraint, a backlessbooster seat may place your child's head(as measured at the tops of the ears)above the top of the seat. In this case,move the backless booster to anotherseating position with a higher seat back orhead restraint and lap and shoulder belts,or consider using a high back booster seat.
•High back booster seats
If, with a backless booster seat, you cannotfind a seating position that adequatelysupports your child's head, a high backbooster seat would be a better choice.
Children and booster seats vary in size andshape. Choose a booster that keeps thelap belt low and snug across the hips,never up across the stomach, and lets youadjust the shoulder belt to cross the chestand rest snugly near the center of theshoulder. The following drawings comparethe ideal fit (center) to a shoulder beltuncomfortably close to the neck and ashoulder belt that could slip off theshoulder. The drawings also show how thelap belt should be low and snug across thechild's hips.
21Fusion (CC7) , enUSAChild SafetyE70710 E142596
Page 26 of 458

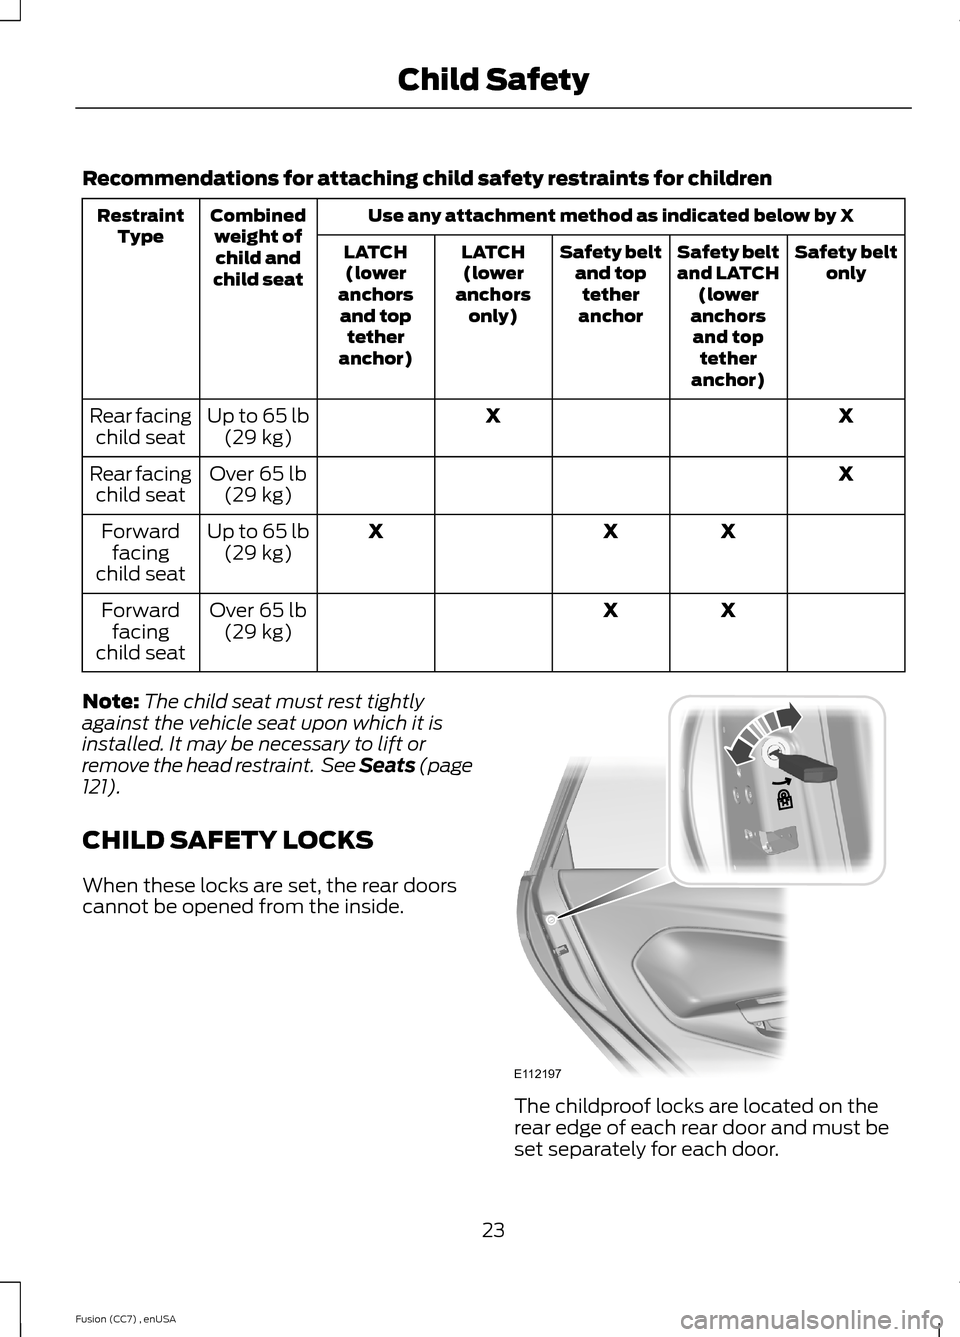
Recommendations for attaching child safety restraints for children
Use any attachment method as indicated below by XCombinedweight ofchild andchild seat
RestraintTypeSafety beltonlySafety beltand LATCH(loweranchorsand toptetheranchor)
Safety beltand toptetheranchor
LATCH(loweranchorsonly)
LATCH(loweranchorsand toptetheranchor)
XXUp to 65 lb(29 kg)Rear facingchild seat
XOver 65 lb(29 kg)Rear facingchild seat
XXXUp to 65 lb(29 kg)Forwardfacingchild seat
XXOver 65 lb(29 kg)Forwardfacingchild seat
Note:The child seat must rest tightlyagainst the vehicle seat upon which it isinstalled. It may be necessary to lift orremove the head restraint. See Seats (page121).
CHILD SAFETY LOCKS
When these locks are set, the rear doorscannot be opened from the inside.
The childproof locks are located on therear edge of each rear door and must beset separately for each door.
23Fusion (CC7) , enUSAChild SafetyE112197
Page 30 of 458

Pregnant women should always wear theirsafety belt. The lap belt portion of acombination lap and shoulder belt shouldbe positioned low across the hips belowthe belly and worn as tight as comfort willallow. The shoulder belt should bepositioned to cross the middle of theshoulder and the center of the chest.
Safety Belt Locking Modes
WARNINGS
After any vehicle crash, the safetybelt system at all passenger seatingpositions must be checked by anauthorized dealer to verify that theautomatic locking retractor feature forchild seats is still functioning properly. Inaddition, all safety belts should be checkedfor proper function.
Belt and retractor assembly must bereplaced if the safety belt assemblyautomatic locking retractor featureor any other safety belt function is notoperating properly when checked by anauthorized dealer. Failure to replace thebelt and retractor assembly could increasethe risk of injury in crashes.
All safety restraints in the vehicle arecombination lap and shoulder belts. Thedriver safety belt has the vehicle sensitivelocking mode. The front outboardpassenger and rear seat safety belts haveboth the vehicle sensitive locking modeand the automatic locking mode.
Vehicle Sensitive Mode
This is the normal retractor mode, whichallows free shoulder belt lengthadjustment to your movements andlocking in response to vehicle movement.For example, if the driver brakes suddenlyor turns a corner sharply, or the vehiclereceives an impact of approximately 5 mph(8 km/h) or more, the combination safetybelts will lock to help reduce forwardmovement of the driver and passengers.
In addition, the retractor is designed to lockif the webbing is pulled out too quickly. Ifthis occurs, let the belt retract slightly andpull webbing out again in a slow andcontrolled manner.
Automatic Locking Mode
In this mode, the shoulder belt isautomatically pre-locked. The belt will stillretract to remove any slack in the shoulderbelt. The automatic locking mode is notavailable on the driver safety belt.
When to Use the Automatic LockingMode
This mode should be used any time a childsafety seat, except a booster, is installedin passenger front or rear seating positions.Children 12 years old and under should beproperly restrained in a rear seatingposition whenever possible. See ChildSafety (page 13).
How to Use the Automatic LockingMode
Non-inflatable safety belts
27Fusion (CC7) , enUSASafety Belts
Page 41 of 458

parents are STRONGLY encouraged toalways properly restrain children in the rearseat. The sensor also turns off thepassenger front airbag and seat-mountedside airbag when the passenger seat isempty.
•When the front passenger sensingsystem disables (will not inflate) thefront passenger frontal airbag, theindicator lamp will illuminate and staylit to remind you that the frontpassenger frontal airbag is disabled.
•If the child restraint has been installedand the indicator lamp is not lit, thenturn the vehicle off, remove the childrestraint from the vehicle and reinstallthe restraint following the childrestraint manufacturer's instructions.
The front passenger sensing system isdesigned to enable (may inflate) the frontpassenger's frontal airbag anytime thesystem senses that a person of adult sizeis sitting properly in the front passengerseat.
•When the front passenger sensingsystem enables the front passengerfrontal airbag (may inflate), theindicator lamp will be unlit and stayunlit.
If a person of adult size is sitting in the frontpassenger’s seat, but the airbag offindicator lamp is lit, it is possible that theperson isn’t sitting properly in the seat. Ifthis happens:
•Turn the vehicle off and ask the personto place the seat back in the full uprightposition.
•Have the person sit upright in the seat,centered on the seat cushion, with theperson’s legs comfortably extended.
•Restart the vehicle and have the personremain in this position for about twominutes. This will allow the system todetect that person and enable thepassenger’s frontal airbag.
•If the indicator lamp remains lit evenafter this, the person should be advisedto ride in the rear seat.
Passenger airbagPassenger airbag OFF indic-atorOccupant
DisabledUnlitEmpty
DisabledLitChild
EnabledUnlitAdult
Note:When the passenger airbag off lightis illuminated, the passenger (seatmounted) side airbag may be disabled toavoid the risk of airbag deployment injuries.
After all occupants have adjusted theirseats and put on safety belts, it is veryimportant that they continue to sitproperly. A properly seated occupant sitsupright, leaning against the seat back, andcentered on the seat cushion, with theirfeet comfortably extended on the floor.Sitting improperly can increase the chance
of injury in a crash event. For example, ifan occupant slouches, lies down, turnssideways, sits forward, leans forward orsideways, or puts one or both feet up, thechance of injury during a crash is greatlyincreased.
If you think that the status of the passengerairbag off indicator lamp is incorrect, checkfor the following:
38Fusion (CC7) , enUSASupplementary Restraints System
Page 42 of 458

•Objects lodged underneath the seat
•Objects between the seat cushion andthe center console
•Objects hanging off the seat back
•Objects stowed in the seat back mappocket
•Objects placed on the occupant's lap
•Cargo interference with the seat
•Other passengers pushing or pulling onthe seat
•Rear passenger feet and knees restingor pushing on the seat
The conditions listed above may cause theweight of a properly seated occupant tobe incorrectly interpreted by the frontpassenger sensing system. The person inthe front passenger seat may appearheavier or lighter due to the conditionsdescribed in the list above.
Make sure the front passengersensing system is operatingproperly. See Crash Sensorsand Airbag Indicator (page 42).
If the airbag readiness light is lit, do thefollowing:
The driver and adult passengers shouldcheck for objects lodged underneath thefront passenger seat, or cargo interferingwith the seat.
If there are lodged objects, or cargo isinterfering with the seat, take the followingsteps to remove the obstruction:
•Pull the vehicle over.
•Turn the vehicle off.
•Driver and adult passengers shouldcheck for any objects lodgedunderneath the front passenger seator cargo interfering with the seat.
•Remove the obstruction(s) (if found).
•Restart the vehicle.
•Wait at least two minutes and verifythat the airbag readiness light is nolonger illuminated.
•If the airbag readiness light remainsilluminated, this may or may not be aproblem due to the front passengersensing system.
Do not attempt to repair or service thesystem. Take your vehicle immediately toan authorized dealer.
If it is necessary to modify an advancedfront airbag system to accommodate aperson with disabilities, contact the FordCustomer Relationship Center. SeeGetting the Services You Need (page220).
SIDE AIRBAGS
WARNINGS
Do not place objects or mountequipment on or near the airbagcover, on the side of the seatbacks(of the front seats), or in front seat areasthat may come into contact with adeploying airbag. Failure to follow theseinstructions may increase the risk ofpersonal injury in the event of a crash.
Do not use accessory seat covers.The use of accessory seat coversmay prevent the deployment of theside airbags and increase the risk of injuryin an accident.
Do not lean your head on the door.The side airbag could injure you as itdeploys from the side of theseatback.
Do not attempt to service, repair, ormodify the airbag, its fuses or theseat cover on a seat containing anairbag as you could be seriously injured orkilled. Contact your authorized dealer assoon as possible.
39Fusion (CC7) , enUSASupplementary Restraints System