2014 FORD FUSION (AMERICAS) remove seats
[x] Cancel search: remove seatsPage 120 of 458

HINTS ON CONTROLLING THE
INTERIOR CLIMATE
General Hints
Note:Prolonged use of recirculated air maycause the windows to fog up.
Note:You may feel a small amount of airfrom the footwell air vents regardless of theair distribution setting.
Note:To reduce humidity build-up insideyour vehicle, do not drive with the systemswitched off or with recirculated air alwaysswitched on.
Note:Do not place objects under the frontseats as this may interfere with the airflowto the rear seats.
Note:Remove any snow, ice or leaves fromthe air intake area at the base of thewindshield.
Note:To improve the time to reach comfortin hot weather, drive with the windowsslightly open for 2-3 minutes after start-upor until your vehicle airs out.
Manual Climate Control
Note:To reduce fogging of the windshieldduring humid weather, adjust the airdistribution control to the windshield airvents position.
Automatic Climate Control
Note:Adjusting the settings when yourvehicle interior is extremely hot or cold isnot necessary. The system automaticallyadjusts to heat or cool the cabin to yourselected temperature as quickly as possible.For the system to function efficiently, theinstrument panel and side air vents shouldbe fully open.
Note:If you select AUTO during coldoutside temperatures, the system directsairflow to the windshield and side windowvents. In addition, the fan may run at aslower speed until the engine warms up.
Note:If you select AUTO during hot outsidetemperatures, or when the inside of thevehicle is hot, the system automatically usesrecirculated air to maximize interior cooling.When the interior reaches the selectedtemperature, the system automaticallyswitches to using outside air.
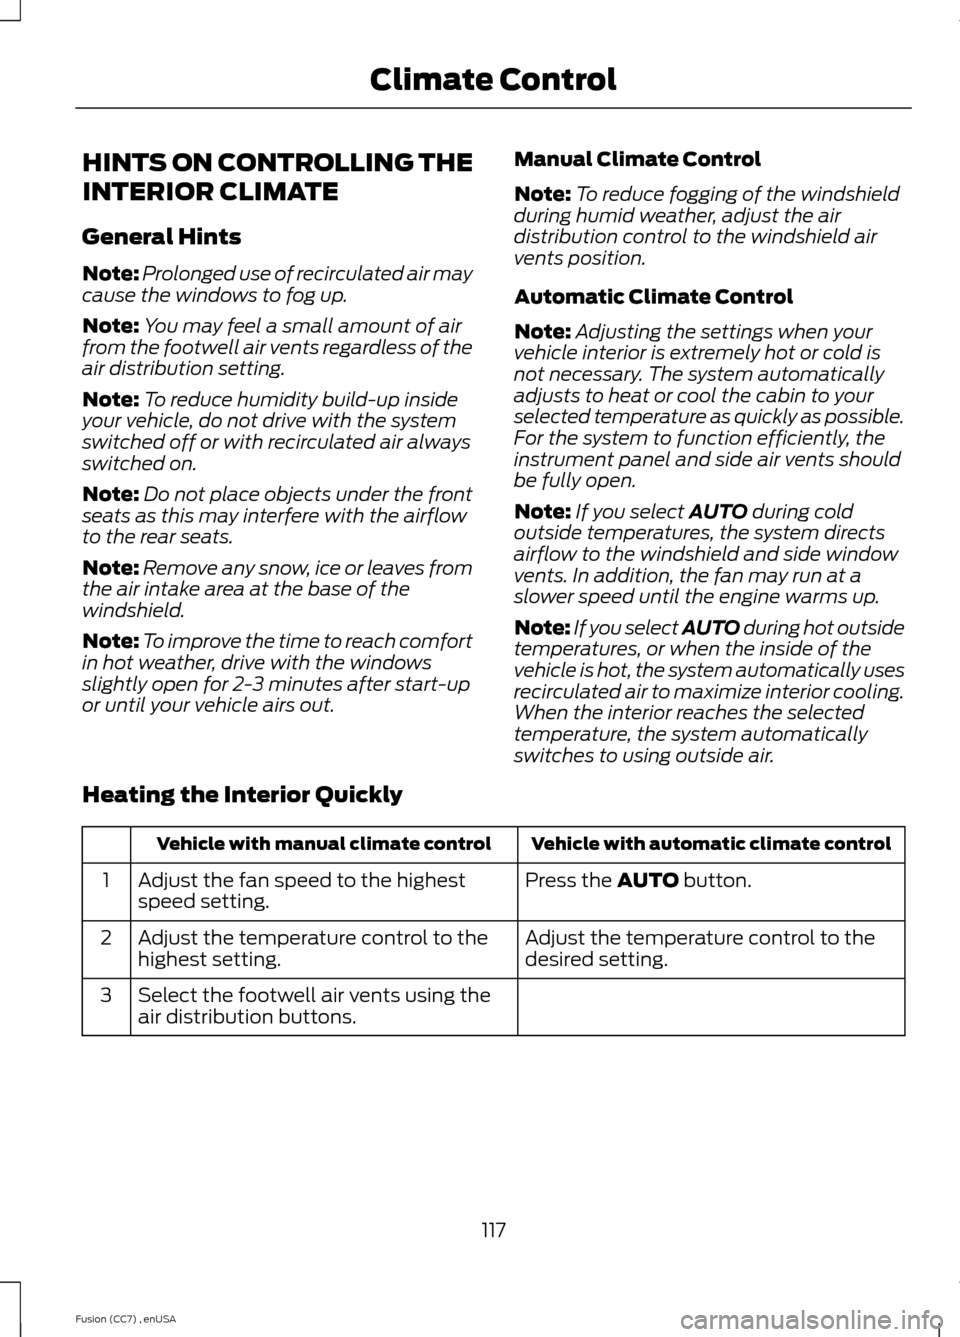
Heating the Interior Quickly
Vehicle with automatic climate controlVehicle with manual climate control
Press the AUTO button.Adjust the fan speed to the highestspeed setting.1
Adjust the temperature control to thedesired setting.Adjust the temperature control to thehighest setting.2
Select the footwell air vents using theair distribution buttons.3
117Fusion (CC7) , enUSAClimate Control
Page 125 of 458

WARNINGS
Install the head restraint properly tohelp minimize the risk of neck injuryin the event of a collision.
Note:Adjust the seat back to an uprightdriving position before adjusting the headrestraint. Adjust the head restraint so thatthe top of it is level with the top of your headand as far forward as possible. Make surethat you remain comfortable. If you areextremely tall, adjust the head restraint toits highest position.
Front seat and rear seat outboard headrestraints
Rear center head restraint
The head restraints consist of:
An energy absorbing headrestraintA
Two steel stemsB
Guide sleeve adjust and unlockbuttonC
Guide sleeve unlock and removebuttonD
Adjusting the Head Restraint
Raising the Head Restraint
Pull the head restraint up.
Lowering the Head Restraint
1.Press and hold button C.
2.Push the head restraint down.
Removing the Head Restraint
1.Pull the head restraint up until itreaches its highest position.
2.Press and hold buttons C and D.
3.Pull the head restraint up.
Installing the Head Restraint
Align the steel stems into the guide sleevesand push the head restraint down until inlocks.
Tilting Head Restraints
The front head restraints have a tiltingfeature for extra comfort. To tilt the headrestraint, do the following:
122Fusion (CC7) , enUSASeatsE138642 E138645
Page 128 of 458

Saving a Pre-Set Position
1.Switch the ignition on.
2.Adjust the seat and exterior mirrors toyour desired position.
3.Press and hold the desired pre-setbutton until you hear a single chime.
You can save up to three pre-set memorypositions. You can save a memory pre-setat any time.
Recalling a Pre-Set Position
Press and release the pre-set buttonassociated with your desired drivingposition. The seat and mirrors will move tothe position stored for that pre-set.
Note:A pre-set memory position can onlybe recalled when the ignition is off, or whenthe transmission selector lever is in positionP or N (and your vehicle is not moving) ifthe ignition is on.
You can recall a pre-set memory positionby pressing the unlock button on yourremote control or intelligent access key ifit is linked to a pre-set position.
Linking a Pre-Set Position to yourRemote Control or IntelligentAccess Key
Your vehicle can save the pre-set memorypositions for up to three remote controlsor intelligent access (IA) keys.
1.With the ignition on, move the memorypositions to the desired positions.
2.Press and hold the desired pre-setbutton for about five seconds. A chimewill sound after about two seconds.Continue holding until a second chimeis heard.
3.Within three seconds, press the lockbutton on the remote control you arelinking.
To unlink a remote control, follow thesame procedure – except in step 3, pressthe unlock button on the remote control.
Note:To stop seat movement during arecall, press any driver seat adjustmentcontrol, any of the memory buttons, or anymirror control switch.
Seat movement will also stop if you moveyour vehicle.
Note:If more than one linked remotecontrol or intelligent access key is in range,the memory function will move to thesettings of the first key stored.
Easy Entry and Exit Function
If you enable the easy entry and exitfeature, it automatically moves the driverseat position rearward up to fivecentimeters when the transmissionselector lever is in position P and youremove the key or turn off the keyless startignition.
The driver seat will return to the previousposition when you put the key in theignition or you activate the keyless startignition.
You can turn off the easy entry and exitfeature by using the driver informationdisplay.
125Fusion (CC7) , enUSASeatsE142554
Page 261 of 458

•Never wash or rinse any ignition coil,spark plug wire or spark plug well, orthe area in and around these locations.
•Cover the battery, power distributionbox, and air filter assembly to preventwater damage when cleaning theengine.
CLEANING THE WINDOWS AND
WIPER BLADES
Car wash chemicals and environmentalfallout can result in windshield and wiperblade contamination. Dirty windshield andwipers will result in poor windshield wiperoperation. Keep the windshield and wiperblades clean to maintain windshield wiperperformance.
To clean the windshield and wiper blades:
•Clean the windshield with anon-abrasive glass cleaner.
•For windshields contaminated withtree sap, chemicals, wax or bugs, cleanthe entire windshield using steel wool(no greater than 0000 grade) in acircular motion and rinse with water.
•Clean the wiper blades with isopropylrubbing alcohol or windshield washerfluid.
Note: Do not use razor blades or othersharp objects to clean or remove decalsfrom the inside of the heated rear window.The vehicle warranty does not coverdamage caused to the heated rear windowgrid lines.
CLEANING THE INTERIOR
WARNINGS
Do not use cleaning solvents, bleachor dye on the vehicle’s safety belts,as these actions may weaken thebelt webbing.
WARNINGS
On vehicles equipped withseat-mounted airbags, do not usechemical solvents or strongdetergents. Such products couldcontaminate the side airbag system andaffect performance of the side airbag in acollision.
For fabric, carpets, cloth seats, safety beltsand seats equipped with side airbags:
•Remove dust and loose dirt with avacuum cleaner.
•Remove light stains and soil withMotorcraft Professional StrengthCarpet & Upholstery Cleaner.
•If grease or tar is present on thematerial, spot-clean the area first withMotorcraft Spot and Stain Remover. InCanada, use Motorcraft Multi-PurposeCleaner.
•If a ring forms on the fabric after spotcleaning, clean the entire areaimmediately (but do not oversaturate)or the ring will set.
•Do not use household cleaningproducts or glass cleaners, which canstain and discolor the fabric and affectthe flame retardant abilities of the seatmaterials.
CLEANING THE INSTRUMENT
PANEL AND INSTRUMENT
CLUSTER LENS
WARNING
Do not use chemical solvents orstrong detergents when cleaning thesteering wheel or instrument panelto avoid contamination of the airbagsystem.
258Fusion (CC7) , enUSAVehicle Care
Page 262 of 458

Clean the instrument panel and clusterlens with a clean, damp, white cottoncloth, then use a clean and dry whitecotton cloth to dry these areas.
•Avoid cleaners or polishes that increasethe gloss of the upper portion of theinstrument panel. The dull finish in thisarea helps protect you fromundesirable windshield reflection.
•Be certain to wash or wipe your handsclean if you have been in contact withcertain products such as insectrepellent and suntan lotion in order toavoid possible damage to the interiorpainted surfaces.
•Do not use household or glass cleanersas these may damage the finish of theinstrument panel, interior trim andcluster lens.
•Do not allow air fresheners and handsanitizers to spill onto interior surfaces.If a spill occurs, wipe off immediately.Damage may not be covered by yourwarranty.
If a staining liquid like coffee or juice hasbeen spilled on the instrument panel or oninterior trim surfaces, clean as follows:
1.Wipe up spilled liquid using a clean,white, cotton cloth.
2.Wipe the surface with a damp, clean,white cotton cloth. For more thoroughcleaning, use a mild soap and watersolution. If the spot cannot becompletely cleaned by this method,the area may be cleaned using acommercially available cleaningproduct designed for automotiveinteriors.
3.If necessary, apply more soap andwater solution or cleaning product toa clean, white, cotton cloth and pressthe cloth onto the soiled area. Allowthis to set at room temperature for 30minutes.
4.Remove the soaked cloth and if it is notsoiled badly, use this cloth to clean thearea by using a rubbing motion for 60seconds.
5.Following this, wipe area dry with aclean, white, cotton cloth.
CLEANING LEATHER SEATS (IF
EQUIPPED)
For routine cleaning, wipe the surface witha soft, damp cloth. For more thoroughcleaning, wipe the surface with a mild soapand water solution. Dry the area with a softcloth.
If you cannot completely clean the leatherusing a mild soap and water solution, youcan try a commercially available leathercleaning product designed for automotiveinteriors.
Note:To check for compatibility, first testany cleaner or stain remover on aninconspicuous part of the leather.
You should:
•remove dust and loose dirt with avacuum cleaner
•clean spills and stains as quickly aspossible
•check for compatibility by first testingany cleaner or stain remover on aninconspicuous part of the leather.
Do not use the following products as thesemay damage the leather:
•oil/petroleum-based leatherconditioners
•household cleaners
•alcohol solutions
•solvents or cleaners intendedspecifically for rubber, vinyl andplastics.
259Fusion (CC7) , enUSAVehicle Care