2014 FORD FIESTA audio
[x] Cancel search: audioPage 97 of 396
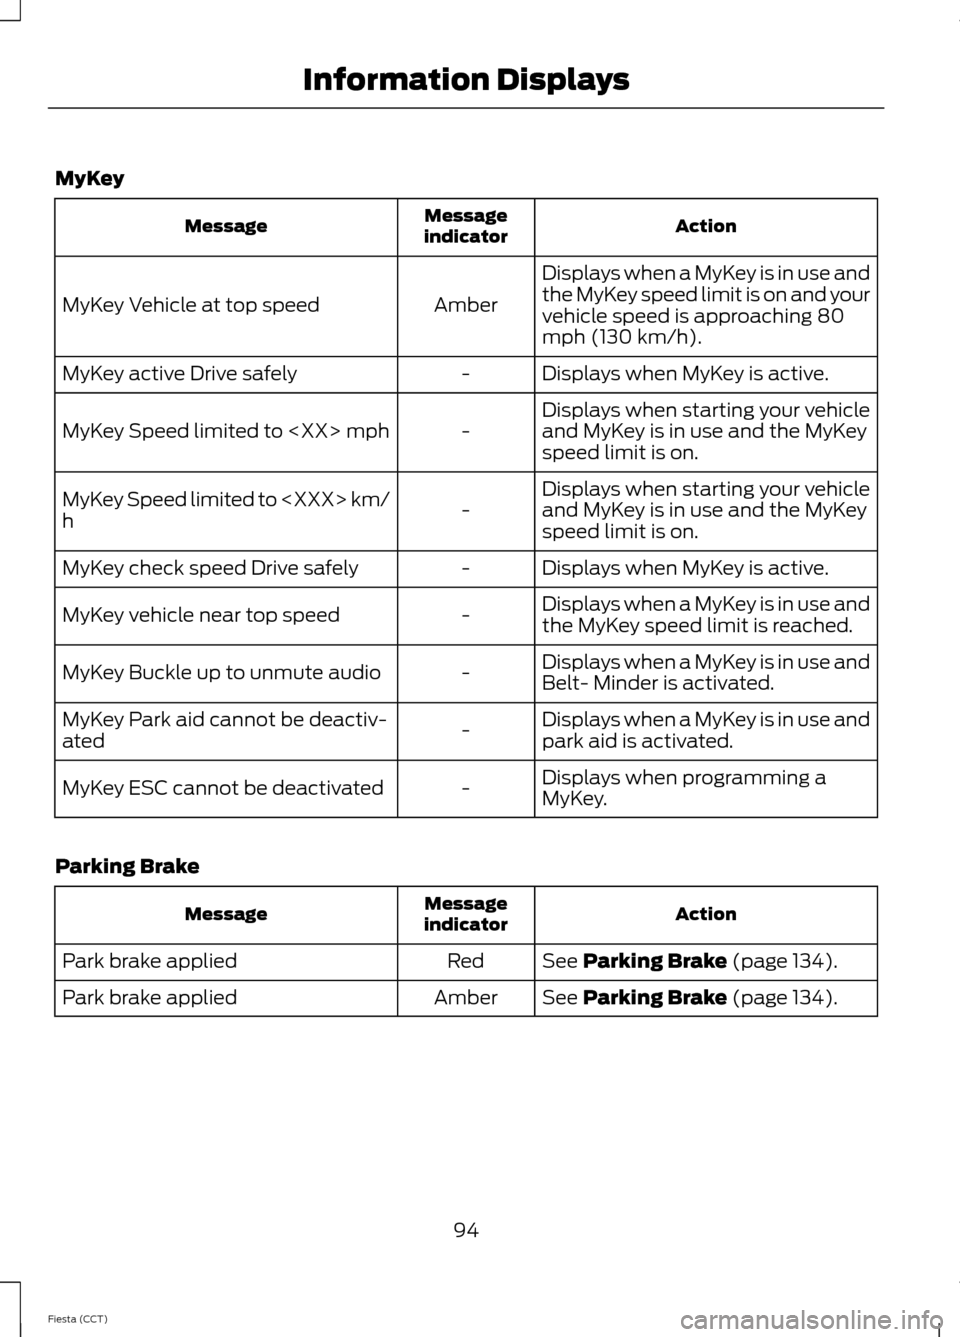
MyKey
Action
Message
indicator
Message
Displays when a MyKey is in use and
the MyKey speed limit is on and your
vehicle speed is approaching 80
mph (130 km/h).
Amber
MyKey Vehicle at top speed
Displays when MyKey is active.
-
MyKey active Drive safely
Displays when starting your vehicle
and MyKey is in use and the MyKey
speed limit is on.
-
MyKey Speed limited to
Displays when starting your vehicle
and MyKey is in use and the MyKey
speed limit is on.
-
MyKey Speed limited to
h
Displays when MyKey is active.
-
MyKey check speed Drive safely
Displays when a MyKey is in use and
the MyKey speed limit is reached.
-
MyKey vehicle near top speed
Displays when a MyKey is in use and
Belt- Minder is activated.
-
MyKey Buckle up to unmute audio
Displays when a MyKey is in use and
park aid is activated.
-
MyKey Park aid cannot be deactiv-
ated
Displays when programming a
MyKey.
-
MyKey ESC cannot be deactivated
Parking Brake Action
Message
indicator
Message
See Parking Brake (page 134).
Red
Park brake applied
See
Parking Brake (page 134).
Amber
Park brake applied
94
Fiesta (CCT) Information Displays
Page 143 of 396
Switching the Rear View Camera
On
WARNING
The camera may not detect objects
that are close to your vehicle.
Switch the ignition and the audio unit on.
Move the transmission selector lever to
position R (reverse).
The image is displayed on the screen.
The camera may not operate correctly in
the following conditions:
• Dark areas.
• Intense light.
• If the ambient temperature increases
or decreases rapidly.
• If the camera is wet, for example in rain
or high humidity.
• If the camera's view is obstructed, for
example by mud.
Using the Display WARNINGS
Obstacles above the camera position
will not be shown. Inspect the area
behind your vehicle if necessary.
Marks are for general guidance only,
and are calculated for vehicles in
maximum load conditions on an
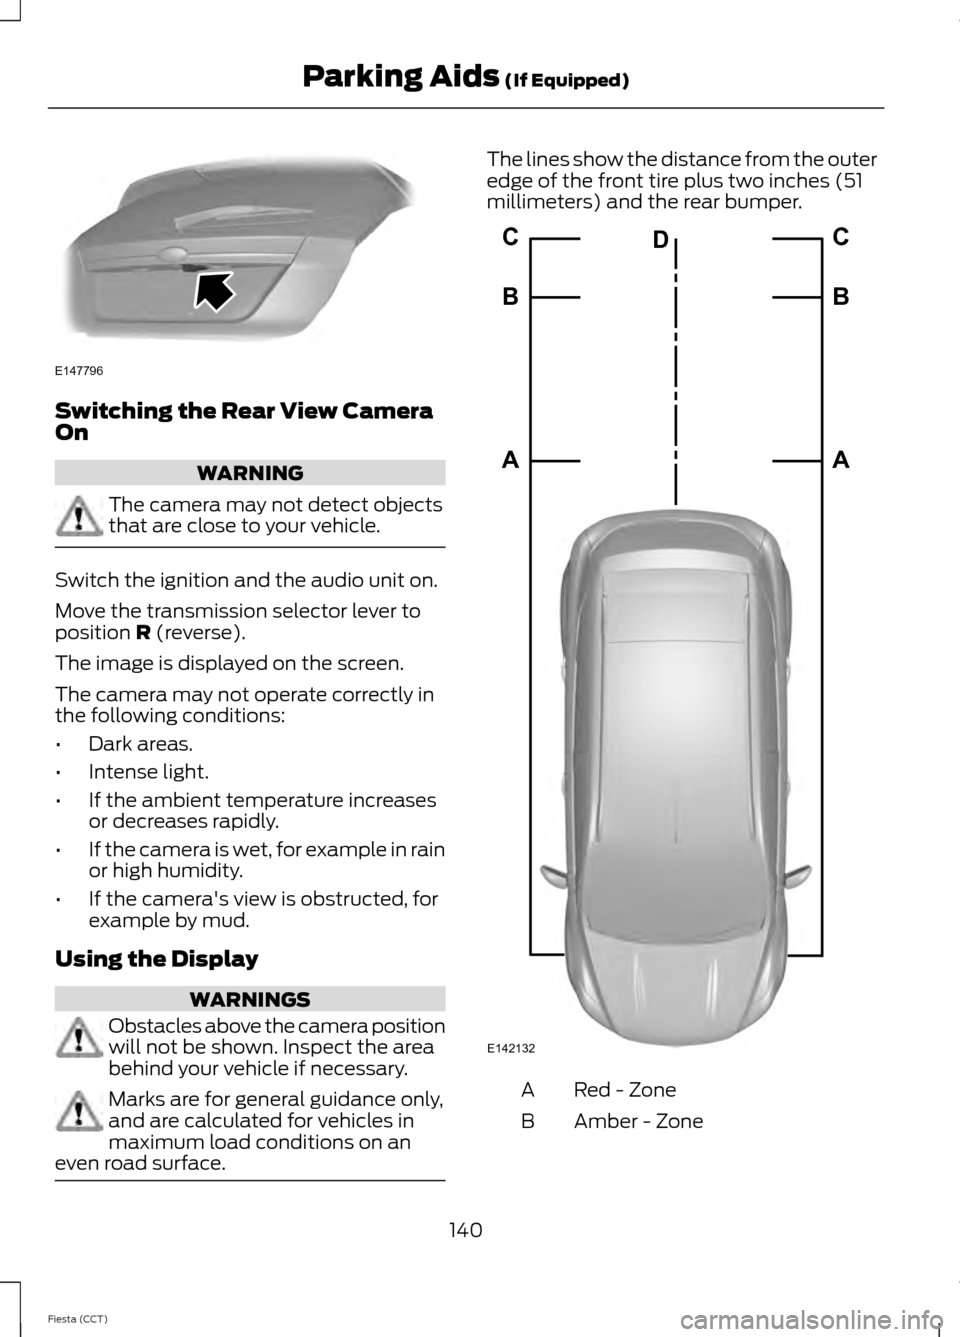
even road surface. The lines show the distance from the outer
edge of the front tire plus two inches (51
millimeters) and the rear bumper.
Red - Zone
A
Amber - Zone
B
140
Fiesta (CCT) Parking Aids
(If Equipped)E147796 E142132A B C
A B C
D
Page 177 of 396
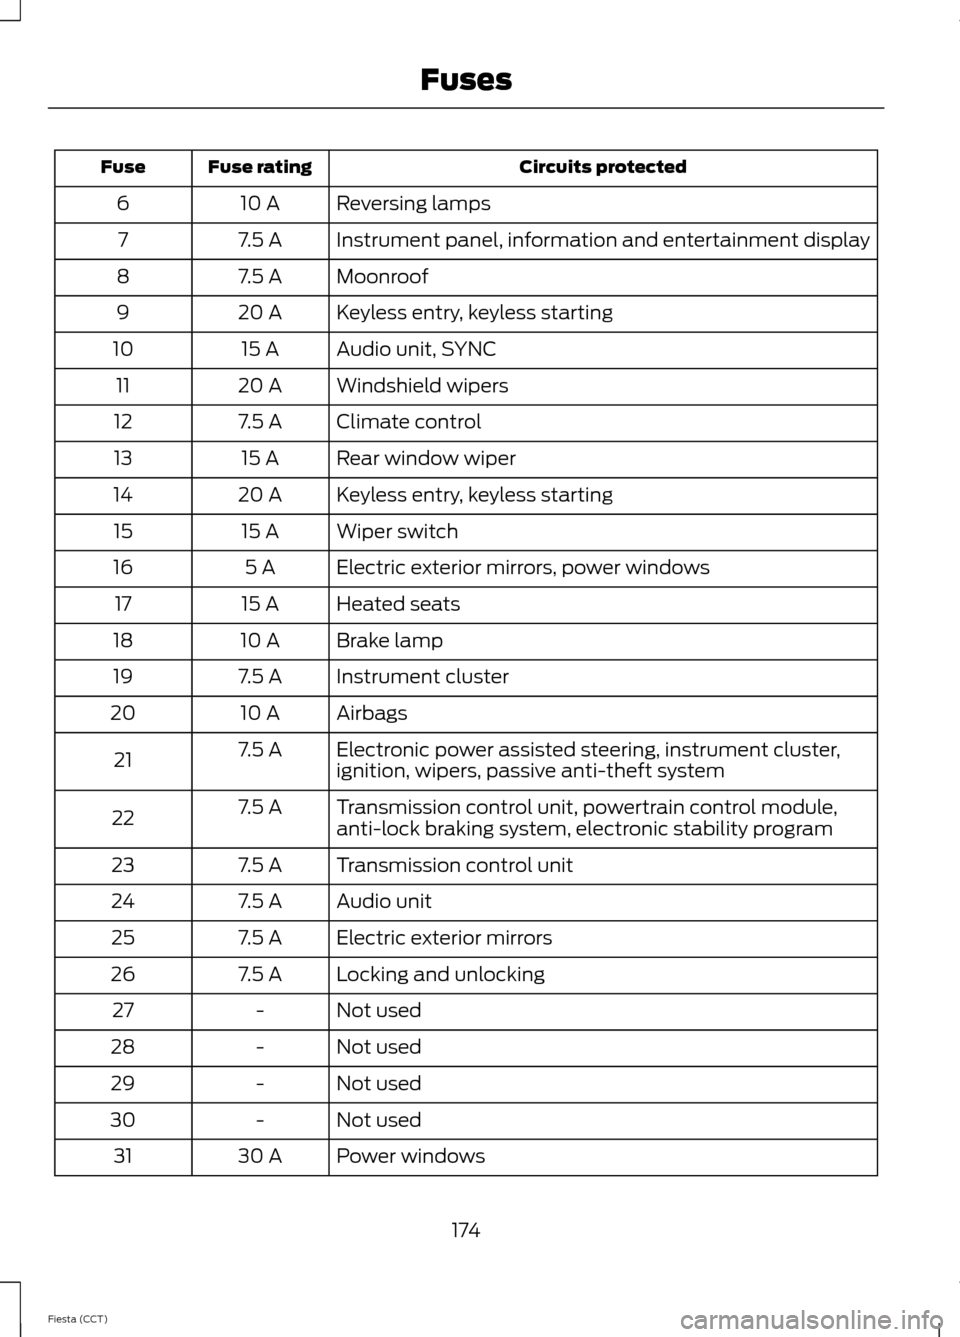
Circuits protected
Fuse rating
Fuse
Reversing lamps
10 A
6
Instrument panel, information and entertainment display
7.5 A
7
Moonroof
7.5 A
8
Keyless entry, keyless starting
20 A
9
Audio unit, SYNC
15 A
10
Windshield wipers
20 A
11
Climate control
7.5 A
12
Rear window wiper
15 A
13
Keyless entry, keyless starting
20 A
14
Wiper switch
15 A
15
Electric exterior mirrors, power windows
5 A
16
Heated seats
15 A
17
Brake lamp
10 A
18
Instrument cluster
7.5 A
19
Airbags
10 A
20
Electronic power assisted steering, instrument cluster,
ignition, wipers, passive anti-theft system
7.5 A
21
Transmission control unit, powertrain control module,
anti-lock braking system, electronic stability program
7.5 A
22
Transmission control unit
7.5 A
23
Audio unit
7.5 A
24
Electric exterior mirrors
7.5 A
25
Locking and unlocking
7.5 A
26
Not used
-
27
Not used
-
28
Not used
-
29
Not used
-
30
Power windows
30 A
31
174
Fiesta (CCT) Fuses
Page 189 of 396

FUEL FILTER
Your vehicle is equipped with a lifetime
fuel filter that is integrated with the fuel
tank. Regular maintenance or replacement
is not needed.
WASHER FLUID CHECK
Note:
The reservoir supplies the front and
rear washer systems.
When adding fluid, use a mixture of washer
fluid and water to help prevent freezing in
cold weather and improve the cleaning
capability. We recommend that you use
only high quality washer fluid.
For information on fluid dilution, refer to
the product instructions.
CHANGING THE 12V BATTERY WARNING
For vehicles with start-stop the
battery requirement is different. You
must replace the battery with one of
exactly the same specification. Note:
Where applicable you must
reprogram the audio system using the
keycode.
The battery is located in the engine
compartment. See Maintenance (page
177). CHECKING THE WIPER
BLADES Run the tip of your fingers over the edge of
the blade to check for roughness.
Clean the wiper blades with washer fluid
or water applied with a soft sponge or
cloth.
CHANGING THE WIPER
BLADES
Windshield Wiper Blades
Changing the Windshield Wiper Blades
1. Press the locking button.
2. Remove the wiper blade.
3. Install in the reverse order.
Note:
Make sure that the wiper blade locks
into place.
Rear Window Wiper Blade
1. Lift the wiper arm.
186
Fiesta (CCT) MaintenanceE142463 E72899
1
2
Page 245 of 396
GENERAL INFORMATION
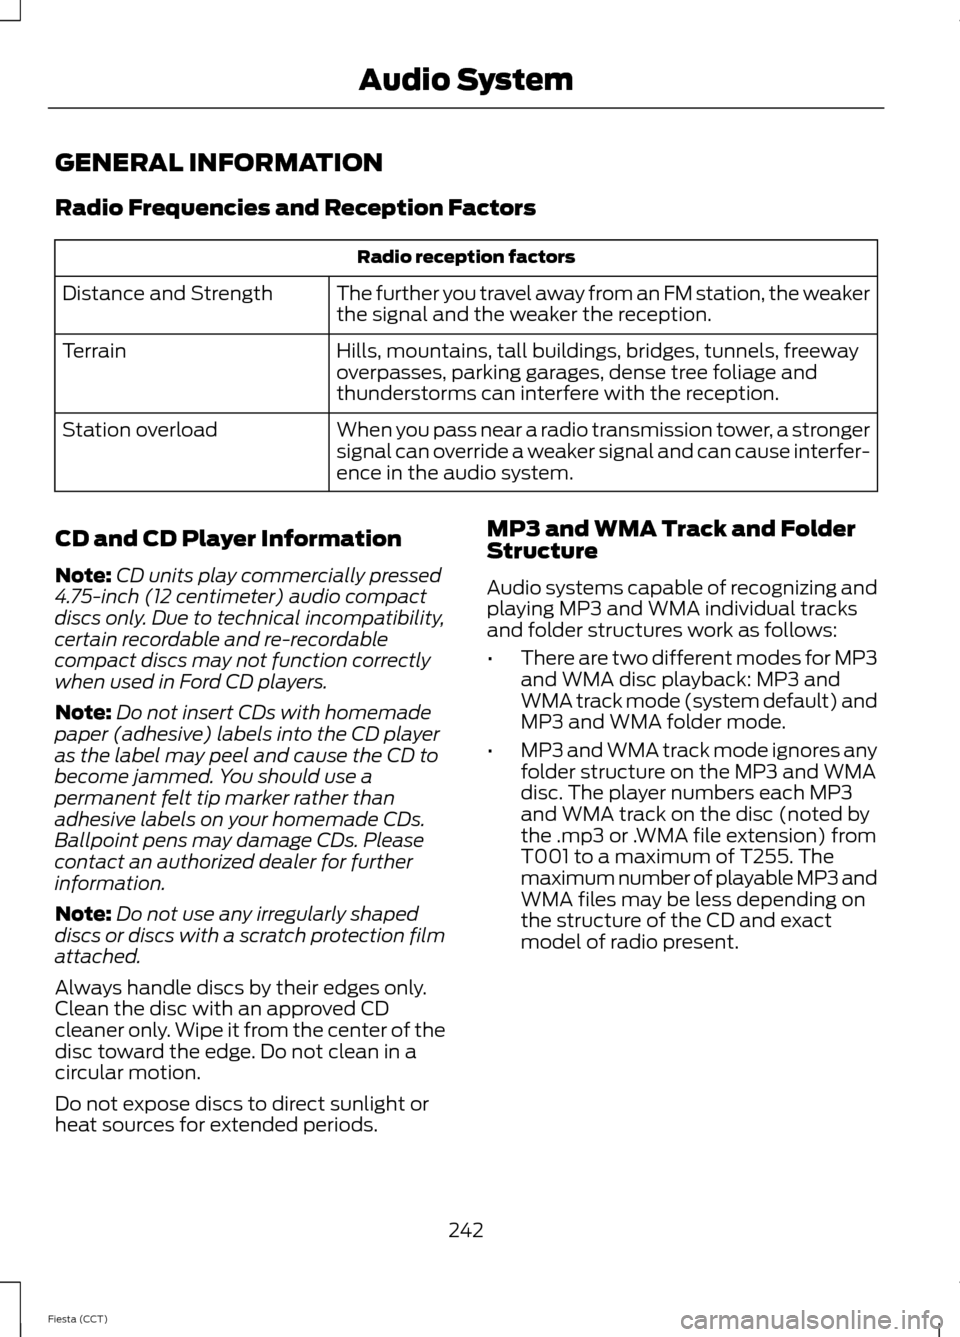
Radio Frequencies and Reception Factors
Radio reception factors
The further you travel away from an FM station, the weaker
the signal and the weaker the reception.
Distance and Strength
Hills, mountains, tall buildings, bridges, tunnels, freeway
overpasses, parking garages, dense tree foliage and
thunderstorms can interfere with the reception.
Terrain
When you pass near a radio transmission tower, a stronger
signal can override a weaker signal and can cause interfer-
ence in the audio system.
Station overload
CD and CD Player Information
Note: CD units play commercially pressed
4.75-inch (12 centimeter) audio compact
discs only. Due to technical incompatibility,
certain recordable and re-recordable
compact discs may not function correctly
when used in Ford CD players.
Note: Do not insert CDs with homemade
paper (adhesive) labels into the CD player
as the label may peel and cause the CD to
become jammed. You should use a
permanent felt tip marker rather than
adhesive labels on your homemade CDs.
Ballpoint pens may damage CDs. Please
contact an authorized dealer for further
information.
Note: Do not use any irregularly shaped
discs or discs with a scratch protection film
attached.
Always handle discs by their edges only.
Clean the disc with an approved CD
cleaner only. Wipe it from the center of the
disc toward the edge. Do not clean in a
circular motion.
Do not expose discs to direct sunlight or
heat sources for extended periods. MP3 and WMA Track and Folder
Structure
Audio systems capable of recognizing and
playing MP3 and WMA individual tracks
and folder structures work as follows:
•
There are two different modes for MP3
and WMA disc playback: MP3 and
WMA track mode (system default) and
MP3 and WMA folder mode.
• MP3 and WMA track mode ignores any
folder structure on the MP3 and WMA
disc. The player numbers each MP3
and WMA track on the disc (noted by
the .mp3 or .WMA file extension) from
T001 to a maximum of T255. The
maximum number of playable MP3 and
WMA files may be less depending on
the structure of the CD and exact
model of radio present.
242
Fiesta (CCT) Audio System
Page 246 of 396
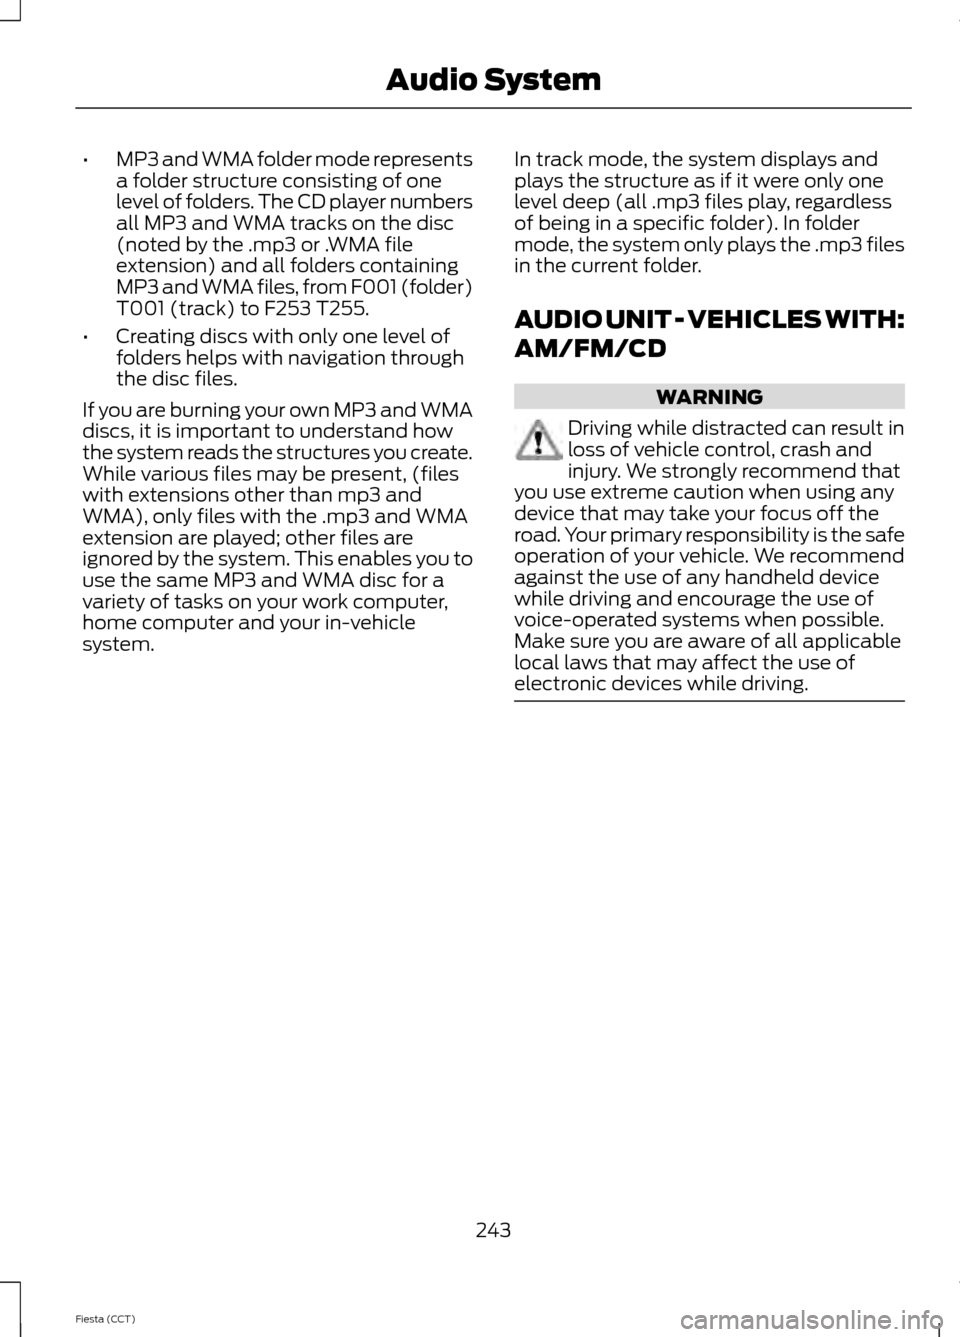
•
MP3 and WMA folder mode represents
a folder structure consisting of one
level of folders. The CD player numbers
all MP3 and WMA tracks on the disc
(noted by the .mp3 or .WMA file
extension) and all folders containing
MP3 and WMA files, from F001 (folder)
T001 (track) to F253 T255.
• Creating discs with only one level of
folders helps with navigation through
the disc files.
If you are burning your own MP3 and WMA
discs, it is important to understand how
the system reads the structures you create.
While various files may be present, (files
with extensions other than mp3 and
WMA), only files with the .mp3 and WMA
extension are played; other files are
ignored by the system. This enables you to
use the same MP3 and WMA disc for a
variety of tasks on your work computer,
home computer and your in-vehicle
system. In track mode, the system displays and
plays the structure as if it were only one
level deep (all .mp3 files play, regardless
of being in a specific folder). In folder
mode, the system only plays the .mp3 files
in the current folder.
AUDIO UNIT - VEHICLES WITH:
AM/FM/CD WARNING
Driving while distracted can result in
loss of vehicle control, crash and
injury. We strongly recommend that
you use extreme caution when using any
device that may take your focus off the
road. Your primary responsibility is the safe
operation of your vehicle. We recommend
against the use of any handheld device
while driving and encourage the use of
voice-operated systems when possible.
Make sure you are aware of all applicable
local laws that may affect the use of
electronic devices while driving. 243
Fiesta (CCT) Audio System
Page 247 of 396

Eject: Press the button to eject a CD.
A
Cursor arrows:
Press a button to scroll through on-screen choices.
B
CD slot:
Where you insert a CD.
C
OK:
Press the button to confirm on-screen selections.
D
Clock:
Press to set the time. Use the H and M buttons outside the audio display
to adjust the hours and minutes. Press OK to finish. (The clock can also be set
by pressing MENU, then scrolling to the clock settings menu.)
E
Tune:
Press the button to manual tune on AM and FM wavebands.
F
Numeric keypad:
Press the button to recall a previously stored station. To
store a favorite station press and hold until the sound returns.
G
Seek up: Press the button to go to the next station up the radio frequency band
or the next track on a CD.
H
On, Off and Volume:
Press the button to switch the audio system on or off.
Turn the dial to adjust the volume.
I
244
Fiesta (CCT) Audio SystemE156613
ED
OF
G
K
L
M
N
JHI
C
A
B
Page 248 of 396
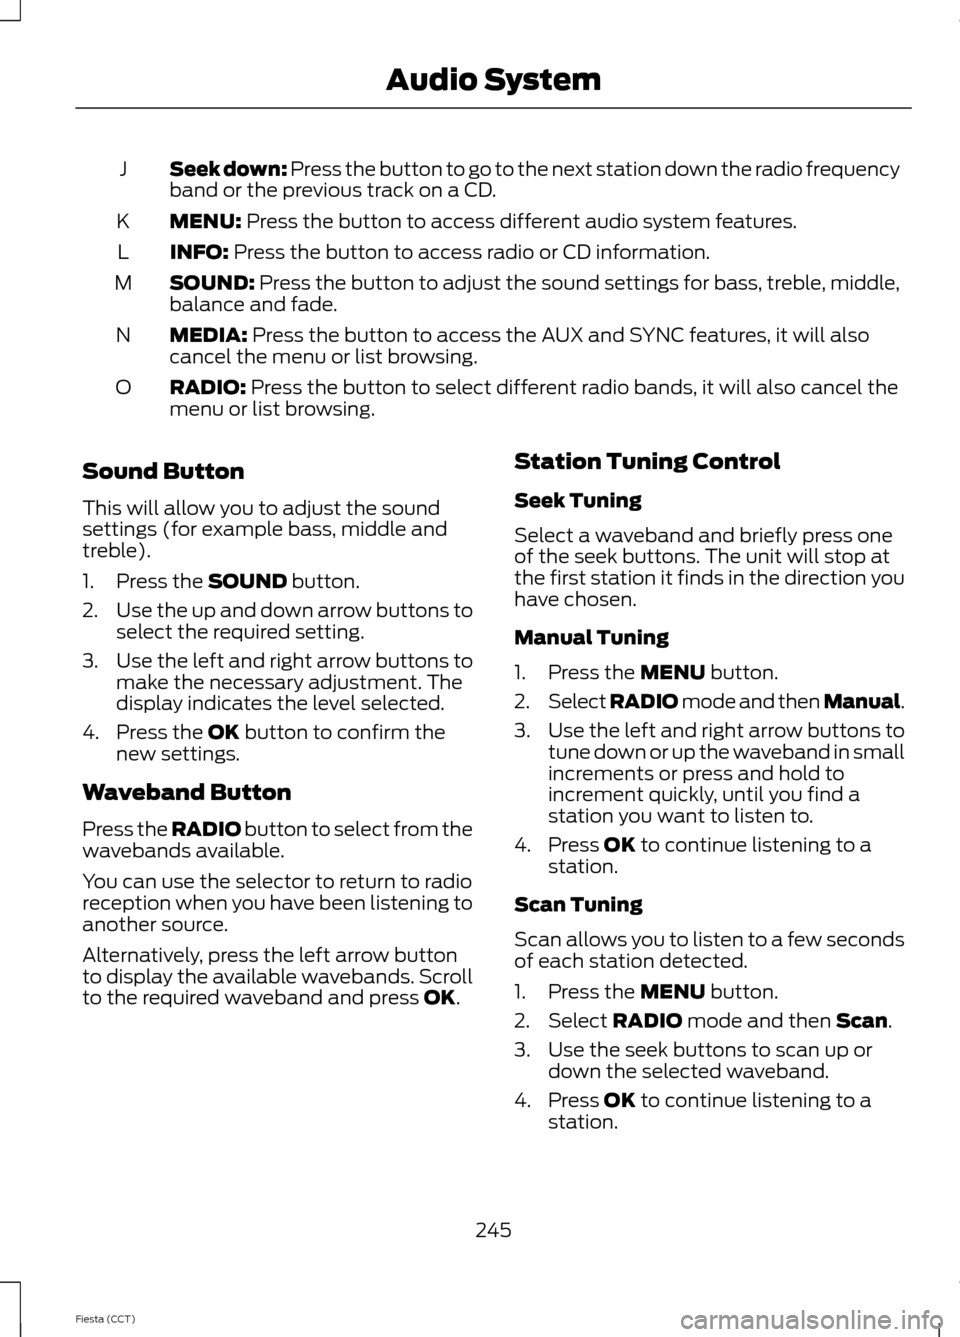
Seek down: Press the button to go to the next station down the radio frequency
band or the previous track on a CD.
J
MENU: Press the button to access different audio system features.
K
INFO:
Press the button to access radio or CD information.
L
SOUND:
Press the button to adjust the sound settings for bass, treble, middle,
balance and fade.
M
MEDIA:
Press the button to access the AUX and SYNC features, it will also
cancel the menu or list browsing.
N
RADIO:
Press the button to select different radio bands, it will also cancel the
menu or list browsing.
O
Sound Button
This will allow you to adjust the sound
settings (for example bass, middle and
treble).
1. Press the
SOUND button.
2. Use the up and down arrow buttons to
select the required setting.
3. Use the left and right arrow buttons to
make the necessary adjustment. The
display indicates the level selected.
4. Press the
OK button to confirm the
new settings.
Waveband Button
Press the
RADIO button to select from the
wavebands available.
You can use the selector to return to radio
reception when you have been listening to
another source.
Alternatively, press the left arrow button
to display the available wavebands. Scroll
to the required waveband and press
OK. Station Tuning Control
Seek Tuning
Select a waveband and briefly press one
of the seek buttons. The unit will stop at
the first station it finds in the direction you
have chosen.
Manual Tuning
1. Press the
MENU button.
2. Select RADIO mode and then Manual.
3. Use the left and right arrow buttons to
tune down or up the waveband in small
increments or press and hold to
increment quickly, until you find a
station you want to listen to.
4. Press
OK to continue listening to a
station.
Scan Tuning
Scan allows you to listen to a few seconds
of each station detected.
1. Press the
MENU button.
2. Select
RADIO mode and then Scan.
3. Use the seek buttons to scan up or down the selected waveband.
4. Press
OK to continue listening to a
station.
245
Fiesta (CCT) Audio System