Page 245 of 460

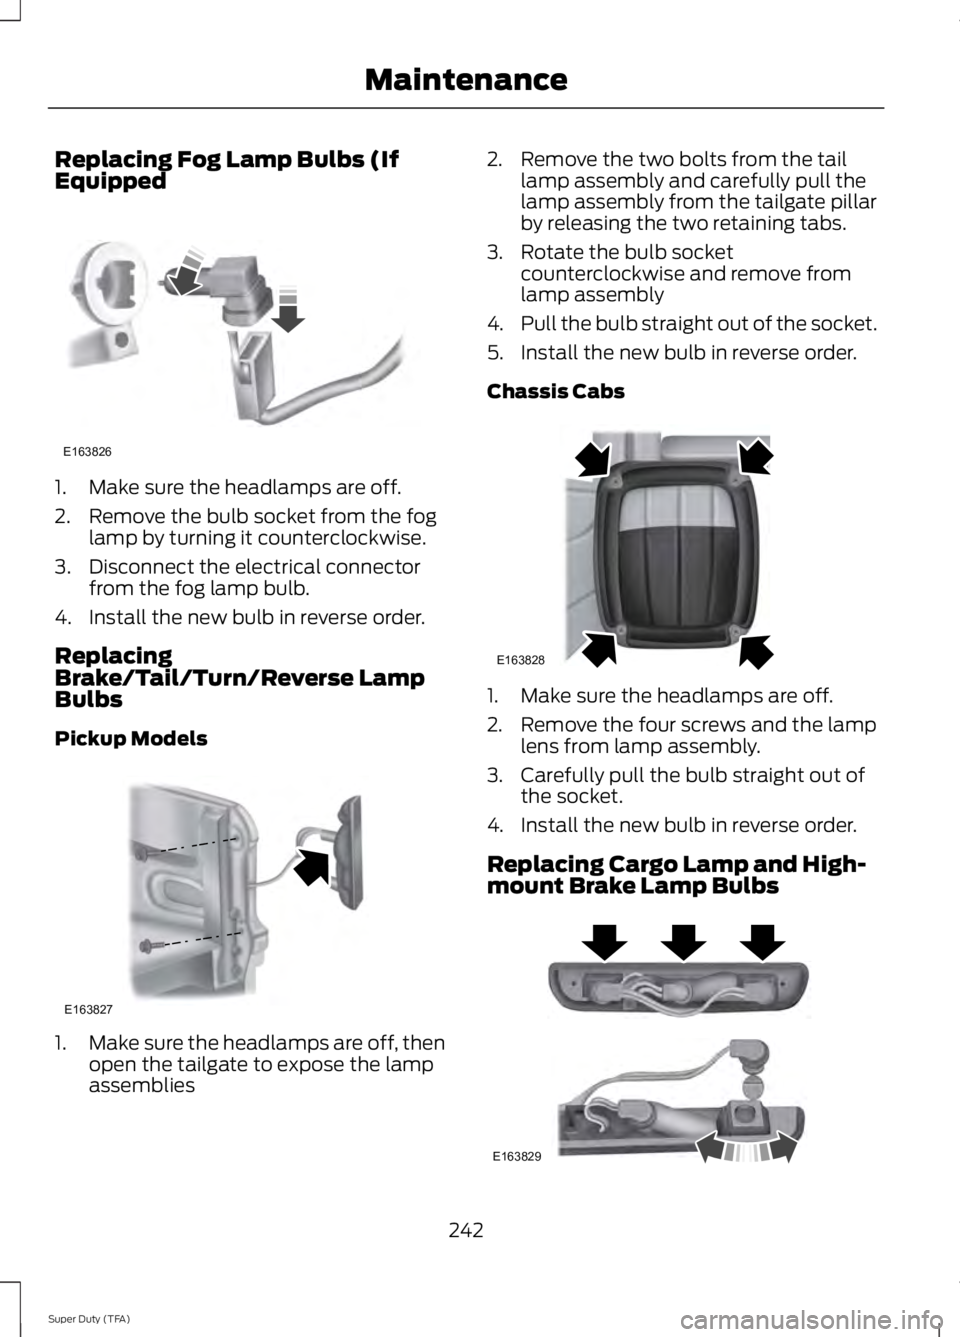
Replacing Fog Lamp Bulbs (If
Equipped
1. Make sure the headlamps are off.
2. Remove the bulb socket from the fog
lamp by turning it counterclockwise.
3. Disconnect the electrical connector from the fog lamp bulb.
4. Install the new bulb in reverse order.
Replacing
Brake/Tail/Turn/Reverse Lamp
Bulbs
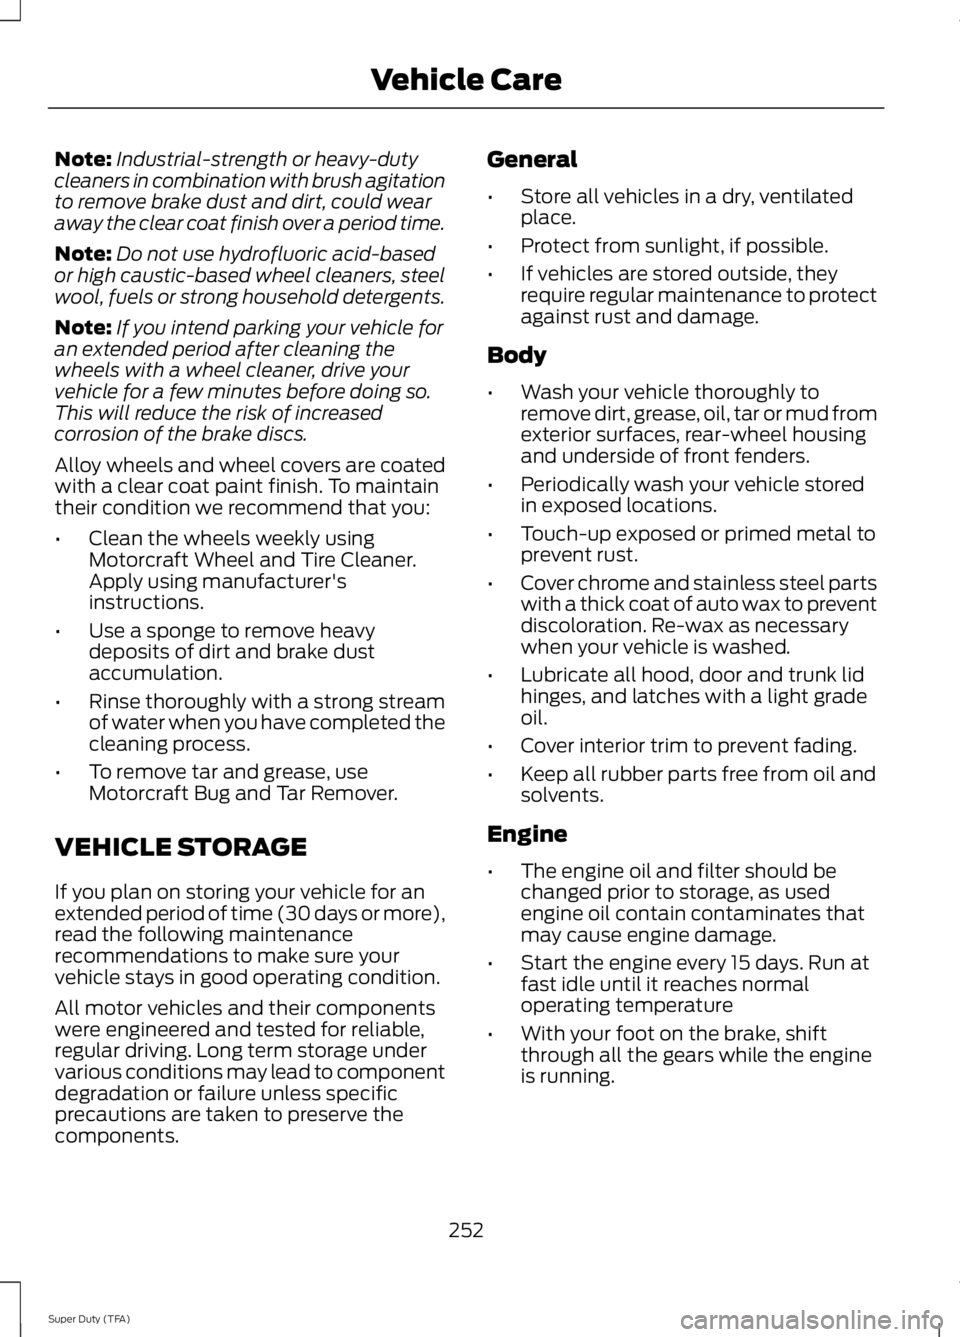
Pickup Models 1.
Make sure the headlamps are off, then
open the tailgate to expose the lamp
assemblies 2. Remove the two bolts from the tail
lamp assembly and carefully pull the
lamp assembly from the tailgate pillar
by releasing the two retaining tabs.
3. Rotate the bulb socket counterclockwise and remove from
lamp assembly
4. Pull the bulb straight out of the socket.
5. Install the new bulb in reverse order.
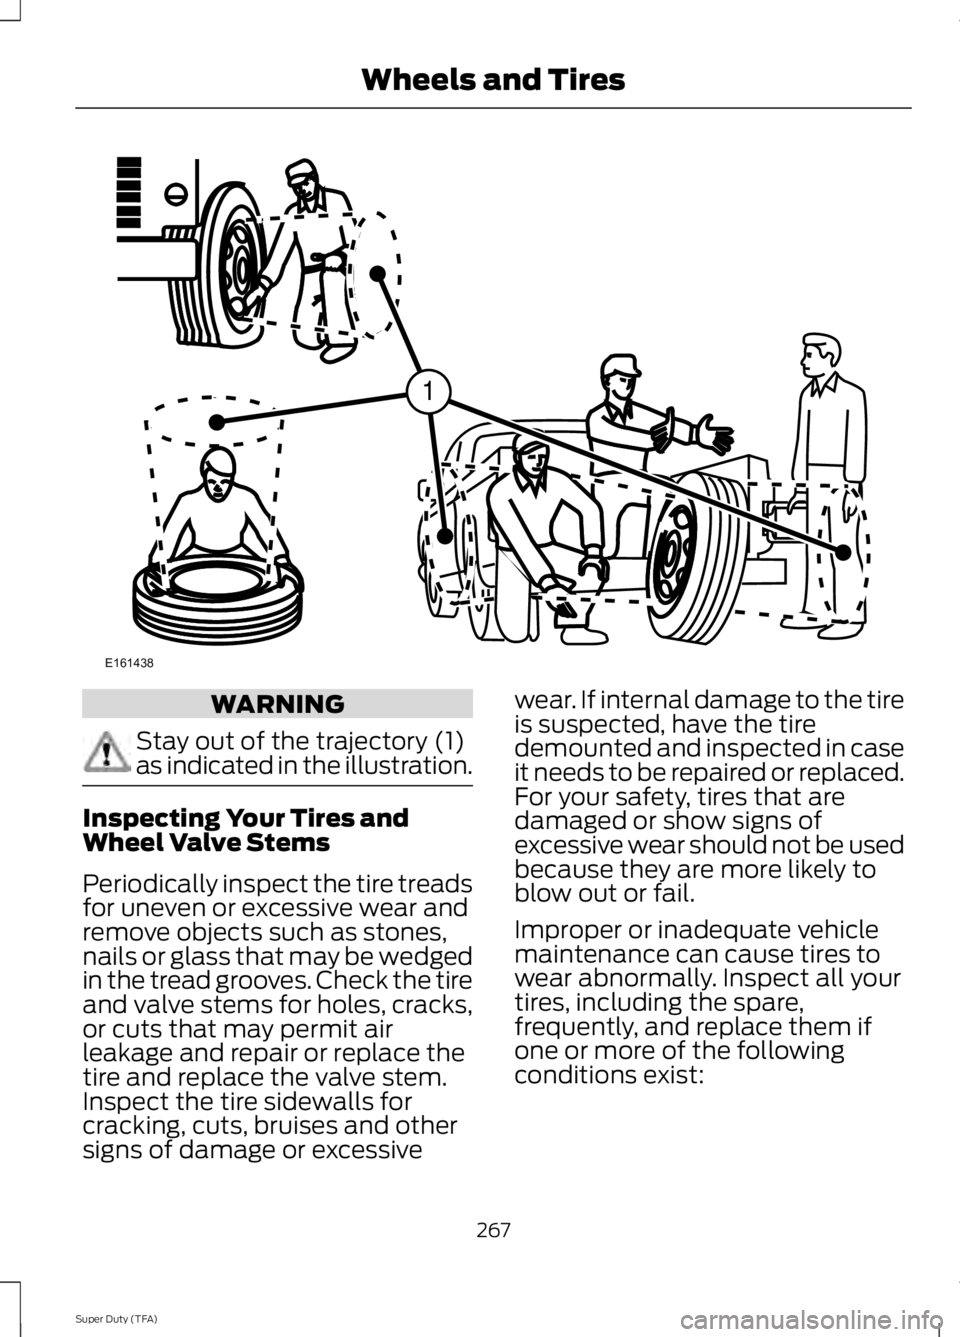
Chassis Cabs 1. Make sure the headlamps are off.
2. Remove the four screws and the lamp
lens from lamp assembly.
3. Carefully pull the bulb straight out of the socket.
4. Install the new bulb in reverse order.
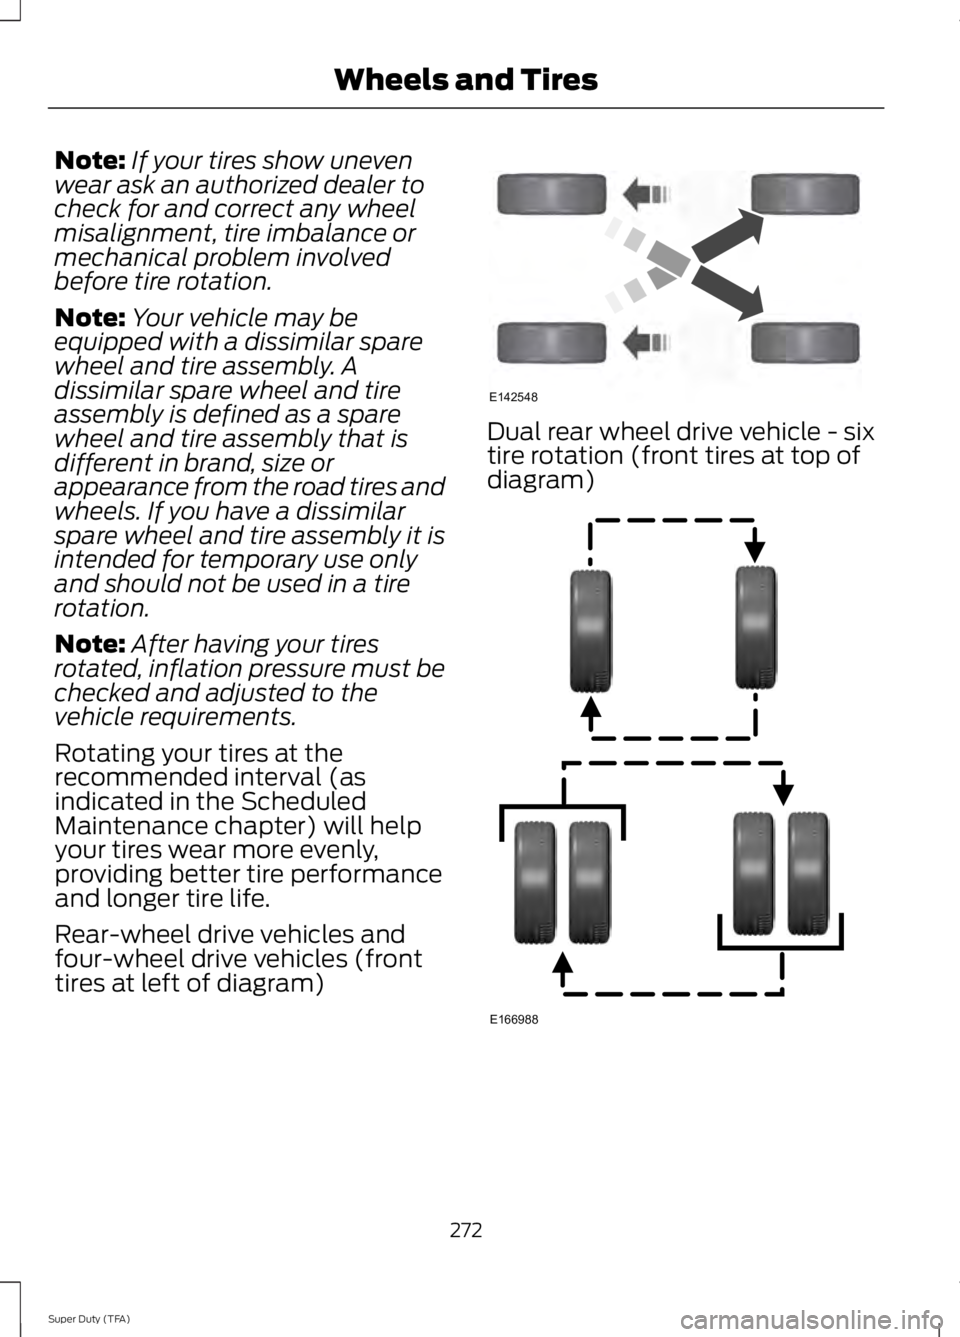
Replacing Cargo Lamp and High-
mount Brake Lamp Bulbs 242
Super Duty (TFA) MaintenanceE163826 E163827 E163828 E163829
Page 246 of 460

1. Make sure the headlamps are off.
2. Remove the screws and lamp
assembly from the vehicle as wiring
permits.
3. Remove the bulb socket by rotating it counterclockwise.
4. Pull the bulb straight out of the socket.
5. Install the new bulb in reverse order.
Replacing the License Plate Lamp
Bulb
Note: The license plate bulbs are located
behind the rear bumper. 1. Reach behind the rear bumper to
locate the bulb.
2. Twist the bulb socket counterclockwise
and carefully pull to remove it from the
lamp assembly.
3. Pull out the old bulb from the socket and push in the new bulb.
4. Install the new bulb in reverse order.
BULB SPECIFICATION CHART
Replacement bulbs are specified in the
chart below. Headlamp bulbs must be
marked with an authorized “D.O.T.” for
North America and an “E” for Europe to
ensure lamp performance, light brightness
and pattern and safe visibility. The correct
bulbs will not damage the lamp assembly
or void the lamp assembly warranty and
will provide quality bulb illumination time. Trade name
Number of Bulbs
Function
H13/9008
2
*Headlamps
W5W
2
*Side marker lamp - front
3157NA
2
*Park/Turn lamp- front
3157
2
Tail/stop/turn/side marker
(pickups only)
3157
2
Tail/stop/turn/side marker
(chassis cabs only)
921
2
Reverse (pickups only)
3157
2
Reverse (chassis cabs only)
194
—
License plate lamp
9145
—
Fog lamp
243
Super Duty (TFA) MaintenanceE163830
Page 247 of 460
Trade name
Number of Bulbs
Function
912
1
High-mount brake lamp
912
2
Cargo lamp
12V6W
2
Map lamp
578
3
Dome/reading lamps
2825
2
Interior visor lamp
2825
2
Mirror turn signal
2825
Mirror clearance lamp
194
5
Front clearance lamps and
front identification lamps 1
LED2
4
Rear fender clearance 1
1932
3
Rear identification 1
906
1
Underhood Lamp
LED (if equipped)2
To replace all instrument panel lights - see your authorized dealer 1Dual rear wheels, if equipped
2 See your authorized dealer to replace the lamp assembly
244
Super Duty (TFA) Maintenance
Page 248 of 460

CHANGING THE ENGINE AIR
FILTER
WARNINGS
To reduce the risk of vehicle damage
and personal burn injuries, do not
start your engine with the air cleaner
removed and do not remove it while the
engine is running. To reduce the risk of vehicle damage
and personal burn injuries, do not
start your engine with the air cleaner
removed and do not remove it while the
engine is running. Note:
Failure to use the correct air filter
element may result in severe engine
damage. The customer warranty may be
void for any damage to the engine if the
correct air filter element is not used.
When changing the air filter element, use
only the air filter element listed. See
Capacities and Specifications (page
292).
Change the air filter element at the proper
interval. See
Scheduled Maintenance
(page 430). 1. Locate the mass air flow sensor
electrical connector on the air outlet
tube. Disconnect the mass air flow
sensor electrical connector. 2. Reposition the locking clip on the
connector (connector shown from
below for clarity), squeeze the
connector and pull it off of the air
outlet tube. 3.
Clean the area from around the air tube
to the air cover connection to prevent
debris from entering the system. Next,
loosen the bolt on the air tube clamp
so the clamp is no longer snug to the
air tube. It is not necessary to
completely remove the clamp.
4. Pull the air tube off from the air cleaner
housing.
245
Super Duty (TFA) MaintenanceE163755 E163756 E163757
Page 249 of 460
5. Release the three clamps that secure
the cover to the air filter housing. Push
the air filter cover toward the center of
the vehicle and up slightly to release it.
6. Remove the air filter element from the
air filter housing.
7. Install the new air filter element. 8.
Replace the air filter housing cover and
secure all the clamps. Be careful not
to crimp the filter element edges
between the air filter housing and cover
and ensure that you properly align the
tabs on the edge into the slots.
9. Slip the air tube onto the air filter housing and tighten the air-tube clamp
bolt snugly. Do not over tighten
air-tube clamp bolt. 10. Reconnect the mass air flow sensor
electrical connector to the outlet
tube. Make sure the locking tab on
the connector is in the locked position
(connector shown from below for
clarity).
246
Super Duty (TFA) MaintenanceE163758 E163759 E163760
Page 255 of 460

Note:
Industrial-strength or heavy-duty
cleaners in combination with brush agitation
to remove brake dust and dirt, could wear
away the clear coat finish over a period time.
Note: Do not use hydrofluoric acid-based
or high caustic-based wheel cleaners, steel
wool, fuels or strong household detergents.
Note: If you intend parking your vehicle for
an extended period after cleaning the
wheels with a wheel cleaner, drive your
vehicle for a few minutes before doing so.
This will reduce the risk of increased
corrosion of the brake discs.
Alloy wheels and wheel covers are coated
with a clear coat paint finish. To maintain
their condition we recommend that you:
• Clean the wheels weekly using
Motorcraft Wheel and Tire Cleaner.
Apply using manufacturer's
instructions.
• Use a sponge to remove heavy
deposits of dirt and brake dust
accumulation.
• Rinse thoroughly with a strong stream
of water when you have completed the
cleaning process.
• To remove tar and grease, use
Motorcraft Bug and Tar Remover.
VEHICLE STORAGE
If you plan on storing your vehicle for an
extended period of time (30 days or more),
read the following maintenance
recommendations to make sure your
vehicle stays in good operating condition.
All motor vehicles and their components
were engineered and tested for reliable,
regular driving. Long term storage under
various conditions may lead to component
degradation or failure unless specific
precautions are taken to preserve the
components. General
•
Store all vehicles in a dry, ventilated
place.
• Protect from sunlight, if possible.
• If vehicles are stored outside, they
require regular maintenance to protect
against rust and damage.
Body
• Wash your vehicle thoroughly to
remove dirt, grease, oil, tar or mud from
exterior surfaces, rear-wheel housing
and underside of front fenders.
• Periodically wash your vehicle stored
in exposed locations.
• Touch-up exposed or primed metal to
prevent rust.
• Cover chrome and stainless steel parts
with a thick coat of auto wax to prevent
discoloration. Re-wax as necessary
when your vehicle is washed.
• Lubricate all hood, door and trunk lid
hinges, and latches with a light grade
oil.
• Cover interior trim to prevent fading.
• Keep all rubber parts free from oil and
solvents.
Engine
• The engine oil and filter should be
changed prior to storage, as used
engine oil contain contaminates that
may cause engine damage.
• Start the engine every 15 days. Run at
fast idle until it reaches normal
operating temperature
• With your foot on the brake, shift
through all the gears while the engine
is running.
252
Super Duty (TFA) Vehicle Care
Page 270 of 460

WARNING
Stay out of the trajectory (1)
as indicated in the illustration.
Inspecting Your Tires and
Wheel Valve Stems
Periodically inspect the tire treads
for uneven or excessive wear and
remove objects such as stones,
nails or glass that may be wedged
in the tread grooves. Check the tire
and valve stems for holes, cracks,
or cuts that may permit air
leakage and repair or replace the
tire and replace the valve stem.
Inspect the tire sidewalls for
cracking, cuts, bruises and other
signs of damage or excessive
wear. If internal damage to the tire
is suspected, have the tire
demounted and inspected in case
it needs to be repaired or replaced.
For your safety, tires that are
damaged or show signs of
excessive wear should not be used
because they are more likely to
blow out or fail.
Improper or inadequate vehicle
maintenance can cause tires to
wear abnormally. Inspect all your
tires, including the spare,
frequently, and replace them if
one or more of the following
conditions exist:
267
Super Duty (TFA) Wheels and TiresE161438
1
Page 275 of 460

Note:
If your tires show uneven
wear ask an authorized dealer to
check for and correct any wheel
misalignment, tire imbalance or
mechanical problem involved
before tire rotation.
Note: Your vehicle may be
equipped with a dissimilar spare
wheel and tire assembly. A
dissimilar spare wheel and tire
assembly is defined as a spare
wheel and tire assembly that is
different in brand, size or
appearance from the road tires and
wheels. If you have a dissimilar
spare wheel and tire assembly it is
intended for temporary use only
and should not be used in a tire
rotation.
Note: After having your tires
rotated, inflation pressure must be
checked and adjusted to the
vehicle requirements.
Rotating your tires at the
recommended interval (as
indicated in the Scheduled
Maintenance chapter) will help
your tires wear more evenly,
providing better tire performance
and longer tire life.
Rear-wheel drive vehicles and
four-wheel drive vehicles (front
tires at left of diagram) Dual rear wheel drive vehicle - six
tire rotation (front tires at top of
diagram)
272
Super Duty (TFA) Wheels and TiresE142548 E166988