2014 FORD F150 transmission fluid
[x] Cancel search: transmission fluidPage 7 of 472

Fuses
Fuse Specification Chart...........................225
Changing a Fuse
...........................................233
Maintenance
General Information
...................................235
Opening and Closing the Hood..............235
Under Hood Overview -
3.5L
Ecoboost™................................................236
Under Hood Overview - 3.7L....................237
Under Hood Overview - 5.0L..................238
Under Hood Overview -
6.2L...................239
Engine Oil Dipstick
......................................240
Engine Oil Check..........................................240
Engine Coolant Check
................................241
Automatic Transmission Fluid Check...........................................................245
Transfer Case Fluid Check........................245
Brake Fluid Check........................................246
Power Steering Fluid Check....................246
Washer Fluid Check
....................................246
Fuel Filter
........................................................246
Changing the 12V Battery.........................246
Checking the Wiper Blades
.....................249
Changing the Wiper Blades.....................249
Adjusting the Headlamps........................249
Removing a Headlamp
...............................251
Changing a Bulb...........................................252
Bulb Specification Chart...........................254
Changing the Engine Air Filter -
3.5L
Ecoboost™................................................256
Changing the Engine Air Filter -
3.7L/
5.0L/6.2L.....................................................257
Vehicle Care
General Information...................................259
Cleaning Products.......................................259
Cleaning the Exterior
..................................259
Waxing............................................................260
Cleaning the Engine
...................................260 Cleaning the Windows and Wiper
Blades...........................................................261
Cleaning the Interior....................................261
Cleaning the Instrument Panel and Instrument Cluster Lens........................261
Cleaning Leather Seats.............................262
Repairing Minor Paint Damage
..............263
Cleaning the Alloy Wheels.......................264
Vehicle Storage............................................264
Wheels and Tires
General Information...................................266
Tire Care
..........................................................268
Using Snow Chains
.....................................283
Tire Pressure Monitoring System...........283
Changing a Road Wheel...........................289
Technical Specifications
...........................294
Capacities and Specific- ations
Engine Specifications................................296
Motorcraft Parts
..........................................298
Vehicle Identification Number
...............298
Vehicle Certification Label.......................299
Transmission Code Designation...........300
Technical Specifications
............................301
Audio System
General Information...................................306
Audio unit - Vehicles With: AM/FM.......307
Audio unit -
Vehicles With: AM/FM/CD/
SYNC/Satellite Radio...........................308
Audio unit -
Vehicles With: AM/FM/CD/
SYNC/Satellite Radio.............................312
Audio unit - Vehicles With: Sony AM/FM/ CD...................................................................315
Digital Radio...................................................316
Satellite Radio
...............................................318
Audio Input Jack............................................321
USB Port
..........................................................322
Media Hub......................................................322
4
F150 (TF6) , enUSA Table of Contents
Page 84 of 472
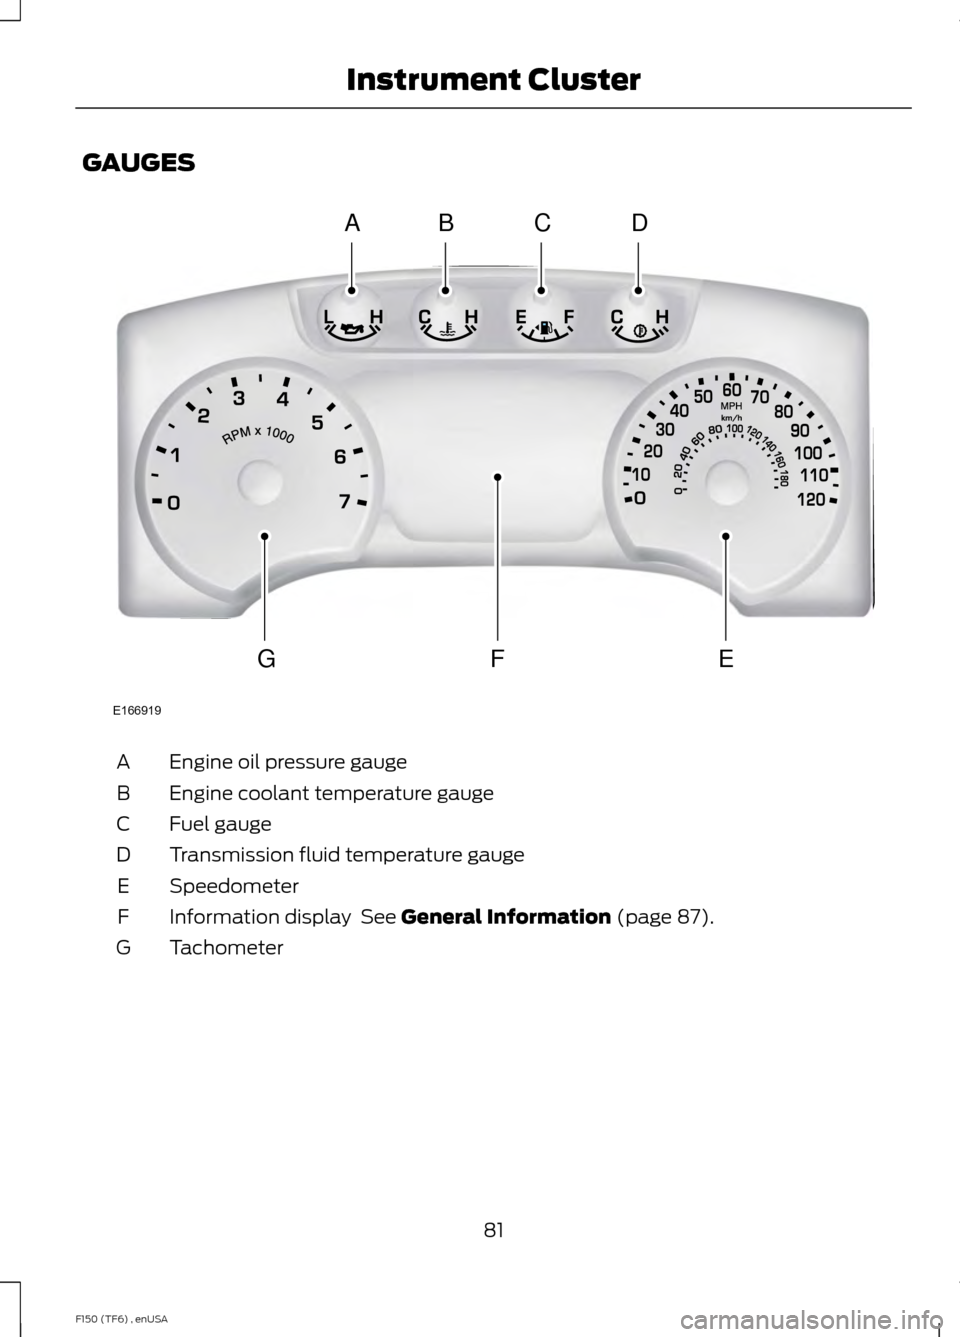
GAUGES
Engine oil pressure gauge
A
Engine coolant temperature gauge
B
Fuel gauge
C
Transmission fluid temperature gauge
D
Speedometer
E
Information display See General Information (page 87).
F
Tachometer
G
81
F150 (TF6) , enUSA Instrument ClusterE166919
FGE
ABCD
Page 85 of 472

Engine Oil Pressure Gauge
Indicates engine oil pressure. The needle
should stay in the normal operating range
(between L and H). If the needle falls
below the normal range, stop the vehicle,
turn off the engine and check the engine
oil level. Add oil if needed. If the oil level is
correct, have your vehicle checked by your
authorized dealer.
Engine Coolant Temperature
Gauge
WARNING
Never remove the coolant reservoir
cap while the engine is running or hot.
Indicates engine coolant temperature. At
normal operating temperature, the level
indicator will be in the normal range. If the
engine coolant temperature exceeds the
normal range, stop the vehicle as soon as
safely possible, switch off the engine and
let the engine cool.
Fuel Gauge
Switch the ignition on. The fuel gauge will
indicate approximately how much fuel is
left in the fuel tank. The fuel gauge may
vary slightly when your vehicle is moving
or on a gradient. The arrow adjacent to the
fuel pump symbol indicates on which side
of the vehicle the fuel filler door is located.
Transmission Fluid Temperature
Gauge
Indicates transmission fluid temperature.
At normal operating temperature, the level
indicator will be in the normal range. If the
transmission fluid temperature exceeds
the normal range, stop the vehicle as soon
as safely possible and verify the airflow is
not restricted such as snow or debris
blocking airflow through the grill. Also,
higher than normal operating temperature can be caused by special operation
conditions (i.e. snowplowing, towing or
off-road use). Refer to Special operating
conditions in the scheduled maintenance
information for instructions. Operating the
transmission for extended periods of time
with the gauge in the higher than normal
area may cause internal transmission
damage. Altering the severity of the driving
conditions is recommended to lower the
transmission temperature into the normal
range. If the gauge continues to show high
temperatures, see your authorized dealer.
Information Display
Odometer
Located in the bottom of the information
display Registers the accumulated
distance your vehicle has traveled.
Trip Computer
See General Information (page 87).
Vehicle Settings and Personalization
See
General Information (page 87).
WARNING LAMPS AND
INDICATORS
The following warning lamps and
indicators will alert you to a vehicle
condition that may become serious. Some
lamps will illuminate when you start your
vehicle to make sure they work. If any
lamps remain on after starting your vehicle,
refer to the respective system warning
lamp for further information.
Note: Some warning indicators appear in
the information display and function the
same as a warning lamp but do not display
when you start your vehicle.
82
F150 (TF6) , enUSA Instrument Cluster
Page 216 of 472

•
The tire air pressures recommended
for general driving are on the vehicle ’s
Safety Certification Label. The
maximum cold inflation pressure for
the tire and associated load rating are
on the tire sidewall. Tire air pressure
may require re-adjustment within these
pressure limits to accommodate the
additional weight of the snowplow
installation.
• Federal and some local regulations
require additional exterior lamps for
snowplow-equipped vehicles. Consult
your authorized dealer for additional
information.
Operating the Vehicle with the
Snowplow Attached
Note: Drive the vehicle at least 500 miles
(800 kilometers) before using your vehicle
for snow removal.
Ford recommends vehicle speed does not
exceed 45 mph (72 km/h) when
snowplowing.
The attached snowplow blade restricts
airflow to the radiator, and may cause the
engine to run at a higher temperature:
Attention to engine temperature is
especially important when outside
temperatures are above freezing. Angle
the blade to maximize airflow to the
radiator and monitor engine temperature
to determine whether a left or right angle
provides the best performance.
Follow the severe duty schedule in your
Scheduled Maintenance information for
engine oil and transmission fluid change
intervals. Snowplowing with your Airbag
Equipped Vehicle WARNINGS
Do not attempt to service, repair, or
modify the airbag supplemental
restraint system (SRS) or its fuses.
See your Ford or Lincoln Mercury dealer. Additional equipment such as
snowplow equipment may affect the
performance of the airbag sensors
increasing the risk of injury. Please refer to
the Body Builders Layout Book for
instructions about the appropriate
installation of additional equipment. All occupants of the vehicle,
including the driver, should always
properly wear their safety belts, even
when provided with an airbag
supplemental restraint system (SRS). Your vehicle is equipped with a driver and
passenger airbag supplemental restraint
system. The supplemental restraint system
will activate in certain frontal and offset
frontal collisions when the vehicle sustains
sufficient longitudinal deceleration.
Careless or high speed driving while
plowing snow which results in sufficient
vehicle decelerations can deploy the
airbag. Such driving also increases the risk
of accidents.
Never remove or defeat the tripping
mechanisms designed into the snow
removal equipment by its manufacturer.
Doing so may cause damage to the vehicle
and the snow removal equipment as well
as possible airbag deployment.
Engine temperature while plowing
Your engine may run at a higher
temperature than normal because the
attached snowplow blade will restrict
airflow to the radiator:
213
F150 (TF6) , enUSA Driving Hints
Page 247 of 472
You have limited engine power when in the
fail-safe mode, so drive your vehicle with
caution. Your vehicle will not maintain
high-speed operation and the engine will
operate poorly.
Remember that the engine is capable of
automatically shutting down to prevent
engine damage. In this situation:
1. Pull off the road as soon as safely
possible and switch off the engine.
2. Tow your vehicle to an authorized dealer.
3. If this is not possible, wait a short period for the engine to cool.
4. Check the coolant level and add if low.
5. Re-start the engine and drive your vehicle to an authorized dealer.
Note: Driving your vehicle without repair
increases the chance of engine damage. See
an authorized dealer as soon as possible.
Engine Fluid Temperature
Management (If Equipped) WARNINGS
To reduce the risk of collision and
injury, be prepared that the vehicle
speed may reduce and the vehicle
may not be able to accelerate with full
power until the fluid temperatures reduce. Never remove the coolant reservoir
cap while the engine is running or hot.
Your vehicle can pull a trailer, but because
of the added load, your vehicle
’s engine
may temporarily reach higher
temperatures during severe operating
conditions such as ascending a long or
steep grade while pulling a trailer in high
temperatures. At this time, you may notice your engine
coolant temperature gauge needle move
toward the H and the POWER REDUCED
TO LOWER TEMP message may appear
in the information display.
You may notice a reduction in vehicle
speed caused by reduced engine power.
In order to manage the engine fluid
temperatures, your vehicle may enter this
mode if certain high-temperature and
high-load conditions take place. The
amount of speed reduction depends on
many factors such as vehicle loading,
towing, grade and ambient temperature.
If this occurs, there is no need to pull off
the road. You can continue to drive your
vehicle while this message is active.
The air conditioning may also cycle on and
off during severe operating conditions to
protect overheating of the engine. When
the engine coolant temperature decreases
to a normal operating temperature, the air
conditioning will turn on once again.
If the engine coolant temperature gauge
moves fully into the red (hot) area, or if the
coolant temperature warning or service
engine soon messages appear in your
information display:
1. Pull off the road as soon as safely possible and shift the transmission into
P
.
2. Leave the engine running until the coolant temperature gauge needle
moves away from the red (hot) area.
After several minutes, if the
temperature does not drop, follow the
remaining steps.
3. Switch the engine off and wait for it to
cool before checking the coolant level.
4. If the coolant level is normal, restart your engine and continue.
244
F150 (TF6) , enUSA Maintenance
Page 248 of 472
5. If the coolant is low, add coolant, and
restart the engine. See Adding Engine
Coolant or How Fail-Safe Cooling
Works in this chapter for more
information.
AUTOMATIC TRANSMISSION
FLUID CHECK
Note: Transmission fluid should be checked
by an authorized dealer. If required, fluid
should be added by an authorized dealer.
The automatic transmission does not have
a transmission fluid dipstick.
Refer to your scheduled maintenance
information for scheduled intervals for fluid
checks and changes. Your transmission
does not consume fluid. However, the fluid
level should be checked if the transmission
is not working properly, (i.e., if the
transmission slips or shifts slowly) or if you
notice some sign of fluid leakage.
Do not use supplemental transmission
fluid additives, treatments or cleaning
agents. The use of these materials may
affect transmission operation and result
in damage to internal transmission
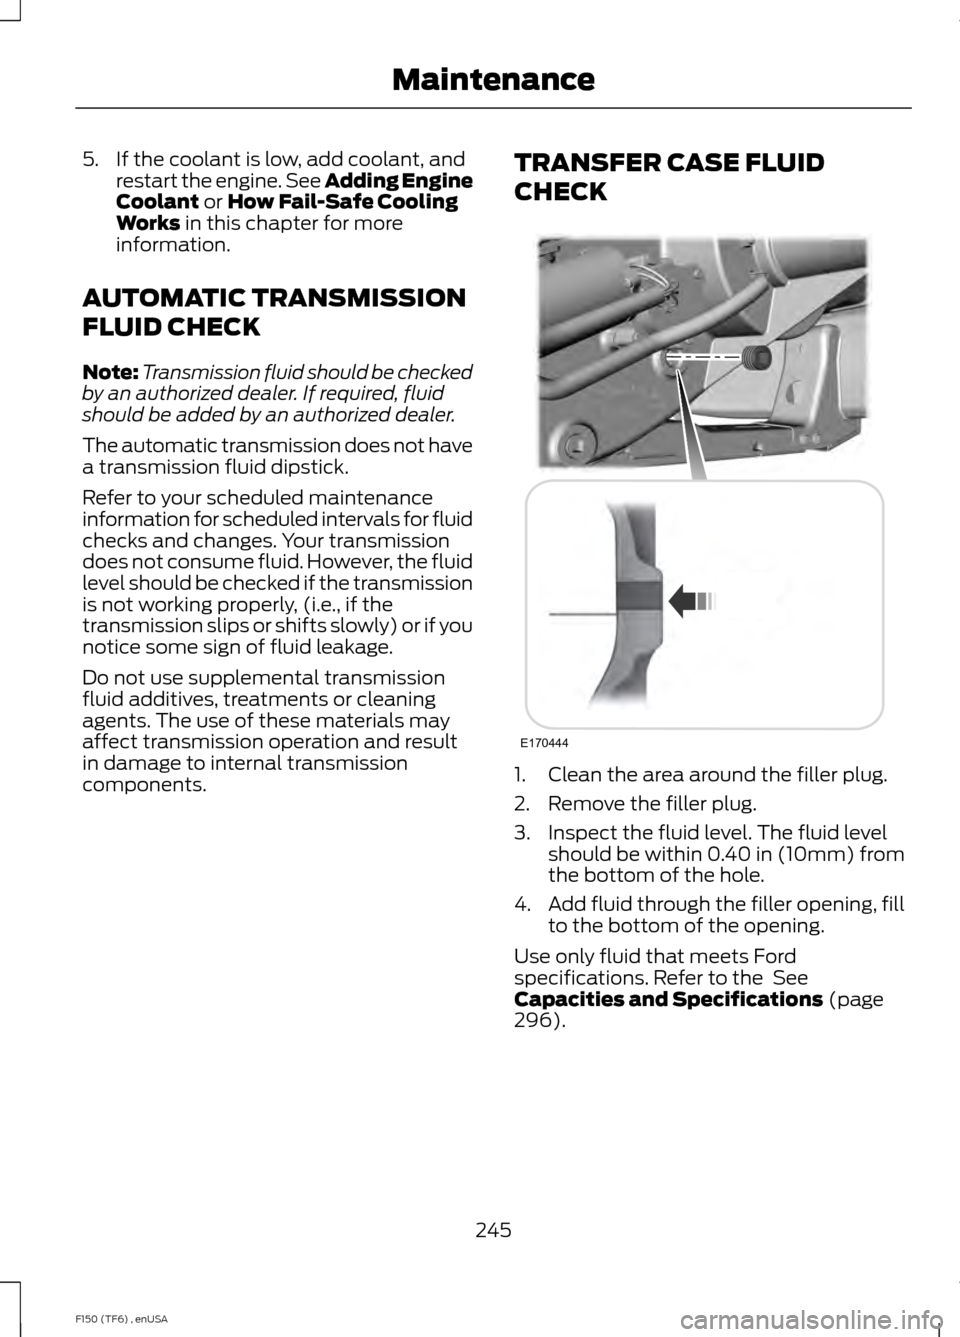
components. TRANSFER CASE FLUID
CHECK
1. Clean the area around the filler plug.
2. Remove the filler plug.
3. Inspect the fluid level. The fluid level
should be within 0.40 in (10mm) from
the bottom of the hole.
4. Add fluid through the filler opening, fill
to the bottom of the opening.
Use only fluid that meets Ford
specifications. Refer to the
See
Capacities and Specifications (page
296).
245
F150 (TF6) , enUSA MaintenanceE170444
Page 301 of 472
MOTORCRAFT PARTS
6.2L V8 engine
5.0L V8 engine
3.7L V6 engine
3.5L V6 Ecoboost
Component
FA-1883
Air filter
element
FL-820-S
FL-500-S
FL-500-S
FL-500-S
Oil filter
BXT-65-750
Battery
SP-526/CYFS-12-FP
SP-519/CYFS-
12Y
SP-520/CYFS-
12F-5
SP-534/CYFS-
12-YT3
Spark plugs
1
WW-2201-PF
Windshield
wiper blade
FS-104
Seat air filter
2
Automatic
transmission fluid filter
1 For spark plug replacement, see your
authorized dealer. See Scheduled
Maintenance (page 438). for the
appropriate intervals for changing the
spark plugs.
Note: Replace the spark plugs with ones
that meet Ford material and design
specifications for your vehicle, such as
Motorcraft or equivalent replacement parts.
The customer warranty may be void for any
damage to the engine if such spark plugs
are not used.
2 For Automatic transmission fluid filter
replacement, see your authorized dealer.
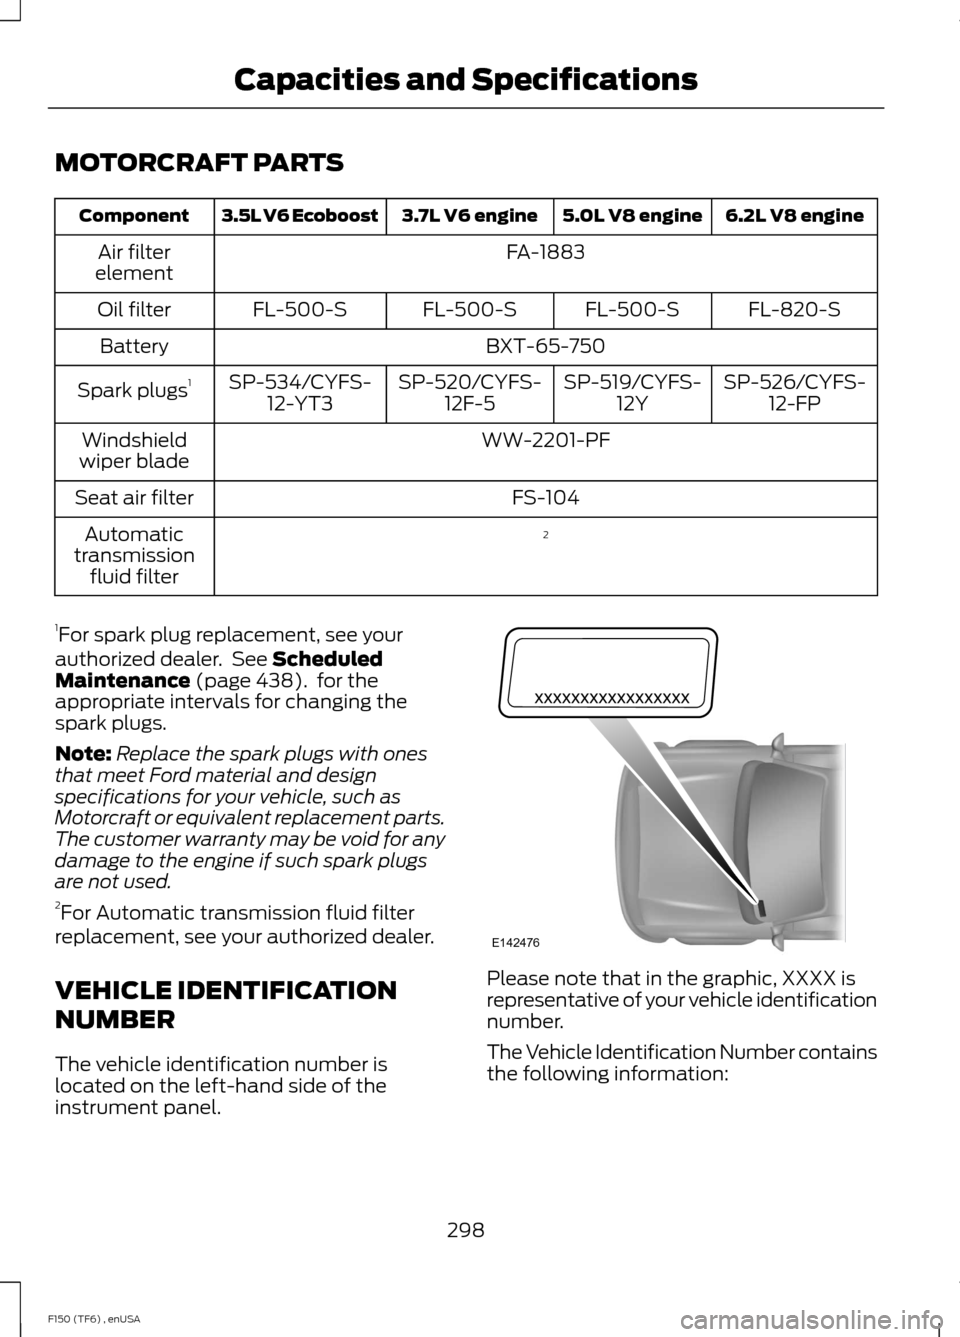
VEHICLE IDENTIFICATION
NUMBER
The vehicle identification number is
located on the left-hand side of the
instrument panel. Please note that in the graphic, XXXX is
representative of your vehicle identification
number.
The Vehicle Identification Number contains
the following information:
298
F150 (TF6) , enUSA Capacities and SpecificationsE142476
Page 305 of 472
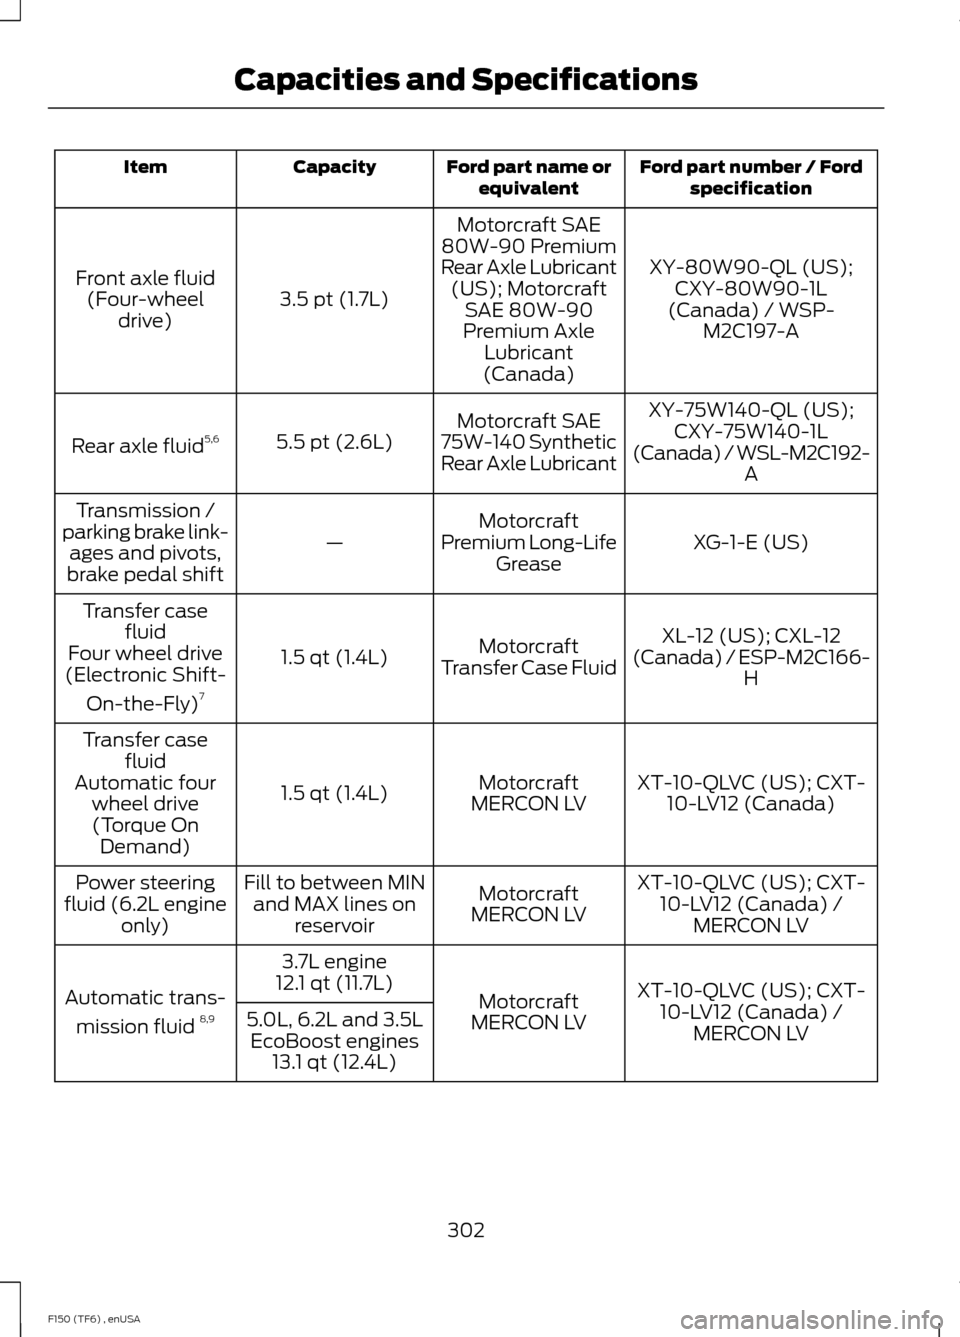
Ford part number / Ford
specification
Ford part name or
equivalent
Capacity
Item
XY-80W90-QL (US);CXY-80W90-1L
(Canada) / WSP- M2C197-A
Motorcraft SAE
80W-90 Premium
Rear Axle Lubricant (US); Motorcraft SAE 80W-90
Premium Axle Lubricant
(Canada)
3.5 pt (1.7L)
Front axle fluid
(Four-wheel drive)
XY-75W140-QL (US);CXY-75W140-1L
(Canada) / WSL-M2C192- A
Motorcraft SAE
75W-140 Synthetic
Rear Axle Lubricant
5.5 pt (2.6L)
Rear axle fluid 5,6
XG-1-E (US)
Motorcraft
Premium Long-Life Grease
—
Transmission /
parking brake link- ages and pivots,
brake pedal shift
XL-12 (US); CXL-12
(Canada) / ESP-M2C166- H
Motorcraft
Transfer Case Fluid
1.5 qt (1.4L)
Transfer case
fluid
Four wheel drive
(Electronic Shift-
On-the-Fly) 7
XT-10-QLVC (US); CXT-10-LV12 (Canada)
Motorcraft
MERCON LV
1.5 qt (1.4L)
Transfer case
fluid
Automatic four wheel drive(Torque On Demand)
XT-10-QLVC (US); CXT-10-LV12 (Canada) / MERCON LV
Motorcraft
MERCON LV
Fill to between MIN
and MAX lines on reservoir
Power steering
fluid (6.2L engine only)
XT-10-QLVC (US); CXT-10-LV12 (Canada) / MERCON LV
Motorcraft
MERCON LV
3.7L engine
12.1 qt (11.7L)
Automatic trans-
mission fluid 8,9
5.0L, 6.2L and 3.5L
EcoBoost engines 13.1 qt (12.4L)
302
F150 (TF6) , enUSA Capacities and Specifications