2014 FORD F150 fuel cap
[x] Cancel search: fuel capPage 182 of 472
LOAD LIMIT
Vehicle Loading - with and
without a Trailer
This section will guide you in the
proper loading of your vehicle,
trailer or both, to keep your loaded
vehicle weight within its design
rating capability, with or without
a trailer. Properly loading your
vehicle will provide maximum
return of vehicle design
performance. Before loading your
vehicle, familiarize yourself with
the following terms for
determining your vehicle
’s weight
ratings, with or without a trailer,
from the vehicle ’s Tire Label or
Safety Compliance Certification
Label:
Base Curb Weight - is the weight
of the vehicle including a full tank
of fuel and all standard
equipment. It does not include
passengers, cargo, or optional
equipment.
Vehicle Curb Weight -
is the
weight of your new vehicle when
you picked it up from your
authorized dealer plus any
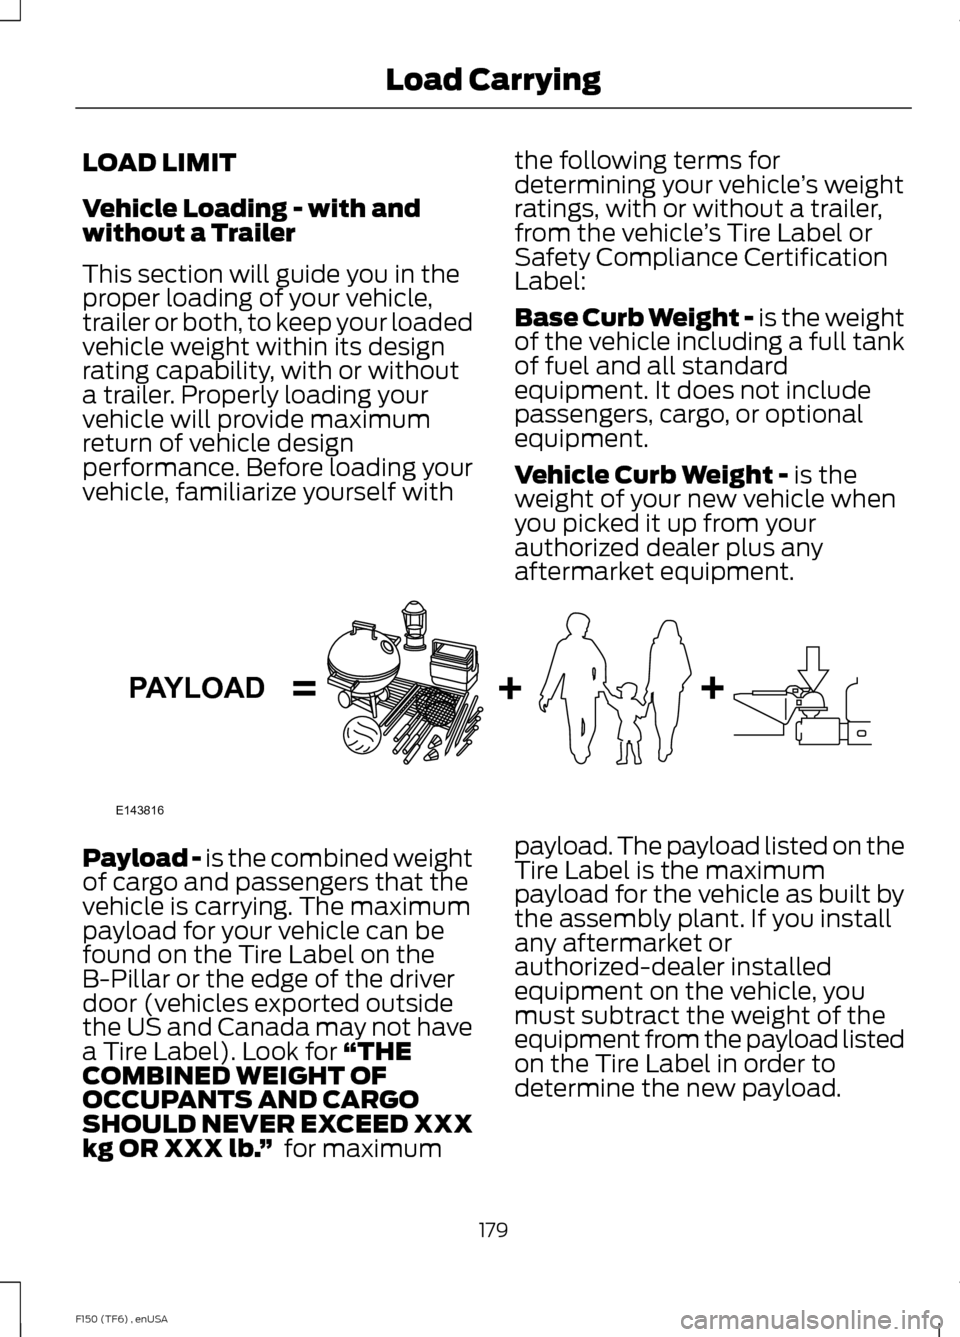
aftermarket equipment. Payload -
is the combined weight
of cargo and passengers that the
vehicle is carrying. The maximum
payload for your vehicle can be
found on the Tire Label on the
B-Pillar or the edge of the driver
door (vehicles exported outside
the US and Canada may not have
a Tire Label). Look for
“THE
COMBINED WEIGHT OF
OCCUPANTS AND CARGO
SHOULD NEVER EXCEED XXX
kg OR XXX lb. ” for maximum payload. The payload listed on the
Tire Label is the maximum
payload for the vehicle as built by
the assembly plant. If you install
any aftermarket or
authorized-dealer installed
equipment on the vehicle, you
must subtract the weight of the
equipment from the payload listed
on the Tire Label in order to
determine the new payload.
179
F150 (TF6) , enUSA Load CarryingE143816PAYLOAD
Page 209 of 472
Trailer Lamps
WARNING
Never connect any trailer lamp wiring
to the vehicle's tail lamp wiring; this
may damage the electrical system
resulting in fire. Contact your authorized
dealer as soon as possible for assistance
in proper trailer tow wiring installation.
Additional electrical equipment may be
required. Trailer lamps are required on most towed
vehicles. Make sure all running lights, brake
lights, turn signals and hazard lights are
working.
Using a Step Bumper (If Equipped)
The rear bumper is equipped with an
integral hitch and only requires a ball with
a one-inch (25.4 millimeter) shank
diameter. The bumper has a 5000-pound
(2268 kilogram) trailer weight and a
500-pound (227 kilogram) tongue weight
capacity
If it is necessary to relocate the hitch ball
position, you must install a frame-mounted
trailer hitch.
Before Towing a Trailer
Practice turning, stopping and backing up
to get the feel of your vehicle-trailer
combination before starting on a trip.
When turning, make wider turns so the
trailer wheels clear curbs and other
obstacles.
When Towing a Trailer
•
Do not drive faster than 70 mph (113
km/h) during the first 500 miles (800
kilometers).
• Do not make full-throttle starts. •
Check your hitch, electrical connections
and trailer wheel lug nuts thoroughly
after you have traveled 50 miles (80
kilometers).
• When stopped in congested or heavy
traffic during hot weather, place the
gearshift in position P to aid engine and
transmission cooling and to help A/C
performance.
• Turn off the speed control with heavy
loads or in hilly terrain. The speed
control may turn off automatically
when you are towing on long, steep
grades.
• Shift to a lower gear when driving down
a long or steep hill. Do not apply the
brakes continuously, as they may
overheat and become less effective.
• If your transmission is equipped with a
Grade Assist or Tow/Haul feature, use
this feature when towing. This provides
engine braking and helps eliminate
excessive transmission shifting for
optimum fuel economy and
transmission cooling.
• If your vehicle is equipped with
AdvanceTrac with RSC, this system
may turn on during typical cornering
maneuvers with a heavily loaded trailer.
This is normal. Turning the corner at a
slower speed while towing may reduce
this tendency.
• If you are towing a trailer frequently in
hot weather, hilly conditions, at the
gross combined weight rating (or any
combination of these factors), consider
refilling your rear axle with synthetic
gear lubricant (if the axle is not already
filled with it). See Capacities and
Specifications (page 296).
• Allow more distance for stopping with
a trailer attached. Anticipate stops and
brake gradually.
• Avoid parking on a grade. However, if
you must park on a grade:
206
F150 (TF6) , enUSA Towing
Page 214 of 472
•
Transmissions give their best fuel
economy when operated in the top
cruise gear and with steady pressure
on the gas pedal.
• Four-wheel-drive operation (if
equipped) is less fuel efficient than
two-wheel-drive operation.
• Close the windows for high-speed
driving.
DRIVING THROUGH WATER
Note: Driving through deep water above
the recommended levels can cause vehicle
damage.
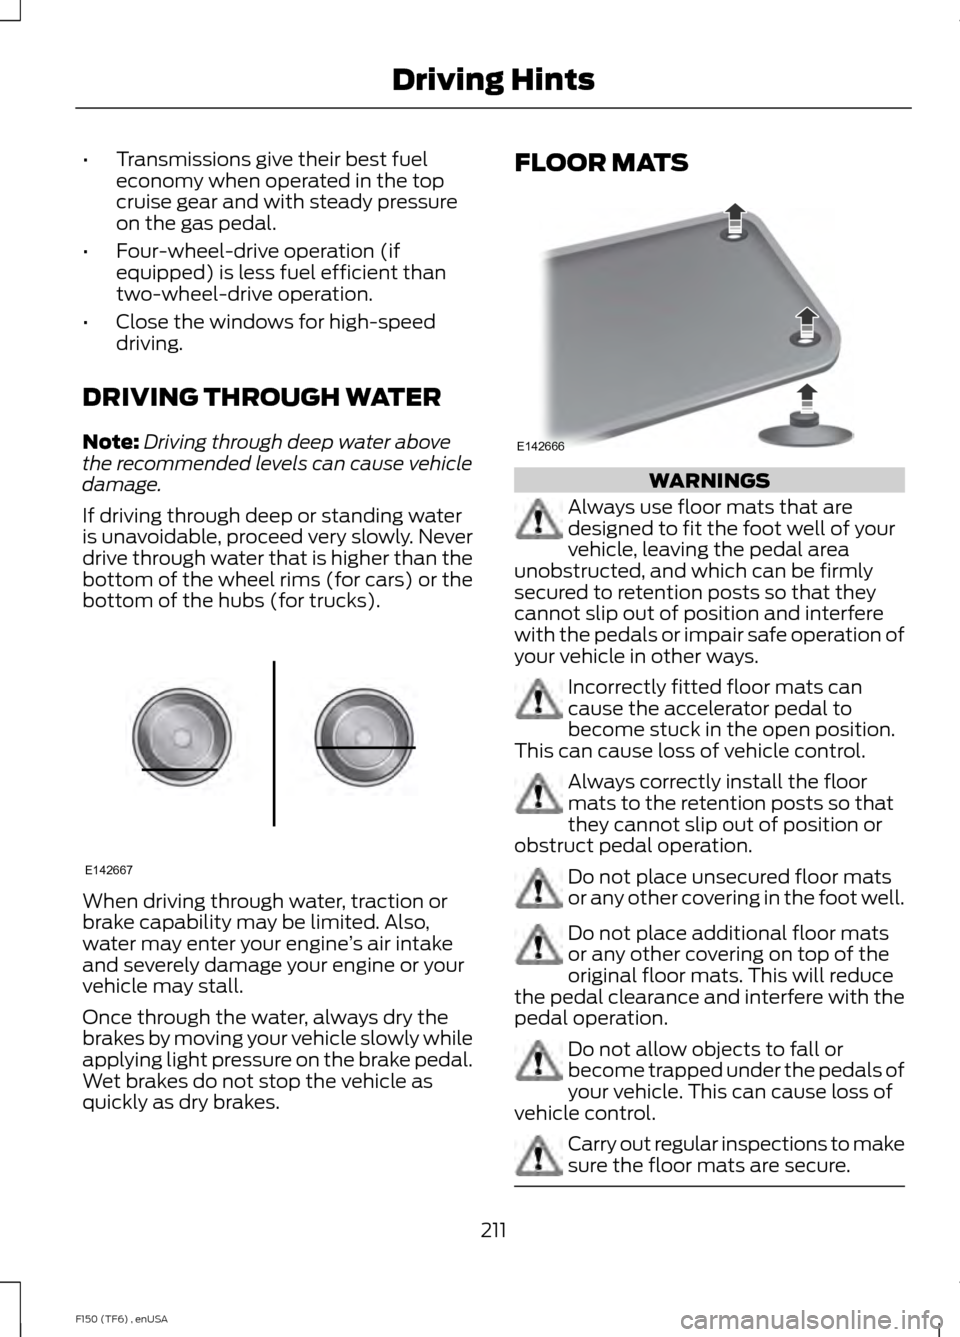
If driving through deep or standing water
is unavoidable, proceed very slowly. Never
drive through water that is higher than the
bottom of the wheel rims (for cars) or the
bottom of the hubs (for trucks). When driving through water, traction or
brake capability may be limited. Also,
water may enter your engine
’s air intake
and severely damage your engine or your
vehicle may stall.
Once through the water, always dry the
brakes by moving your vehicle slowly while
applying light pressure on the brake pedal.
Wet brakes do not stop the vehicle as
quickly as dry brakes. FLOOR MATS
WARNINGS
Always use floor mats that are
designed to fit the foot well of your
vehicle, leaving the pedal area
unobstructed, and which can be firmly
secured to retention posts so that they
cannot slip out of position and interfere
with the pedals or impair safe operation of
your vehicle in other ways. Incorrectly fitted floor mats can
cause the accelerator pedal to
become stuck in the open position.
This can cause loss of vehicle control. Always correctly install the floor
mats to the retention posts so that
they cannot slip out of position or
obstruct pedal operation. Do not place unsecured floor mats
or any other covering in the foot well.
Do not place additional floor mats
or any other covering on top of the
original floor mats. This will reduce
the pedal clearance and interfere with the
pedal operation. Do not allow objects to fall or
become trapped under the pedals of
your vehicle. This can cause loss of
vehicle control. Carry out regular inspections to make
sure the floor mats are secure.
211
F150 (TF6) , enUSA Driving HintsE142667 E142666
Page 220 of 472
Preparing Your Vehicle
Note:
Do not attempt to push-start your
automatic transmission vehicle. Automatic
transmissions do not have push-start
capability. Attempting to push-start a
vehicle with an automatic transmission may
cause transmission damage.
Note: Use only a 12-volt supply to start your
vehicle.
Note: Do not disconnect the battery of the
disabled vehicle as this could damage the
vehicle's electrical system.
Park the booster vehicle close to the hood
of the disabled vehicle, making sure the
two vehicles do not touch. Turn all
accessories off.
Connecting the Jumper Cables WARNING
Do not attach the cables to fuel lines,
engine rocker covers, the intake
manifold or electrical components
as grounding points. Stay clear of moving
parts. To avoid reverse polarity
connections, make sure that you correctly
identify the positive (+) and negative (-)
terminals on both the disabled and booster
vehicles before connecting the cables. Note:
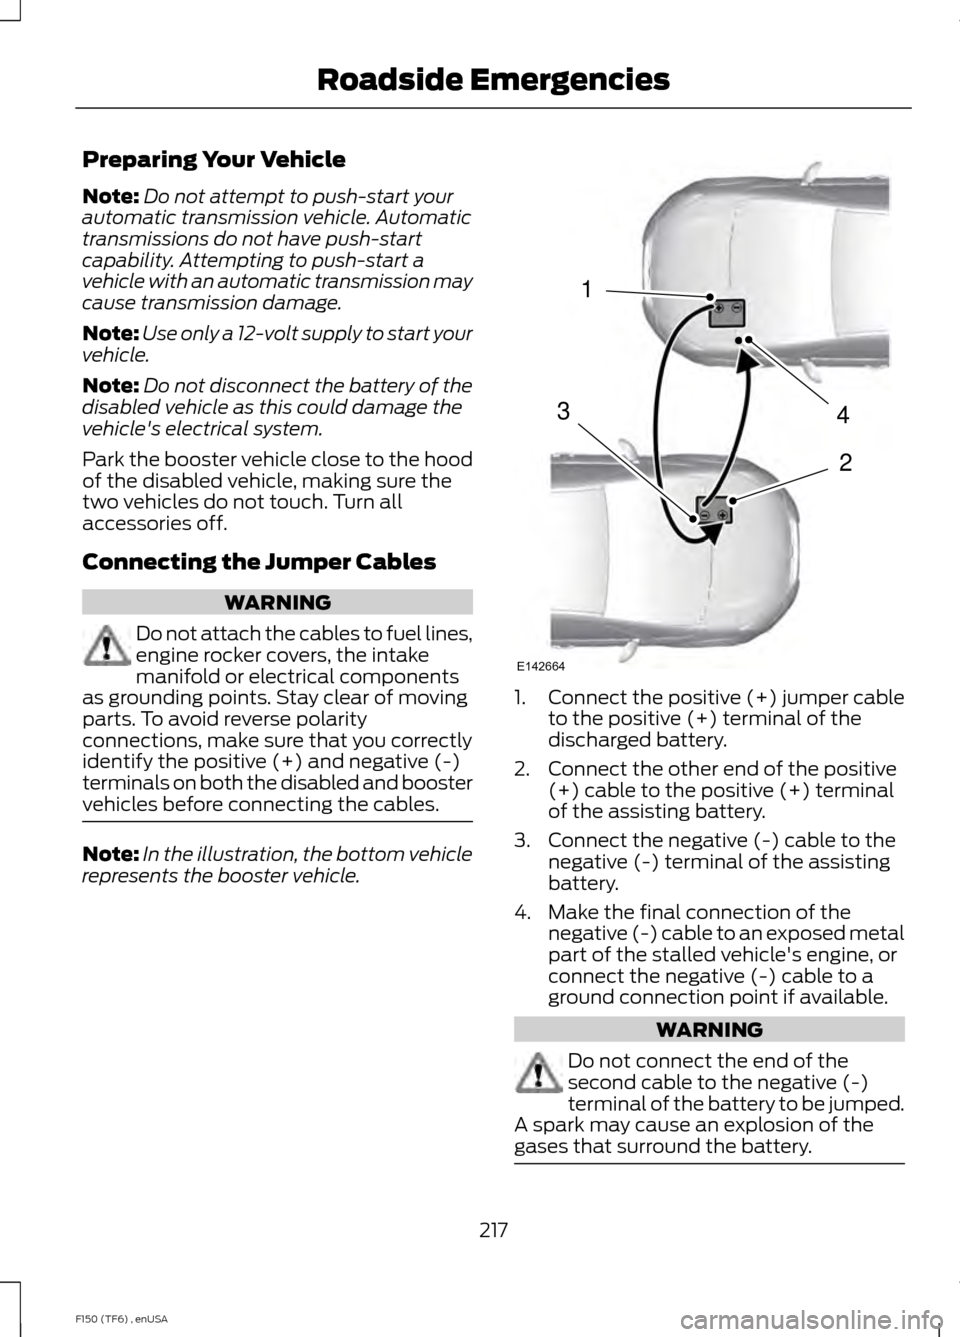
In the illustration, the bottom vehicle
represents the booster vehicle. 1.
Connect the positive (+) jumper cable
to the positive (+) terminal of the
discharged battery.
2. Connect the other end of the positive (+) cable to the positive (+) terminal
of the assisting battery.
3. Connect the negative (-) cable to the negative (-) terminal of the assisting
battery.
4. Make the final connection of the negative (-) cable to an exposed metal
part of the stalled vehicle's engine, or
connect the negative (-) cable to a
ground connection point if available. WARNING
Do not connect the end of the
second cable to the negative (-)
terminal of the battery to be jumped.
A spark may cause an explosion of the
gases that surround the battery. 217
F150 (TF6) , enUSA Roadside Emergencies4
2
1
3
E142664
Page 244 of 472
Only use oils certified for gasoline engines
by the American Petroleum Institute (API).
An oil with this trademark symbol
conforms to the current engine and
emission system protection standards and
fuel economy requirements of the
International Lubricants Specification
Advisory Council (ILSAC), comprised of
U.S. and Japanese automobile
manufacturers.
1. Check the engine oil level.
2. If the engine oil level is not within the
normal range, add engine oil that
meets Ford specifications. See
Capacities and Specifications (page
296
).
3. Remove the engine oil filler cap and use a funnel to pour the engine oil into
the opening.
4. Recheck the engine oil level. Make sure
the oil level is not above the normal
operating range on the engine oil level
dipstick.
5. Install the engine oil level dipstick and ensure it is fully seated.
6. Fully install the engine oil filler cap by turning the filler cap clockwise until
three clicks are heard or until the cap
is fully seated.
ENGINE COOLANT CHECK WARNINGS
Do not add engine coolant when the
engine is hot. Steam and scalding
liquids released from a hot cooling
system can burn you badly. Also, spilling
coolant on hot engine parts can burn you. Do not put engine coolant in the
windshield washer fluid container. If
sprayed on the windshield, engine
coolant could make it difficult to see
through the windshield. WARNINGS
To reduce the risk of personal injury,
make sure the engine is cool before
unscrewing the coolant pressure
relief cap. The cooling system is under
pressure. steam and hot liquid can come
out forcefully when you loosen the cap
slightly. Do not add coolant further than the
MAX mark.
Checking the Engine Coolant
When the engine is cold, check the
concentration and level of the engine
coolant at the intervals listed in the
scheduled maintenance information. See
Scheduled Maintenance
(page 438).
Note: Make sure that the coolant level is
between the MIN and MAX marks on the
coolant reservoir.
Note: Coolant expands when it is hot. The
level may extend beyond the MAX mark.
Note: If the level is at the MIN mark, below
the MIN mark, or empty, add coolant
immediately. See
Adding Engine Coolant
in this chapter.
Maintain coolant concentration within
48% to 50%, which equates to a freeze
point between -30°F (-34°C) and -34°F
(-37°C).
Note: For best results, coolant
concentration should be tested with a
refractometer such as Rotunda tool
300-ROB75240 available from your
authorized dealer. Ford does not
recommend the use of hydrometers or
coolant test strips for measuring coolant
concentrations.
Note: Automotive fluids are not
interchangeable. Do not use engine coolant,
antifreeze or windshield washer fluid outside
of its specified function and vehicle location.
241
F150 (TF6) , enUSA Maintenance
Page 249 of 472
BRAKE FLUID CHECK
Fluid levels between the MIN and MAX
lines are within the normal operating range;
there is no need to add fluid. If the fluid
levels are outside of the normal operating
range, the performance of the system
could be compromised; seek service from
your authorized dealer immediately.
POWER STEERING FLUID
CHECK
3.5L, 3.7L and 5.0L Engines
Your vehicle is equipped with an electric
power steering (EPS) system. There is no
fluid reservoir to check or fill.
6.2L Engines
Check the power steering fluid. Refer to
See Scheduled Maintenance (page 438).
1. Start the engine and let it run until it reaches normal operating temperature
(the engine coolant temperature gauge
indicator will be near the center of the
normal area between
H and C).
2. While the engine idles, turn the steering
wheel left and right several times.
3. Turn the engine off.
4. Check the fluid level in the reservoir. It should be between the MIN and MAX
lines. Do not add fluid if the level is in
this range.
5. If the fluid is low, add fluid in small amounts, continuously checking the
level until it reaches the range between
the MIN and MAX lines. For the proper
fluid type, See
Capacities and
Specifications (page 296).
6. Put the cap back on the reservoir. WASHER FLUID CHECK WARNING
If you operate your vehicle in
temperatures below 40°F (5°C), use
washer fluid with antifreeze
protection. Failure to use washer fluid with
antifreeze protection in cold weather could
result in impaired windshield vision and
increase the risk of injury or accident. Add fluid to fill the reservoir if the level is
low. Only use a washer fluid that meets
Ford specifications. See
Capacities and
Specifications (page 296).
State or local regulations on volatile
organic compounds may restrict the use
of methanol, a common windshield washer
antifreeze additive. Washer fluids
containing non-methanol antifreeze
agents should be used only if they provide
cold weather protection without damaging
the vehicle ’s paint finish, wiper blades or
washer system.
FUEL FILTER
Your vehicle is equipped with a lifetime
fuel filter that is integrated with the fuel
tank. Regular maintenance or replacement
is not needed.
CHANGING THE 12V BATTERY WARNINGS
Batteries normally produce explosive
gases that can cause personal injury.
Therefore, do not allow flames,
sparks or lighted substances to come near
the battery. When working near the
battery, always shield your face and
protect your eyes. Always provide proper
ventilation.
246
F150 (TF6) , enUSA Maintenance
Page 250 of 472
WARNINGS
This vehicle may be equipped with
more than one battery, removal of
cable from only one battery does not
disconnect your vehicle electrical system.
Be sure to disconnect cables from all
batteries when disconnecting power.
Failure to do so may cause serious
personal injury or property damage. When lifting a plastic-cased battery,
excessive pressure on the end walls
could cause acid to flow through the
vent caps, resulting in personal injury and
damage to the vehicle or battery. Lift the
battery with a battery carrier or with your
hands on opposite corners. Keep batteries out of reach of
children. Batteries contain sulfuric
acid. Avoid contact with skin, eyes or
clothing. Shield your eyes when working
near the battery to protect against possible
splashing of acid solution. In case of acid
contact with skin or eyes, flush
immediately with water for a minimum of
15 minutes and get prompt medical
attention. If acid is swallowed, call a
physician immediately. Note:
If your battery has a cover/shield,
make sure it is reinstalled after the battery
has been cleaned or replaced.
Note: Battery posts, terminals and related
accessories contain lead and lead
compounds. Wash hands after handling.
Note: Electrical or electronic accessories
or components added to your vehicle by the
dealer or the owner may adversely affect
battery performance and durability.
Your vehicle is equipped with a Motorcraft
maintenance-free battery which normally
does not require additional water during
its life of service. For longer, trouble-free operation, keep the
top of the battery clean and dry. Also,
make certain the battery cables are always
tightly fastened to the battery terminals.
If you see any corrosion on the battery or
terminals, remove the cables from the
terminals and clean with a wire brush. You
can neutralize the acid with a solution of
baking soda and water.
It is recommended that the negative
battery cable terminal be disconnected
from the battery if you plan to store your
vehicle for an extended period of time.
Because your vehicle
’s engine is
electronically controlled by a computer,
some control conditions are maintained
by power from the battery. When the
battery is disconnected or a new battery
is installed, the engine must relearn its idle
and fuel trim strategy for optimum
driveability and performance. Flexible fuel
vehicles (FFV) must also relearn the
ethanol content of the fuel for optimum
driveability and performance. To begin this
process:
1. With your vehicle at a complete stop, set the parking brake.
2. Put the gearshift in P(Park), turn off all
accessories.
3. Start the engine. Run the engine until it reaches normal operating
temperature.
4. Allow the engine to idle for at least one
minute.
5. Turn the air conditioning on and allow the engine to idle for at least one
minute.
247
F150 (TF6) , enUSA Maintenance
Page 294 of 472
Tire Change Procedure
WARNINGS
When one of the front wheels is off
the ground, the transmission alone
will not prevent the vehicle from
moving or slipping off the jack, even if the
transmission selector lever is in position P. To help prevent the vehicle from
moving when you change a tire, be
sure to place the transmission
selector lever in position P, set the parking
brake and block (in both directions) the
wheel that is diagonally opposite (other
side and end of the vehicle) to the tire
being changed. Never get underneath a vehicle that
is supported only by a jack. If the
vehicle slips off the jack, you or
someone else could be seriously injured. Do not attempt to change a tire on
the side of the vehicle close to
moving traffic. Pull far enough off the
road to avoid the danger of being hit when
operating the jack or changing the wheel. Always use the jack provided as
original equipment with your vehicle.
If using a jack other than the one
provided as original equipment with your
vehicle, make sure the jack capacity is
adequate for the vehicle weight, including
any vehicle cargo or modifications. Disable the power running boards
before jacking, lifting, or placing any
object under the vehicle. Never place
your hand between the power running
board and the vehicle as extended power
running boards will retract when the doors
are closed. Failure to follow these
instructions may result in personal injury. Note:
Passengers should not remain in the
vehicle when the vehicle is being jacked. Park on a level surface, activate the hazard
flashers and set the parking brake. Then,
place the transmission selector lever in
position P and turn the engine off.
To remove the jack on Regular Cab and
SuperCab models:
Remove the wing nut and turn the jack
screw counterclockwise to release
pressure before removing the jack from the
bracket.
To remove the jack on SuperCrew
models:
1. Lift both rear seat cushions.
2. Remove the insert containing the Easy
Fuel funnel from the driver's side.
3. Remove the two small wing nuts on the passenger side.
4. Slide the plastic box toward the driver's
side and remove.
See the instruction sheet (located with the
jack) for detailed tire change instructions.
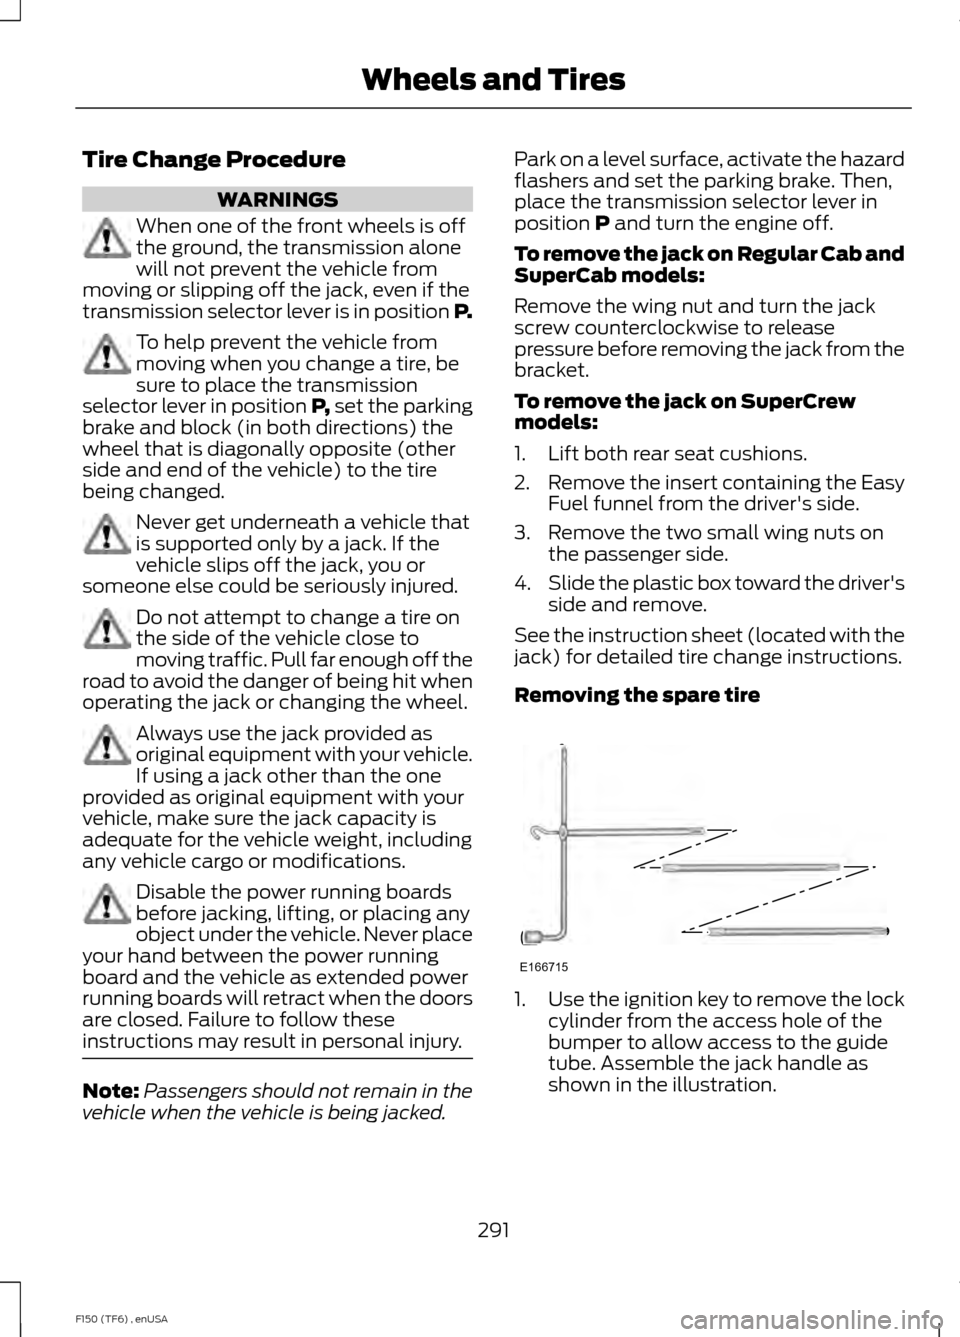
Removing the spare tire 1.
Use the ignition key to remove the lock
cylinder from the access hole of the
bumper to allow access to the guide
tube. Assemble the jack handle as
shown in the illustration.
291
F150 (TF6) , enUSA Wheels and TiresE166715