2014 FORD F150 buttons
[x] Cancel search: buttonsPage 110 of 472
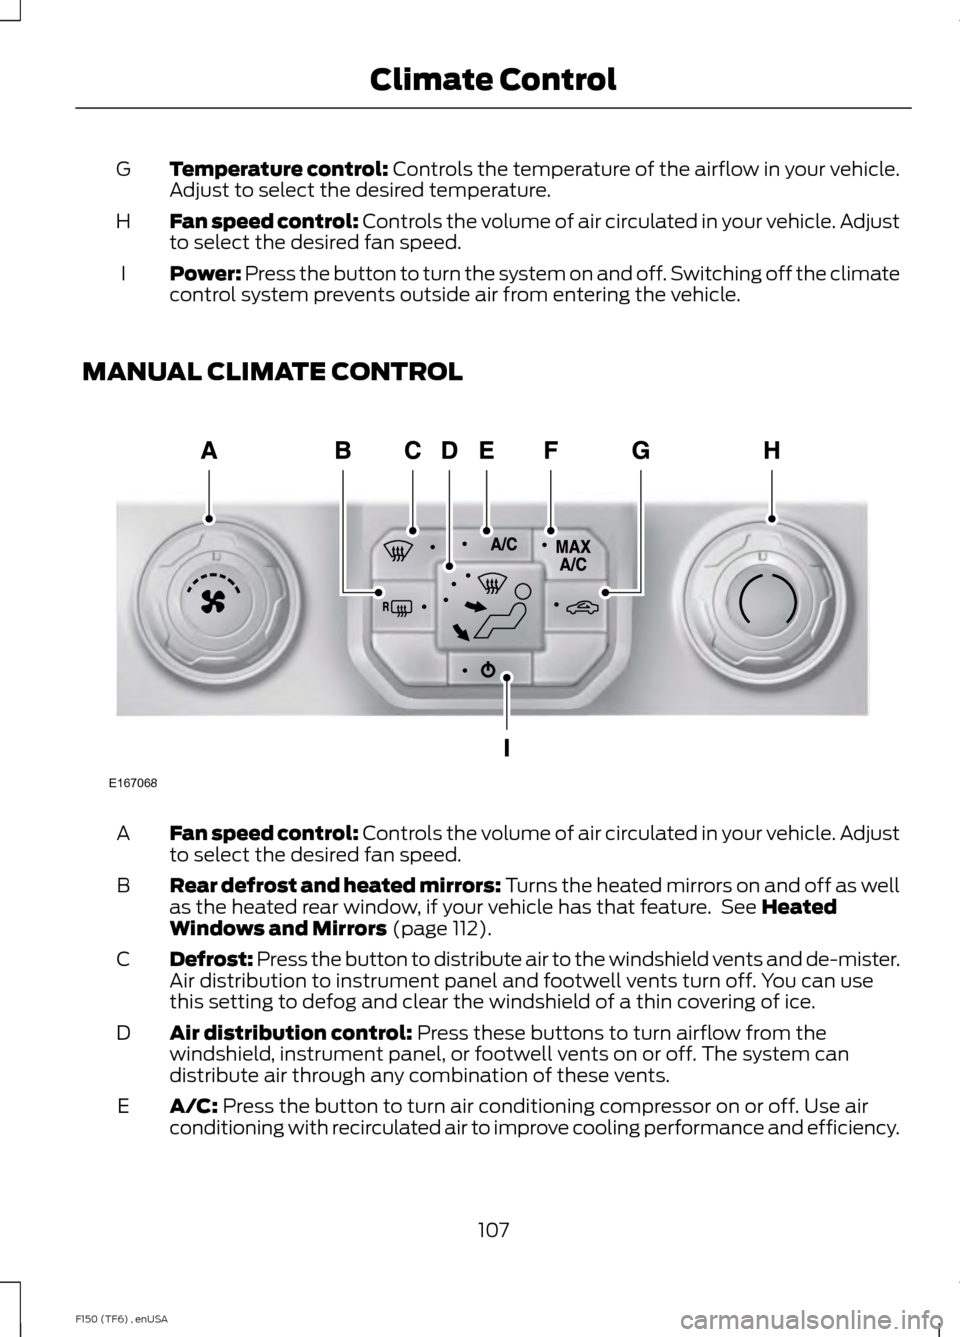
Temperature control: Controls the temperature of the airflow in your vehicle.
Adjust to select the desired temperature.
G
Fan speed control:
Controls the volume of air circulated in your vehicle. Adjust
to select the desired fan speed.
H
Power: Press the button to turn the system on and off. Switching off the climate
control system prevents outside air from entering the vehicle.
I
MANUAL CLIMATE CONTROL Fan speed control:
Controls the volume of air circulated in your vehicle. Adjust
to select the desired fan speed.
A
Rear defrost and heated mirrors: Turns the heated mirrors on and off as well
as the heated rear window, if your vehicle has that feature. See
Heated
Windows and Mirrors (page 112).
B
Defrost: Press the button to distribute air to the windshield vents and de-mister.
Air distribution to instrument panel and footwell vents turn off. You can use
this setting to defog and clear the windshield of a thin covering of ice.
C
Air distribution control:
Press these buttons to turn airflow from the
windshield, instrument panel, or footwell vents on or off. The system can
distribute air through any combination of these vents.
D
A/C:
Press the button to turn air conditioning compressor on or off. Use air
conditioning with recirculated air to improve cooling performance and efficiency.
E
107
F150 (TF6) , enUSA Climate ControlE167068
Page 112 of 472
AUTOMATIC CLIMATE CONTROL (IF EQUIPPED)
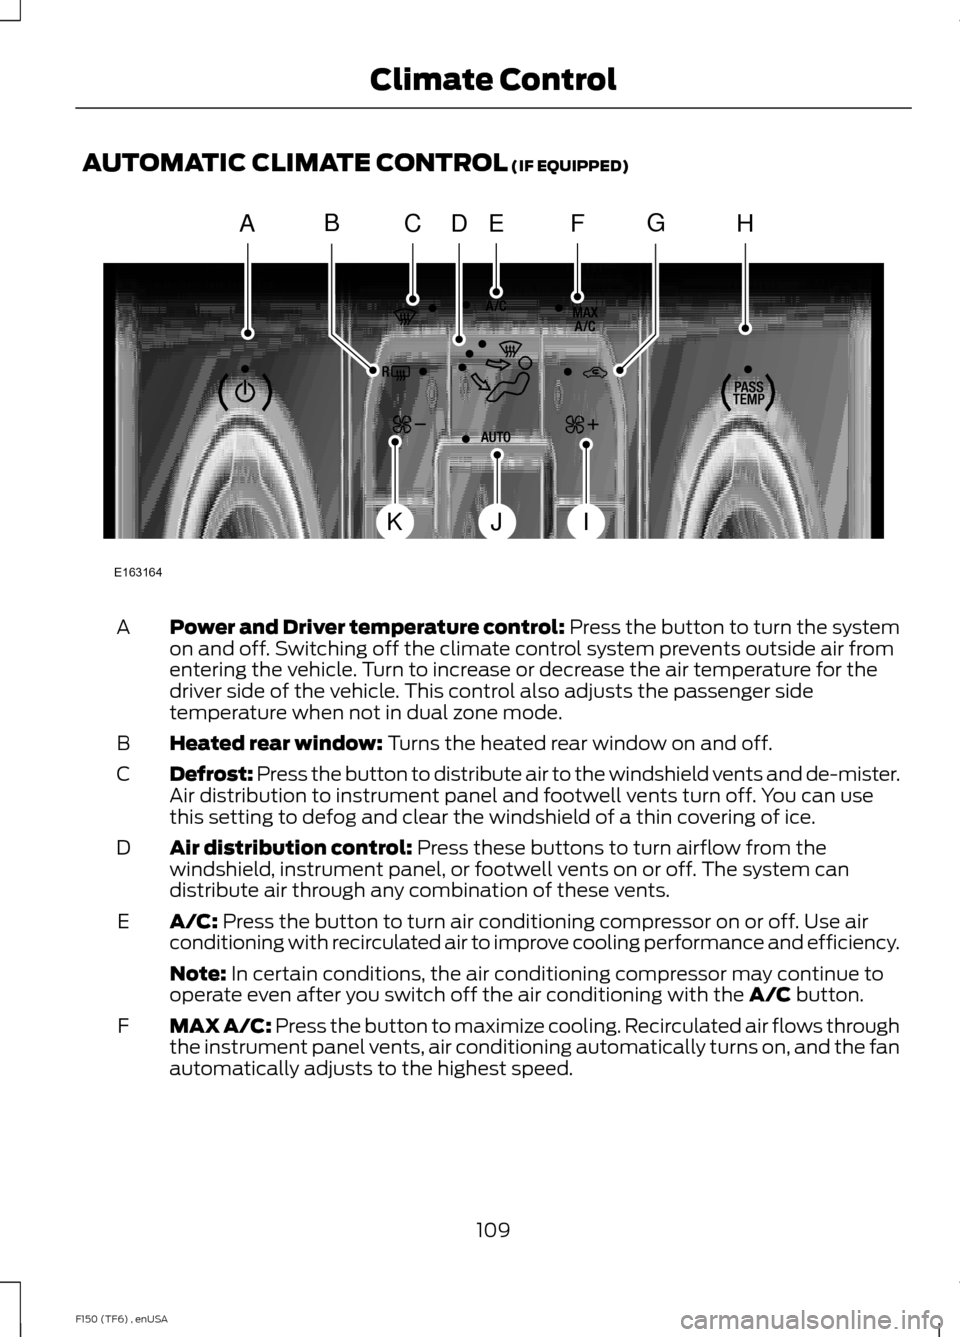
Power and Driver temperature control: Press the button to turn the system
on and off. Switching off the climate control system prevents outside air from
entering the vehicle. Turn to increase or decrease the air temperature for the
driver side of the vehicle. This control also adjusts the passenger side
temperature when not in dual zone mode.
A
Heated rear window:
Turns the heated rear window on and off.
B
Defrost: Press the button to distribute air to the windshield vents and de-mister.
Air distribution to instrument panel and footwell vents turn off. You can use
this setting to defog and clear the windshield of a thin covering of ice.
C
Air distribution control:
Press these buttons to turn airflow from the
windshield, instrument panel, or footwell vents on or off. The system can
distribute air through any combination of these vents.
D
A/C:
Press the button to turn air conditioning compressor on or off. Use air
conditioning with recirculated air to improve cooling performance and efficiency.
E
Note:
In certain conditions, the air conditioning compressor may continue to
operate even after you switch off the air conditioning with the A/C button.
MAX A/C:
Press the button to maximize cooling. Recirculated air flows through
the instrument panel vents, air conditioning automatically turns on, and the fan
automatically adjusts to the highest speed.
F
109
F150 (TF6) , enUSA Climate ControlE163164
AHCEF
JIK
DBG
Page 114 of 472
Note:
If you select AUTO during cold
outside temperatures, the system directs
airflow to the windshield and side window
vents. In addition, the fan may run at a
slower speed until the engine warms up. Note:
If you select AUTO during hot outside
temperatures, or when the inside of the
vehicle is hot, the system automatically uses
recirculated air to maximize interior cooling.
When the interior reaches the selected
temperature, the system automatically
switches to using outside air.
Heating the Interior Quickly Vehicle with automatic climate control
Vehicle with manual climate control
Press the
AUTO button.
Adjust the fan speed to the highest
speed setting.
1
Adjust the temperature control to the
desired setting.
Adjust the temperature control to the
highest setting.
2
Select the footwell air vents using the
air distribution buttons.
3
Recommended Settings for Heating Vehicle with automatic climate control
Vehicle with manual climate control
Press the
AUTO button.
Adjust the fan speed to the center
setting.
1
Adjust the temperature control to the
desired setting. Use 72°F (22°C) as a
starting point, then adjust the setting as
necessary.
Adjust the temperature control to the
midway point of the hot settings.
2
Select the footwell air vents using the
air distribution buttons.
3
Cooling the Interior Quickly Vehicle with automatic climate control
Vehicle with manual climate control
Press the
MAX A/C button.
Press the MAX A/C button.
1
Drive with the windows open for 2-3
minutes.
2
111
F150 (TF6) , enUSA Climate Control
Page 115 of 472
Recommended Settings for Cooling
Vehicle with automatic climate control
Vehicle with manual climate control
Press the AUTO button.
Adjust the fan speed to the center
setting.
1
Adjust the temperature control to the
desired setting. Use 72°F (22°C) as a
starting point, then adjust the setting as
necessary.
Adjust the temperature control to the
midway point of the cold settings.
2
Select the instrument panel air vents
using the air distribution buttons.
3
Side Window Defogging in Cold Weather Vehicle With Automatic Climate Control
Vehicle With Manual Climate Control
Press the defrost button.
Select the instrument panel and footwell
air vents positions through the air distri-
bution control.
1
Adjust the temperature control to the
desired setting. Use 72°F (22°C) as a
starting point, then adjust the setting as
necessary.
Press the
A/C button.
2
Adjust the temperature control to the
desired setting.
3
Adjust the fan speed to the highest
setting.
4
Direct the instrument panel side air vents
toward the side windows.
5
Close the instrument panel center vents.
6
HEATED WINDOWS AND
MIRRORS
Heated Rear Window
(If Equipped)
Note: The engine must be running to use
this feature. Note:
If your vehicle is equipped with a
sliding rear window, the feature does not
operate when you open the window.
Press the button to clear the rear window
of thin ice and fog. Press the button again
within 10 minutes to switch it off. It
switches off automatically after 10
minutes, or when you switch the ignition
off.
112
F150 (TF6) , enUSA Climate Control
Page 118 of 472
WARNINGS
Install the head restraint properly to
help minimize the risk of neck injury
in the event of a crash.
Note:
Adjust the seatback to an upright
driving position before adjusting the head
restraint. Adjust the head restraint so that
the top of it is level with the top of your head
and as far forward as possible. Make sure
that you remain comfortable. If you are
extremely tall, adjust the head restraint to
its highest position.
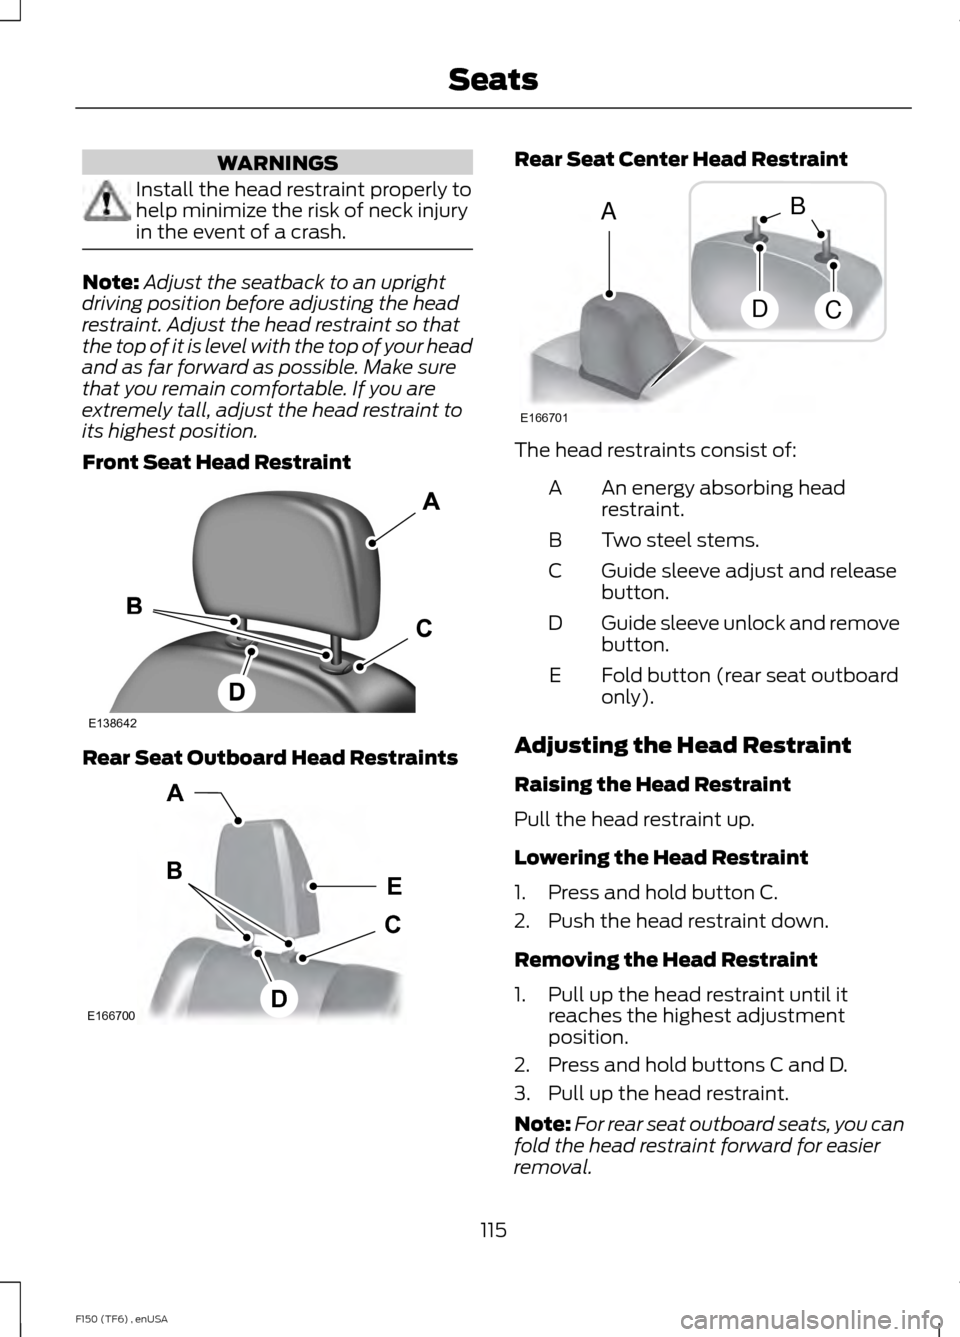
Front Seat Head Restraint Rear Seat Outboard Head Restraints Rear Seat Center Head Restraint
The head restraints consist of:
An energy absorbing head
restraint.
A
Two steel stems.
B
Guide sleeve adjust and release
button.
C
Guide sleeve unlock and remove
button.
D
Fold button (rear seat outboard
only).
E
Adjusting the Head Restraint
Raising the Head Restraint
Pull the head restraint up.
Lowering the Head Restraint
1. Press and hold button C.
2. Push the head restraint down.
Removing the Head Restraint
1. Pull up the head restraint until it reaches the highest adjustment
position.
2. Press and hold buttons C and D.
3. Pull up the head restraint.
Note: For rear seat outboard seats, you can
fold the head restraint forward for easier
removal.
115
F150 (TF6) , enUSA SeatsE138642 E166700
E
D
C
B
A E166701
A
DC
B
Page 119 of 472
Installing the Head Restraint
Align the steel stems into the guide sleeves
and push the head restraint down until it
locks.
Folding the Head Restraint
Note:
The rear seat outboard head
restraints may fold forward for improved
visibility.
1. Press and hold button E.
2. Pull it back up to reset.
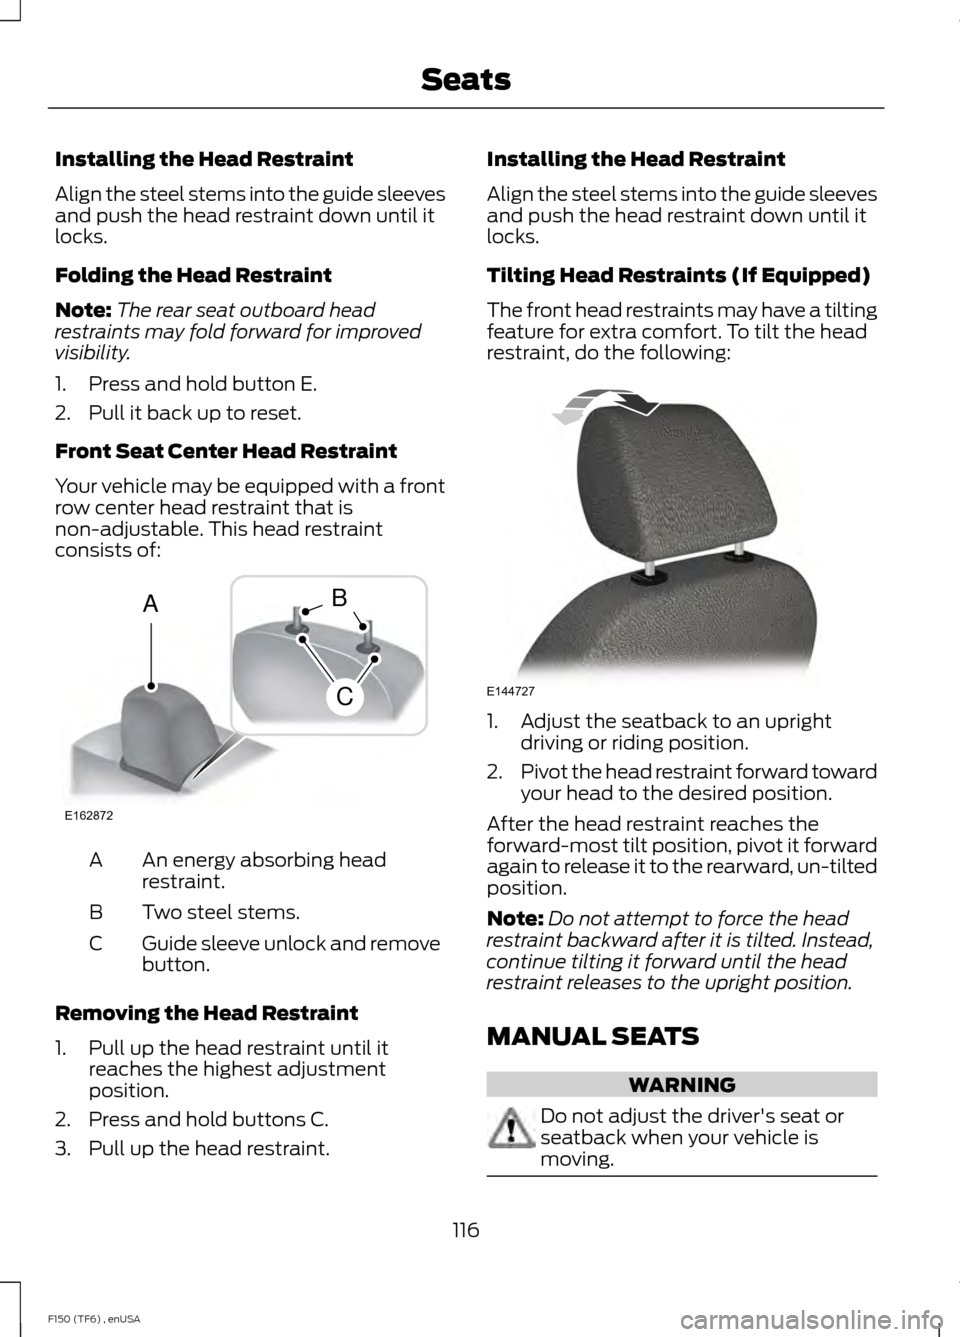
Front Seat Center Head Restraint
Your vehicle may be equipped with a front
row center head restraint that is
non-adjustable. This head restraint
consists of: An energy absorbing head
restraint.
A
Two steel stems.
B
Guide sleeve unlock and remove
button.
C
Removing the Head Restraint
1. Pull up the head restraint until it reaches the highest adjustment
position.
2. Press and hold buttons C.
3. Pull up the head restraint. Installing the Head Restraint
Align the steel stems into the guide sleeves
and push the head restraint down until it
locks.
Tilting Head Restraints (If Equipped)
The front head restraints may have a tilting
feature for extra comfort. To tilt the head
restraint, do the following:
1. Adjust the seatback to an upright
driving or riding position.
2. Pivot the head restraint forward toward
your head to the desired position.
After the head restraint reaches the
forward-most tilt position, pivot it forward
again to release it to the rearward, un-tilted
position.
Note: Do not attempt to force the head
restraint backward after it is tilted. Instead,
continue tilting it forward until the head
restraint releases to the upright position.
MANUAL SEATS WARNING
Do not adjust the driver's seat or
seatback when your vehicle is
moving.
116
F150 (TF6) , enUSA SeatsE162872
A
C
B E144727
Page 127 of 472
The appearance of your vehicle
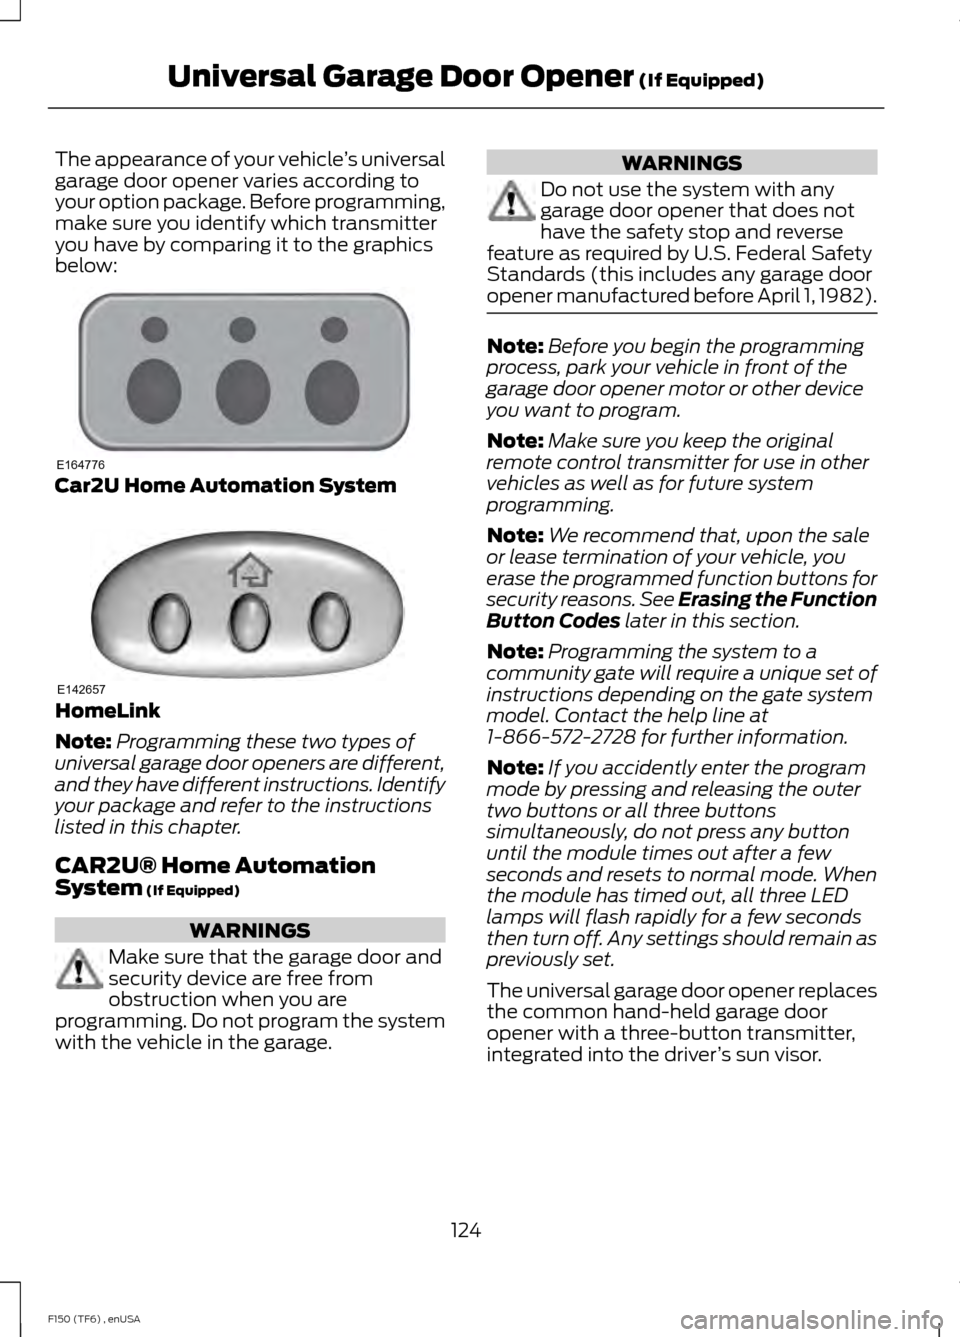
’s universal
garage door opener varies according to
your option package. Before programming,
make sure you identify which transmitter
you have by comparing it to the graphics
below: Car2U Home Automation System
HomeLink
Note:
Programming these two types of
universal garage door openers are different,
and they have different instructions. Identify
your package and refer to the instructions
listed in this chapter.
CAR2U® Home Automation
System (If Equipped) WARNINGS
Make sure that the garage door and
security device are free from
obstruction when you are
programming. Do not program the system
with the vehicle in the garage. WARNINGS
Do not use the system with any
garage door opener that does not
have the safety stop and reverse
feature as required by U.S. Federal Safety
Standards (this includes any garage door
opener manufactured before April 1, 1982). Note:
Before you begin the programming
process, park your vehicle in front of the
garage door opener motor or other device
you want to program.
Note: Make sure you keep the original
remote control transmitter for use in other
vehicles as well as for future system
programming.
Note: We recommend that, upon the sale
or lease termination of your vehicle, you
erase the programmed function buttons for
security reasons. See Erasing the Function
Button Codes
later in this section.
Note: Programming the system to a
community gate will require a unique set of
instructions depending on the gate system
model. Contact the help line at
1-866-572-2728 for further information.
Note: If you accidently enter the program
mode by pressing and releasing the outer
two buttons or all three buttons
simultaneously, do not press any button
until the module times out after a few
seconds and resets to normal mode. When
the module has timed out, all three LED
lamps will flash rapidly for a few seconds
then turn off. Any settings should remain as
previously set.
The universal garage door opener replaces
the common hand-held garage door
opener with a three-button transmitter,
integrated into the driver ’s sun visor.
124
F150 (TF6) , enUSA Universal Garage Door Opener
(If Equipped)E164776 E142657
Page 128 of 472
The system includes two primary features,
a garage door opener and a platform for
remote activation of devices within the
home. This functionality allows you to
program garage door openers as well as
security devices and home lighting
systems.
You can find additional system information
online at www.learcar2U.com or by calling
the toll-free help line on 1-866-572-2728.
Rolling Code Programming
Note:
If you do not follow the time-sensitive
instructions, the device will time out and
you will have to repeat the complete
procedure.
Note: It may be helpful to have another
person assist you in programming the
transmitter.
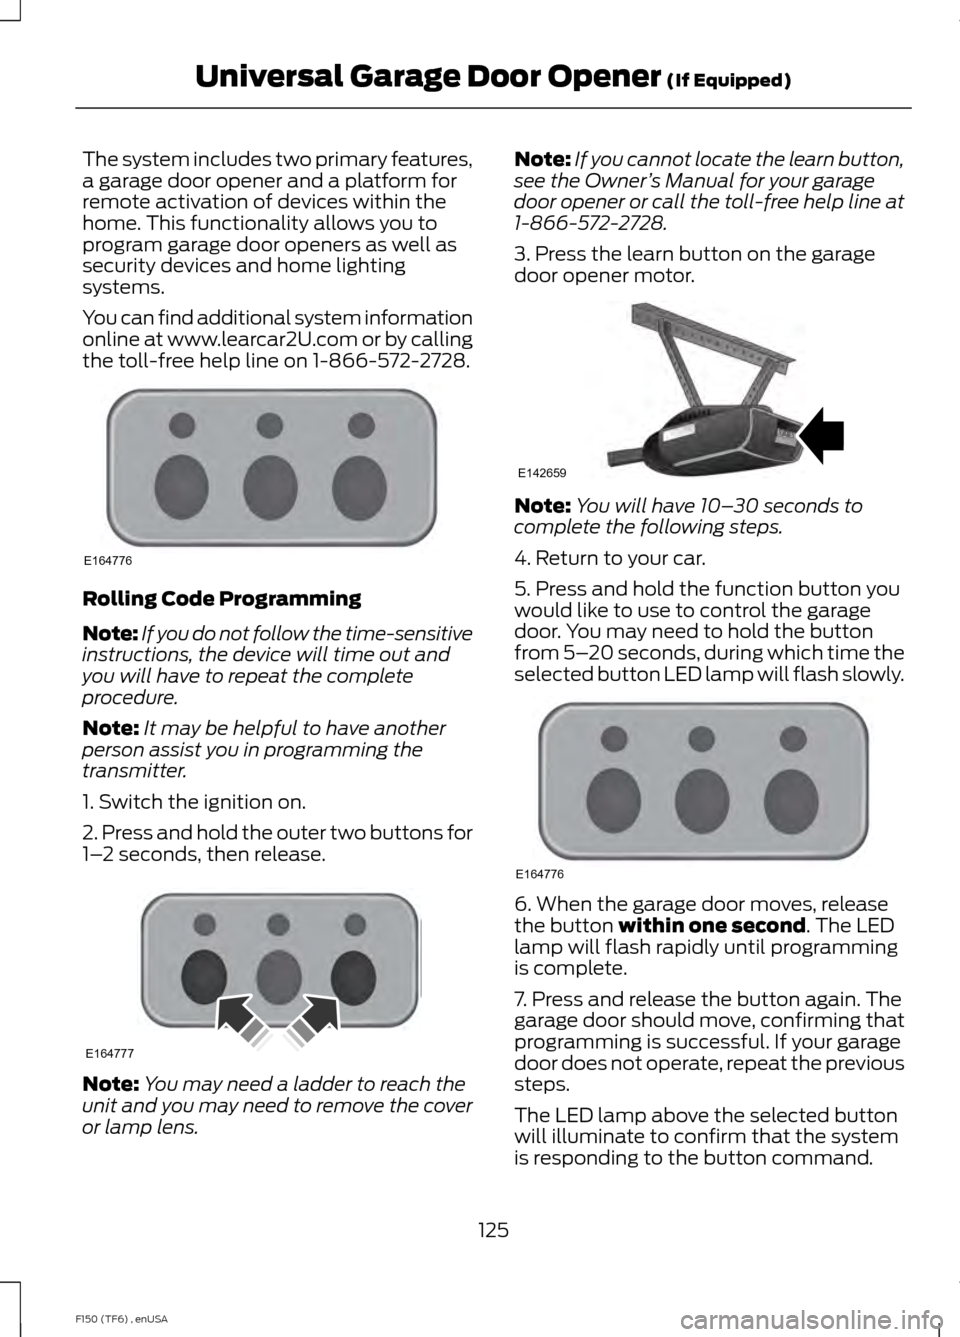
1. Switch the ignition on.
2. Press and hold the outer two buttons for
1– 2 seconds, then release. Note:
You may need a ladder to reach the
unit and you may need to remove the cover
or lamp lens. Note:
If you cannot locate the learn button,
see the Owner ’s Manual for your garage
door opener or call the toll-free help line at
1-866-572-2728.
3. Press the learn button on the garage
door opener motor. Note:
You will have 10– 30 seconds to
complete the following steps.
4. Return to your car.
5. Press and hold the function button you
would like to use to control the garage
door. You may need to hold the button
from 5– 20 seconds, during which time the
selected button LED lamp will flash slowly. 6. When the garage door moves, release
the button within one second. The LED
lamp will flash rapidly until programming
is complete.
7. Press and release the button again. The
garage door should move, confirming that
programming is successful. If your garage
door does not operate, repeat the previous
steps.
The LED lamp above the selected button
will illuminate to confirm that the system
is responding to the button command.
125
F150 (TF6) , enUSA Universal Garage Door Opener
(If Equipped)E164776 E164777 E142659 E164776