2014 FORD F150 ECU
[x] Cancel search: ECUPage 25 of 472
Each time you use the safety seat, check
that the seat is properly attached to the
lower anchors and tether anchor, if
applicable. Tug the child seat from side to
side and forward and back where it is
secured to the vehicle. The seat should
move less than one inch when you do this
for a proper installation.
If the safety seat is not anchored properly,
the risk of a child being injured in a crash
greatly increases.
Combining Safety Belt and LATCH
Lower Anchors for Attaching Child
Safety Seats
When used in combination, either the
safety belt or the LATCH lower anchors
may be attached first, provided a proper
installation is achieved. Attach the tether
strap afterward, if included with the child
seat.
Using Tether Straps
Many forward-facing child safety seats
include a tether strap which extends from
the back of the child safety seat and hooks
to an anchoring point called the top tether
anchor. Tether straps are available as an
accessory for many older safety seats.
Contact the manufacturer of your child
seat for information about ordering a
tether strap, or to obtain a longer tether
strap if the tether strap on your safety seat
does not reach the appropriate top tether
anchor in the vehicle.
The passenger seats of your vehicle may
be equipped with built-in tether strap
anchors located behind the seats as
described below.
The tether anchors in your vehicle may be
loops of webbing above the seatback or
an anchor bracket behind the seat on the
rear edge of the seat cushion.
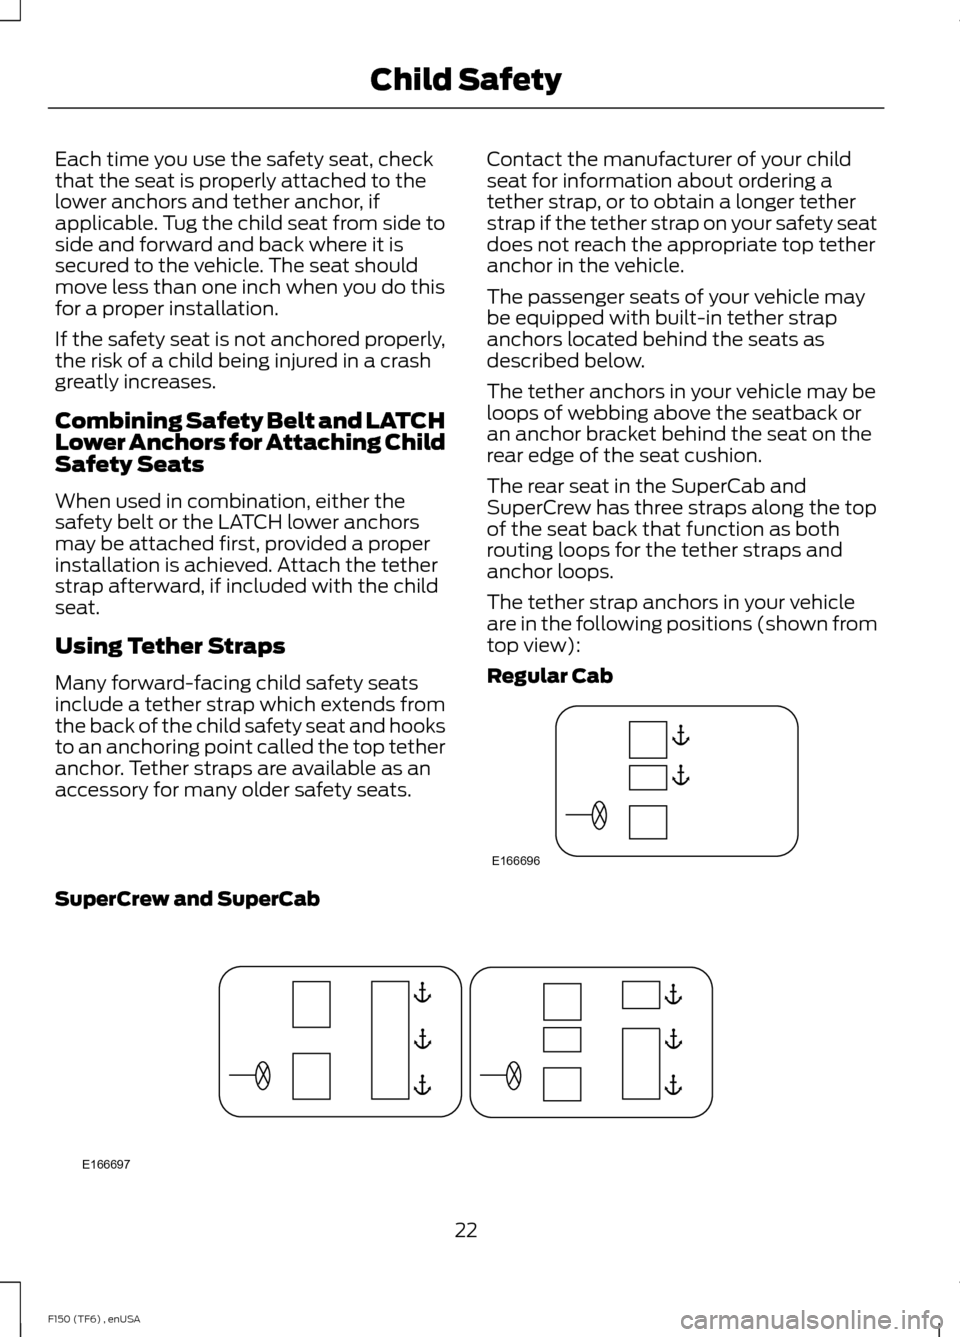
The rear seat in the SuperCab and
SuperCrew has three straps along the top
of the seat back that function as both
routing loops for the tether straps and
anchor loops.
The tether strap anchors in your vehicle
are in the following positions (shown from
top view):
Regular Cab
SuperCrew and SuperCab
22
F150 (TF6) , enUSA Child SafetyE166696 E166697
Page 34 of 472

•
crash sensors and monitoring system
with readiness indicator.
The safety belt pretensioners at the front
seating positions are designed to tighten
the safety belts when activated. In frontal
and near-frontal crashes, side crashes and
rollovers, the safety belt pretensioners may
be activated alone or, if the crash is of
sufficient severity, together with the front
airbags.
FASTENING THE SAFETY
BELTS
The front outboard and rear safety
restraints in the vehicle are combination
lap and shoulder belts. 1. Insert the belt tongue into the proper
buckle (the buckle closest to the
direction the tongue is coming from)
until you hear a snap and feel it latch.
Make sure you securely fasten the
tongue in the buckle. 2. To unfasten, press the release button
and remove the tongue from the
buckle.
Using the Safety Belt with Cinch
Tongue (Front Center Seat)
The cinch tongue will slide up and down
the belt webbing when the belt is stowed
or while putting safety belts on. When you
buckle the lap and shoulder safety belt,
the cinch tongue will allow you to shorten
the lap portion, but pinches the webbing
to keep the lap portion from getting longer.
The cinch tongue is designed to slip during
a crash, so always wear the shoulder belt
properly and do not allow any slack in
either the lap or shoulder portions.
Before you can reach and latch a lap and
shoulder belt having a cinch tongue into
the buckle, you may have to lengthen the
lap belt portion of it. 31
F150 (TF6) , enUSA Safety BeltsE142587 E142588 E162708
Page 35 of 472
1. To lengthen the lap belt, pull some
webbing out of the shoulder belt
retractor.
2. While holding the webbing below the tongue, grasp the tip (metal portion)
of the tongue so that it is parallel to the
webbing and slide the tongue upward.
3. Provide enough lap belt length so that
the tongue can reach the buckle.
Fastening the Cinch Tongue WARNING
The lap belt should fit snugly and as
low as possible around the hips, not
across the waist.
1.
Pull the lap and shoulder belt from the
retractor so that the shoulder belt
portion of the safety belt crosses your
shoulder and chest.
2. Be sure the belt is not twisted. If the belt is twisted, remove the twist.
3. Insert the belt tongue into the proper buckle for your seating position until
you hear a snap and feel it latch.
4. Make sure you securely fasten the tongue to the buckle by pulling on the
tongue.
While you are fastened in the safety belt,
the lap and shoulder belt with a cinch
tongue adjusts to your movement.
However, if you brake hard, turn hard, or if
your vehicle receives an impact of 5 mph
(8 km/h) or more, the safety belt will
become locked and help reduce your
forward movement. Using Safety Belts During
Pregnancy WARNING
Always ride and drive with your
seatback upright and the safety belt
properly fastened. The lap portion of
the safety belt should fit snug and be
positioned low across the hips. The
shoulder portion of the safety belt should
be positioned across the chest. Pregnant
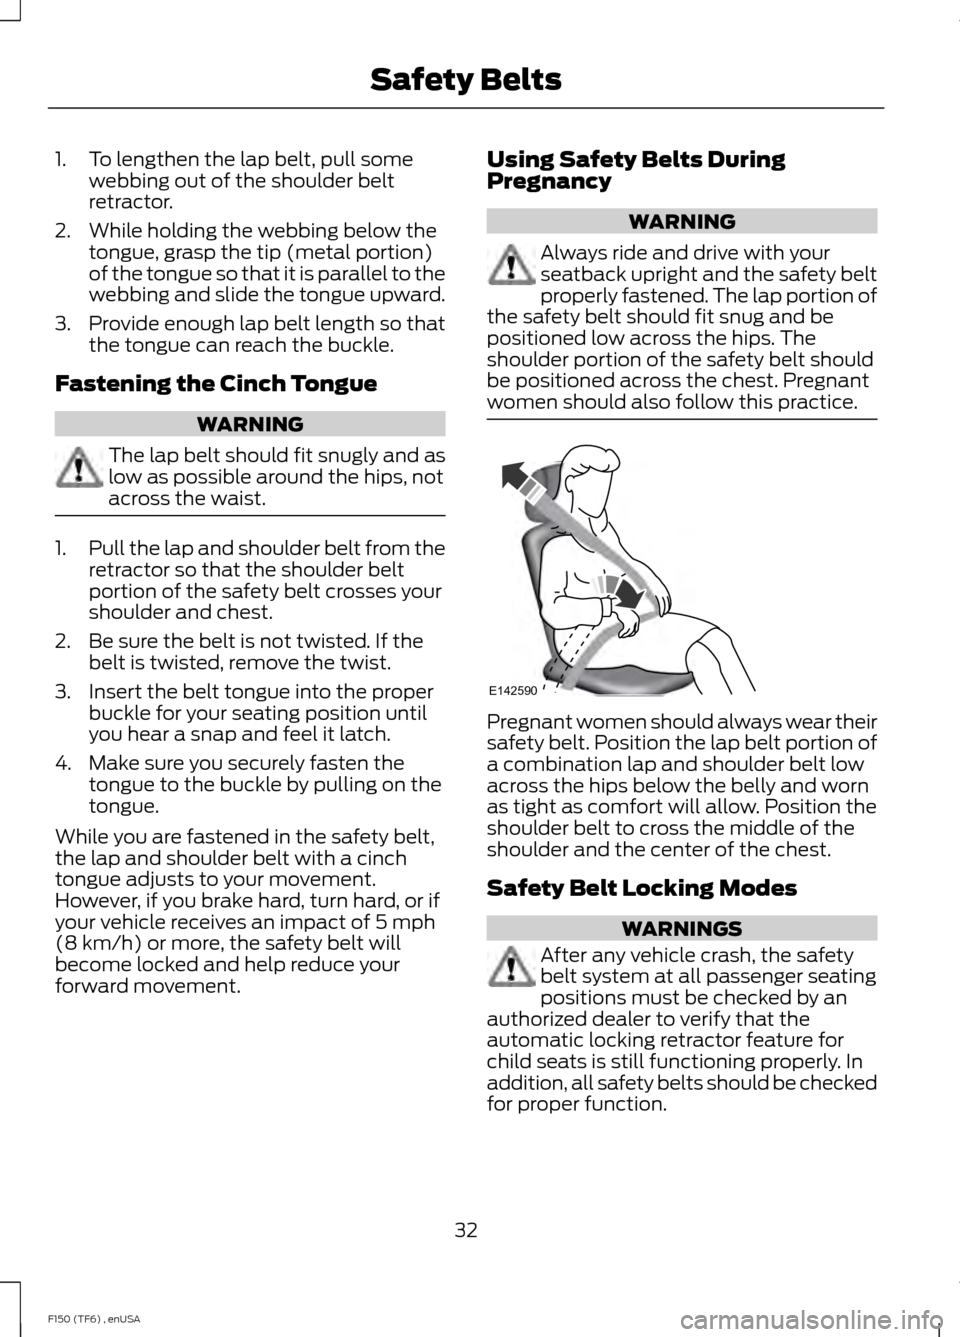
women should also follow this practice. Pregnant women should always wear their
safety belt. Position the lap belt portion of
a combination lap and shoulder belt low
across the hips below the belly and worn
as tight as comfort will allow. Position the
shoulder belt to cross the middle of the
shoulder and the center of the chest.
Safety Belt Locking Modes
WARNINGS
After any vehicle crash, the safety
belt system at all passenger seating
positions must be checked by an
authorized dealer to verify that the
automatic locking retractor feature for
child seats is still functioning properly. In
addition, all safety belts should be checked
for proper function.
32
F150 (TF6) , enUSA Safety BeltsE142590
Page 52 of 472
GENERAL INFORMATION ON
RADIO FREQUENCIES
This device complies with Part 15 of the
FCC Rules and with Industry Canada
license-exempt RSS standard(s).
Operation is subject to the following two
conditions: (1) This device may not cause
harmful interference, and (2) This device
must accept any interference received,
including interference that may cause
undesired operation.
Note:
Changes or modifications not
expressively approved by the party
responsible for compliance could void the
user's authority to operate the equipment.
The term IC before the radio certification
number only signifies that Industry Canada
technical specifications were met.
The typical operating range for your
transmitter is approximately 33 feet (10
meters). Vehicles with the remote start
feature will have a greater range. One of
the following could cause a decrease in
operating range:
• weather conditions
• nearby radio towers
• structures around the vehicle
• other vehicles parked next to your
vehicle
The radio frequency used by your remote
control can also be used by other short
distance radio transmissions, for example
amateur radios, medical equipment,
wireless headphones, remote controls and
alarm systems. If the frequencies are
jammed, you will not be able to use your
remote control. You can lock and unlock
the doors with the key.
Note: Make sure to lock your vehicle before
leaving it unattended.
Note: If you are in range, the remote control
will operate if you press any button
unintentionally. REMOTE CONTROL
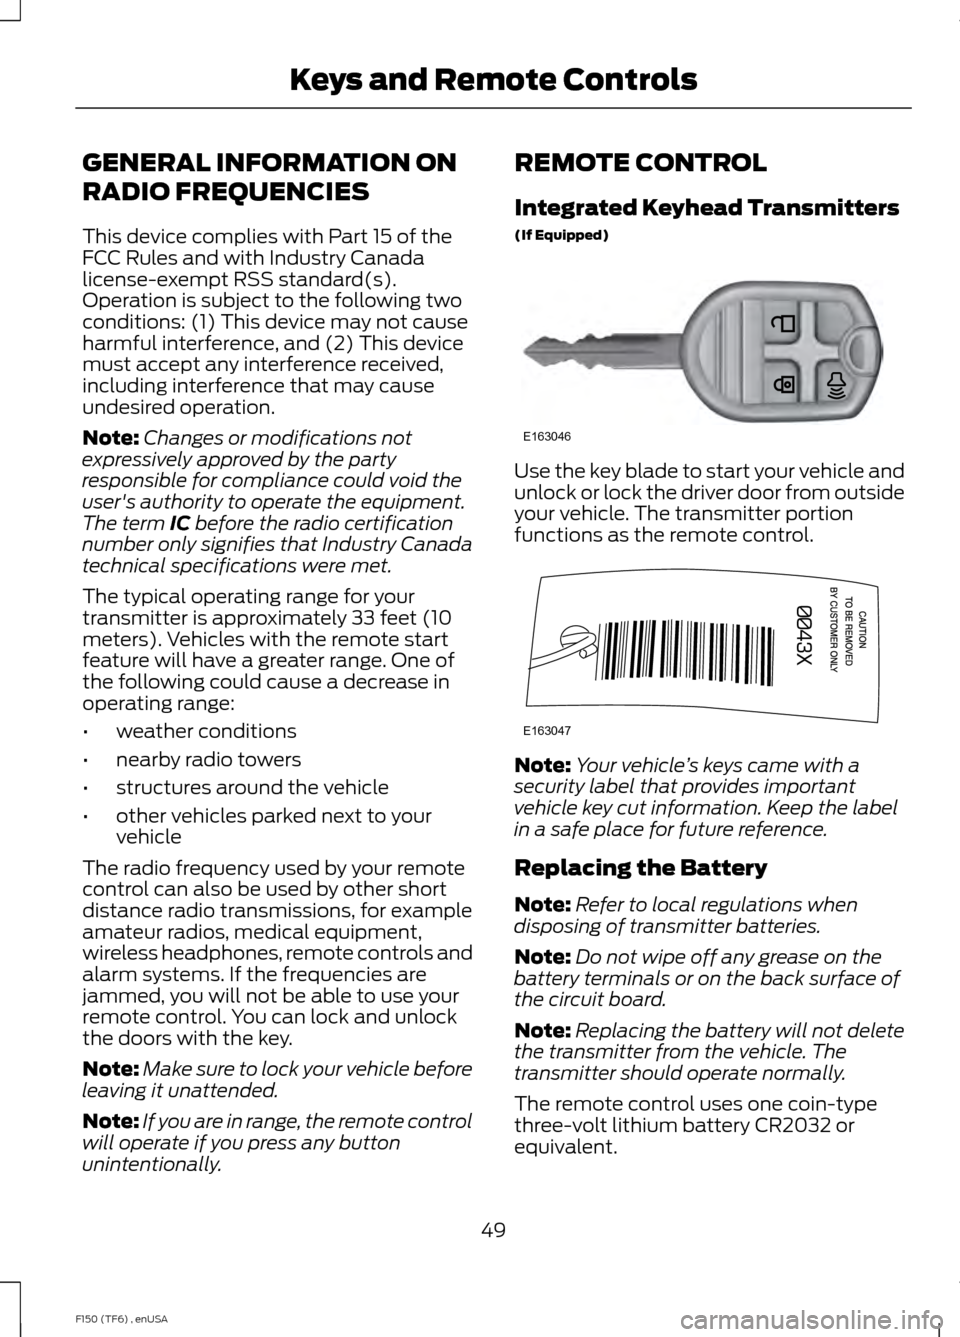
Integrated Keyhead Transmitters
(If Equipped)
Use the key blade to start your vehicle and
unlock or lock the driver door from outside
your vehicle. The transmitter portion
functions as the remote control.
Note:
Your vehicle ’s keys came with a
security label that provides important
vehicle key cut information. Keep the label
in a safe place for future reference.
Replacing the Battery
Note: Refer to local regulations when
disposing of transmitter batteries.
Note: Do not wipe off any grease on the
battery terminals or on the back surface of
the circuit board.
Note: Replacing the battery will not delete
the transmitter from the vehicle. The
transmitter should operate normally.
The remote control uses one coin-type
three-volt lithium battery CR2032 or
equivalent.
49
F150 (TF6) , enUSA Keys and Remote ControlsE163046 E163047
Page 59 of 472
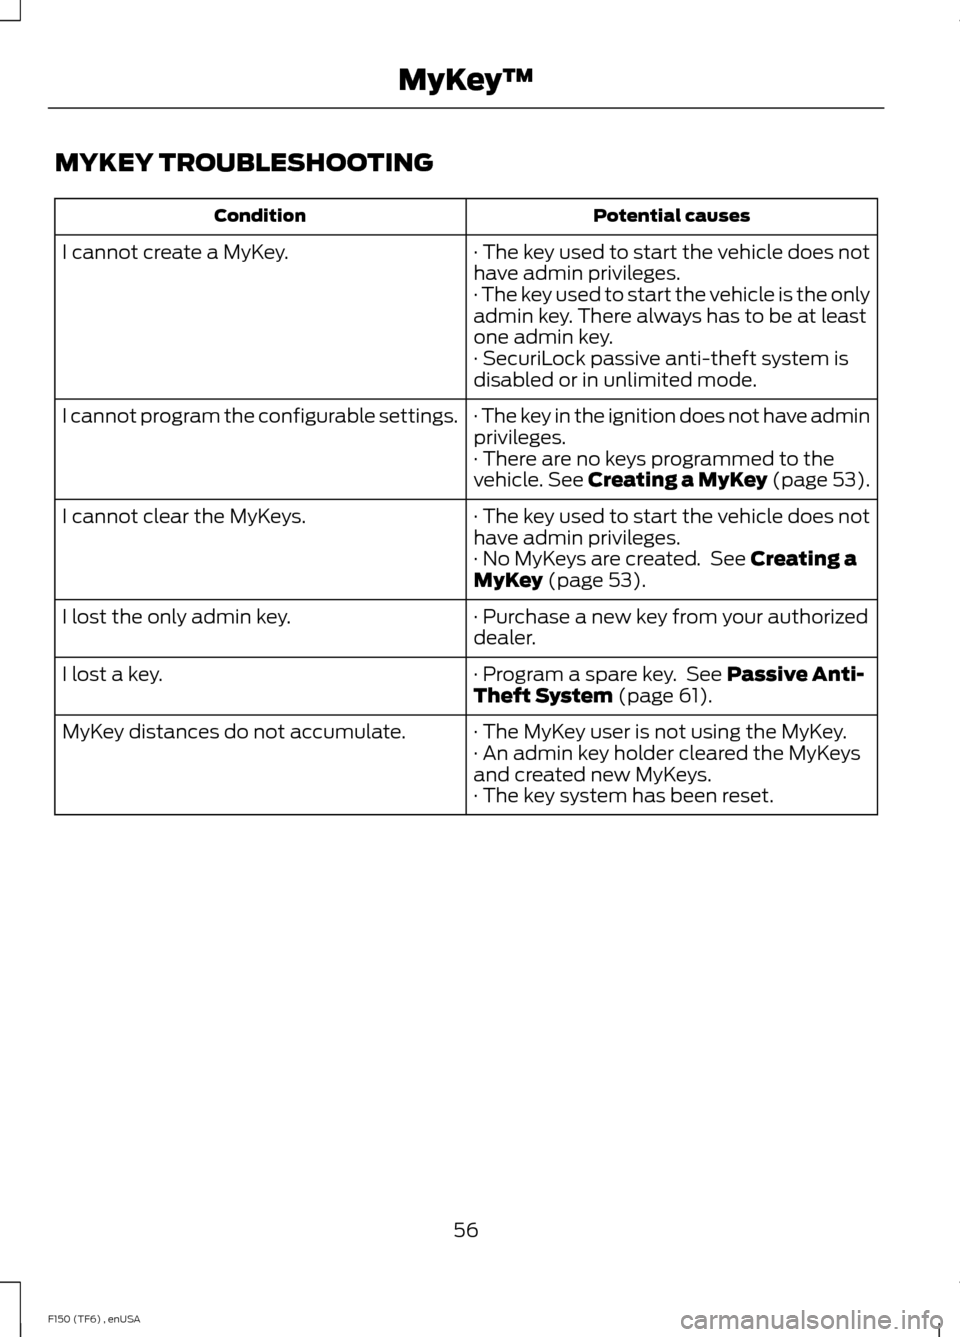
MYKEY TROUBLESHOOTING
Potential causes
Condition
· The key used to start the vehicle does not
have admin privileges.
I cannot create a MyKey.
· The key used to start the vehicle is the only
admin key. There always has to be at least
one admin key.
· SecuriLock passive anti-theft system is
disabled or in unlimited mode.
· The key in the ignition does not have admin
privileges.
I cannot program the configurable settings.
· There are no keys programmed to the
vehicle. See Creating a MyKey (page 53).
· The key used to start the vehicle does not
have admin privileges.
I cannot clear the MyKeys.
· No MyKeys are created. See
Creating a
MyKey (page 53).
· Purchase a new key from your authorized
dealer.
I lost the only admin key.
· Program a spare key. See
Passive Anti-
Theft System (page 61).
I lost a key.
· The MyKey user is not using the MyKey.
MyKey distances do not accumulate.
· An admin key holder cleared the MyKeys
and created new MyKeys.
· The key system has been reset.
56
F150 (TF6) , enUSA MyKey
™
Page 61 of 472
The autolock feature will unlock all the
doors when:
•
autolock has locked the doors
• you stop the vehicle and switch the
ignition off or to accessory mode, and
• you open the driver door within 10
minutes.
Note: The doors will not autounlock if you
have electronically locked them before
opening the driver door.
Enabling or Disabling
You can enable or disable these features
in the information display or your
authorized dealer can do it for you. See
General Information (page 87).
Note: You can enable or disable the
autolock and autounlock features
independently of each other.
Illuminated Entry
The interior lamps and select exterior
lamps will illuminate when you unlock the
doors with the remote entry system.
The illuminated entry system will turn off
the lights if:
• the ignition is on
• you press the remote control lock
button, or
• after 25 seconds of illumination.
The dome lamp will not turn on if the
control is set to the off position.
The lights will not turn off if:
• you turn them on with the dimmer
control, or
• any door is open. Battery Saver
The battery saver turns off the interior
lamps 30 minutes after you switch the
ignition off if a door is open and the dome
lamp switch is on. It turns off the interior
lamps after 10 minutes if the dome lamp
switch is off.
KEYLESS ENTRY
(IF EQUIPPED)
SECURICODE™ KEYLESS ENTRY
KEYPAD
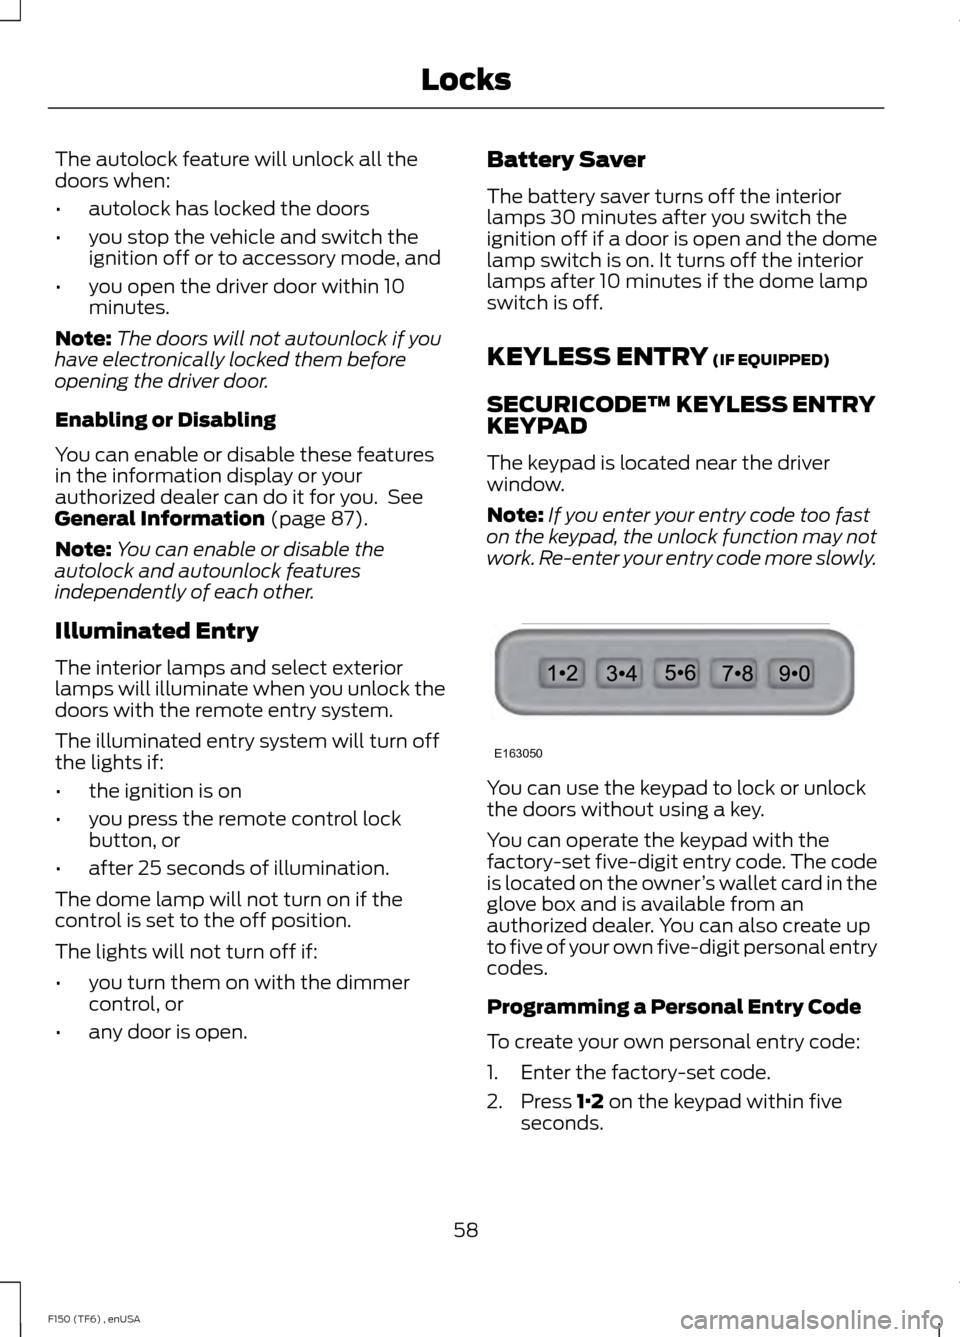
The keypad is located near the driver
window.
Note: If you enter your entry code too fast
on the keypad, the unlock function may not
work. Re-enter your entry code more slowly. You can use the keypad to lock or unlock
the doors without using a key.
You can operate the keypad with the
factory-set five-digit entry code. The code
is located on the owner
’s wallet card in the
glove box and is available from an
authorized dealer. You can also create up
to five of your own five-digit personal entry
codes.
Programming a Personal Entry Code
To create your own personal entry code:
1. Enter the factory-set code.
2. Press
1·2 on the keypad within five
seconds.
58
F150 (TF6) , enUSA LocksE163050
Page 62 of 472
3. Enter your personal 5-digit code. You
must enter each number within five
seconds of each other.
4. Press 1·2 on the keypad to save
personal code 1.
The doors will lock then unlock to confirm
that programming was successful.
To program additional personal entry
codes, repeat Steps 1-3, then for Step 4:
• Press
3·4 to save personal code 2.
• Press
5·6,7·8 or 9·0 to save personal
code 3.
You may also program a personal entry
code through the MyFord Touch system.
Tips:
• Do not set a code that uses five of the
same number.
• Do not use five numbers in sequential
order.
• The factory-set code will work even if
you have set your own personal code.
Recalling Memory Positions (If
Equipped)
The programmed entry codes will recall
driver memory positions as follows:
• Entry code 1 will recall driver 1 memory
positions.
• Entry code 2 will recall driver 2 memory
positions.
Note: Personal entry codes 3, 4 and 5 will
not recall memory positions.
Erasing a Personal Code
1. Enter the factory-set 5-digit code.
2. Press and release
1·2 on the keypad
within five seconds.
3. Press and hold
1·2 for two seconds.
You must do this within five seconds
of completing Step 2. All personal codes will erase and only the
factory-set 5-digit code will work.
Anti-Scan Feature
The keypad will go into an anti-scan mode
if you enter the wrong code seven times
(35 consecutive button presses). This
mode disables the keypad for one minute
and the keypad lamp will flash.
The anti-scan feature will turn off after:
•
One minute of keypad inactivity.
• Pressing the unlock button on the
remote control.
• Switching the ignition on.
Unlocking and Locking the Doors
To Unlock the Driver Door
Enter the factory-set 5-digit code or your
personal code. You must press each
number within five seconds of each other.
The interior lamps will illuminate.
Note: All doors will unlock if you disable
the two-stage unlocking mode. See
Locking and Unlocking
(page 57).
To Unlock All Doors
Enter the factory-set code or your personal
code, then press
3·4 within five seconds.
To Lock All Doors
Press and hold
7·8 and 9·0 at the same
time (with the driver door closed). You do
not need to enter the keypad code first.
Displaying the Factory Set Code
Note: You will need to have two
programmed passive anti-theft keys for this
procedure.
To display the factory-set code in the
information display:
1. Insert a key into the ignition and switch
the ignition on for a few seconds.
59
F150 (TF6) , enUSA Locks
Page 64 of 472
PASSIVE ANTI-THEFT
SYSTEM (IF EQUIPPED)
Note: The system is not compatible with
non-Ford aftermarket remote start systems.
Use of these systems may result in vehicle
starting problems and a loss of security
protection.
Note: Metallic objects, electronic devices
or a second coded key on the same key
chain may cause vehicle starting problems
if they are too close to the key when starting
the engine. Prevent these objects from
touching the coded key while starting the
engine. Switch the ignition off, move all
objects on the key chain away from the
coded key and restart the engine if a
problem occurs.
Note: Do not leave a duplicate coded key
in the vehicle. Always take your keys and
lock all doors when leaving the vehicle.
SecuriLock ™
The system is an engine immobilization
system. It helps prevent the engine from
starting unless you use a coded key
programmed to your vehicle. Using the
wrong key may prevent the engine from
starting. A message may appear in the
information display.
If you are unable to start the engine with a
correctly coded key, the system has
malfunctioned. A message may appear in
the information display.
Automatic Arming
The system arms immediately after you
switch the ignition off.
Automatic Disarming
Switching the ignition on with a coded key
disarms the system. Replacement Keys
Note:
Your vehicle may have two integrated
keyhead transmitters.
The integrated keyhead transmitter
functions as a programmed ignition key. It
operates all the locks, starts the vehicle
and acts as a remote control.
If your programmed transmitters or
standard SecuriLock coded keys are lost
or stolen and you do not have an extra
coded key, you will need to have your
vehicle towed to an authorized dealer. You
need to erase the key codes from your
vehicle and program new coded keys.
Store an extra programmed key away from
your vehicle in a safe place to help prevent
any inconveniences. See an authorized
dealer to purchase additional spare or
replacement keys.
Programming a Spare Key
Note: You can program a maximum of eight
coded keys to your vehicle. Only four of
these can be integrated keyhead
transmitters.
You can program your own integrated
keyhead transmitter or standard
SecuriLock coded keys to your vehicle. This
procedure will program both the engine
immobilizer keycode and the remote entry
portion of the remote control to your
vehicle.
Only use integrated keyhead transmitters
or standard SecuriLock keys.
You must have two previously
programmed coded keys and the new
unprogrammed key readily accessible. See
an authorized dealer to have the spare key
programmed if two previously
programmed coded keys are not available.
Read and understand the entire procedure
before you begin.
61
F150 (TF6) , enUSA Security