2014 FORD EXPEDITION USB
[x] Cancel search: USBPage 8 of 519
Wheels and Tires 304
Tire care...........................................306
Tire Pressure Monitoring System (TPMS)...................323
Changing a road wheel.................................327
Technical specifications.................................335
Wheel lug nut torque..................................335
Capacities and Specifications 336
Engine specifications..................................336
Part numbers........................................341
Vehicle identification number............................342
Vehicle certification label...............................343
Transmission code designation............................343
Accessories 344
Accessories.........................................344
Ford Extended Service Plan 346
Audio System 349
AM/FM/CD with SYNC.................................351
Rear seat controls.....................................354
Satellite radio information...............................357
Auxiliary input jack...................................360
USBport...........................................361
Rear seat entertainment system...........................362
SYNC® 381
Pairing your phone for the first time.......................386
911 Assist™.........................................400
Vehicle Health Report..................................403
Table of Contents7
2014 Expedition(exd)
Owners Guide gf, 1st Printing, June 2013
USA(fus)
Page 9 of 519
Navigation System (If Equipped) 426
Statusbars..........................................429
Loading pictures......................................429
Voice recognition.....................................431
Accessing media features...............................436
Jukebox features.....................................454
Recording (saving) music to your jukebox...................454
Accessing the music in your jukebox.......................454
Creating a playlist.....................................455
Where am I?.........................................457
Accessing the help screen...............................460
Navigation features....................................461
Appendices 482
Navigation end user license agreement......................489
Scheduled Maintenance 494
Normal scheduled maintenance and log.....................499
Index 511
The information contained in this publication was correct at the time of going to
print. In the interest of continuous development, we reserve the right to change
specifications, design or equipment at any time without notice or obligation.
No part of this publication may be reproduced, transmitted, stored in a retrieval
system or translated into any language in any form by any means without our
written permission. Errors and omissions excepted.
© Ford Motor Company 2013
8Table of Contents
2014 Expedition(exd)
Owners Guide gf, 1st Printing, June 2013
USA(fus)
Page 168 of 519
CENTER CONSOLE (IF EQUIPPED)
Stow items in the cupholder carefully as items may become loose during
hard braking, acceleration or collisions, including hot drinks which may
spill.
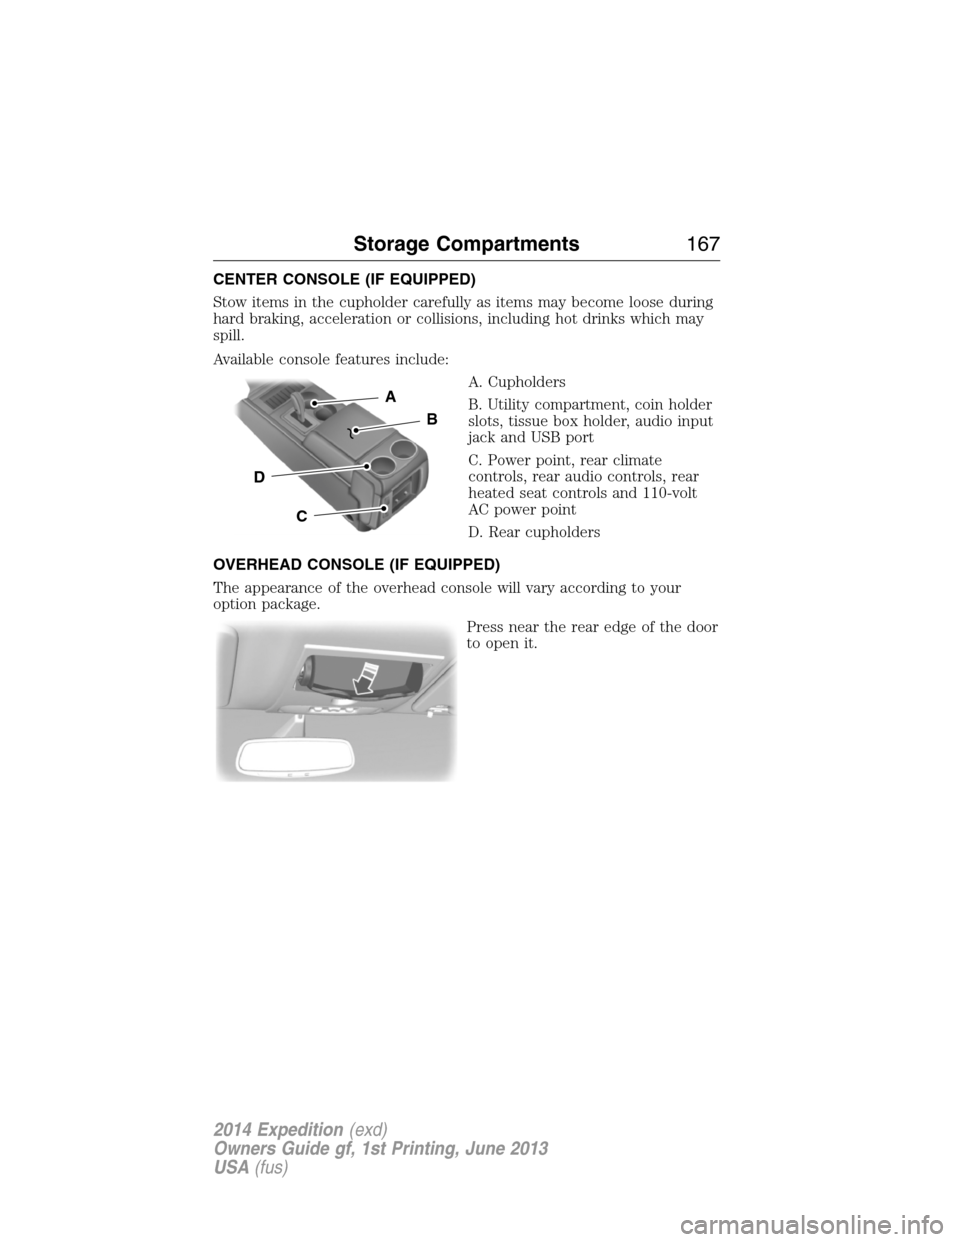
Available console features include:
A. Cupholders
B. Utility compartment, coin holder
slots, tissue box holder, audio input
jack and USB port
C. Power point, rear climate
controls, rear audio controls, rear
heated seat controls and 110-volt
AC power point
D. Rear cupholders
OVERHEAD CONSOLE (IF EQUIPPED)
The appearance of the overhead console will vary according to your
option package.
Press near the rear edge of the door
to open it.
A
B
C
D
Storage Compartments167
2014 Expedition(exd)
Owners Guide gf, 1st Printing, June 2013
USA(fus)
Page 355 of 519
REAR AUDIO CONTROLS
Your vehicle is equipped with rear seat audio controls. This allows front
and middle seat passengers to listen to different media sources (radio,
CD or SYNC) simultaneously.
Note:The front and middle seat passengers cannot listen to two
different radio stations at the same time.
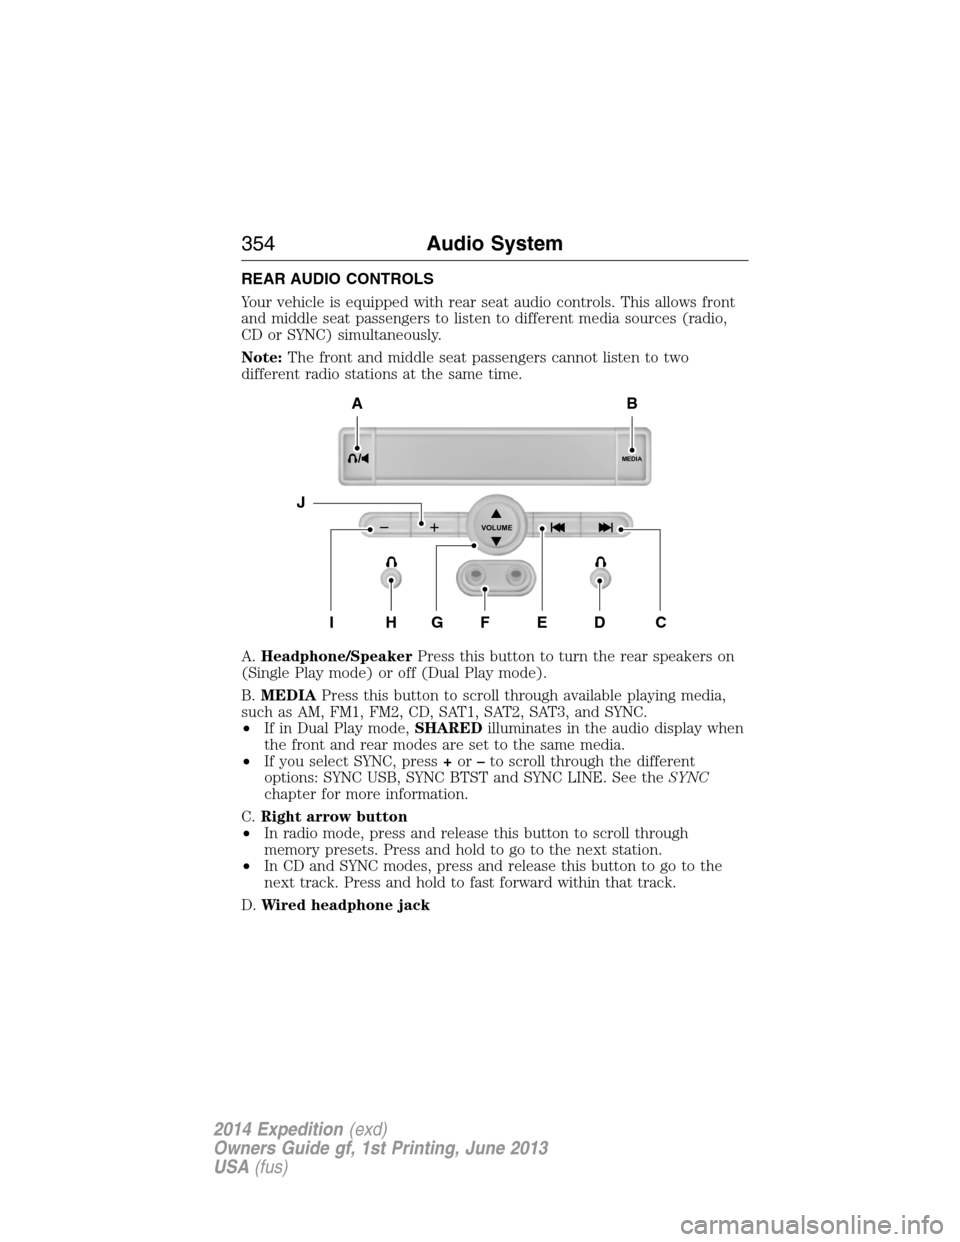
A.Headphone/SpeakerPress this button to turn the rear speakers on
(Single Play mode) or off (Dual Play mode).
B.MEDIAPress this button to scroll through available playing media,
such as AM, FM1, FM2, CD, SAT1, SAT2, SAT3, and SYNC.
•If in Dual Play mode,SHAREDilluminates in the audio display when
the front and rear modes are set to the same media.
•If you select SYNC, press+or–to scroll through the different
options: SYNC USB, SYNC BTST and SYNC LINE. See theSYNC
chapter for more information.
C.Right arrow button
•In radio mode, press and release this button to scroll through
memory presets. Press and hold to go to the next station.
•In CD and SYNC modes, press and release this button to go to the
next track. Press and hold to fast forward within that track.
D.Wired headphone jack
MEDIA
VOLUME
B
HFGEDCI
A
J
354Audio System
2014 Expedition(exd)
Owners Guide gf, 1st Printing, June 2013
USA(fus)
Page 362 of 519

4. Adjust the volume as desired.
5. Switch your portable music player on and adjust its volume to half its
maximum level.
6. PressAUXuntilLINEorLINE INappears in the display. You
should hear music from your device even if it is low.
7. Adjust the volume on your portable music player until it reaches the
volume level of the FM station or CD. Do this by switching back and
forth between the AUX and FM or CD controls.
USB PORT (IF EQUIPPED)
WARNING:Driving while distracted can result in loss of vehicle
control, crash and injury. We strongly recommend that you use
extreme caution when using any device that may take your focus off
the road. Your primary responsibility is the safe operation of your
vehicle. We recommend against the use of any hand-held device while
driving and encourage the use of voice-operated systems when possible.
Make sure you are aware of all applicable local laws that may affect the
use of electronic devices while driving.
The USB port allows you to plug in
media playing devices, memory
sticks and charge devices
(if supported). See theSYNC
chapter for more information.
LINE IN
Audio System361
2014 Expedition(exd)
Owners Guide gf, 1st Printing, June 2013
USA(fus)
Page 363 of 519

REAR SEAT ENTERTAINMENT SYSTEM (IF EQUIPPED)
WARNING:Driving while distracted can result in loss of vehicle
control, crash and injury. We strongly recommend that you use
extreme caution when using any device that may take your focus off
the road. Your primary responsibility is the safe operation of your
vehicle. We recommend against the use of any hand-held device while
driving and encourage the use of voice-operated systems when possible.
Make sure you are aware of all applicable local laws that may affect the
use of electronic devices while driving.
Note:Make sure you run the engine while using the device. To avoid
discharging your vehicle battery:
•Do not use this device without the engine running.
•Turn off the device when your vehicle is not in use for long periods.
The system consists of the following features:
•Seven-inch color TFT-LCD panel (480x234) with 16:9 aspect
•Built-in, top-loading slot load DVD player
•Infrared transmitters for infrared wireless headphones
•Audio/Video source input (three RCA jacks)
•USB 2.0 (optional)
•One-eighth inch stereo headphone jack
•Forward remote sensor on the front panel
•Full-function remote control
•Five control buttons on the front panel: POWER, SOURCE, STOP,
PLAY and EJECT
•On-screen display control
•12V DC power input
•FM transmitter (may be optional)
Note:Do not touch the inner pins of the jacks on the front panel.
Electrostatic discharge may cause permanent damage to the device.
Your system plays the following types of discs:
•DVD-Video:DVD contains video.
•DVD +/- R:DVD contains video.
•CD-DA:CD contains musical or sound content only.
•CD-Video:CD contains movie only.
•CD-R/RW:CD contains audio files (such as a CD-R with MP3 files),
MPEG or JPEG files.
362Audio System
2014 Expedition(exd)
Owners Guide gf, 1st Printing, June 2013
USA(fus)
Page 367 of 519

D.STOP*:Press this button to stop playing the disc.
E.PLAY*:Press this button to play the disc.
F.Headphone jack:Plug in your wired headphones with a 1/8-inch
(3.5 millimeter) stereo connector plug to listen to audio from the
program.
G.Video input jack (red):Connect an RCA cable to this port.
H.Video input jack (white):Connect an RCA cable to this port.
I.Video input jack (yellow):Connect an RCA cable to this port.
J.USB port (optional):Listen to music or view images you stored on a
USB device such as a USB memory stick or a memory card reader.
K.SOURCE:Press this button to select Monitor A, Monitor B, AUX/TV
(if available), and AUX 2 (if available).
L.POWER:Press this button to turn the system off and on.
M.TFT LCD panel:Seven-inch TFT LCD panel.
N.Level lock and release latch:Use this latch to change the viewing
angle of the LCD panel or lock the panel into the secured position.
O.Infrared sensor - forward sensor eye:This allows the remote
control to navigate the on-screen display.
Remote Control
Note:The remote control uses infrared light to send commands to the
DVD player, just as many home video systems do. Just point the remote
control at the DVD player infrared window located above each screen in
order to control that DVD player. While you can connect a second device
such as a VCR through the auxiliary inputs, and view the playback on
the screen, you cannot control that device by aiming its remote control
at the Ford DVD player. The Ford DVD system remote control is the
only remote control you can use with the system. For example, if you
connect a VCR to the DVD system, you must point the VCR remote
control at the VCR to control it.
Installing the Battery
Before using your remote control, install the batteries as follows:
1. Turn the remote control face down. Press down on the ridged area of
the battery cover and slide it off.
2. Install two AAA batteries. Make sure you install the batteries
properly, with the + and – facing the correct way, as shown in the
battery compartment.
3. Slide the cover back until it clicks.
366Audio System
2014 Expedition(exd)
Owners Guide gf, 1st Printing, June 2013
USA(fus)
Page 376 of 519
Skipping Songs
PressNEXTon the remote control to move to the next song. Press
PREVto move to the beginning of the currently playing song. Press
PREVtwice to move to the previous song.
Selecting a Play Mode
You can choose what order the songs play on a disc temporarily. The
FOLDER play mode is the default. To access the play mode operations,
pressREPEATon the remote control. The play mode options are:
•Single:Play a selected song.
•Repeat One:Repeat the song that is playing.
•Folder:Play the folder in the order you recorded the songs.
•Folder Repeat:Repeat the folder that is playing.
•Random:Play the songs in the random order.
•Shuffle:Play the songs within the selected folder in random order.
Order of Tracks
The DVD-headrest module plays the files in the order that you added
them to the USB drive. Therefore, the playback order may not be the
same as what appears on the screen. To access the file structure and
menus, for the USB device, you need the remote control set to the
appropriate systems (A or B).
When you insert the USB device, the system may begin playing files
automatically, returning to the previous position, if it was unplugged
during a previous playback. To return to the menus, pressMENUor
VOL -,depending on the type of file you are playing. The current
directory appears, listing all file types.
Controls
•MENU:Press this button to return to the menu structure.
•CH + and CH -:Press these buttons to move the select bar up and
down within the selected menu or file list.
•VOL -:Press this button to move the menu up one level. Pressing
this button in some menu functions returns you to the menu
structure.
•VOL +:Press this button to select a menu item.
•ENTER:Press this button to make a selection or begin file playback.
•P L AY:Press this button to play a file.
•STOP:Press this button to stop the playing media.
•PAUSE:Press this button to stop the media playback temporarily.
Audio System375
2014 Expedition(exd)
Owners Guide gf, 1st Printing, June 2013
USA(fus)