2014 FORD EXPEDITION ignition
[x] Cancel search: ignitionPage 189 of 519
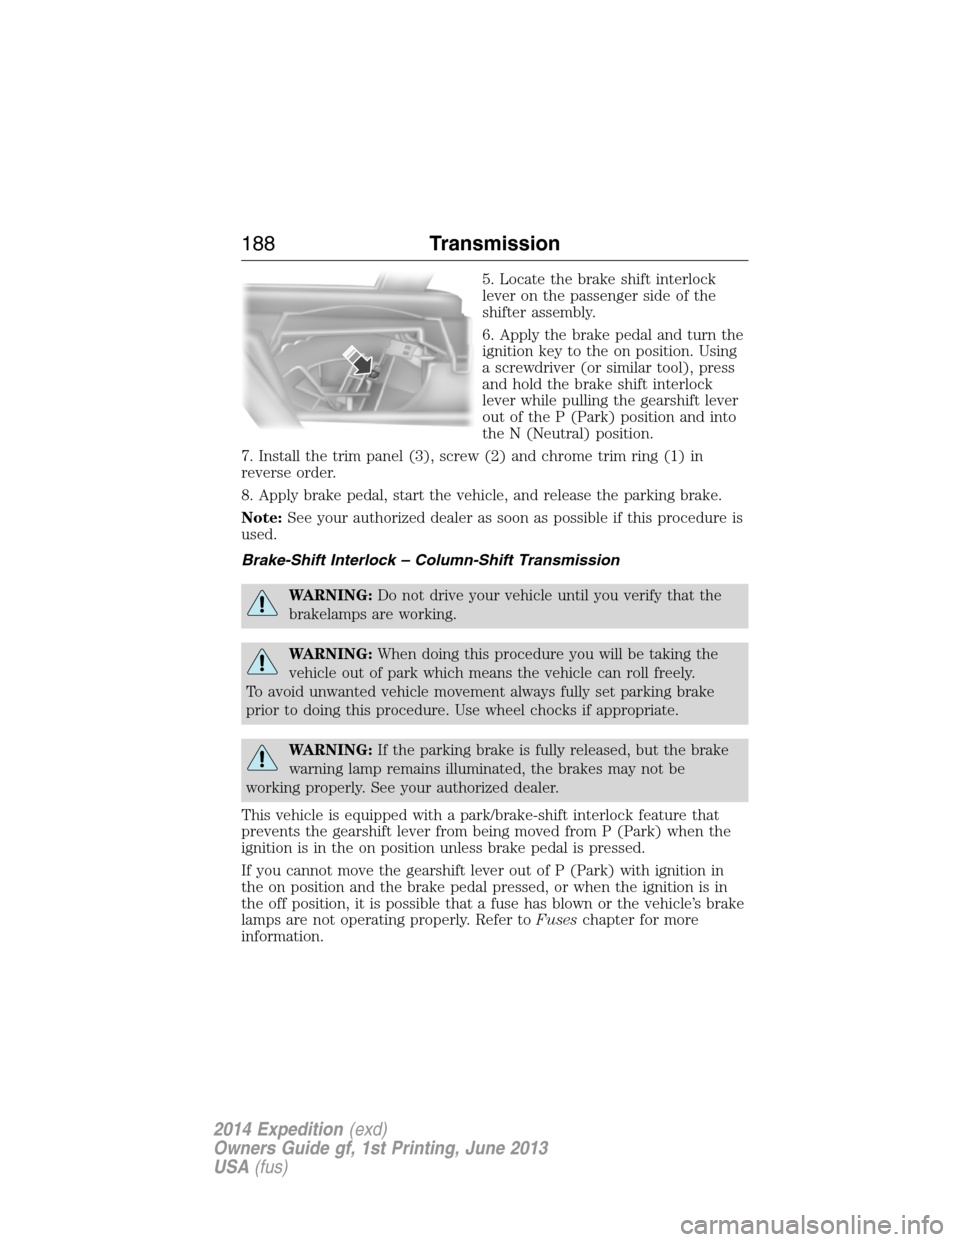
5. Locate the brake shift interlock
lever on the passenger side of the
shifter assembly.
6. Apply the brake pedal and turn the
ignition key to the on position. Using
a screwdriver (or similar tool), press
and hold the brake shift interlock
lever while pulling the gearshift lever
out of the P (Park) position and into
the N (Neutral) position.
7. Install the trim panel (3), screw (2) and chrome trim ring (1) in
reverse order.
8. Apply brake pedal, start the vehicle, and release the parking brake.
Note:See your authorized dealer as soon as possible if this procedure is
used.
Brake-Shift Interlock – Column-Shift Transmission
WARNING:Do not drive your vehicle until you verify that the
brakelamps are working.
WARNING:When doing this procedure you will be taking the
vehicle out of park which means the vehicle can roll freely.
To avoid unwanted vehicle movement always fully set parking brake
prior to doing this procedure. Use wheel chocks if appropriate.
WARNING:If the parking brake is fully released, but the brake
warning lamp remains illuminated, the brakes may not be
working properly. See your authorized dealer.
This vehicle is equipped with a park/brake-shift interlock feature that
prevents the gearshift lever from being moved from P (Park) when the
ignition is in the on position unless brake pedal is pressed.
If you cannot move the gearshift lever out of P (Park) with ignition in
the on position and the brake pedal pressed, or when the ignition is in
the off position, it is possible that a fuse has blown or the vehicle’s brake
lamps are not operating properly. Refer toFuseschapter for more
information.
188Transmission
2014 Expedition(exd)
Owners Guide gf, 1st Printing, June 2013
USA(fus)
Page 197 of 519
Mud and water
Note:Driving through deep water may damage the vehicle.
If you must drive through high water, drive slowly. Traction or brake
capability may be limited.
When driving through water, determine the depth; avoid water higher
than the bottom of the hubs (if possible) and proceed slowly. If the
ignition system gets wet, the vehicle may stall.
Once through water, always try the brakes. Wet brakes do not stop the
vehicle as effectively as dry brakes. Drying can be improved by moving
your vehicle slowly while applying light pressure on the brake pedal.
Be cautious of sudden changes in vehicle speed or direction when you
are driving in mud. Even 4WD vehicles can lose traction in slick mud. As
when you are driving over sand, apply the accelerator slowly and avoid
spinning your wheels. If the vehicle does slide, steer in the direction of
the slide until you regain control of the vehicle.
If the transmission, transfer case or front axle are submerged in water,
their fluids should be checked and changed, if necessary.
If the front or rear axle is submerged in water, the axle lubricant should
be replaced.
After driving through mud, clean off residue stuck to rotating driveshafts
and tires. Excess mud stuck on tires and rotating driveshafts causes an
imbalance that could damage drive components.
“Tread Lightly” is an educational
program designed to increase public
awareness of land-use regulations
and responsibilities in our nations
wilderness areas. Ford Motor
Company joins the U.S. Forest
Service and the Bureau of Land Management in encouraging you to help
preserve our national forest and other public and private lands by
“treading lightly.”
196Four-Wheel Drive (If Equipped)
2014 Expedition(exd)
Owners Guide gf, 1st Printing, June 2013
USA(fus)
Page 201 of 519
GENERAL INFORMATION
Note:Occasional brake noise is normal. If a metal-to-metal, continuous
grinding or continuous squeal sound is present, the brake linings may be
worn out. Have them inspected by an authorized dealer. If your vehicle
has continuous vibration or shudder in the steering wheel while braking,
have your vehicle inspected by an authorized dealer.
Note:Brake dust may accumulate on the wheels, even under normal
driving conditions. Some dust is inevitable as the brakes wear and does
not contribute to brake noise. See theVehicle Carechapter for wheel
cleaning instructions.
See theInstrument Clusterchapter for information on the
brake system warning light.
Wet brakes result in reduced braking efficiency. Gently press the brake
pedal a few times when driving from a car wash or standing water to dry
the brakes.
Brake Over Accelerator
In the event the accelerator pedal becomes stuck or entrapped, apply
steady and firm pressure to the brake pedal to slow your vehicle and
reduce engine power. If you experience this condition, apply the brakes
and bring your vehicle to a safe stop. Turn the engine off, shift to
positionPand apply the parking brake, then inspect the accelerator
pedal for any interferences. If none are found and the condition persists,
have your vehicle towed to the nearest authorized dealer.
Anti-Lock Brake System
This system helps you maintain steering control during emergency stops
by keeping the brakes from locking.
This lamp momentarily illuminates when you turn the ignition
on. If the light does not illuminate during start-up, remains on
or flashes, the anti-lock brake system may be disabled and may
need to be serviced.
If the anti-lock brake system is disabled, normal braking is still
effective. If the brake warning lamp illuminates with the parking
brake released, have your brake system serviced immediately.
200Brakes
2014 Expedition(exd)
Owners Guide gf, 1st Printing, June 2013
USA(fus)
Page 206 of 519

SENSING SYSTEM (IF EQUIPPED)
WARNING:To help avoid personal injury, please read and
understand the limitations of the system as contained in this
section. Sensing is only an aid for some (generally large and fixed)
objects when moving in reverse on a flat surface at parking speeds.
Traffic control systems, inclement weather, air brakes, and external
motors and fans may also affect the function of the sensing system; this
may include reduced performance or a false activation.
WARNING:To help avoid personal injury, always use caution
when in R (Reverse) and when using the sensing system.
WARNING:This system is not designed to prevent contact with
small or moving objects. The system is designed to provide a
warning to assist the driver in detecting large stationary objects to
avoid damaging the vehicle. The system may not detect smaller objects,
particularly those close to the ground.
WARNING:Certain add-on devices such as large trailer hitches,
bike or surfboard racks and any device that may block the normal
detection zone of the system, may create false beeps.
Note:Keep the sensors (located on the bumper/fascia) free from snow,
ice and large accumulations of dirt. If the sensors are covered, the
system’s accuracy can be affected. Do not clean the sensors with sharp
objects.
Note:If your vehicle sustains damage to the bumper/fascia, leaving it
misaligned or bent, the sensing zone may be altered causing inaccurate
measurement of obstacles or false alarms.
Note:If your vehicle is equipped with MyKey®, it is possible to prevent
turning the sensing system off. Refer to theMyKey®chapter.
The sensing system warns the driver of obstacles within a certain range
of the bumper area. The system turns on automatically whenever the
ignition is switched on.
When receiving a detection warning, the radio volume is reduced to a
predetermined level. After the warning goes away, the radio volume
returns to the previous level.
Parking Aids205
2014 Expedition(exd)
Owners Guide gf, 1st Printing, June 2013
USA(fus)
Page 213 of 519
Setting a Speed
1. Accelerate to the desired speed.
2. Press and releaseSET+.
3. Take your foot off the accelerator pedal.
The indicator will turn on in the instrument cluster.
Changing the Set Speed
•Press and holdSET+orSET–. Release the button when you reach
the desired speed.
•Press and releaseSET+orSET–. The set speed will change in
approximately 1 mph (2 km/h) increments.
•Press the accelerator pedal or brake pedal until you reach the desired
speed. Press and releaseSET+.
Canceling a Set Speed
Tap the brake pedal. The set speed will not be erased.
Resuming a Set Speed
Press and releaseRES.
Switching Off Cruise Control
Note:The set speed is erased when you turn off cruise control.
PressOFFor turn off the ignition.
212Cruise Control
2014 Expedition(exd)
Owners Guide gf, 1st Printing, June 2013
USA(fus)
Page 236 of 519
The controller shows gain setting, output bar graph, and trailer
connectivity status in the information display. They appear in the
information display as follows:
•TBC GAIN = XX.X NO TRAILER:Shows the current gain setting
during a given ignition cycle and when adjusting the gain. This also
displays if you use the manual control lever or make gain adjustments
with no trailer connected.
•TBC GAIN = XX.X OUTPUT=//////:Displays when you push
your vehicle’s brake pedal, or when you use the manual control. Bar
indicators illuminate in the information display to indicate the amount
of power going to the trailer brakes relative to the brake pedal or
manual control input. One bar indicates the least amount of output;
six bars indicate maximum output.
•TRAILER CONNECTED:Displays when the system senses a
correct trailer wiring connection (a trailer with electric trailer brakes)
during a given ignition cycle.
•TRAILER DISCONNECTED:Displays, accompanied by a single
audible chime, when the system senses a trailer connection and then
a disconnection, either intentional or unintentional, during a given
ignition cycle. It also displays if a truck or trailer-wiring fault occurs
causing the trailer to appear disconnected. This message can also
display if you use the manual control lever without a trailer
connected.
B.Manual control lever:Slide the control lever to the left to turn on
the trailer’s electric brakes independent of the tow vehicle’s brakes. See
the followingProcedure for adjusting gainsection for instructions on
proper use of this feature. If you use the manual control while the brake
is also applied, the greater of the two inputs determines the power sent
to the trailer brakes.
•Stop lamps:Using the manual control lever illuminates both the
trailer brake lamps and your vehicle brake lamps except the center
high-mount stop lamp, if you make the proper electrical connection
to the trailer. Pressing your vehicle brake pedal also illuminates both
trailer and vehicle brake lamps.
Procedure for Adjusting Gain
Note:Only perform this procedure in a traffic-free environment at
speeds of approximately 20–25 mph (30–40 km/h).
The gain setting sets the trailer brake controller for the specific towing
condition. You should change the setting as towing conditions change.
Changes to towing conditions include trailer load, vehicle load, road
conditions and weather.
Towing235
2014 Expedition(exd)
Owners Guide gf, 1st Printing, June 2013
USA(fus)
Page 238 of 519
Points to Remember
Note:Do not attempt removal of the trailer brake controller without
consulting theWorkshop Manual.Damage to the unit may result.
•Adjust gain setting before using the trailer brake controller for the
first time.
•Adjust gain setting, using the procedure above, whenever road,
weather and trailer or vehicle loading conditions change from when
the gain was initially set.
•Only use the manual control lever for proper adjustment of the gain
during trailer setup. Misuse, such as application during trailer sway,
could cause instability of trailer or tow vehicle.
•Avoid towing in adverse weather conditions. The trailer brake
controller does not provide anti-lock control of the trailer wheels.
Trailer wheels can lock up on slippery surfaces, resulting in reduced
stability of trailer and tow vehicle.
•The trailer brake controller is equipped with a feature that reduces
output at vehicle speeds below 11 mph (18 km/h) so trailer and
vehicle braking is not jerky or harsh. This feature is only available
when applying the brakes using your vehicle’s brake pedal, not the
controller.
•The controller interacts with the brake control system and powertrain
control system of your vehicle to provide the best performance on
different road conditions.
•Your vehicle’s brake system and the trailer brake system work
independently of each other. Changing the gain setting on the
controller does not affect the operation of your vehicle’s brakes
whether you attach a trailer or not.
•When you turn the engine off, the controller output is disabled and
the display and module shut down. The controller module and display
turn on when you turn the ignition on.
•The trailer brake controller is only a factory-installed or
dealer-installed item. Ford is not responsible for warranty or
performance of the controller due to misuse or customer installation.
Towing237
2014 Expedition(exd)
Owners Guide gf, 1st Printing, June 2013
USA(fus)
Page 244 of 519
![FORD EXPEDITION 2014 3.G Owners Manual •Carry unnecessary weight (approximately 1 mpg [0.4 km/L] is lost for
every 400 pounds [180 kilograms] of weight carried).
•Add particular accessories to your vehicle (e.g.; bug deflectors,
rollba FORD EXPEDITION 2014 3.G Owners Manual •Carry unnecessary weight (approximately 1 mpg [0.4 km/L] is lost for
every 400 pounds [180 kilograms] of weight carried).
•Add particular accessories to your vehicle (e.g.; bug deflectors,
rollba](/manual-img/11/4936/w960_4936-243.png)
•Carry unnecessary weight (approximately 1 mpg [0.4 km/L] is lost for
every 400 pounds [180 kilograms] of weight carried).
•Add particular accessories to your vehicle (e.g.; bug deflectors,
rollbars or light bars, running boards, ski racks).
•Drive with the wheels out of alignment.
DRIVING THROUGH WATER
Note:Driving through deep water may allow water into the transmission
and engine causing internal damage. If you drove through deep water,
check the transmission and engine fluid. If water is found, see your
authorized dealer immediately for fluid replacement.
Do not drive quickly through standing water, especially if the depth is
unknown. Traction or brake capability may be limited and if the ignition
system gets wet, your engine may stall. Water may also enter your
engine’s air intake and severely damage your engine.
If driving through deep or standing
water is unavoidable, proceed very
slowly. Never drive through water
that is higher than the bottom of
the hubs (for trucks) or the bottom
of the wheel rims (for cars).
Once through the water, always try the brakes. Wet brakes do not stop
the vehicle as effectively as dry brakes. Drying can be improved by
moving your vehicle slowly while applying light pressure on the brake
pedal.
Driving Hints243
2014 Expedition(exd)
Owners Guide gf, 1st Printing, June 2013
USA(fus)