2014 FORD EXPEDITION turn signal
[x] Cancel search: turn signalPage 291 of 519
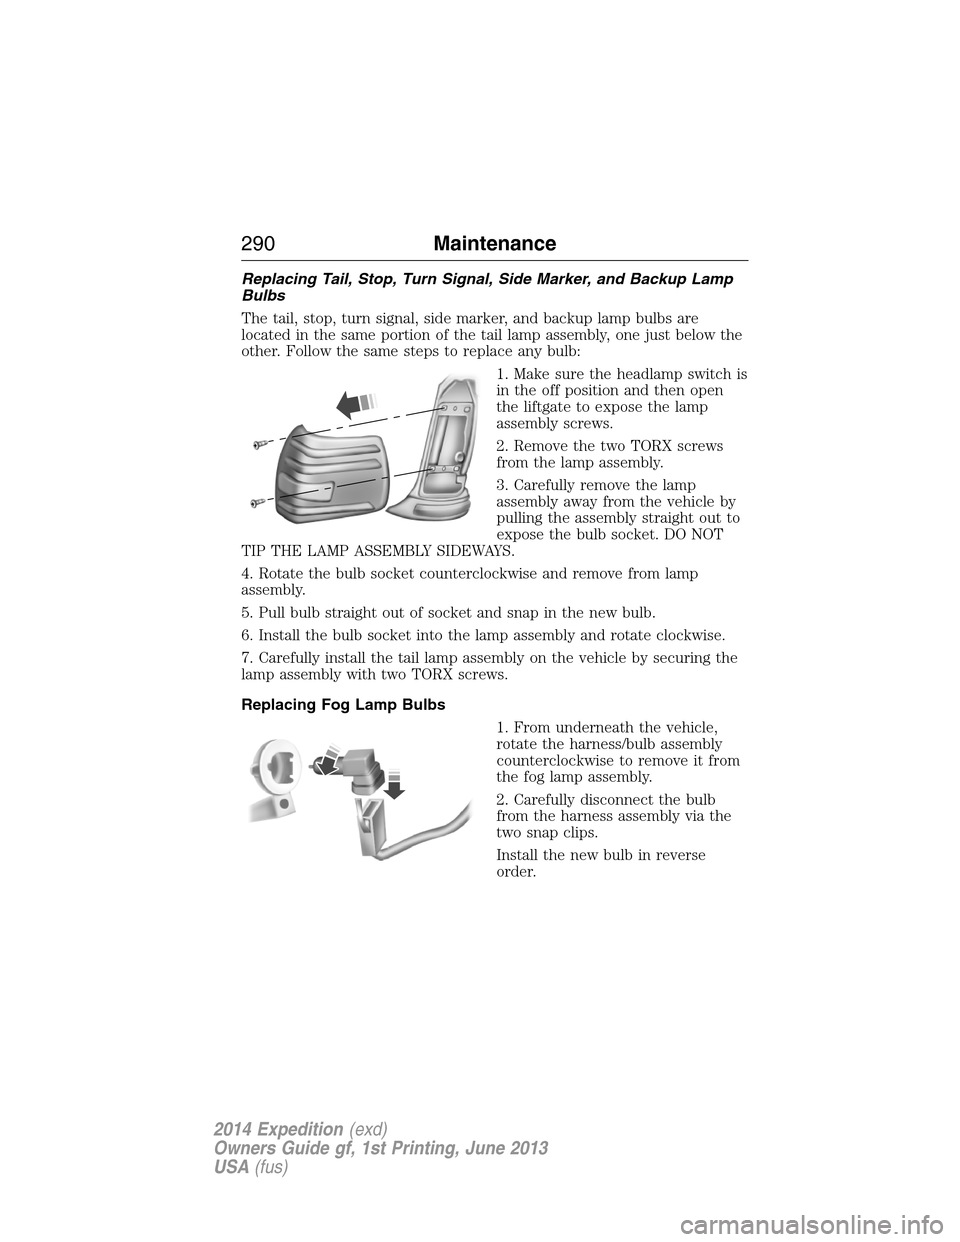
Replacing Tail, Stop, Turn Signal, Side Marker, and Backup Lamp
Bulbs
The tail, stop, turn signal, side marker, and backup lamp bulbs are
located in the same portion of the tail lamp assembly, one just below the
other. Follow the same steps to replace any bulb:
1. Make sure the headlamp switch is
in the off position and then open
the liftgate to expose the lamp
assembly screws.
2. Remove the two TORX screws
from the lamp assembly.
3. Carefully remove the lamp
assembly away from the vehicle by
pulling the assembly straight out to
expose the bulb socket. DO NOT
TIP THE LAMP ASSEMBLY SIDEWAYS.
4. Rotate the bulb socket counterclockwise and remove from lamp
assembly.
5. Pull bulb straight out of socket and snap in the new bulb.
6. Install the bulb socket into the lamp assembly and rotate clockwise.
7. Carefully install the tail lamp assembly on the vehicle by securing the
lamp assembly with two TORX screws.
Replacing Fog Lamp Bulbs
1. From underneath the vehicle,
rotate the harness/bulb assembly
counterclockwise to remove it from
the fog lamp assembly.
2. Carefully disconnect the bulb
from the harness assembly via the
two snap clips.
Install the new bulb in reverse
order.
290Maintenance
2014 Expedition(exd)
Owners Guide gf, 1st Printing, June 2013
USA(fus)
Page 292 of 519
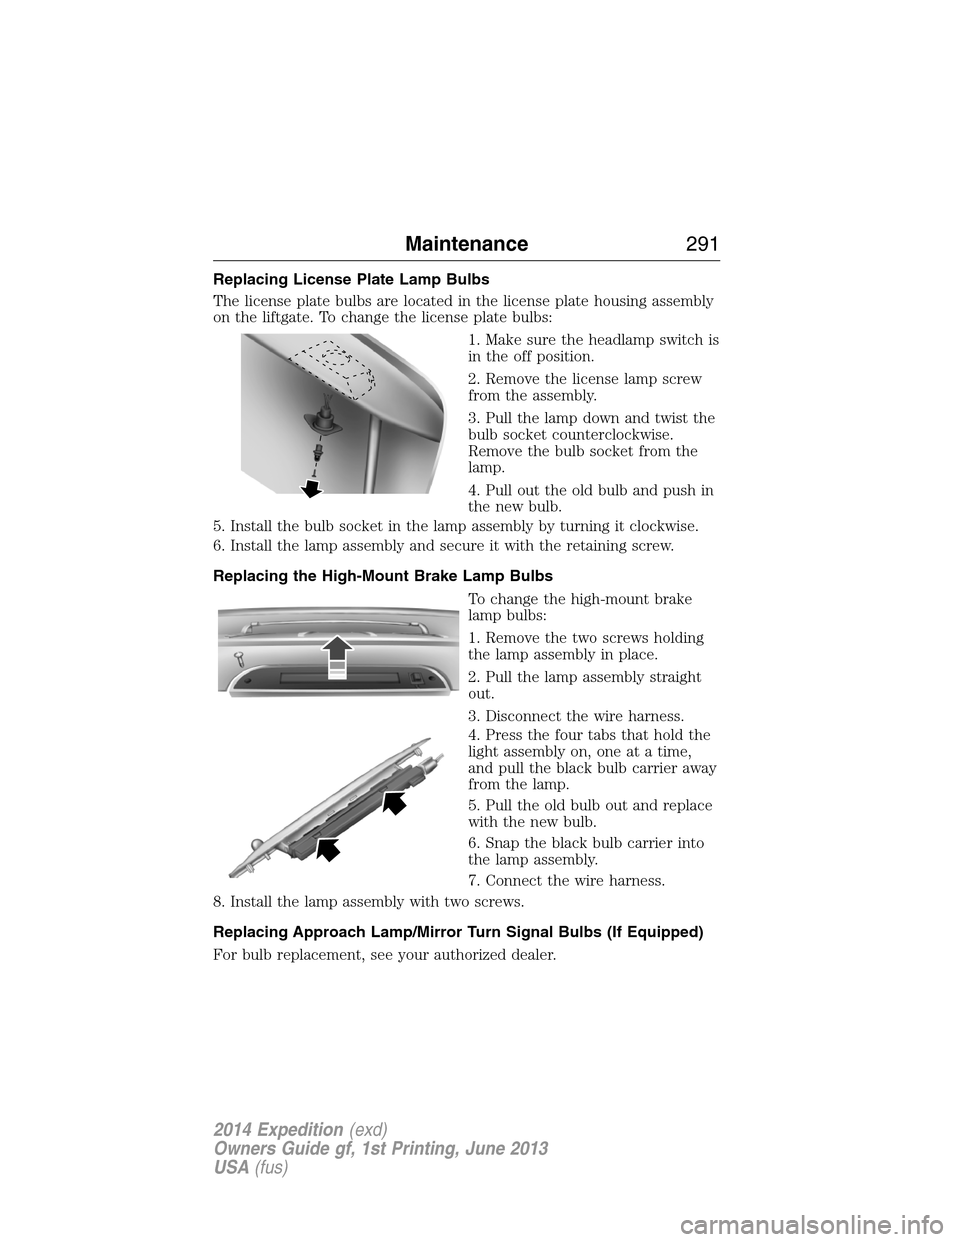
Replacing License Plate Lamp Bulbs
The license plate bulbs are located in the license plate housing assembly
on the liftgate. To change the license plate bulbs:
1. Make sure the headlamp switch is
in the off position.
2. Remove the license lamp screw
from the assembly.
3. Pull the lamp down and twist the
bulb socket counterclockwise.
Remove the bulb socket from the
lamp.
4. Pull out the old bulb and push in
the new bulb.
5. Install the bulb socket in the lamp assembly by turning it clockwise.
6. Install the lamp assembly and secure it with the retaining screw.
Replacing the High-Mount Brake Lamp Bulbs
To change the high-mount brake
lamp bulbs:
1. Remove the two screws holding
the lamp assembly in place.
2. Pull the lamp assembly straight
out.
3. Disconnect the wire harness.
4. Press the four tabs that hold the
light assembly on, one at a time,
and pull the black bulb carrier away
from the lamp.
5. Pull the old bulb out and replace
with the new bulb.
6. Snap the black bulb carrier into
the lamp assembly.
7. Connect the wire harness.
8. Install the lamp assembly with two screws.
Replacing Approach Lamp/Mirror Turn Signal Bulbs (If Equipped)
For bulb replacement, see your authorized dealer.
Maintenance291
2014 Expedition(exd)
Owners Guide gf, 1st Printing, June 2013
USA(fus)
Page 293 of 519

BULB SPECIFICATION CHART
Replacement bulbs are specified in the chart below. Headlamp bulbs
must be marked with an authorized “D.O.T.” for North America to ensure
lamp performance, light brightness and pattern and safe visibility. The
correct bulbs will not damage the lamp assembly or void the lamp
assembly warranty and will provide quality bulb burn time.
Function Number of bulbs Trade number
Headlamps (low and
high-beam)2 H13/9008
Front side marker 2 194
Front park/turn lamps 2 3157 A
Fog lamps 2 9140
Front row map lamps 2 W5W
Front row map/dome
lamps3 578
Rear cargo lamp 1 578
2nd row reading lamp 2 W5W
Turn/tail/brake/side
marker lamps2 3157K
Backup lamp 2 921
Approach/mirror
turn signal lamps
(if equipped)2 906
Mirror approach lamps
– non turn signal
(if equipped)2 *See your dealer
License lamp 2 168
Visor vanity lamp -
Slide on rail system
(SOR)2 A6224PF
High-mount brake lamp 5 W5W
All replacement bulbs are clear in color except where noted.
To replace all instrument panel lights - see your authorized dealer
* To obtain replacement approach lamp assembly bulbs, see your
authorized dealer and reference Ford part no. 2L1Z–13B374–BB for the
passenger side mirror and 2L1Z–13B375–BB for the driver side mirror.
292Maintenance
2014 Expedition(exd)
Owners Guide gf, 1st Printing, June 2013
USA(fus)
Page 360 of 519
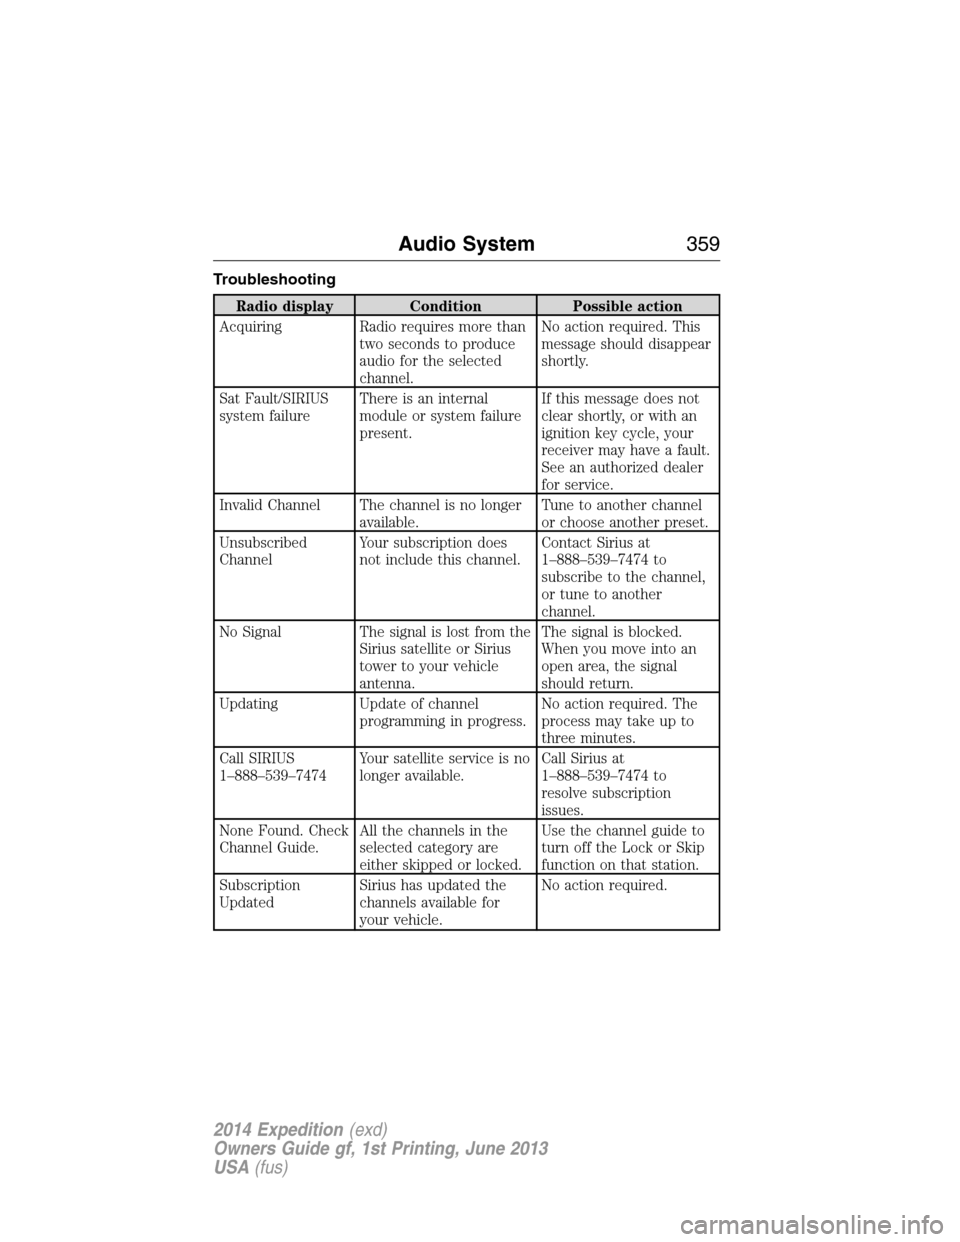
Troubleshooting
Radio display Condition Possible action
Acquiring Radio requires more than
two seconds to produce
audio for the selected
channel.No action required. This
message should disappear
shortly.
Sat Fault/SIRIUS
system failureThere is an internal
module or system failure
present.If this message does not
clear shortly, or with an
ignition key cycle, your
receiver may have a fault.
See an authorized dealer
for service.
Invalid Channel The channel is no longer
available.Tune to another channel
or choose another preset.
Unsubscribed
ChannelYour subscription does
not include this channel.Contact Sirius at
1–888–539–7474 to
subscribe to the channel,
or tune to another
channel.
No Signal The signal is lost from the
Sirius satellite or Sirius
tower to your vehicle
antenna.The signal is blocked.
When you move into an
open area, the signal
should return.
Updating Update of channel
programming in progress.No action required. The
process may take up to
three minutes.
Call SIRIUS
1–888–539–7474Your satellite service is no
longer available.Call Sirius at
1–888–539–7474 to
resolve subscription
issues.
None Found. Check
Channel Guide.All the channels in the
selected category are
either skipped or locked.Use the channel guide to
turn off the Lock or Skip
function on that station.
Subscription
UpdatedSirius has updated the
channels available for
your vehicle.No action required.
Audio System359
2014 Expedition(exd)
Owners Guide gf, 1st Printing, June 2013
USA(fus)
Page 365 of 519

Wired Headphones
You can use any standard stereo headphones by plugging them into the
1/8–inch (3.5 millimeter) headphone jack on each of the headrest DVD
systems. Remove and save the protective plastic cover to access the
jacks. Remember to replace the cover when the jacks are not in use.
A/V Input
You can connect an external audio/video device that uses common RCA
interface cables to the Ford DVD system, such as a video game device or
VCR. Connect the device RCA cables to the AV RCA INPUT jacks
according to color: yellow for video, red for right audio and white for left
audio. The signal from the external audio/video source overrides other
video sources for that monitor.
Wireless FM Transmitter
Your device has an internal FM transmitter. This allows you to listen to
the DVD player audio signal by tuning your vehicle FM radio to a radio
frequency that you select, then accessing the SOUND-AROUND feature
by using the remote control. SOUND-AROUND allows the user to choose
from a number of pre-programmed frequencies to play back the rear-seat
entertainment system audio over the radio. When you engage
SOUND-AROUND, as long as the DVD player is active, it adversely
affects the FM radio reception of other stations, especially neighboring
stations nearest to whichever station is in use for the DVD player.
Performance of SOUND-AROUND varies based on geographic location.
You may need to change the SOUND-AROUND frequency periodically
when travelling long distances. This helps maintain the best performance
when listening to DVD system content over the radio. Audio heard
through wireless headphones remains unaffected by SOUND-AROUND.
There may also be a reduction in AM radio performance as well. AM and
FM radio performance can be expected to return to normal when the
DVD system is turned off.
How to use the FM Transmitter
1. Switch on the system and place a disc in Monitor A.
2. Point the remote control at the monitor, and then press DVD A.
3. PressSOUND AROUND ON/OFFto turn FM transmission off and
on.
4. Select a radio frequency (88.3, 88.7, 89.1, 89.5, 89.9, and 90.3MHz)
by pressingSOUND AROUND SELECT.
5. Select a frequency, and then tune your radio to the corresponding
frequency. Try each station frequency until you achieve a clear audio
signal.
364Audio System
2014 Expedition(exd)
Owners Guide gf, 1st Printing, June 2013
USA(fus)
Page 378 of 519
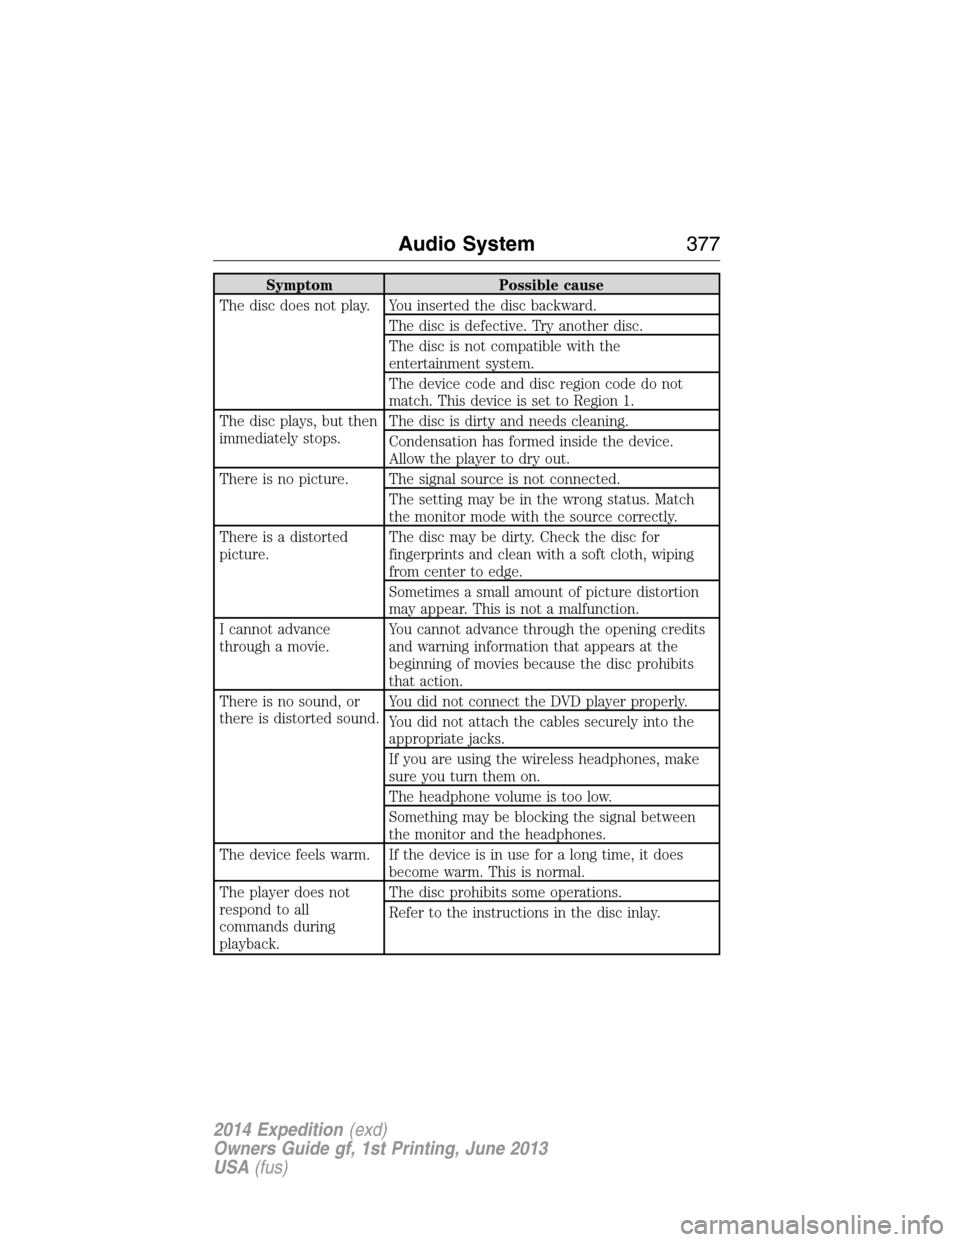
Symptom Possible cause
The disc does not play. You inserted the disc backward.
The disc is defective. Try another disc.
The disc is not compatible with the
entertainment system.
The device code and disc region code do not
match. This device is set to Region 1.
The disc plays, but then
immediately stops.The disc is dirty and needs cleaning.
Condensation has formed inside the device.
Allow the player to dry out.
There is no picture. The signal source is not connected.
The setting may be in the wrong status. Match
the monitor mode with the source correctly.
There is a distorted
picture.The disc may be dirty. Check the disc for
fingerprints and clean with a soft cloth, wiping
from center to edge.
Sometimes a small amount of picture distortion
may appear. This is not a malfunction.
I cannot advance
through a movie.You cannot advance through the opening credits
and warning information that appears at the
beginning of movies because the disc prohibits
that action.
There is no sound, or
there is distorted sound.You did not connect the DVD player properly.
You did not attach the cables securely into the
appropriate jacks.
If you are using the wireless headphones, make
sure you turn them on.
The headphone volume is too low.
Something may be blocking the signal between
the monitor and the headphones.
The device feels warm. If the device is in use for a long time, it does
become warm. This is normal.
The player does not
respond to all
commands during
playback.The disc prohibits some operations.
Refer to the instructions in the disc inlay.
Audio System377
2014 Expedition(exd)
Owners Guide gf, 1st Printing, June 2013
USA(fus)
Page 396 of 519
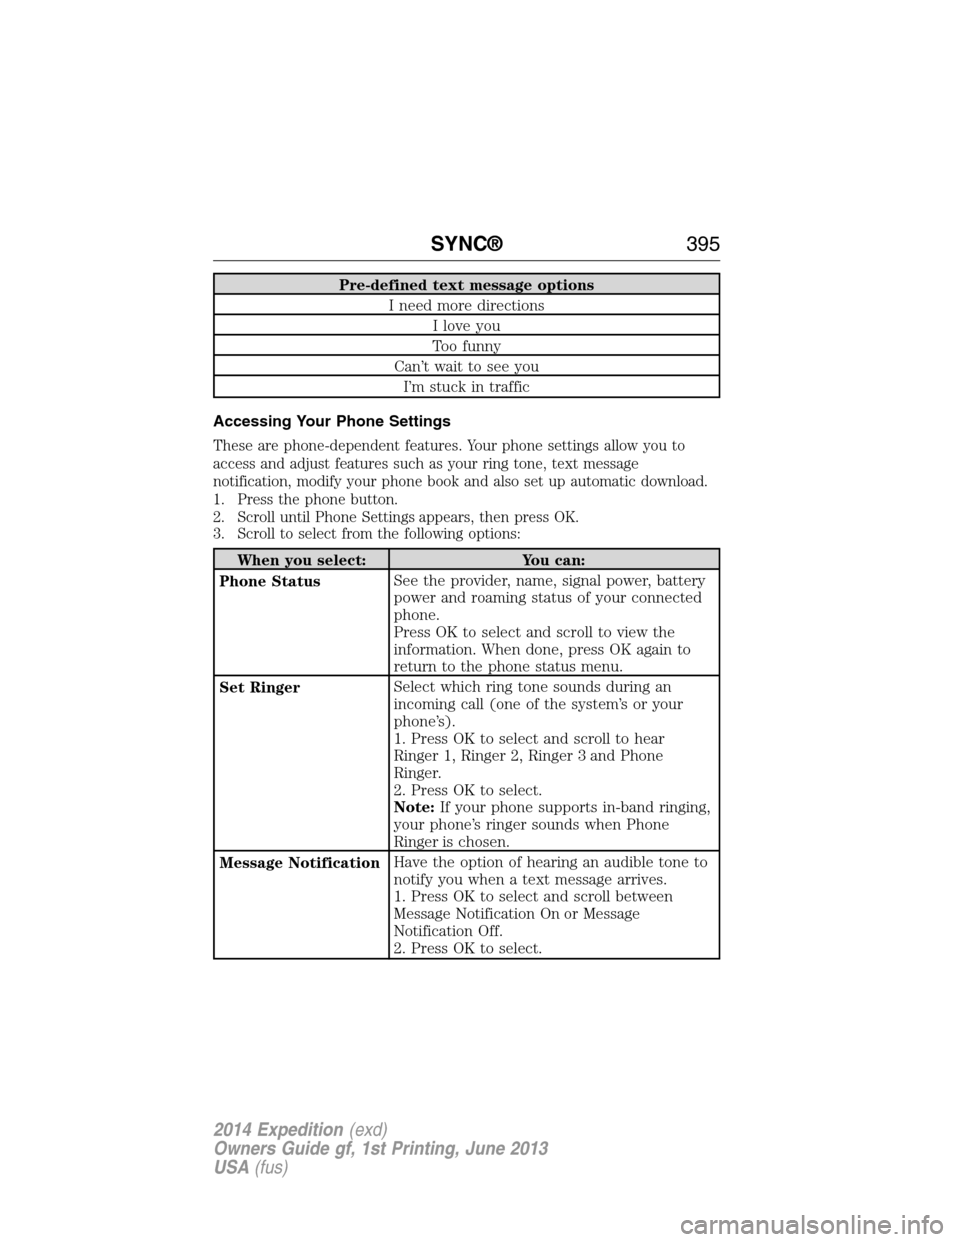
Pre-defined text message options
I need more directions
I love you
Too funny
Can’t wait to see you
I’m stuck in traffic
Accessing Your Phone Settings
These are phone-dependent features. Your phone settings allow you to
access and adjust features such as your ring tone, text message
notification, modify your phone book and also set up automatic download.
1. Press the phone button.
2. Scroll until Phone Settings appears, then press OK.
3. Scroll to select from the following options:
When you select: You can:
Phone StatusSee the provider, name, signal power, battery
power and roaming status of your connected
phone.
Press OK to select and scroll to view the
information. When done, press OK again to
return to the phone status menu.
Set RingerSelect which ring tone sounds during an
incoming call (one of the system’s or your
phone’s).
1. Press OK to select and scroll to hear
Ringer 1, Ringer 2, Ringer 3 and Phone
Ringer.
2. Press OK to select.
Note:If your phone supports in-band ringing,
your phone’s ringer sounds when Phone
Ringer is chosen.
Message NotificationHave the option of hearing an audible tone to
notify you when a text message arrives.
1. Press OK to select and scroll between
Message Notification On or Message
Notification Off.
2. Press OK to select.
SYNC®395
2014 Expedition(exd)
Owners Guide gf, 1st Printing, June 2013
USA(fus)
Page 424 of 519
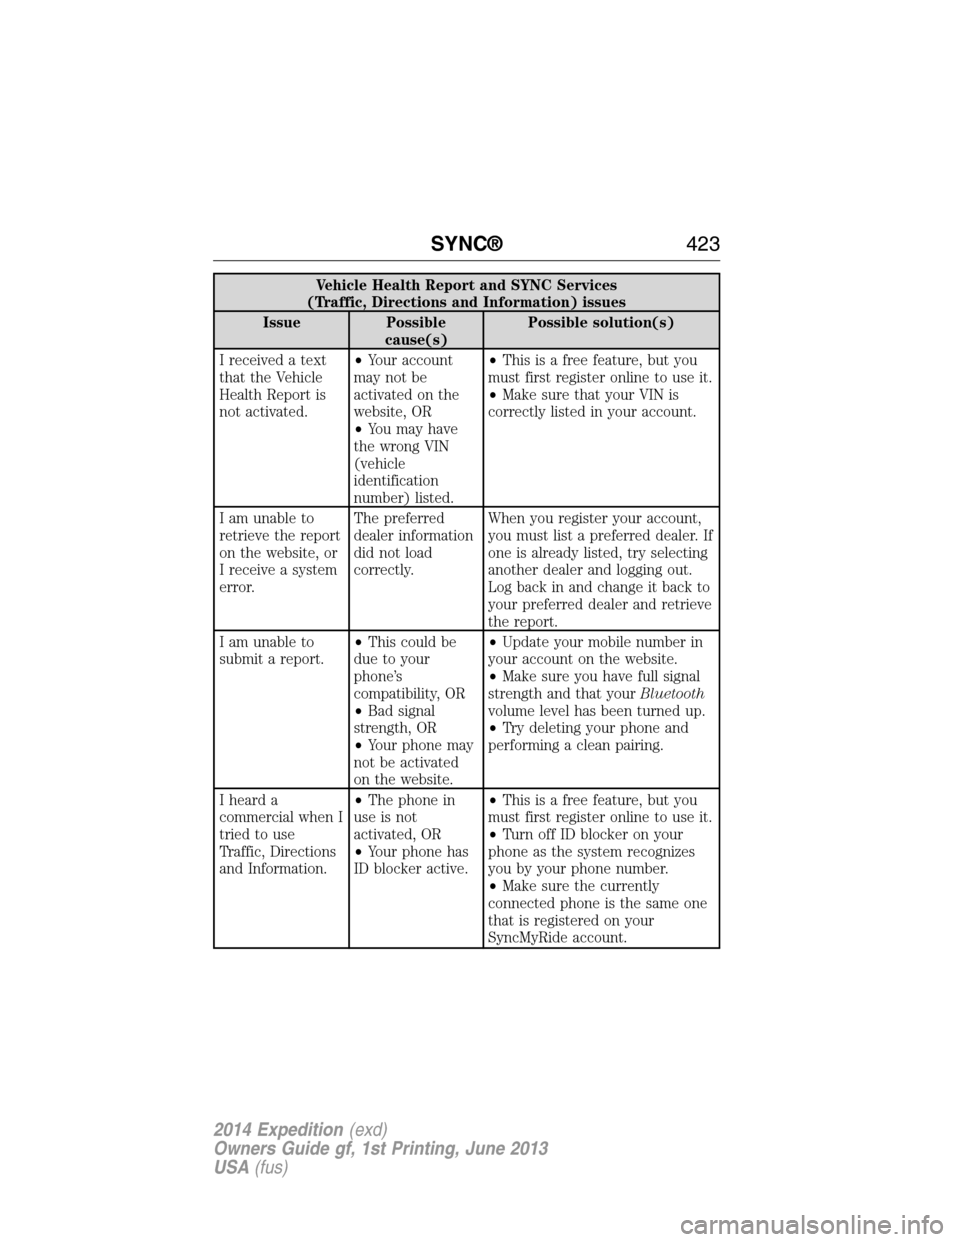
Vehicle Health Report and SYNC Services
(Traffic, Directions and Information) issues
Issue Possible
cause(s)Possible solution(s)
I received a text
that the Vehicle
Health Report is
not activated.•Your account
may not be
activated on the
website, OR
•You may have
the wrong VIN
(vehicle
identification
number) listed.•This is a free feature, but you
must first register online to use it.
•Make sure that your VIN is
correctly listed in your account.
I am unable to
retrieve the report
on the website, or
I receive a system
error.The preferred
dealer information
did not load
correctly.When you register your account,
you must list a preferred dealer. If
one is already listed, try selecting
another dealer and logging out.
Log back in and change it back to
your preferred dealer and retrieve
the report.
I am unable to
submit a report.•This could be
due to your
phone’s
compatibility, OR
•Bad signal
strength, OR
•Your phone may
not be activated
on the website.•Update your mobile number in
your account on the website.
•Make sure you have full signal
strength and that yourBluetooth
volume level has been turned up.
•Try deleting your phone and
performing a clean pairing.
I heard a
commercial when I
tried to use
Traffic, Directions
and Information.•The phone in
use is not
activated, OR
•Your phone has
ID blocker active.•This is a free feature, but you
must first register online to use it.
•Turn off ID blocker on your
phone as the system recognizes
you by your phone number.
•Make sure the currently
connected phone is the same one
that is registered on your
SyncMyRide account.
SYNC®423
2014 Expedition(exd)
Owners Guide gf, 1st Printing, June 2013
USA(fus)