2014 FORD EXPEDITION change time
[x] Cancel search: change timePage 279 of 519

AUTOMATIC TRANSMISSION FLUID CHECK
Note:Transmission fluid should be checked by an authorized dealer.
If required, fluid should be added by an authorized dealer.
The automatic transmission does not have a transmission fluid dipstick.
Refer to yourscheduled maintenance informationfor scheduled
intervals for fluid checks and changes. Your transmission does not
consume fluid. However, the fluid level should be checked if the
transmission is not working properly, (i.e., if the transmission slips or
shifts slowly) or if you notice some sign of fluid leakage.
Do not use supplemental transmission fluid additives, treatments or
cleaning agents. The use of these materials may affect transmission
operation and result in damage to internal transmission components.
BRAKE FLUID CHECK
Fluid levels between the MIN and MAX lines are within the normal
operating range; there is no need to add fluid. If the fluid levels are
outside of the normal operating range, the performance of the system
could be compromised; seek service from your authorized dealer
immediately.
POWER STEERING FLUID CHECK
Check the power steering fluid. Refer toscheduled maintenance
information.
1. Start the engine and let it run until it reaches normal operating
temperature (the engine coolant temperature gauge indicator will be
near the center of the normal area between H and C).
2. While the engine idles, turn the steering wheel left and right several
times.
3. Turn the engine off.
4. Check the fluid level in the reservoir. It should be between the MIN
and MAX lines. Do not add fluid if the level is in this range.
5. If the fluid is low, add fluid in small amounts, continuously checking
the level until it reaches the range between the MIN and MAX lines.
Be sure to put the cap back on the reservoir. Refer to theCapacities
and Specificationschapter for the proper fluid type.
278Maintenance
2014 Expedition(exd)
Owners Guide gf, 1st Printing, June 2013
USA(fus)
Page 288 of 519
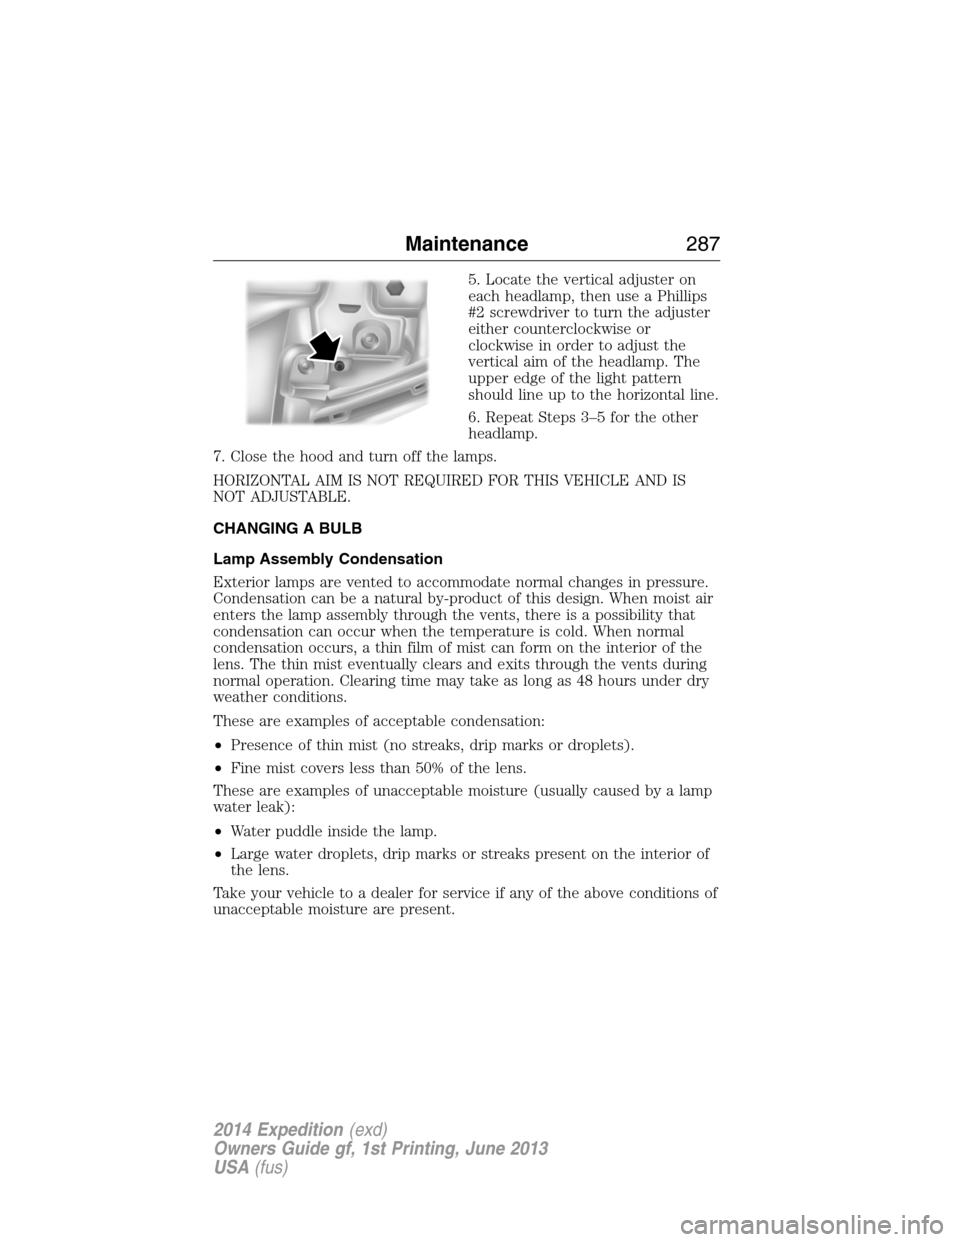
5. Locate the vertical adjuster on
each headlamp, then use a Phillips
#2 screwdriver to turn the adjuster
either counterclockwise or
clockwise in order to adjust the
vertical aim of the headlamp. The
upper edge of the light pattern
should line up to the horizontal line.
6. Repeat Steps 3–5 for the other
headlamp.
7. Close the hood and turn off the lamps.
HORIZONTAL AIM IS NOT REQUIRED FOR THIS VEHICLE AND IS
NOT ADJUSTABLE.
CHANGING A BULB
Lamp Assembly Condensation
Exterior lamps are vented to accommodate normal changes in pressure.
Condensation can be a natural by-product of this design. When moist air
enters the lamp assembly through the vents, there is a possibility that
condensation can occur when the temperature is cold. When normal
condensation occurs, a thin film of mist can form on the interior of the
lens. The thin mist eventually clears and exits through the vents during
normal operation. Clearing time may take as long as 48 hours under dry
weather conditions.
These are examples of acceptable condensation:
•Presence of thin mist (no streaks, drip marks or droplets).
•Fine mist covers less than 50% of the lens.
These are examples of unacceptable moisture (usually caused by a lamp
water leak):
•Water puddle inside the lamp.
•Large water droplets, drip marks or streaks present on the interior of
the lens.
Take your vehicle to a dealer for service if any of the above conditions of
unacceptable moisture are present.
Maintenance287
2014 Expedition(exd)
Owners Guide gf, 1st Printing, June 2013
USA(fus)
Page 292 of 519
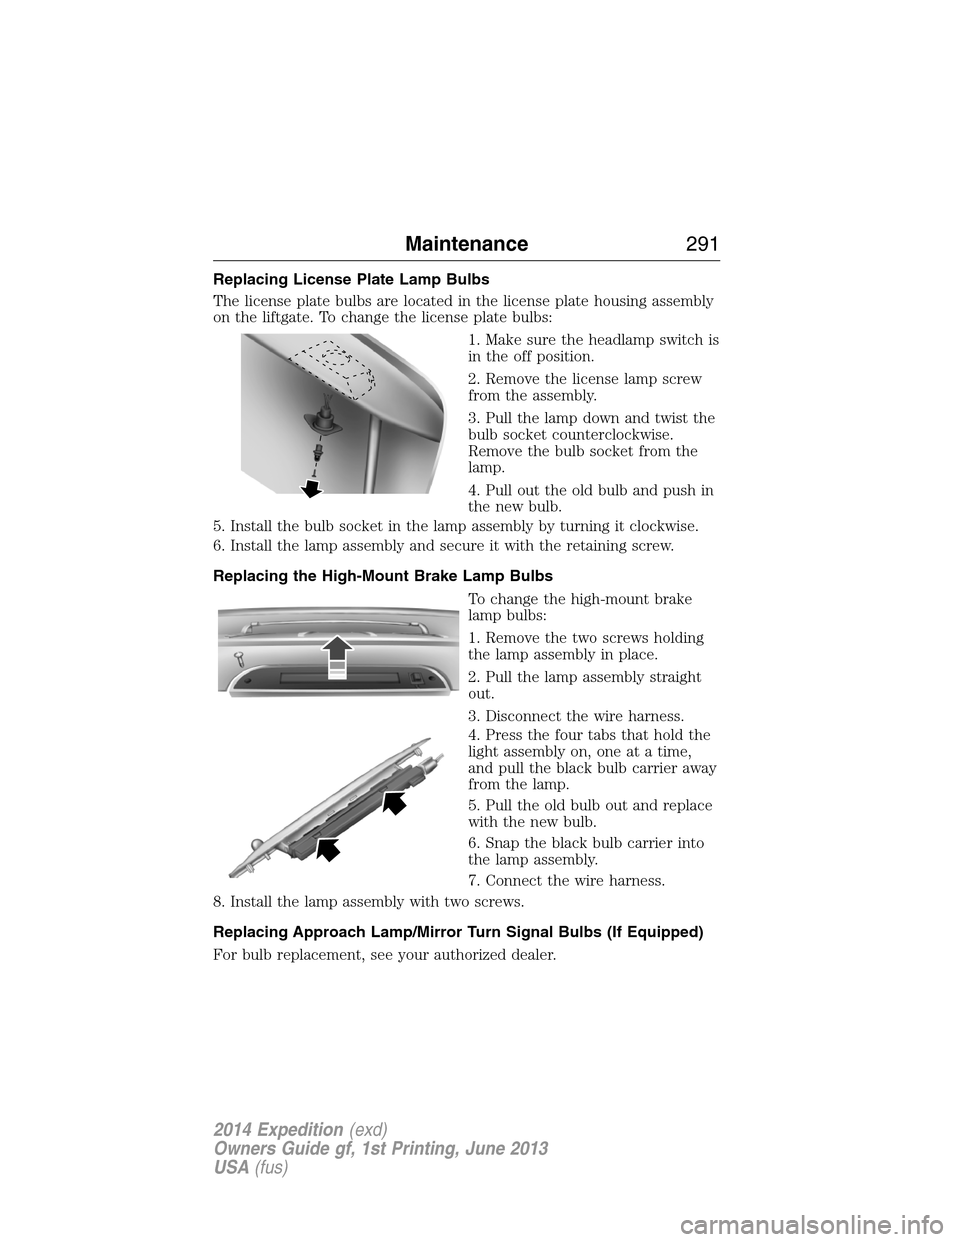
Replacing License Plate Lamp Bulbs
The license plate bulbs are located in the license plate housing assembly
on the liftgate. To change the license plate bulbs:
1. Make sure the headlamp switch is
in the off position.
2. Remove the license lamp screw
from the assembly.
3. Pull the lamp down and twist the
bulb socket counterclockwise.
Remove the bulb socket from the
lamp.
4. Pull out the old bulb and push in
the new bulb.
5. Install the bulb socket in the lamp assembly by turning it clockwise.
6. Install the lamp assembly and secure it with the retaining screw.
Replacing the High-Mount Brake Lamp Bulbs
To change the high-mount brake
lamp bulbs:
1. Remove the two screws holding
the lamp assembly in place.
2. Pull the lamp assembly straight
out.
3. Disconnect the wire harness.
4. Press the four tabs that hold the
light assembly on, one at a time,
and pull the black bulb carrier away
from the lamp.
5. Pull the old bulb out and replace
with the new bulb.
6. Snap the black bulb carrier into
the lamp assembly.
7. Connect the wire harness.
8. Install the lamp assembly with two screws.
Replacing Approach Lamp/Mirror Turn Signal Bulbs (If Equipped)
For bulb replacement, see your authorized dealer.
Maintenance291
2014 Expedition(exd)
Owners Guide gf, 1st Printing, June 2013
USA(fus)
Page 311 of 519
E.15:Indicates the wheel or rim diameter in inches. If you change your
wheel size, you will have to purchase new tires to match the new wheel
diameter.
F.95:Indicates the tire’s load index. It is an index that relates to how
much weight a tire can carry. You may find this information in your
owner’s manual. If not, contact a local tire dealer.
Note:You may not find this information on all tires because it is not
required by federal law.
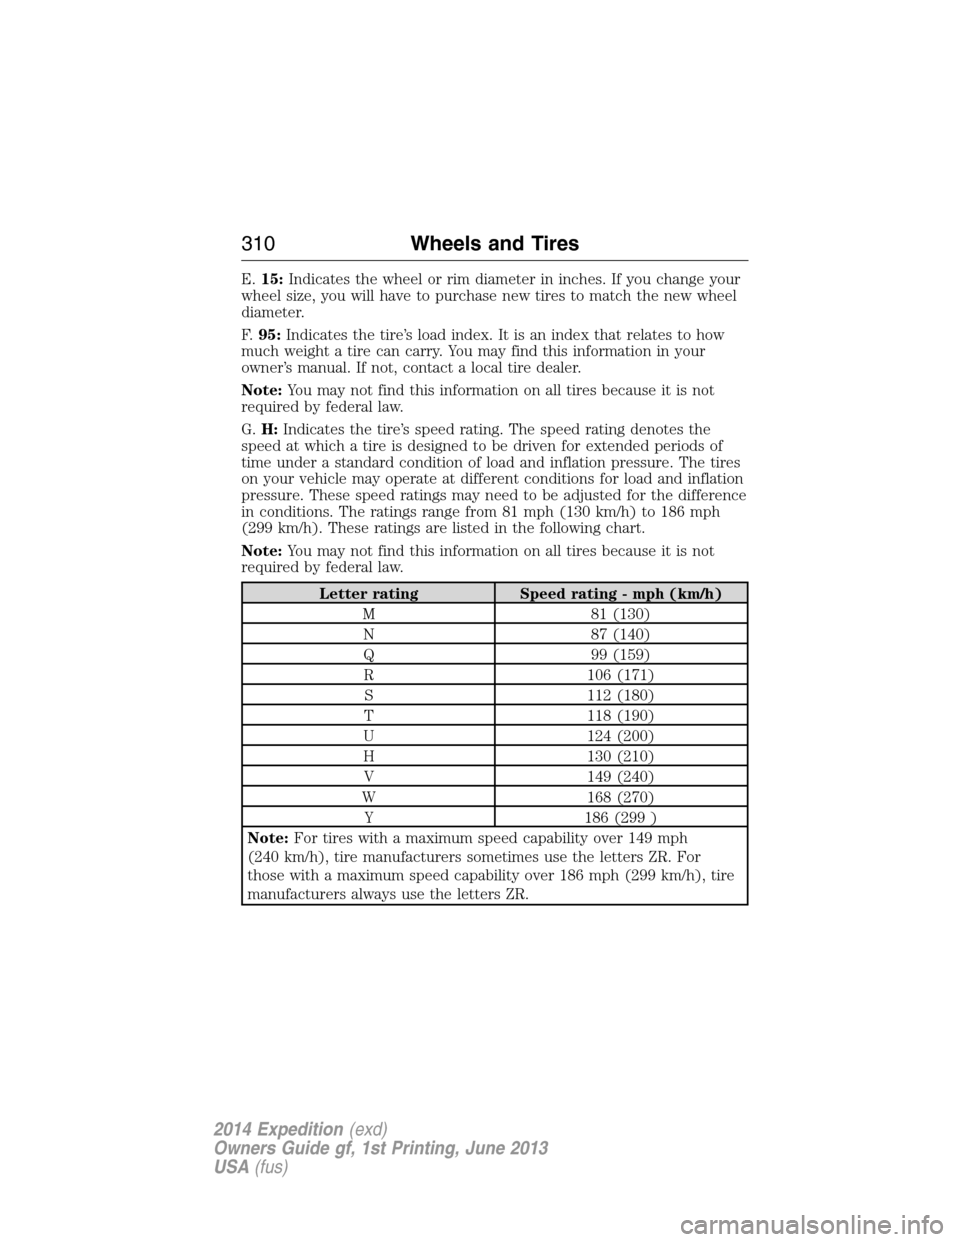
G.H:Indicates the tire’s speed rating. The speed rating denotes the
speed at which a tire is designed to be driven for extended periods of
time under a standard condition of load and inflation pressure. The tires
on your vehicle may operate at different conditions for load and inflation
pressure. These speed ratings may need to be adjusted for the difference
in conditions. The ratings range from 81 mph (130 km/h) to 186 mph
(299 km/h). These ratings are listed in the following chart.
Note:You may not find this information on all tires because it is not
required by federal law.
Letter rating Speed rating - mph (km/h)
M 81 (130)
N 87 (140)
Q 99 (159)
R 106 (171)
S 112 (180)
T 118 (190)
U 124 (200)
H 130 (210)
V 149 (240)
W 168 (270)
Y 186 (299 )
Note:For tires with a maximum speed capability over 149 mph
(240 km/h), tire manufacturers sometimes use the letters ZR. For
those with a maximum speed capability over 186 mph (299 km/h), tire
manufacturers always use the letters ZR.
310Wheels and Tires
2014 Expedition(exd)
Owners Guide gf, 1st Printing, June 2013
USA(fus)
Page 341 of 519

Item Capacity Ford part nameFord part number /
Ford specification
3We have designed your engine to use Motorcraft motor oils or equivalent oil brands that meet our
specifications. Motor oils of the recommended viscosity grade that meet API SN requirements and display
the API Certification Mark for gasoline engines are also acceptable.4Do not use API S category oils labeled as SN, SM, SL or lower category unless the label also displays the
API certification mark. These oils do not meet all the requirements of your vehicles engine and emission
system.5Do not use supplemental engine oil additives in your engine. They are unnecessary and could lead to
engine damage that is not covered by your Ford warranty.6Automatic transmissions that require MERCON™ LV should only use MERCON LV fluid. Refer to
scheduled maintenance informationto determine the correct service interval. Use of any fluid other than
the recommended fluid may cause transmission damage.7Indicates only approximate dry-fill capacity. Some applications may vary based on cooler size and if
equipped with an in-tank cooler.8Your vehicle’s rear axle is filled with a synthetic rear axle lubricant and is considered lubricated for life.
These lubricants are not to be checked or changed unless a leak is suspected, service is required or the axle
has been submerged in water. The axle lubricant should be changed any time the axle has been submerged
in water.9Add 4 oz. (118 ml) of Additive Friction Modifier XL-3 or equivalent for complete refill of Ford limited slip
rear axles.10Warning:The air conditioning refrigerant system contains refrigerant R–134a under high pressure.
Opening and air conditioning refrigerant system can cause personal injury. Only qualified personnel should
service the air conditioning refrigerant system.
340Capacities and Specifications
2014 Expedition(exd)
Owners Guide gf, 1st Printing, June 2013
USA(fus)
Page 349 of 519
Interest Free Financing Options Available
Take advantage of our interest free installment payment plan. Just a 10%
down payment will provide you with an affordable, no interest, no fee
payment program.
Complete the information below and mail to:
Ford ESP
PO Box 8072
Royal Oak Michigan 48068-0039
To learn more, call our Ford ESP specialists at 800-367-3377. Don’t
forget to ask about our interest free payment program, allowing you all
the security and benefits Ford ESP has to offer while paying over time.
You are pre-approved with no credit checks, no hassles!
SERVICE PLANS (CANADA ONLY)
You can get more protection for your vehicle by purchasing a Ford
Extended Service Plan. Ford Extended Service Plan is the only service
contract backed by Ford Motor Company of Canada, Limited. Depending
on the plan you purchase, Ford Extended Service Plan provides benefits
such as:
•Rental reimbursement
•Coverage for certain maintenance and wear items
•Protection against repair costs after your New Vehicle Limited
Warranty Coverage expires
•Roadside Assistance benefits
There are several Ford Extended Service Plans available in various time,
distance and deductible combinations. Each plan is tailored to fit your
own driving needs, including reimbursement for towing and rental.
When you purchase Ford Extended Service Plan, you receive added
peace-of-mind protection throughout Canada and the United States,
provided by a network of participating Ford Motor Company dealers. The
Lincoln Maintenance Protection Plan is honored at authorized Lincoln
dealers.
Note:Repairs performed outside of Canada and the United States are
not eligible for Ford Extended Service Plan coverage.
This information is subject to change.
For more information, visit your local Ford of Canada dealer or
www.ford.ca to find the Ford Extended Service Plan that is right for you.
348Ford Extended Service Plan
2014 Expedition(exd)
Owners Guide gf, 1st Printing, June 2013
USA(fus)
Page 359 of 519

Sirius Satellite Radio Service
Note:Sirius reserves the unrestricted right to change, rearrange, add or
delete programming including canceling, moving or adding particular
channels, and its prices, at any time, with or without notice to you. Ford
Motor Company shall not be responsible for any such programming
changes.
Sirius satellite radio is a
subscription-based satellite radio
service that broadcasts a variety of
music, sports, news, weather, traffic
and entertainment programming.
Your factory-installed Sirius satellite
radio system includes hardware and
a limited subscription term which begins on the date of sale or lease of
your vehicle. See an authorized dealer for availability.
For more information on extended subscription terms (a service fee is
required), the online media player and a complete list of Sirius satellite
radio channels, and other features, please visit www.siriusxm.com in the
United States, www.sirius.ca in Canada, or call Sirius at 1–888–539–7474.
Satellite Radio Electronic Serial Number (ESN)
You need your ESN to activate, modify or track your satellite radio
account. When in satellite radio mode, you can view this number by
pressingSIRIUSand memory preset 1 at the same time. To access your
ESN, press the bottom left corner of the touchscreen, thenSIRIUS>
Options.
358Audio System
2014 Expedition(exd)
Owners Guide gf, 1st Printing, June 2013
USA(fus)
Page 368 of 519
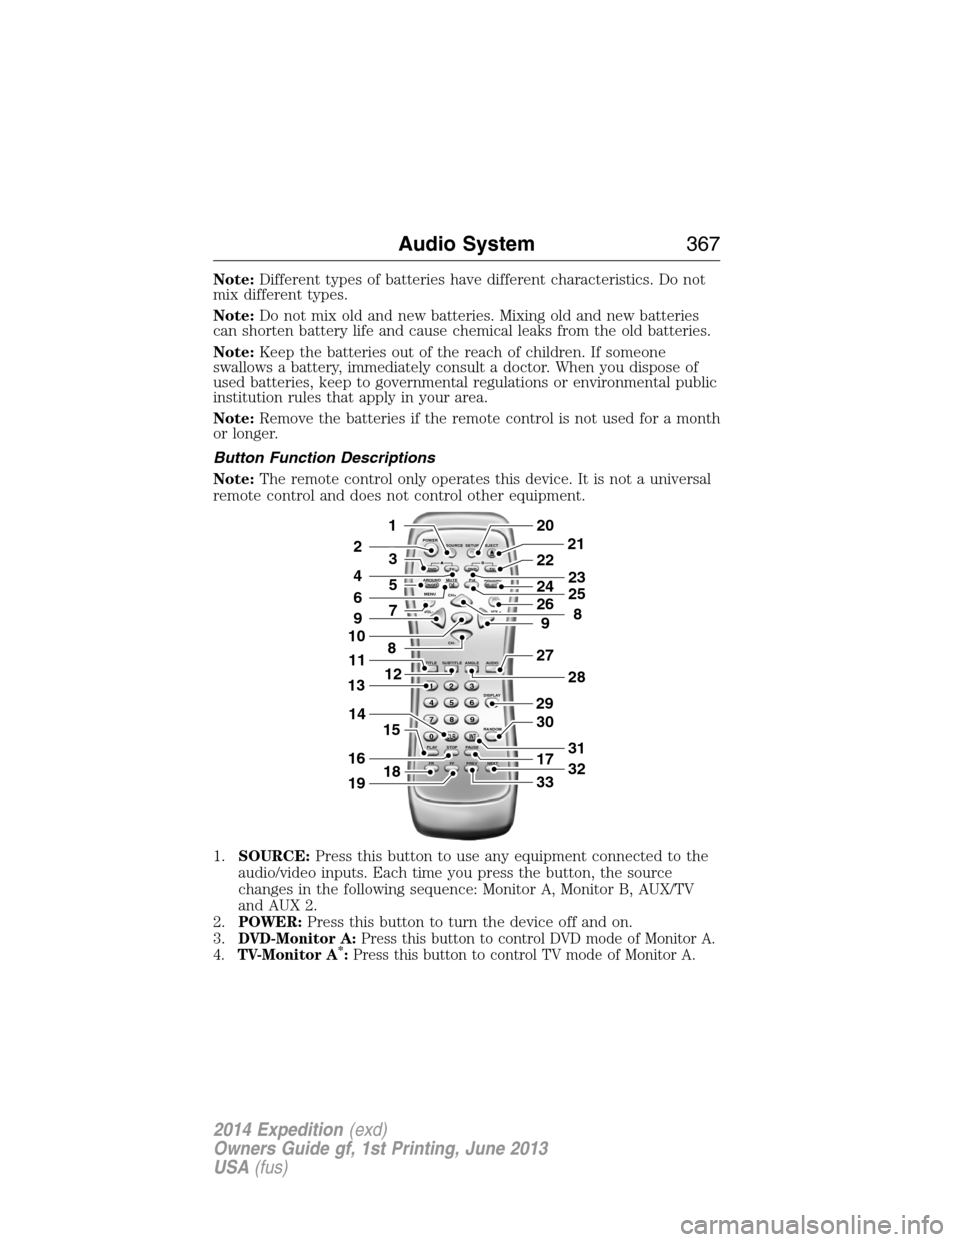
Note:Different types of batteries have different characteristics. Do not
mix different types.
Note:Do not mix old and new batteries. Mixing old and new batteries
can shorten battery life and cause chemical leaks from the old batteries.
Note:Keep the batteries out of the reach of children. If someone
swallows a battery, immediately consult a doctor. When you dispose of
used batteries, keep to governmental regulations or environmental public
institution rules that apply in your area.
Note:Remove the batteries if the remote control is not used for a month
or longer.
Button Function Descriptions
Note:The remote control only operates this device. It is not a universal
remote control and does not control other equipment.
1.SOURCE:Press this button to use any equipment connected to the
audio/video inputs. Each time you press the button, the source
changes in the following sequence: Monitor A, Monitor B, AUX/TV
and AUX 2.
2.POWER:Press this button to turn the device off and on.
3.
DVD-Monitor A:Press this button to control DVD mode of Monitor A.
4.TV-Monitor A*:Press this button to control TV mode of Monitor A.
POWER
SOURCE
A
SOUND
AROUNDSOUND
AROUND MUTE
MENU REPEAT
CH+
CH-
TITLESUBTITLE ANGLE AUDIO
DISPLAY
RANDOM
PLAY
123
6 5 4
789
0
CLR INT
FR FF PREV NEXTSTOP PAUSE VOL- VOL+PIX A
D
VD
ON/OFFSELECT
TV DVD TVSETUP EJECTB
5
9
29
27
30
17
33
28
32
31
201
2
7
8
12
4
3
15
21
22
24
2625
8
23
6
9
10
16
13
18
11
14
19
Audio System367
2014 Expedition(exd)
Owners Guide gf, 1st Printing, June 2013
USA(fus)