2014 FIAT 500X suspension
[x] Cancel search: suspensionPage 162 of 476

•Understeer - when the vehicle is turning less than
appropriate for the steering wheel position.
The “ESC Activation/Malfunction Indicator Light” lo-
cated in the instrument cluster will start to flash as soon
as the ESC system becomes active. The “ESC
Activation/Malfunction Indicator Light” also flashes
when the TCS is active. If the “ESC Activation/
Malfunction Indicator Light” begins to flash during
acceleration, ease up on the accelerator and apply as
little throttle as possible. Be sure to adapt your speed
and driving to the prevailing road conditions.
NOTE: The ESC Off switch is located below the radio
screen.
WARNING!
When in “Partial Off” mode, the TCS functionality
of ESC, (except for the limited slip feature de-
scribed in the TCS section), has been disabled and
the “ESC Off Indicator Light” will be illuminated.
When in “Partial Off” mode, the engine power
reduction feature of TCS is disabled, and the en-
hanced vehicle stability offered by the ESC system
is reduced.
WARNING!
• Electronic Stability Control (ESC) cannot prevent
the natural laws of physics from acting on the
vehicle, nor can it increase the traction afforded
by prevailing road conditions. ESC cannot pre-
vent accidents, including those resulting from
excessive speed in turns, driving on very slippery
surfaces, or hydroplaning. ESC also cannot pre-
vent accidents resulting from loss of vehicle con-
trol due to inappropriate driver input for the
conditions. Only a safe, attentive, and skillful
driver can prevent accidents. The capabilities of
an ESC equipped vehicle must never be exploited
in a reckless or dangerous manner which could
jeopardize the user ’s safety or the safety of others.
• Vehicle modifications, or failure to properly
maintain your vehicle, may change the handling
characteristics of your vehicle, and may nega-
tively affect the performance of the ESC system.
Changes to the steering system, suspension, brak-
ing system, tire type and size or wheel size may
adversely affect ESC performance. Improperly
(Continued)
160 SAFETY
Page 270 of 476
WARNING!
•Do not affix objects/plugs to the end of the filler
neck other than is provided on the car.
• The use of objects/plugs do not comply with the
vehicle and may cause pressure increases inside
the tank, creating dangerous conditions.
• Do not approach the neck of the tank with open
flames or lit cigarettes its an extreme fire hazard.
Also, avoid close contact with the filler pipe with
your face, do not inhale harmful vapors.
• Do not use your mobile phone in the vicinity of
the pump fuel nozzle, it can be a possible risk of
fire.
VEHICLE LOADING
Certification Label
As required by National Highway Traffic Safety Admin-
istration regulations, your vehicle has a certification
label affixed to the driver’s side door or pillar.
This label contains the month and year of manufacture,
Gross Vehicle Weight Rating (GVWR), Gross Axle
Weight Rating (GAWR) front and rear, and Vehicle
Identification Number (VIN). A Month-Day-Hour (MDH) number is included on this label and indicates
the Month, Day and Hour of manufacture. The bar code
that appears on the bottom of the label is your VIN.
Gross Vehicle Weight Rating (GVWR)
The GVWR is the total permissible weight of your
vehicle including driver, passengers, vehicle, options
and cargo. The label also specifies maximum capacities
of front and rear axle systems (GAWR). Total load must
be limited so GVWR and front and rear GAWR are not
exceeded.
Payload
The payload of a vehicle is defined as the allowable
load weight a truck can carry, including the weight of
the driver, all passengers, options and cargo.
Gross Axle Weight Rating (GAWR)
The GAWR is the maximum permissible load on the
front and rear axles. The load must be distributed in the
cargo area so that the GAWR of each axle is not
exceeded.
Each axle GAWR is determined by the components in
the system with the lowest load carrying capacity (axle,
springs, tires or wheels). Heavier axles or suspension
268 STARTING AND OPERATING
Page 280 of 476
Consider the following items when computing the
weight on the rear axle of the vehicle:
•The tongue weight of the trailer.
• The weight of any other type of cargo or equipment
put in or on your vehicle.
• The weight of the driver and all passengers.
NOTE: Remember that everything put into or on the
trailer adds to the load on your vehicle. Also, additional
factory-installed options or dealer-installed options
must be considered as part of the total load on your
vehicle. Refer to the “Tire And Loading Information”
placard for the maximum combined weight of occu-
pants and cargo for your vehicle.
Towing Requirements
To promote proper break-in of your new vehicle drive-
train components, the following guidelines are recom-
mended:
WARNING!
Improper towing can lead to a collision. Follow
these guidelines to make your trailer towing as safe
as possible:
• Make certain that the load is secured in the trailer
and that it will not shift during travel. When
trailering cargo that is not fully secured, dynamic
load shifts can occur that may be difficult for the
driver to control. You could lose control of your
vehicle and have a collision.
• When hauling cargo, or towing a trailer, do not
overload your vehicle or trailer. Overloading can
cause a loss of control, poor performance, or
damage to brakes, axle, engine, transmission,
steering, suspension, chassis structure, or tires.
• Safety chains must always be used between your
vehicle and trailer. Always connect the chains to
the frame or hook retainers of the vehicle hitch.
Cross the chains under the trailer tongue and
allow enough slack for turning corners.
• Vehicles with trailers should not be parked on a
grade. When parking, apply the parking brake on
the tow vehicle. Put the tow vehicle transmission
(Continued)
278 STARTING AND OPERATING
Page 337 of 476
If you must use the accessories (wipers, defrosters, etc.)
while being towed, the ignition must be in the RUN
position.
NOTE:The Safehold feature will engage the Electric
Park Brake whenever the driver’s door is opened (if the
ignition is RUN, transmission is not in PARK, and brake
pedal is released). If you are towing this vehicle with
the ignition in the RUN position, you must manually
disable the Electric Park Brake each time the driver’s
door is opened, by pressing the brake pedal and then
releasing the EPB.
If the key fob is unavailable, or the vehicle’s battery is
discharged, refer to “Gear Selector Override” in this
section for instructions on shifting the transmission out
of PARK so that the vehicle can be moved.
CAUTION!
• Do not use sling type equipment when towing.
Vehicle damage may occur.
• When securing the vehicle to a flat bed truck, do
not attach to front or rear suspension components.
Damage to your vehicle may result from improper
towing.
Front Wheel Drive (FWD) Models
The manufacturer recommends towing your vehicle
with all four wheels OFF the ground using a flatbed.
If flatbed equipment is not available, this vehicle must
towed with the front wheels OFF the ground (using a
towing dolly, or wheel lift equipment with the front
wheels raised).
NOTE: Ensure that the Electric Park Brake is released,
and remains released, while being towed.
CAUTION!
Towing this vehicle in violation of the above re-
quirements can cause severe transmission damage.
Damage from improper towing is not covered un-
der the New Vehicle Limited Warranty.
All Wheel Drive (AWD) Models
The manufacturer requires towing with all four wheels
OFF the ground. Acceptable methods are to tow the
vehicle on a flatbed, or with one end of the vehicle
raised and the opposite end on a towing dolly.
8
IN CASE OF EMERGENCY 335
Page 351 of 476
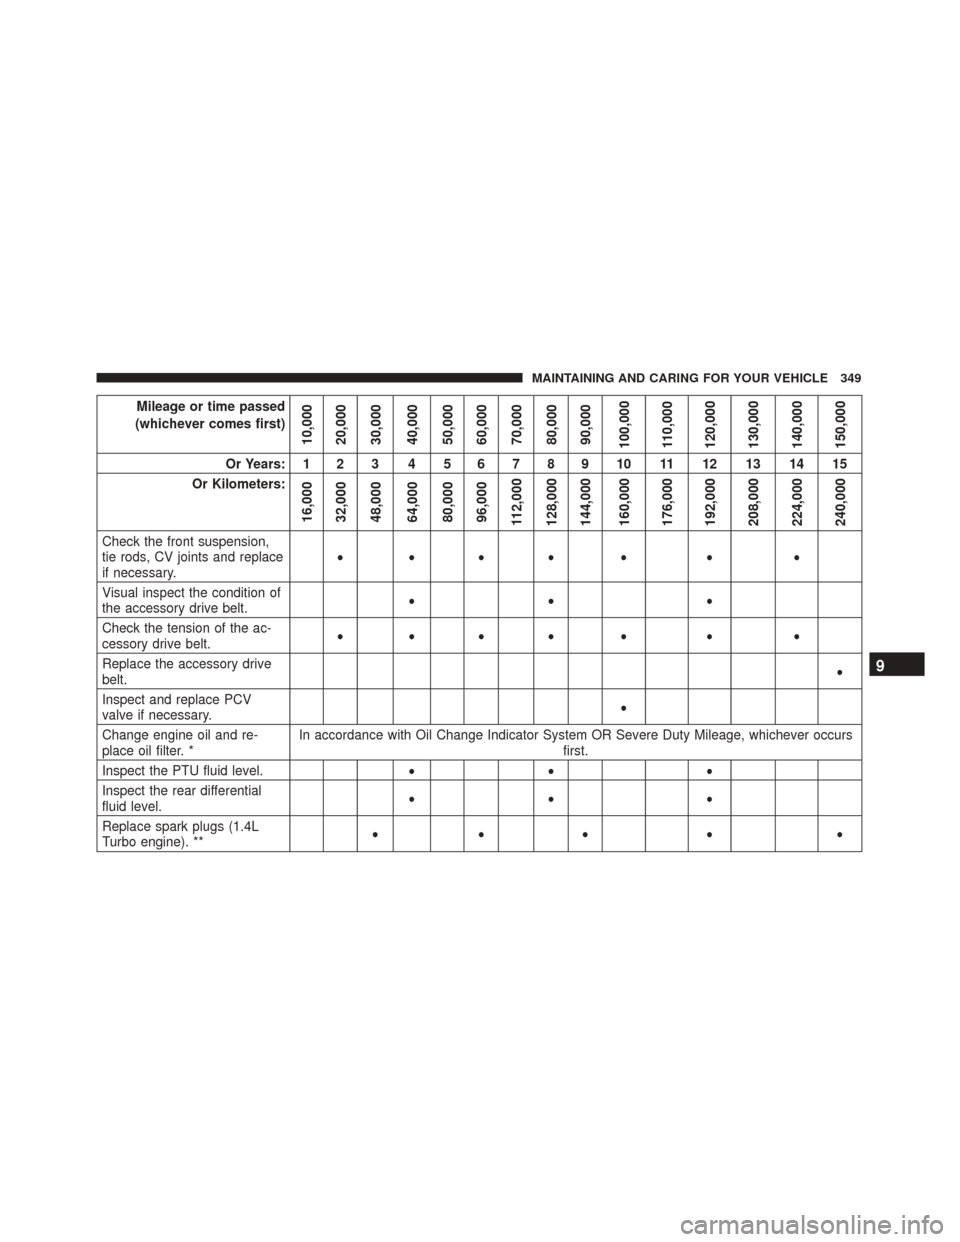
Mileage or time passed
(whichever comes first)
10,000
20,000
30,000
40,000
50,000
60,000
70,000
80,000
90,000
100,000
110,000
120,000
130,000
140,000
150,000
Or Years: 1 2 3 4 5 6 7 8 9 10 11 12 13 14 15
Or Kilometers:
16,000
32,000
48,000
64,000
80,000
96,000
112,000
128,000
144,000
160,000
176,000
192,000
208,000
224,000
240,000
Check the front suspension,
tie rods, CV joints and replace
if necessary. •••• • • •
Visual inspect the condition of
the accessory drive belt. •• •
Check the tension of the ac-
cessory drive belt. •••• • • •
Replace the accessory drive
belt. •
Inspect and replace PCV
valve if necessary. •
Change engine oil and re-
place oil filter. * In accordance with Oil Change Indicator System OR Severe Duty Mileage, whichever occurs
first.
Inspect the PTU fluid level. •• •
Inspect the rear differential
fluid level. •• •
Replace spark plugs (1.4L
Turbo engine). ** ••• • •
9
MAINTAINING AND CARING FOR YOUR VEHICLE 349
Page 398 of 476
See the Tire Sizing Chart example found in the “Tire
Safety Information” section of this manual for more
information relating to the Load Index and Speed
Symbol of a tire.
It is recommended to replace the two front tires or two
rear tires as a pair. Replacing just one tire can seriously
affect your vehicle’s handling. If you ever replace a
wheel, make sure that the wheel’s specifications match
those of the original wheels.
It is recommended you contact your authorized tire
dealer or original equipment dealer with any questions
you may have on tire specifications or capability. Fail-
ure to use equivalent replacement tires may adversely
affect the safety, handling, and ride of your vehicle.
WARNING!
•Do not use a tire, wheel size or rating other than
that specified for your vehicle. Some combina-
tions of unapproved tires and wheels may change
suspension dimensions and performance charac-
teristics, resulting in changes to steering, han-
dling, and braking of your vehicle. This can cause
(Continued)
WARNING! (Continued)
unpredictable handling and stress to steering and
suspension components. You could lose control
and have a collision resulting in serious injury or
death. Use only the tire and wheel sizes with load
ratings approved for your vehicle.
• Never use a tire with a smaller load index or
capacity, other than what was originally equipped
on your vehicle. Using a tire with a smaller load
index could result in tire overloading and failure.
You could lose control and have a collision.
• Failure to equip your vehicle with tires having
adequate speed capability can result in sudden
tire failure and loss of vehicle control.
CAUTION!
Replacing original tires with tires of a different size
may result in false speedometer and odometer read-
ings.
396 MAINTAINING AND CARING FOR YOUR VEHICLE
Page 399 of 476
TIRE CHAINS (TRACTION DEVICES)
Use of traction devices require sufficient tire-to-body
clearance. Follow these recommendations to guard
against damage.
•Traction device must be of proper size for the tire, as
recommended by the traction device manufacturer.
• Install on Front Tires Only.
• Only 215/60 R16 and 215/55 R17 tire sizes can be
chained using 9 mm tire chains.
• No other tire sizes can be chained.
WARNING!
Using tires of different size and type (M+S, Snow)
between front and rear axles can cause unpredict-
able handling. You could lose control and have a
collision.
CAUTION!
To avoid damage to your vehicle or tires, observe
the following precautions:
•Because of restricted traction device clearance
between tires and other suspension components,
it is important that only traction devices in good
condition are used. Broken devices can cause
serious damage. Stop the vehicle immediately if
noise occurs that could indicate device breakage.
Remove the damaged parts of the device before
further use.
• Install device as tightly as possible and then
retighten after driving about ½ mile (0.8 km).
• Do not exceed 30 mph (48 km/h).
• Drive cautiously and avoid severe turns and large
bumps, especially with a loaded vehicle.
• Do not drive for a prolonged period on dry
pavement.
• Observe the traction device manufacturer ’s in-
structions on the method of installation, operat-
ing speed, and conditions for use. Always use the
suggested operating speed of the device manufac-
turer ’s if it is less than 30 mph (48 km/h).
•
Do not use traction devices on a compact spare tire.
9
MAINTAINING AND CARING FOR YOUR VEHICLE 397