2014 FIAT 500X key
[x] Cancel search: keyPage 73 of 476
NOTE:
•Before exiting the vehicle, make sure that the interior
lights are turned off. This will prevent the battery
from discharging once the doors are closed.
• If a light is left on it will automatically be turned off
after approximately 15 minutes after the ignition is in
STOP mode.
Dome Light Timing
The Dome Light will automatically illuminate when the
doors are unlocked, the doors are opened or after the
doors are closed.
Timing Entering The Vehicle
The dome lights illuminate in the following ways:
• When the doors are unlocked, the dome light will
illuminate for approximately 27 seconds.
• When one of the doors is opened, the dome light will
illuminate for approximately three minutes.
• When the doors are closed, the dome light will
automatically shut off after approximately 27 sec-
onds. NOTE:
The timing stops once the ignition is placed in
the RUN or START mode.
The dome light will turn off under any of the following
conditions:
• The dome light is disabled when the ignition is
placed in the RUN or START mode.
• The dome lights will turn off automatically when the
doors are locked.
• The dome lights will automatically turn off after
approximately fifteen minutes of inactivity to pre-
serve the battery.
Timing Exiting The Vehicle
The dome light will illuminate under the following
conditions when the ignition is turned to the STOP
mode:
• The dome light will illuminate for 27 seconds after
the key is removed from the vehicle.
• The opening of one of the doors (approximately three
minutes).
• After closing a door (approximately 27 seconds).
4
GETTING TO KNOW YOUR VEHICLE 71
Page 100 of 476
WINDOWS
Driver’s Door Controls
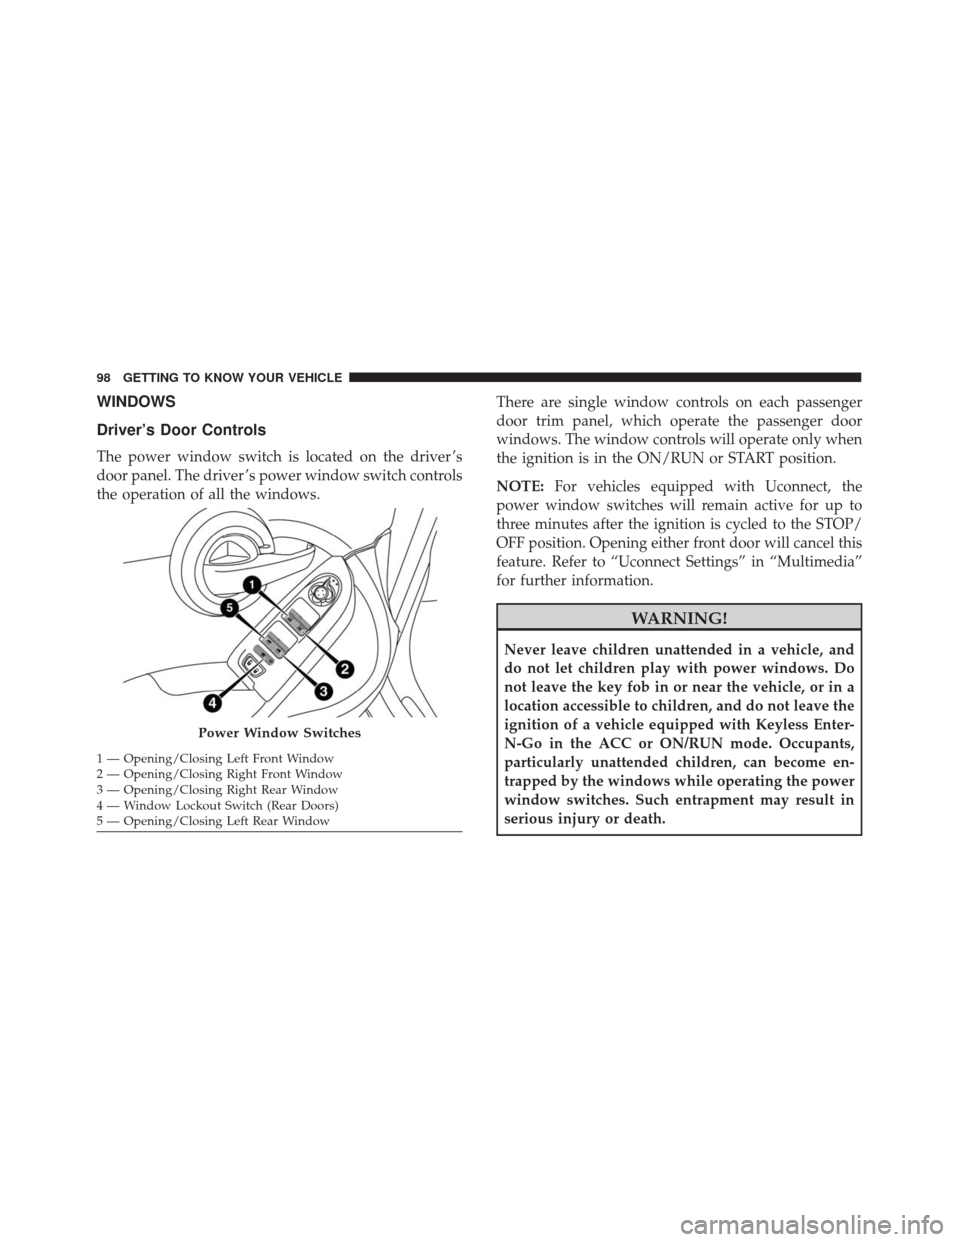
The power window switch is located on the driver ’s
door panel. The driver ’s power window switch controls
the operation of all the windows.There are single window controls on each passenger
door trim panel, which operate the passenger door
windows. The window controls will operate only when
the ignition is in the ON/RUN or START position.
NOTE:
For vehicles equipped with Uconnect, the
power window switches will remain active for up to
three minutes after the ignition is cycled to the STOP/
OFF position. Opening either front door will cancel this
feature. Refer to “Uconnect Settings” in “Multimedia”
for further information.
WARNING!
Never leave children unattended in a vehicle, and
do not let children play with power windows. Do
not leave the key fob in or near the vehicle, or in a
location accessible to children, and do not leave the
ignition of a vehicle equipped with Keyless Enter-
N-Go in the ACC or ON/RUN mode. Occupants,
particularly unattended children, can become en-
trapped by the windows while operating the power
window switches. Such entrapment may result in
serious injury or death.
Power Window Switches
1 — Opening/Closing Left Front Window
2 — Opening/Closing Right Front Window
3 — Opening/Closing Right Rear Window
4 — Window Lockout Switch (Rear Doors)
5 — Opening/Closing Left Rear Window 98 GETTING TO KNOW YOUR VEHICLE
Page 103 of 476
WARNING!
•Never leave children alone in a vehicle, or with
access to an unlocked vehicle. Never leave the key
fob in or near the vehicle or in a location acces-
sible to children. Occupants, particularly unat-
tended children, can become entrapped by the
power sunroof while operating the power sunroof
(Continued)
WARNING! (Continued)
switch. Such entrapment may result in serious
injury or death.
• In a collision, there is greater risk of being thrown
from a vehicle with an open sunroof. You could
also be seriously injured or killed. Always fasten
your seat belt properly and make sure all passen-
gers are properly secured too.
• Do not allow small children to operate the sun-
roof. Never allow your fingers, other body parts,
or any object to project through the sunroof
opening. Injury may result.
Opening The Sunroof
To retract the front panel to the open position, push the
open/close button and the sunroof will fully open. The
sunroof can be stopped in any position by pushing the
switch a second time while is opening.
Venting The Front Panel
To vent the sunroof push and hold the vent switch.
NOTE: The vent switch has the automatic function only
at the opening of the roof, during the closing of the roof,
the expected functionality is only that manual.
Operation Switch
1 — Front Panel Open/Close Switch
2 — Front Panel Vent Switch
4
GETTING TO KNOW YOUR VEHICLE 101
Page 104 of 476
Closing The Sunroof
To close the front panel completely, pull the sunroof
switch from the open position. The sunroof can be
stopped in any position by pulling the sunroof switch a
second time while it is closing.
NOTE:During the open/close or vent operation any
push on the switches will stop the closing of the panel.
Wind Buffeting
Wind buffeting can be described as the perception of
pressure on the ears or a helicopter-type sound in the
ears. Your vehicle may exhibit wind buffeting with the
windows down, or the sunroof (if equipped) in certain
open or partially open positions. This is a normal
occurrence and can be minimized. If the buffeting
occurs with the rear windows open, open the front and
rear windows together to minimize the buffeting. If the
buffeting occurs with the sunroof open, adjust the
sunroof opening to minimize the buffeting or open any
window.
Sun Shade
The two sun shades are manually operated and can be
adjusted in any position.
Anti-Pinch Safety Device
This feature will detect an obstruction in the opening of
the sunroof during Express Close operation. If an
obstruction in the path of the sunroof is detected, the
sunroof will automatically retract. Remove the obstruc-
tion if this occurs. Next, push the switch forward and
release to Express Close.
Emergency Operation
If the power sunroof switch fails, the sunroof can be
operated manually as follows:
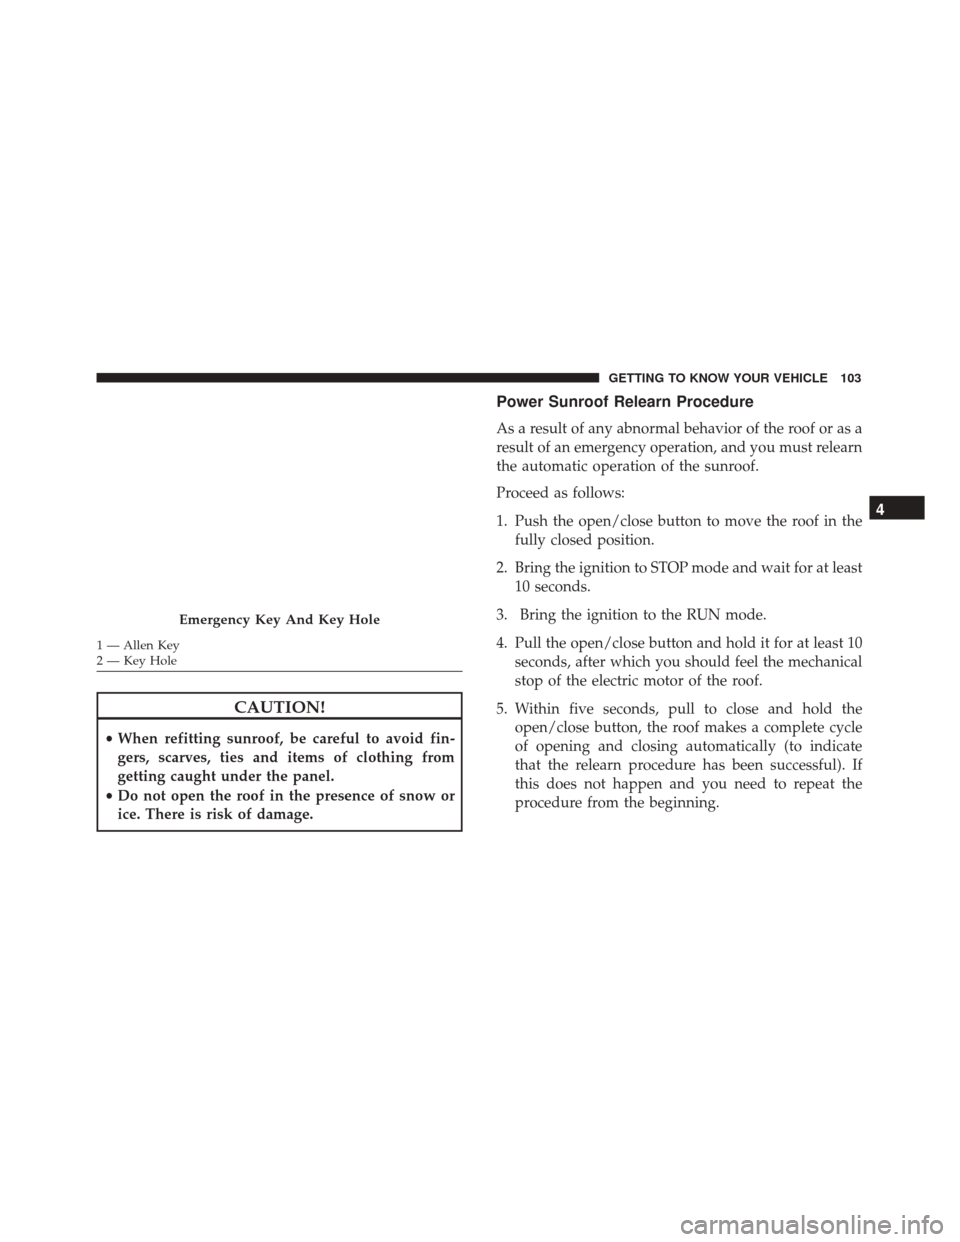
1. Remove the protective cap located on the inner lining.
2. Remove the Allen Key that is supplied in the tool bag in the cargo area.
3. Insert the Allen Key into the key hole and turn it clockwise to open the roof or counter-clockwise to
close.
102 GETTING TO KNOW YOUR VEHICLE
Page 105 of 476
CAUTION!
•When refitting sunroof, be careful to avoid fin-
gers, scarves, ties and items of clothing from
getting caught under the panel.
• Do not open the roof in the presence of snow or
ice. There is risk of damage.
Power Sunroof Relearn Procedure
As a result of any abnormal behavior of the roof or as a
result of an emergency operation, and you must relearn
the automatic operation of the sunroof.
Proceed as follows:
1. Push the open/close button to move the roof in the fully closed position.
2. Bring the ignition to STOP mode and wait for at least 10 seconds.
3. Bring the ignition to the RUN mode.
4. Pull the open/close button and hold it for at least 10 seconds, after which you should feel the mechanical
stop of the electric motor of the roof.
5. Within five seconds, pull to close and hold the open/close button, the roof makes a complete cycle
of opening and closing automatically (to indicate
that the relearn procedure has been successful). If
this does not happen and you need to repeat the
procedure from the beginning.
Emergency Key And Key Hole
1 — Allen Key
2 — Key Hole
4
GETTING TO KNOW YOUR VEHICLE 103
Page 109 of 476
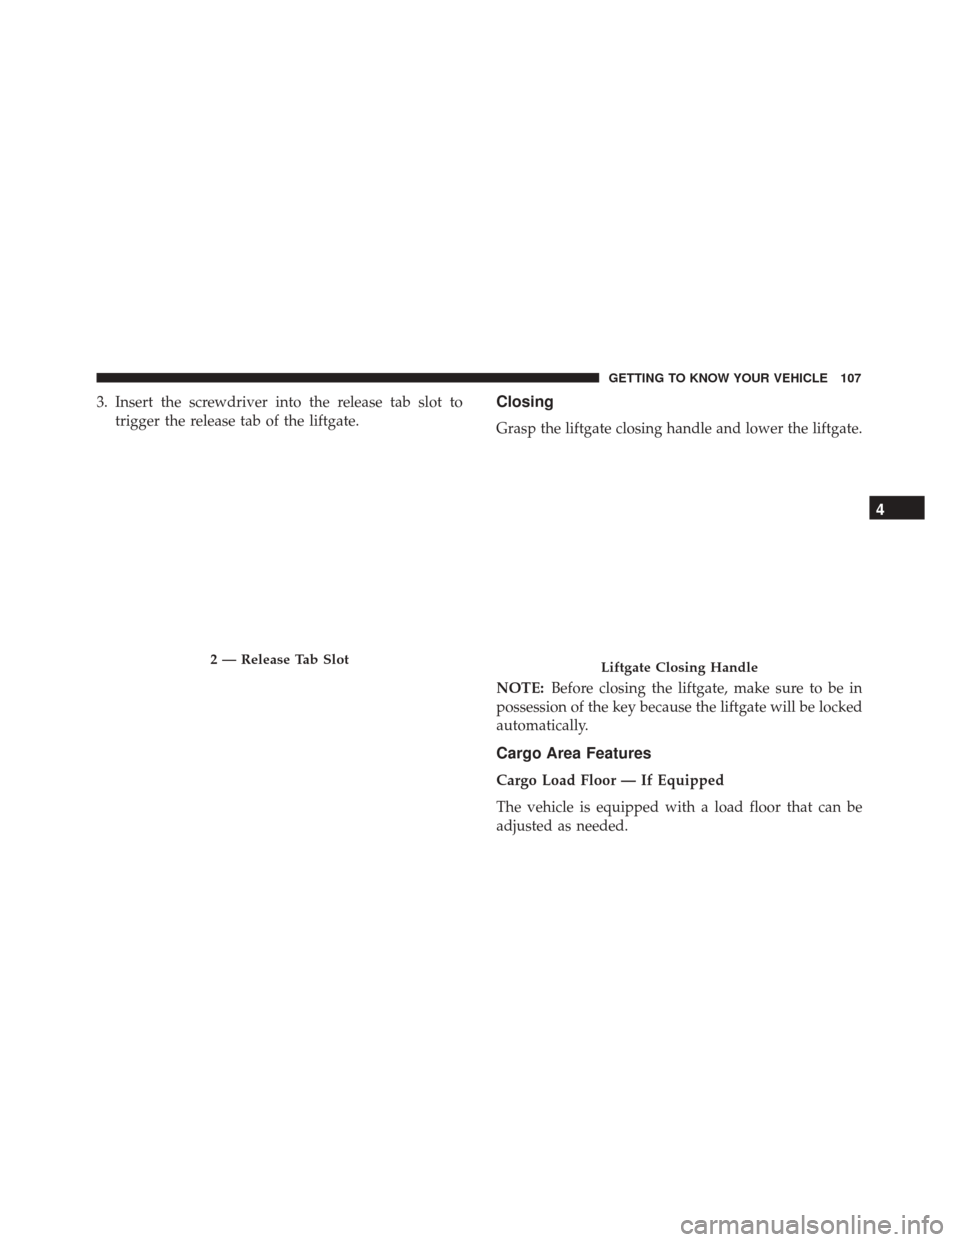
3. Insert the screwdriver into the release tab slot totrigger the release tab of the liftgate.Closing
Grasp the liftgate closing handle and lower the liftgate.
NOTE: Before closing the liftgate, make sure to be in
possession of the key because the liftgate will be locked
automatically.
Cargo Area Features
Cargo Load Floor — If Equipped
The vehicle is equipped with a load floor that can be
adjusted as needed.
2 — Release Tab SlotLiftgate Closing Handle
4
GETTING TO KNOW YOUR VEHICLE 107
Page 123 of 476
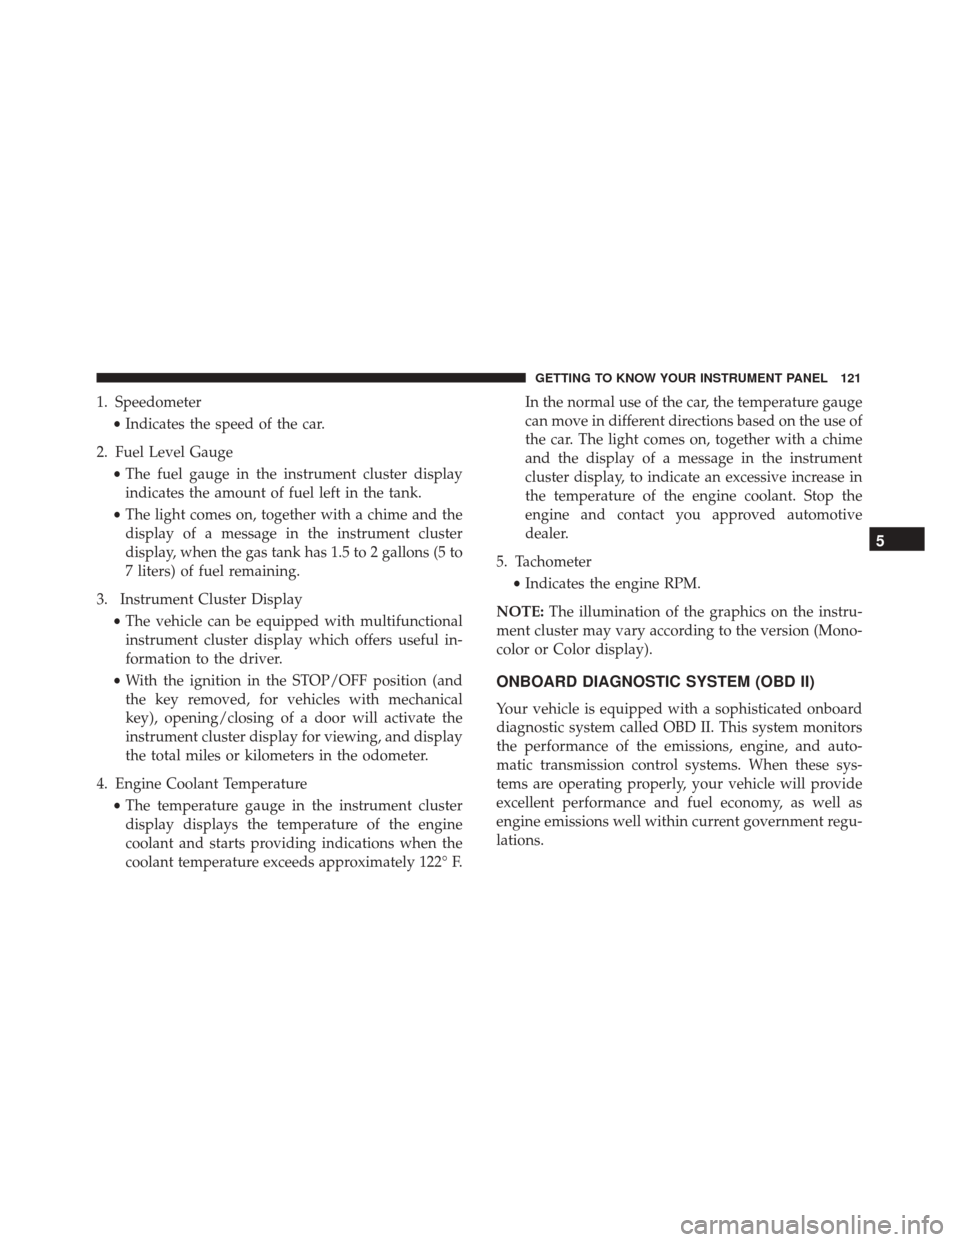
1. Speedometer•Indicates the speed of the car.
2. Fuel Level Gauge •The fuel gauge in the instrument cluster display
indicates the amount of fuel left in the tank.
• The light comes on, together with a chime and the
display of a message in the instrument cluster
display, when the gas tank has 1.5 to 2 gallons (5 to
7 liters) of fuel remaining.
3. Instrument Cluster Display •The vehicle can be equipped with multifunctional
instrument cluster display which offers useful in-
formation to the driver.
• With the ignition in the STOP/OFF position (and
the key removed, for vehicles with mechanical
key), opening/closing of a door will activate the
instrument cluster display for viewing, and display
the total miles or kilometers in the odometer.
4. Engine Coolant Temperature •The temperature gauge in the instrument cluster
display displays the temperature of the engine
coolant and starts providing indications when the
coolant temperature exceeds approximately 122° F. In the normal use of the car, the temperature gauge
can move in different directions based on the use of
the car. The light comes on, together with a chime
and the display of a message in the instrument
cluster display, to indicate an excessive increase in
the temperature of the engine coolant. Stop the
engine and contact you approved automotive
dealer.
5. Tachometer •Indicates the engine RPM.
NOTE: The illumination of the graphics on the instru-
ment cluster may vary according to the version (Mono-
color or Color display).
ONBOARD DIAGNOSTIC SYSTEM (OBD II)
Your vehicle is equipped with a sophisticated onboard
diagnostic system called OBD II. This system monitors
the performance of the emissions, engine, and auto-
matic transmission control systems. When these sys-
tems are operating properly, your vehicle will provide
excellent performance and fuel economy, as well as
engine emissions well within current government regu-
lations.
5
GETTING TO KNOW YOUR INSTRUMENT PANEL 121
Page 127 of 476

Engine Oil Change Reset
Your vehicle is equipped with an engine oil change
indicator system. The “Change Engine Oil” message
will flash in the instrument cluster display for approxi-
mately 10 seconds after a single chime has sounded to
indicate the next scheduled oil change interval. The
engine oil change indicator system is duty cycle based,
which means the engine oil change interval may fluc-
tuate, dependent upon your personal driving style.
Unless reset, this message will continue to display each
time you turn the ignition switch to the ON/RUN
position. To reset the oil change indicator system (after
performing the scheduled maintenance), refer to the
following procedure.
1. In key-on: press accelerator pedal at 100%, remain inthis condition for more than 30 seconds.
2. After this time, always with accelerator pedal down to 100%, press the brake pedal for at least 7 times.
3. Release the pedals.
4. Key-off and wait for Power latch. NOTE:
If the indicator message illuminates when you
start the vehicle, the oil change indicator system did not
reset. If necessary, repeat this procedure.
Instrument Cluster Display Main Menu
The Main Menu is composed of several options that can
be selected using the control buttons above.
NOTE:
• The display mode of the menu items varies depend-
ing on the type of display.
• For some items, a submenu is provided.
• In the Uconnect system, some items on the menu are
not shown on the instrument cluster display.
Instrument Cluster Display Menu/Submenu
Items
The Menu is composed of the following items:
• Trip
– Speedometer
– Instantaneous Info
– Trip A
– Trip B
5
GETTING TO KNOW YOUR INSTRUMENT PANEL 125