Page 73 of 116

NOTE:
•The “ESC Off Indicator Light” and the “ESC Activation/Malfunction Indicator Light”
come on momentarily each time the ignition switch is turned to ON/RUN.
•Each time the ignition is turned to ON/RUN, the ESC system will be ON even if it
was turned off previously.
•ESC Activation/Malfunction Light can blink during a ESC or TC intervention.
- Tire Pressure Monitoring System (TPMS) Light
Each tire, including the spare (if provided), should be checked monthly when cold and
inflated to the inflation pressure recommended by the vehicle manufacturer on the ve-
hicle placard or tire inflation pressure label.(If your vehicle has tires of a different size
than the size indicated on the vehicle placard or tire inflation pressure label, you should
determine the proper tire inflation pressure for those tires.)
As an added safety feature, your vehicle has been equipped with a tire pressure monitoring
system (TPMS) that illuminates a low tire pressure telltale when one or more of your tires is
significantly under-inflated.Accordingly, when the low tire pressure telltale illuminates, you
should stop and check your tires as soon as possible, and inflate them to the proper pressure.
Driving on a significantly under-inflated tire causes the tire to overheat and can lead to tire
failure.Under-inflation also reduces fuel efficiency and tire tread life, and may affect the vehi-
cle’s handling and stopping ability.
IF THE LIGHT STARTS FLASHING INDICATING A LOW TIRE PRESSURE, ADJUST
THE AIR PRESSURE IN THE LOW TIRE TO THE AIR PRESSURE SHOWN ON THE
VEHICLE PLACARD OR TIRE INFLATION PRESSURE LABEL LOCATED ON THE
DRIVER'S DOOR.
NOTE:
AFTER INFLATION, THE VEHICLE MAY NEED TO BE DRIVEN FOR 20 MINUTES
BEFORE THE FLASHING LIGHT WILL TURN OFF.
Please note that the TPMS is not a substitute for proper tire maintenance, and it is the
driver’s responsibility to maintain correct tire pressure, even if under-inflation has not
reached the level to trigger illumination of the TPMS low tire pressure telltale.
Your vehicle has also been equipped with a TPMS malfunction indicator to indicate when
the system is not operating properly.The TPMS malfunction indicator is combined with
the low tire pressure telltale.
When the system detects a malfunction, the telltale will flash for approximately one min-
ute and then remain continuously illuminated.This sequence will continue upon subse-
quent vehicle start-ups as long as the malfunction exists.When the malfunction indicator
is illuminated, the system may not be able to detect or signal low tire pressure as in-
tended.TPMS malfunctions may occur for a variety of reasons, including the installation of
replacement or alternate tires or wheels on the vehicle that prevent the TPMS from
functioning properly.Always check the TPMS malfunction telltale after replacing one or
more tires or wheels on your vehicle to ensure that the replacement or alternate tires
and wheels allow the TPMS to continue to function properly.
WHAT TO DO IN EMERGENCIES
71
Page 74 of 116
 per 12° F (7° C) of air tempera-
ture change.Keep this in mind when checking tire pressure inside a garage, especially in
the Winter.Exampl")
NOTE:
Tire pressures change by approximately 1 psi (7 kPa) per 12° F (7° C) of air tempera-
ture change.Keep this in mind when checking tire pressure inside a garage, especially in
the Winter.Example: If garage temperature is 68°F (20°C) and the outside temperature
is 32°F (0°C), then the cold tire inflation pressure should be increased by 3 psi (21 kPa),
which equals 1 psi (7 kPa) for every 12°F (7°C) for this outside temperature condition.
CAUTION!
The TPMS has been optimized for the original equipment tires and wheels.TPMS pres-
sures and warning have been established for the tire size equipped on your vehicle.
Undesirable system operation or sensor damage may result when using replacement
equipment that is not of the same size, type, and/or style.Aftermarket wheels can cause
sensor damage.Do not use tire sealant from a can, or balance beads if your vehicle is
equipped with a TPMS, as damage to the sensors may result.
BRAKE- Brake Warning Light
The Brake Warning light illuminates when there is either a system malfunction or the
parking brake is applied.If the light is on and the parking brake is not applied, it indicates
a possible brake hydraulic malfunction, brake booster problem or an Anti-Lock Brake Sys-
tem problem.
Please have your vehicle serviced immediately.
WARNING!
Driving a vehicle with the red brake light on is dangerous.Part of the brake system
may have failed.It will take longer to stop the vehicle.You could have a collision.Have
the vehicle checked immediately.
- Malfunction Indicator Light (MIL)
Certain conditions, such as a loose or missing gas cap, poor fuel quality, etc., may illumi-
nate the MIL after engine start.The vehicle should be serviced if the light stays on
through several typical driving cycles.In most situations, the vehicle will drive normally and
not require towing.
If the MIL flashes when the engine is running, serious conditions may exist that could lead
to immediate loss of power or severe catalytic converter damage.We recommend you
do not operate the vehicle.Have the vehicle serviced immediately.
WHAT TO DO IN EMERGENCIES
72
Page 75 of 116

- Charging System Light
This light shows the status of the electrical charging system.If the charging system light
remains on, it means that the vehicle is experiencing a problem with the charging system.
We recommend you do not continue driving if the charging system light is on.Have the
vehicle serviced immediately.
- Oil Pressure Warning Light
This light indicates low engine oil pressure.If the light turns on while driving, stop the
vehicle and shut off the engine as soon as possible.A chime will sound when this light
turns on.
We recommend you do not operate the vehicle or engine damage will occur.Have the
vehicle serviced immediately.
- Anti-Lock Brake (ABS) Light
This light monitors the Anti-Lock Brake System (ABS).
If the light is not on during starting, stays on, or turns on while driving, we recommend
you contact the nearest authorized dealer and have the vehicle serviced immediately.
- Air Bag Warning Light
If the light is not on during starting, stays on, or turns on while driving, have the vehicle
serviced by an authorized dealer immediately.
- Seat Belt Reminder Light
When the ignition switch is first turned to ON/RUN, this light will turn on if the driver’s
seat belt is unbuckled, a chime will sound.When driving, if the driver’s seat belt remains
unbuckled, the Seat Belt Reminder Light will illuminate and the chime will sound.
Please have your vehicle serviced immediately.
WARNING!
Driving a vehicle with the red brake light on is dangerous.Part of the brake system
may have failed.It will take longer to stop the vehicle.You could have a collision.Have
the vehicle checked immediately.
Passenger Air Bag Disable (PAD) Light
The Passenger Air Bag Disable (PAD) Indicator Light tells the driver and front passenger
when the front passenger air bag is turned off.The PAD Indicator light illuminates to show
that the front passenger air bag will not inflate during a collision requiring air bags.When the
right front passenger seat is empty or when very light objects are placed on the seat, the pas-
senger air bag will not inflate even though the PAD indicator light is not illuminated.
WHAT TO DO IN EMERGENCIES
73
Page 76 of 116

IF YOUR ENGINE OVERHEATS
•In any of the following situations, you can reduce the potential for overheating by
taking the appropriate action.
•On the highways — slow down.
•In city traffic — while stopped, shift transmission into NEUTRAL, but do not increase
engine idle speed.
NOTE:
There are steps that you can take to slow down an overheat condition:
•If your air conditioner (A/C) is on, turn it off.The A/C system adds heat to the engine
cooling system and turning the A/C off can help remove this heat.
•You can also turn the Temperature control to maximum heat, the Mode control to
floor and the Fan control to high.This allows the heater core to act as a supplement
to the radiator and aids in removing heat from the engine cooling system.
•If the temperature reading does not return to normal, turn the engine off immediately.
•We recommend that you do not operate the vehicle or engine damage will occur.
Have the vehicle serviced immediately.
CAUTION!
Driving with a hot cooling system could damage your vehicle.If the temperature gauge
reads hot, pull over and stop the vehicle.Idle the vehicle with the air conditioner
turned off until the pointer drops back into the normal range.If the pointer remains
on hot, turn the engine off immediately and call for service.
WARNING!
You or others can be badly burned by hot engine coolant (antifreeze) or steam from
your radiator.If you see or hear steam coming from under the hood, do not open the
hood until the radiator has had time to cool.Never try to open a cooling system pres-
sure cap when the radiator or coolant bottle is hot.
WHAT TO DO IN EMERGENCIES
74
Page 77 of 116
JACKING AND TIRE CHANGING
Jack Location
•Your vehicle may be equipped with a
temporary spare tire.The jack and jack-
handle are stowed in rear cargo area
behind the rear seat.
Spare Tire Removal
•The spare tire is stowed to the underbody below the cargo area.
1.Fit the wrench tool over the drive nut.Use the wrench to rotate the nut counter-
clockwise until the spare is on the ground with enough slack in the cable to allow you
to pull the tire out from under the vehicle.
WHAT TO DO IN EMERGENCIES
75
Page 78 of 116
2.Pull the spare tire out from under the vehicle.
3.When the spare is clear, remove the knob or plastic molded nut by rotating it
counter-clockwise.
4.Tilt the retainer at the end of the cable and pull it through the center of the wheel.
WHAT TO DO IN EMERGENCIES
76
Page 79 of 116
Preparations For Jacking
1.Park the vehicle on a firm level surface, avoiding ice or slippery areas.
2.Turn on the Hazard Warning flashers.
3.Set the parking brake.
4.Place the shift lever in PARK (Euro Twin Clutch Transmission) or REVERSE (manual
transmission).
5.Turn Off the ignition.
6.Block both the front and rear of the wheel diagonally opposite the jacking position.
For example, if changing the right front tire, block the left rear wheel.
NOTE:
Passengers should not remain in the vehicle
while the vehicle is being jacked.
Jacking Instructions
NOTE:
Refer to the “Compact Spare Tire” section
of the “Tires-General Information” under
“Starting And Operating” for information
about the spare tire, it's use, and operation.
1.Remove the scissors jack and wheel
wrench from the rear storage area.
2.Loosen, but do not remove, the wheel
bolts by turning them to the left one
turn while the wheel is still on the
ground.
WHAT TO DO IN EMERGENCIES
77
Page 80 of 116
.
Do not raise the vehicle until you are sure the jack i")
NOTE:
There are front and rear jacking locations on each side of the body (as indicated by the
triangular lift point symbol on the sill molding).
Do not raise the vehicle until you are sure the jack is securely engaged.
3.Turn the jack screw to the left until the jack can be placed under the jacking location.
Once the jack is positioned, turn the jack screw to the right until the jack head is
properly engaged with the lift area closest to the wheel to be changed.
4.Using the swivel wrench, raise the ve-
hicle by turning the jack screw to the
right.Raise the vehicle only until the tire
just clears the surface and enough clear-
ance is obtained to install the spare tire.
Minimum tire lift provides maximum
stability.
5.Remove the wheel bolts and pull the
wheel off the hub.For vehicles
equipped with aluminum wheels, the
center caps must be removed to re-
move the wheel bolts.
NOTE:
The wheel cover is held on the wheel by
the wheel bolts.When reinstalling the origi-
nal wheel, properly align the wheel cover to
the valve stem, place the wheel cover onto
the wheel, then install the wheel bolts.
6.Install the spare wheel and wheel bolts
with the cone shaped end of the bolts
toward the wheel.Lightly tighten the
bolts.To avoid the risk of forcing the
vehicle off the jack, do not tighten the
bolts fully until the vehicle has been
lowered.
7.Lower the vehicle by turning the jack
screw to the left.
WHAT TO DO IN EMERGENCIES
78
 1
1 2
2 3
3 4
4 5
5 6
6 7
7 8
8 9
9 10
10 11
11 12
12 13
13 14
14 15
15 16
16 17
17 18
18 19
19 20
20 21
21 22
22 23
23 24
24 25
25 26
26 27
27 28
28 29
29 30
30 31
31 32
32 33
33 34
34 35
35 36
36 37
37 38
38 39
39 40
40 41
41 42
42 43
43 44
44 45
45 46
46 47
47 48
48 49
49 50
50 51
51 52
52 53
53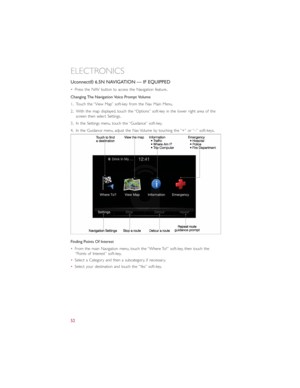 54
54 55
55 56
56 57
57 58
58 59
59 60
60 61
61 62
62 63
63 64
64 65
65 66
66 67
67 68
68 69
69 70
70 71
71 72
72 73
73 74
74 75
75 76
76 77
77 78
78 79
79 80
80 81
81 82
82 83
83 84
84 85
85 86
86 87
87 88
88 89
89 90
90 91
91 92
92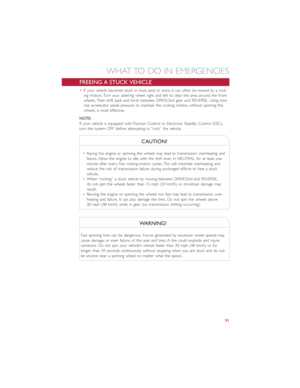 93
93 94
94 95
95 96
96 97
97 98
98 99
99 100
100 101
101 102
102 103
103 104
104 105
105 106
106 107
107 108
108 109
109 110
110 111
111 112
112 113
113 114
114 115
115

