2014 DODGE AVENGER wheel
[x] Cancel search: wheelPage 88 of 124

WARNING!
• Being under a jacked-up vehicle is dangerous. The vehicle could slip off the jack andfall on you. You could be crushed. Never put any part of your body under a vehicle that
is on a jack. If you need to get under a raised vehicle, take it to a service center where
it can be raised on a lift.
• Never start or run the engine while the vehicle is on a jack.
• The jack is designed to be used as a tool for changing tires only. The jack should not
be used to lift the vehicle for service purposes. The vehicle should be jacked on a firm
level surface only. Avoid ice or slippery areas.
• Do not attempt to change a tire on the side of the vehicle close to moving traffic, pull
far enough off the road to avoid the danger of being hit when operating the jack or
changing the wheel.
• Carefully follow these tire changing warnings to help prevent personal injury or
damage to your vehicle:
• Always park on a firm, level surface as far from the edge of the roadway as pos-sible before raising the vehicle.
• Turn on the Hazard Warning flasher.
• Block the wheel diagonally opposite the wheel to be raised.
• Set the parking brake firmly and set an automatic transmission in PARK; a
manual transmission in REVERSE.
• Do not let anyone sit in the vehicle when it is on a jack.
• Do not get under the vehicle when it is on a jack.
• Only use the jack in the positions indicated and for lifting this vehicle during a tire
change.
• If working on or near a roadway, be extremely careful of motor traffic.
• To assure that spare tires, flat or inflated, are securely stowed, spares must be
stowed with the valve stem facing the ground.
• Raising the vehicle higher than necessary can make the vehicle less stable. It could
slip off the jack and hurt someone near it. Raise the vehicle only enough to remove
the tire.
• To avoid possible personal injury, handle the wheel covers with care to avoid contact
with any sharp edges.
• A loose tire or jack thrown forward in a collision or hard stop could injure the
occupants in the vehicle. Have the deflated (flat) tire repaired or replaced immedi-
ately.
• To avoid the risk of forcing the vehicle off the jack, do not tighten the lug nuts fully
until the vehicle is lowered to the ground. Failure to follow this warning may result in
personal injury.
WHAT TO DO IN EMERGENCIES
86
Page 89 of 124

BATTERY LOCATION
• The battery in your vehicle is located between the left front headlight assembly and theleft front wheel splash shield. To allow jump-starting there are remote battery posts
located on the left side of the engine compartment.
JUMP-STARTING
• If your vehicle has a discharged battery it can be jump-started using a set of jumpercables and a battery in another vehicle or by using a portable battery booster pack.
Jump-starting can be dangerous if done improperly so please follow the procedures in
this section carefully.
NOTE:
When using a portable battery booster pack follow the manufacturer's operating instruc-
tions and precautions.
WHAT TO DO IN EMERGENCIES
87
Page 90 of 124

Preparations For Jump-Start
• The battery in your vehicle is located between the left front headlight assembly and theleft front wheel splash shield. To allow jump-starting there are remote battery posts
located on the left side of the engine compartment.
1. Set the parking brake, shift the automatic transmission into PARK and turn the igni-
tion to LOCK.
2. Turn off the heater, radio, and all unnec- essary electrical accessories.
3. Remove the protective cover over the re- mote positive (+)battery post. To remove
the cover, press the locking tab and pull
upward on the cover.
4. If using another vehicle to jump-start the battery, park the vehicle within the
jumper cables reach, set the parking
brake and make sure the ignition is OFF.
Jump-Starting Procedure
1. Connect the positive (+)end of the jumper cable to the remote positive (+)post of the
discharged vehicle.
2. Connect the opposite end of the positive (+)jumper cable to the positive (+)post of the
booster battery.
3. Connect the negative end (-)of the jumper cable to the negative (-)post of the booster
battery.
4. Connect the opposite end of the negative (-)jumper cable to the remote negative (-)post
of the vehicle with the discharged battery.
5. Start the engine in the vehicle that has the booster battery, let the engine idle a few minutes, and then start the engine in the vehicle with the discharged battery.
Once the engine is started, remove the jumper cables in the reverse sequence:
1. Disconnect the negative (-)jumper cable from the remote negative (-)post of the vehicle
with the discharged battery.
2. Disconnect the negative end (-)of the jumper cable from the negative (-)post of the
booster battery.
3. Disconnect the opposite end of the positive (+)jumper cable from the positive (+)post of
the booster battery.
1 — Positive Jump Starting Post
2 — Negative Jump Starting Post
WHAT TO DO IN EMERGENCIES
88
Page 93 of 124

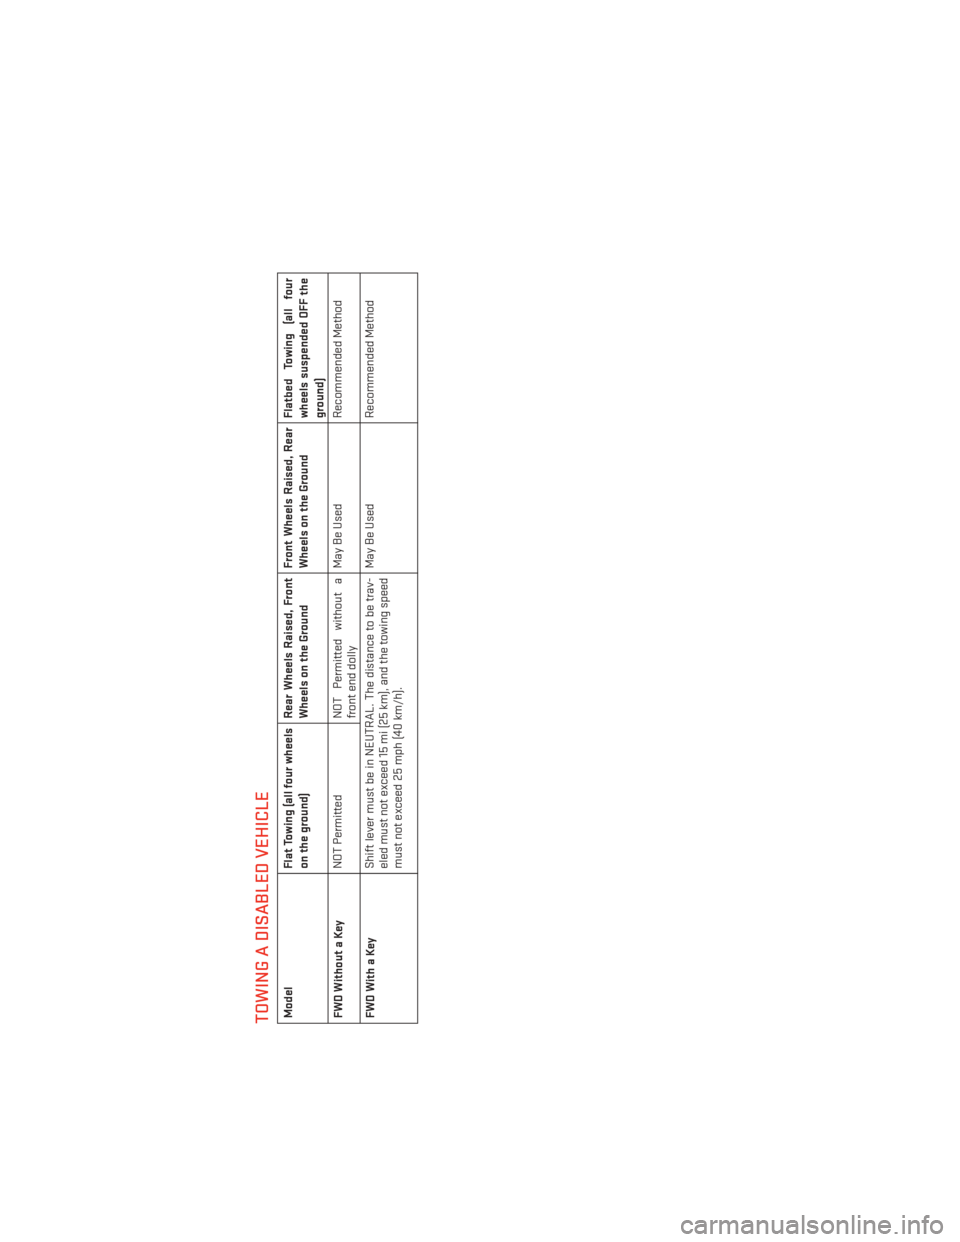
TOWING A DISABLED VEHICLEModelFlat Towing (all four wheels
on the ground) Rear Wheels Raised, Front
Wheels on the GroundFront Wheels Raised, Rear
Wheels on the GroundFlatbed Towing (all four
wheels suspended OFF the
ground)
FWDWithoutaKey NOT Permitted
NOT Permitted without a
front end dolly May Be Used
Recommended Method
FWDWithaKey Shift lever must be in NEUTRAL. The distance to be trav-
eled must not exceed 15 mi (25 km), and the towing speed
must not exceed 25 mph (40 km/h). May Be Used
Recommended Method
WHAT TO DO IN EMERGENCIES
91
Page 94 of 124

FREEING A STUCK VEHICLE
• If your vehicle becomes stuck in mud, sand or snow, it can often be moved by a rockingmotion. Turn your steering wheel right and left to clear the area around the front wheels.
Then move the shift lever back and forth between REVERSE and DRIVE. Using minimal
accelerator pedal pressure to maintain the rocking motion, without spinning the wheels,
is most effective.
NOTE:
To improve the vehicle's traction when starting off in deep snow, sand or gravel, it may be
desirable to switch the Electronic Stability Control (ESC) to “Partial Off” mode by momen-
tarily pressing the ESC Off
switch. For further information on ESC, refer to the Owner's
Manual on the DVD.
CAUTION!
• When “rocking” a stuck vehicle by shifting between REVERSE and DRIVE, do not spin the wheels faster than 15 mph (24 km/h), or drivetrain damage may result.
• Revving the engine or spinning the wheels too fast may lead to transmission over-
heating and failure. It can also damage the tires. Do not spin the wheels above
30 mph (48 km/h) while in gear (no transmission shifting occurring).
WARNING!
Fast spinning tires can be dangerous. Forces generated by excessive wheel speeds may
cause tire damage or failure. A tire could explode and injure someone. Do not spin your
vehicle's wheels faster than 30 mph (48 km/h) when you are stuck. Do not let anyone
near a spinning wheel, no matter what the speed.
WHAT TO DO IN EMERGENCIES
92
Page 109 of 124

WHEEL AND WHEEL TRIM CARE
• All wheels and wheel trim, especially aluminum and chrome plated wheels, should becleaned regularly with a mild soap and water to prevent corrosion.
• To remove heavy soil and/or excessive brake dust, use MOPAR® Wheel Cleaner or equivalent or select a non-abrasive, non-acidic cleaner.
CAUTION!
Do not use scouring pads, steel wool, a bristle brush, or metal polishes. Do not use oven
cleaner. These products may damage the wheel's protective finish. Avoid automatic car
washes that use acidic solutions or harsh brushes that may damage the wheel's protec-
tive finish. Only MOPAR® Wheel Cleaner or equivalent is recommended.
EXTERIOR BULBS
LIGHT BULBS – Exterior Bulb Number
Low Beam Headlamp 9006
High Beam Headlamp 9005
Front Park/Turn Signal Lamp 3457A
Front Fog Lamp H11
Front Side Marker Lamp WY5W
Center High Mounted Stop (CHMSL) Lamp LED (Serviced at Authorized Dealer)
Rear Tail/Stop/Turn Signal Lamp LED (Serviced at Authorized Dealer)
Backup Lamp 921
License Lamp W5W
MAINTAINING YOUR VEHICLE
107
Page 112 of 124

AUTHENTIC ACCESSORIES BY MOPAR®
• The following highlights just some of the many Authentic Dodge Accessories by Mopar®featuring a fit, finish, and functionality specifically for your Dodge Avenger.
• In choosing Authentic Accessories you gain far more than expressive style, premium protection, or extreme entertainment, you also benefit from enhancing your vehicle with
accessories that have been thoroughly tested and factory-approved.
• For the full line of Authentic Dodge Accessories by Mopar®, visit your local Dodge dealership or online at mopar.com for U.S. residents or mopar.ca for Canadian residents.
EXTERIOR:
• Front End Cover • Sunroof Air Deflector • Front Air Deflector
• Hitch Receiver • Rear Spoiler• Molded Splash Guards
• Chrome Wheel • Locking Fuel Cap• Vehicle Cover
• Wheel Locks • Chrome Exhaust Tip
INTERIOR:
• Premium Carpet Floor Mats • Ambient Light Kit • Katzkin Leather Interiors
• Slush Mats • Roadside Safety Kit
• Door Sill Guards • Molded Cargo Tray
ELECTRONICS:
• Park Distance Sensors • Mopar® Web (WiFi) • Remote Start
• Kicker® Sound System •
Rearview Mirror with Back-up Camera and Bluetooth®
Hands Free Phone• Electronic Vehicle Tracking System
CARRIERS:
• Hitch-mount Bike Carrier • Roof-mount Bike Carrier • Roof Box Cargo Carrier
• Roof-mount Ski and Snow- board Carrier • Roof-mount Water Sports
Carrier • Roof-mount Canoe Carrier
• Roof-mount Cargo Bag
• Kicker® is a registered trademark of Stillwater Designs and Audio, Inc.
MOPAR® ACCESSORIES
110
Page 115 of 124

SIRIUSTravelLink.............57
SpareTire.................81
Spark Plugs................97
Speed Control Accel/Decel .............23
Cancel ................24
Resume ...............24
Set ..................23
Starting Remote ................9
Steering Tilt Column ..............19
Steering Wheel Audio Controls ......61
SunRoof .................27
Tether Anchor, Child Restraint ......15
Tilt Steering Column ...........19
Tires Air Pressure .............106
Changing ...............81
Jacking ................81
SpareTire...............81
Touchscreen Radio Cleaning Your Touchscreen
Radio ...............43, 53
Towing...................74 Disabled Vehicle ...........91
Recreational .............75 Towing Vehicle Behind a Motorhome . . .75
Trailer Towing
Trailer and Tongue Weight ......74
Trailer Weight ...............74
Transmission Fluid .................97
Transmission Temperature Warning Light ..................79
Trunk Lid (Deck Lid) ...........9,10
Trunk Release, Emergency ........10
Trunk Release Remote Control .....8,9
TurnSignals................21
Uconnect® Voice Command .......65
Vehicle Security Alarm Arming ......10
Vehicle Security Alarm Disarming ....10
Voice Command .............65
Voice Prompt Volume Navigation ............43,53
Volume Navigation Voice Prompt .....43,53
Washers, Windshield ...........22
Wheel and Wheel Trim Care .......107
Wind Buffeting ..............29
Windshield Washers ...........22
Windshield Wipers ............22
INDEX
113