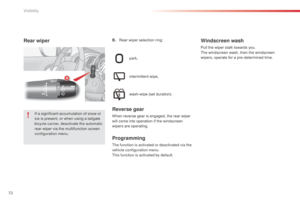
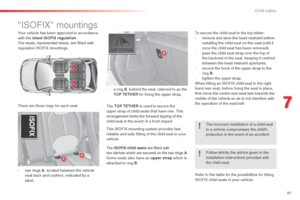
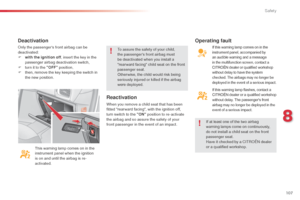
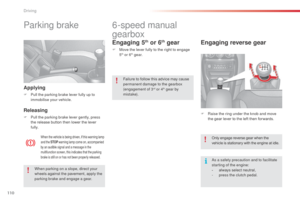
Page 49 of 284

47
C3_en_Chap03_Confort_ed01-2014
Scented air freshenerSystem permitting the diffusion of a fragrance in the passenger compartment in accordance with
your requirements, by means of the adjustment dial and the various fragrance cartridges available.
This dial is located on the dashboard.
It allows you to adjust the intensity of diffusion
of the fragrance.
F
T
urn the dial to the right to permit diffusion
of the fragrance.
F
T
urn the dial to the left to stop diffusion of
the fragrance.
Leave the central vents open.
Fragrance cartridge
Removing the cartridge
F Press the dial and turn it a quarter of a turn anti-clockwise.
F
R
emove the cartridge.
F
R
efit its sealing case.
Fitting the cartridge
F Remove the cartridge from the sealing case.
F
I
nstall the cartridge (flower at top left).
F
P
ress the dial and turn it a quarter of a turn
clockwise.
as a s
afety precaution, do not carry
out any action on the cartridge while
driving.do n
ot dismantle the cartridges.do n
ot attempt to refill the fragrance
diffuser or the cartridges.
Avoid all contact with the skin and eyes.
ke
ep out of reach of children and
animals.
do n
ot discard the original cartridge as
this serves as a plug when no fragrance
cartridge is in use.
In order to preserve the service life of
the cartridge, turn the dial fully to the left
when you no longer wish to diffuse the
fragrance in the passenger compartment.
The intensity of diffusion of the
fragrance may depend on the
ventilation or air conditioning settings.
Adjustment dial
This cartridge can be removed easily. The
first time it is used, replace the plug with a real
cartridge.
You can change it at any time and store it in the
sealed case which keeps it closed once it has
been opened.
You can obtain different fragrance cartridges
from a CITR
oËn
dealer or a qualified
workshop.
3
Comfort
Page 50 of 284
48
C3_en_Chap03_Confort_ed01-2014
Front seatsSeat consisting of a seat cushion, a seat back and a head restraint which can all be adjusted to
adapt your position for ease of driving and comfort.
F
Ra
ise the control and slide the seat
for wards or backwards. F
P
ull the control upwards to raise or push
it downwards to lower, as many times as
required, to obtain the position required.
Forwards-backwards Height
F Push the control rear wards.
Seat backrest angle
Adjustments
Before moving the seat backwards, ensure that there is nothing that might prevent the full travel of the seat, so as to avoid the risk of of jamming
the seat caused by the presence of objects on the floor behind the seat or rear passengers. If the seat jams, stop the movement immediately.
Comfort
Page 51 of 284

49
C3_en_Chap03_Confort_ed01-2014
Additional adjustments
Head restraint height
F To raise the head restraint, pull it for wards and upwards at the same time.
F
T
o remove the head restraint, press the lug A
and pull the head restraint upwards.
F
To put the head restraint back in place, engage
the head restraint stems in the openings
keeping them in line with the seat back.
F To lower the head restraint, press the lug A and the head restraint at the same time.
Heated seats control
With the engine running, the front seats can be
heated separately.
F
U
se the adjustment dial, placed on the side
of each front seat, to switch on and select
the level of heating required:
0 :
o
f
f.
1: L
ow.
2: M
edium.
3:
High.
The head restraint is fitted with a frame
with notches which prevents it from
lowering; this is a safety device in case
of impact.
The adjustment is correct when the
upper edge of the head restraint is
level with the top of the head.
Never drive with the head restraints
removed; they must be in place and
adjusted correctly.
3
Comfort
Page 52 of 284

50
C3_en_Chap03_Confort_ed01-2014
Rear seatsBench seat with fixed one-piece cushion and split backrest (right hand 2/3, left hand 1/3) to adjust the load space in the boot.
Rear head restraintsFolding the backrest
They can also be removed.
To remove a head restraint:
F
r
elease the backrest using control 1 ,
F
t
ilt the backrest 2 slightly for wards,
F
p
ull the head restraint upwards to the stop,
F
t
hen, press the lug A . F
Move the corresponding front seat for ward if necessary.F Check that the seat belt is positioned correctly on the
side of the seat backrest.
F Place the head restraints in the low position.
With passengers in the rear seats,
never drive with the head restraints
removed; they must be in place and
correctly adjusted.
These have one position for use (up) and a
stowed position (down).
F
P
ull control 1 for wards to release the seat
backrest 2 .
F
F
old the seat backrest 2 on to the cushion.
Repositioning the seat backrest
When repositioning the seat backrest,
take care not to trap the seat belts.
F
S
traighten the seat backrest 2
and secure it.
F
C
heck that the red indicator, located next to
the control 1 , is no longer visible.
Comfort
Page 53 of 284

51
C3_en_Chap03_Confort_ed01-2014
Mirrors
Each fitted with an adjustable mirror glass
permitting the lateral rearward vision necessary
for overtaking or parking. They can also be
folded for parking in confined spaces.Adjustment
F Move control A to the right or to the left to select the corresponding mirror.
F
M
ove control B in all four directions to
adjust.
F
R
eturn control A to the central position.
Folding
F From outside: lock the vehicle using the remote control or the key.
F
F
rom inside: with the ignition on, with the
control A in the central position, pull it
downwards.
Unfolding
F From outside: unlock the vehicle using the remote control or the key.
F
F
rom inside: with the ignition on, with the
control A in the central position, pull it
downwards.
Demisting - Defrosting
If your vehicle is fitted with heated mirrors, the
demisting-defrosting operates with the engine
running, by switching on the heated rear screen
(refer to the "Rear screen demist-defrost"
page).
Door mirrors
The objects observed are, in reality,
closer than they appear.
Take this into account in order to
correctly judge the distance of vehicles
approaching from behind. If the mirrors are folded using control A
,
they will not unfold when the vehicle is
unlocked. Pull again on control A .
The folding and unfolding of the door
mirrors using the remote control can be
deactivated by a CITR
oËn
dealer or a
qualified workshop.
ne
ver fold or unfold the electric folding
mirrors manually.
3
Comfort
Page 54 of 284

52
C3_en_Chap03_Confort_ed01-2014
Steering wheel adjustment
F When stationary, pull the control lever to
release the adjustment mechanism.
F
a
d
just the height and reach to suit your
driving position.
F
P
ush the control lever to lock the
adjustment mechanism.
Rear view mirror
Adjustable mirror providing a central rear ward
view.
Equipped with an anti-dazzle system, which
darkens the mirror glass and reduces the
nuisance to the driver caused by the sun,
headlamps from other vehicles...
Adjustment
F adjust the mirror so that the glass is directed correctly in the "day" position.
Day / night position
F Pull the lever to change to the "night" anti-dazzle position.
F
P
ush the lever to change to the normal
"day" position.
Automatic day/night model
By means of a sensor, which measures the
light from the rear of the vehicle, this system
automatically and progressively changes
between the day and night uses.
Manual day/night model
as a safety measure, the mirrors should
be adjusted to reduce the "blind spot". In order to ensure optimum visibility
during your manoeuvres, the mirror
lightens automatically when reverse
gear is engaged.
as a s
afety precaution, these
operations should only be carried out
with the vehicle stationary.
Comfort
Page 55 of 284

53
C3_en_Chap04_ouvertures_ed01-2014
Remote control keySystem which permits central unlocking or locking of the vehicle using the lock or from a distance. It is also used to locate and start the vehicle, as well
as providing protection against theft.
Unlocking the vehicle
Unfolding the key
F First press this button to unfold the key.
Unlocking using the remote
control
F Press the open padlock to unlock
the vehicle.
Unlocking using the key
F Turn the key to the left in the driver's door lock to unlock the vehicle.
Locking the vehicle
Locking using the remote
control
F Press the closed padlock to lock the vehicle.
Locking using the key
F Turn the key to the right in the driver's door lock to lock the vehicle completely.
Locking is confirmed by fixed lighting of
the direction indicators for approximately
two
seconds.
ac
cording to version, the door mirrors fold at
the same time. Unlocking is confirmed by rapid flashing of
the direction indicators for approximately
two seconds.
ac
cording to version, the door mirrors unfold at
the same time. If one of the doors or the boot is still
open, the central locking does not take
place.
When the vehicle is locked, if it is
unlocked inadvertently, it will relock
automatically after thirty seconds
unless a door or the boot is open.
The folding and unfolding of the door
mirrors using the remote control can be
deactivated by a CITR
oËn
dealer or a
qualified workshop.
4
access
Page 56 of 284

54
C3_en_Chap04_ouvertures_ed01-2014
Folding the key
F First press this button to fold the key.
If you do not press the button when folding
the key, there is a risk of damage to the
mechanism.
Anti-theft protection
Electronic engine immobiliser
The key contains an electronic chip which has
a special code. When the ignition is switched
on, this code must be recognised in order for
starting to be possible.
This electronic engine immobiliser locks the
engine management system a few minutes
after the ignition is switched off and prevents
starting of the engine by anyone who does not
have the key.
In the event of a fault, you are
informed by illumination of this
warning lamp, an audible signal and
a message in the screen.
Ignition switch
- Position 1: Stop
- P osition 2: Ignition
-
P
osition 3: Starting
Starting the vehicle
F Insert the key in the ignition switch. The system recognises the starting code.
F
T
urn the key fully towards the dashboard to
position 3 (Starting) .
F
W
hen the engine starts, release the key.Locating your vehicle
F Press the closed padlock to locate your locked vehicle in a
car park.
This is indicated by lighting of the courtesy
lamps and flashing of the direction indicators
for a few seconds. In this case, your vehicle will not start; contact
a CITR
oËn
dealer as soon as possible.
Keep safely, away from your vehicle, the label
attached to the keys given to you on acquisition
of the vehicle.
access