2014 AUDI RS7 SPORTBACK child seat
[x] Cancel search: child seatPage 183 of 292
-Make sure that the PA SSENGER AIR BA G
OFF
light comes on and stays on all the
t ime whenever the ignition is switched
on.
- If the
PA SS ENGER AIR BAG OFF light
does not come on and stay on, immedi
ately install the rear -facing child safety
seat in a rear seating position and have
the a irbag system inspected by your Audi
dealer.
Activating the convertible locking retractor
Use the convertible locking retractor to se
cure a child restraint .
Always heed the child safety seat manufactur
e r's instructions when install ing a ch ild re
straint in you r vehicle. To activate the conver
tible locking retractor:
.,. Place the child rest raint on a seat, prefera
bly on the rear seat.
.,. Slow ly pull the be lt
a ll th e wa y out .
.,. Route it around or through the chi ld re
straint be lt path ¢.&_ .
.,. Push the child safety seat down with your
full weight to get the safety belt rea lly tight.
.,. Insert the belt tongue into the buckle for
that seating position .
.,. Gu ide the safety belt back into the retractor
until the belt lies flat and snug on the child
safety seat .
.,. You should hear a "clicking " noise as the
belt w inds bac k into the ine rtia reel. Test the
convertible locking retractor by pulling on
the belt . You should no longer be able to
pull the belt out of the retractor . The con
vertib le locking retractor is now activated.
.,. Make sure that the red re lease button is fac
ing away from the chi ld restraint so that it
can be unbuckled qu ickly .
.,. Pull on the belt to make sure the safety belt
is p roperly t ight and fastened so t hat the
seat cannot move fo rward or sideways mo re
than one inch (2.5 cm).
Child Sa fet y 181
A WARNING
Using the wrong child restraint or an im
properly installed chi ld restraint can cause
serious pe rsonal injury or death in a c rash .
- Always make sure that the safety belt re-
tractor is loc ked when insta lling a child
safety seat. An unlocked safety belt re
tracto r cannot hold the child safety seat
in place dur ing no rma l dr iving o r in a
crash.
- Always buckle the child sa fety seat firmly
in place even if a ch ild is not si tt ing in it.
A loose child safe ty seat can fly around
during a s udden stop or in a crash .
- Always ma ke sure the seat backrest to
which the child res traint is installed is in
an upright position and securely latched
into place and cannot fold forward. Oth
erwise, the seatback with the child safety
seat attached to it could fly forward in
the event of an accident o r other emer
gency situation.
- Always read and heed all WARNINGS
whenever us ing a child restrained in ave
hicle is being used ¢
page 168. Special
precautions apply when insta lling a child
safety seat on the front passenger seat
¢ page 144, Child restraints on the front
seat -some important things to know.
-
Deactivating the convertible locking
retractor
The conv ertibl e locking retractor for child r e
straints will be deactivated automatically when the belt is wound all the way back into
the retractor.
.,. Press the red b utton on the safety belt buck
le . Th e belt tong ue will pop out of t he b uck
le .
.,. Guide the s afety belt all the way back into
i t s s towed position .
A lways let the safety be lt retract completely
into its stowed position. The safety belt can
now be used as an ordinary safety belt w ith
out the convertible locking retractor fo r child
restraints.
•
•
Page 184 of 292

182 Child Saf ety
If the convertible locking retracto r shou ld be
activated inadvertently, the safety belt must be unfastened and guided completely back in
to its stowed pos ition to deactivate th is fea
ture. If the convertible locking retractor is not
deactivated, the safety belt will gradually be
come tighter a nd uncomfortable to wear.
A WARNING
Improperly insta lled child safety seats in
crease the risk of ser ious personal inju ry
and death in a collision.
- Never unfasten the safety belt to deacti
vate the convert ible lo ck ing ret ractor for
child rest rain ts while the veh icle is mov
ing. You would not be restrained and
cou ld be ser iously injured in an accident.
- Always read and heed all WARNINGS
whenever using a child rest rained in ave
hicle is being used
¢page 168. Special
precautions apply when installing a ch ild
safety seat on the front passenger seat
¢ page 144, Child restraints on the front
seat -some important things to know.
LATCH Lower
anchorages and tethers
for children
Child Restraint System anchors and how
are they related to child safety
To provide a s imp ler and more prac ticable way
to attach the chi ld restraint on the vehicle
seat, Federa l reg ulations require specia l lower
anchorages in vehicles and devices on new
child restraints to attach to the vehicle ancho
rages.
The combination of the tether anchorages and
the lower anchorages is now generally called
the
LATCH system for " Lower Anchorages and
T ethers for Children."
F orward-facing child rest raints manufactured
after September 1, 1999, are required by U .S .
federal regulations to comply with new child head movement performance requirements. T
hese new performance req uirements make a
tethe r necessary on most new child seats.
Installing a c hild restra int tha t requires a top
tether wi thou t one can seriously impa ir the
performance of the chi ld restra int and its abil
ity to protect the child in a collision . Insta lling
a chi ld restraint that req uires a top tether
without the top tether may be a violat ion of
state law.
Child restraint manufacturers offer LA TCH
lower anchorages on their child seats w ith
hook-on or push-on connectors attached to
adjustable straps.
In addition to the LATCH lower anchorages,
these chi ld restraint systems usua lly require
the use of tether straps to he lp keep the chi ld
restraint firmly in place.
A WARNING ,.__ -
Improper installat ion of child restra ints
will increase the r isk of injury and death in
a crash.
- Always follow the instructions provided
by the manufacture r of the child re
straint you intend to install in your ve hi
cle.
- Never install a chi ld restrai nt without a
p roperly attached top tether strap if the
child res tra int m anufa cture r's instruc
tions require the top tether st rap to be
used .
- I mp roper use of child restraint LA TC H
lowe r ancho rage poin ts can lead to injury
in a co llision. The LATCH lower anchorage
points are designed to withstand on ly
those loads imposed by correctly fitted
child restraints.
- Never mo unt two child restraint systems
on one LATCH lower anchorage point.
- Never secure or attach any luggage or
other item to the LATCH lower anchorag
es.
Page 185 of 292
@ Tips
-In Canada, the terms "top tether" with
"lower universal anchorages" (or "lower
universal anchorage bars") are used to
describe the system.
- In other countries, the term "ISO FIX" is
used to describe the lower anchorages.
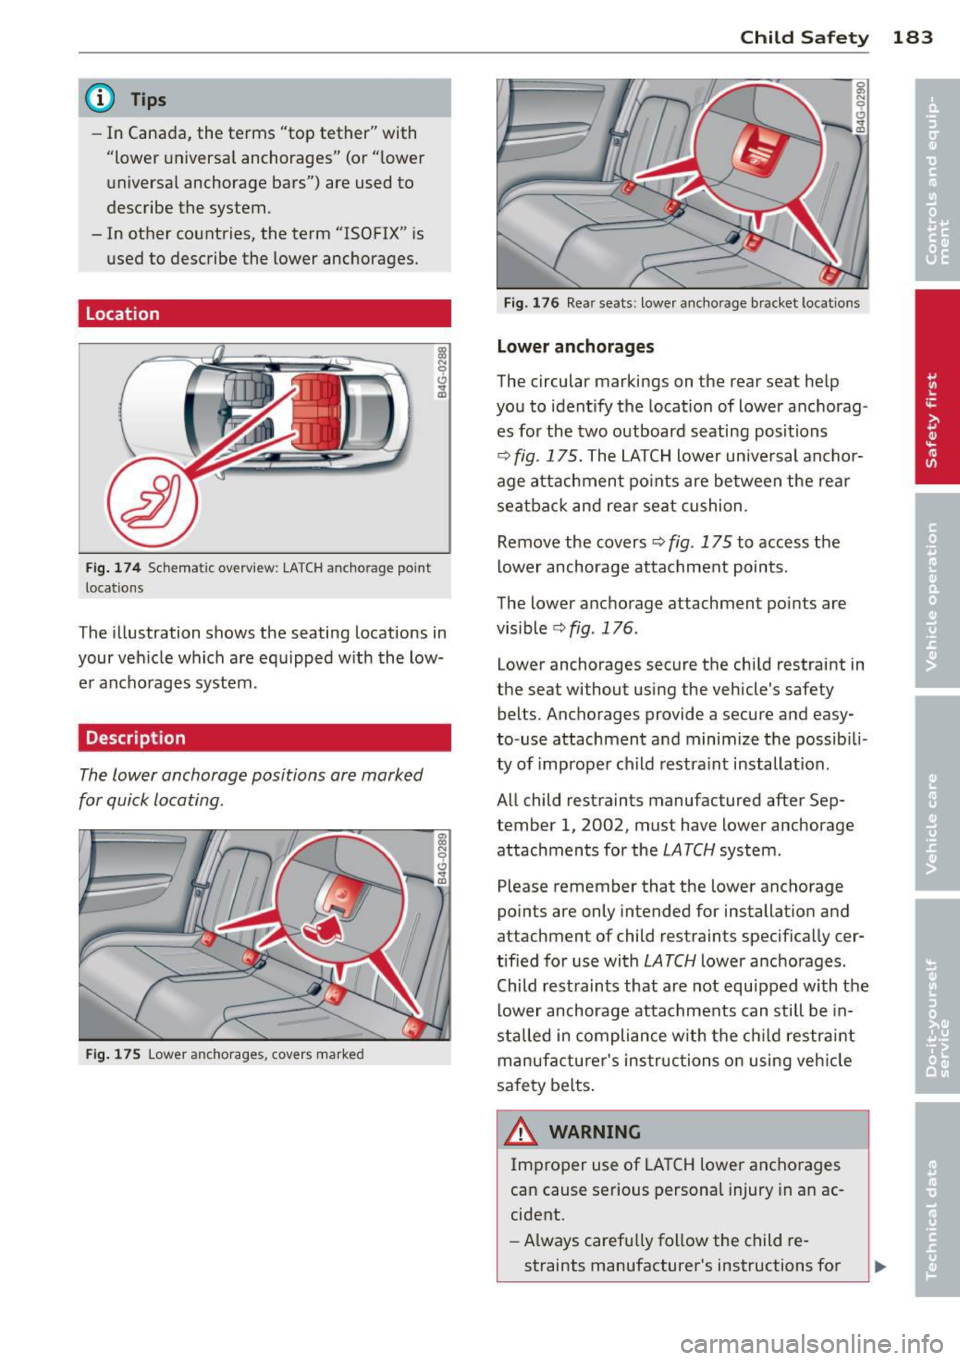
Location
Fig . 174 Schematic overview: LA T CH ancho rage point
locations
The illustration shows the seating locations in
your veh icle which are equipped w ith the low
e r anchorages system .
Description
The lower anchorage positions are marked
for quick locating .
Fig. 175 Lower anchorages , covers marked
Child Safety 183
Fig. 176 Rea r seats: lower anchorage bra cket locat ions
Lower anchorages
The circular markings on the rear seat help
you to ident ify the location of lower anchorag
es for the two outboard seating positions
¢ fig. 175. The LATCH lower unive rsal anchor
age attachment points are between the rear
seatback and rear seat cushion .
Remove the covers¢
fig. 175 to access the
lower anchorage attachment points.
The lower anchorage attachment points are
vis ible ¢
fig . 176.
Lower anchorages secure the chi ld restraint in
the seat without using the vehicle's safety
belts. Anchorages provide a secure and easy
to-use attachment and minimize the possib ili
ty of improper child restraint installation.
All child restraints manufactured after Sep
tember 1, 2002, must have lower anchorage
attachments for the
LATCH system.
Please remember that the lower anchorage
points are only intended for installation and
attachment of child restraints specifically cer
tified for use with
LATCH lower anchorages .
Child rest raints that are not equipped with the
lower anchorage attachments can still be in
stalled in compliance with the child restraint
manufacturer's instructions on using veh icle
safety belts.
A WARNING ~
Improper use of LATCH Lower anchorages
can cause serious personal injury in an ac
cident.
- Always carefully follow the child re
straints manufacturer's instructions for
Page 186 of 292
184 Child Safet y
proper installation of the child restraint
and proper use of the lower anchorages or safety belts in your vehicle.
- Never secure or attach any luggage or
other items to the
LATCH lower ancho
rages.
- Always read and heed the important in format ion about child restra ints in this
chapter and WARNINGS
<=:>page 168,
Child Safety .
Installing a child restraint with LATCH
lower anchorages
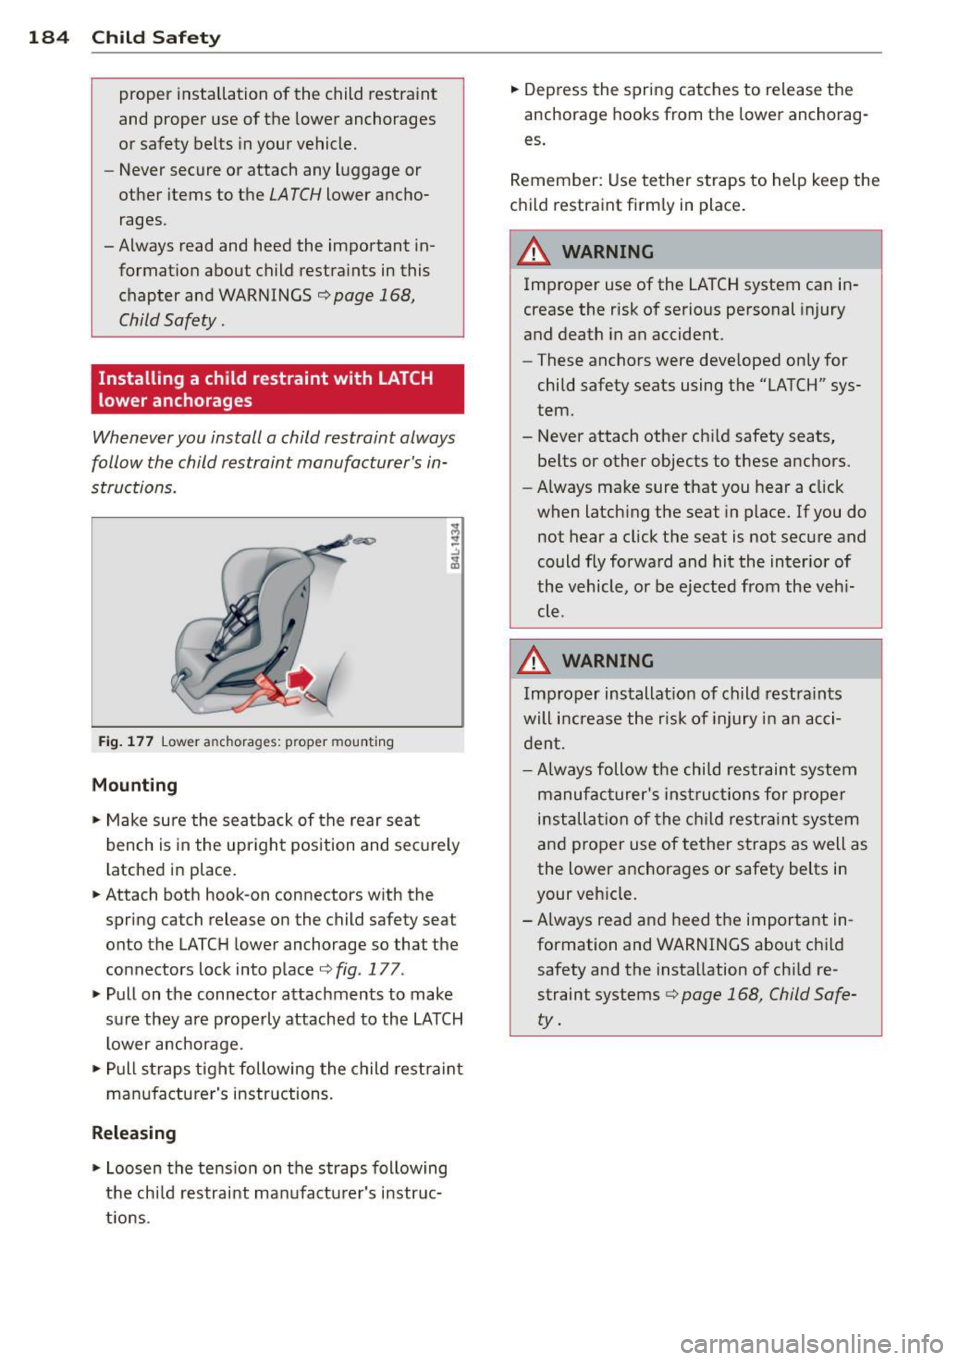
Whenever you install a child restraint always
follow the child restraint manufacturer's in
structions.
Fig. 177 Lower anchorages: proper mount ing
Mounting
.,. Make su re the seatback of the rear sea t
bench is in the upright pos ition and sec urely
latched in place.
.,. Attach both hook-on connectors w ith the
spring catch release on the child safety seat onto the LATC H lower anchorage so that the
connectors lock into place¢
fig. 177 .
.,. Pul l on the connector attachments to make
sure they are properly attached to the LATCH lower anchorage .
.,. Pull s traps tight following the child restra in t
m anuf acturer's instructions .
Releasing
.,. Loosen the te nsio n on the straps following
the ch ild restraint ma nufactu rer's i nstr uc
ti ons. .,.
Depress the spr ing catches to release the
anchorage hooks from the lower anchorag
es.
Remember: Use tether s traps to help keep the
c h ild restraint firm ly in place .
A WARNING ~
Improper use of the LATCH system can in-
crease the risk of serious personal in jury
and death in an accident.
- These anchors were deve loped on ly for
child safety seats using the "LATCH" sys
tem.
- Never attach other chi ld safety seats,
belts or other objects to these anchors.
- Always make sure that you hear a click
when latch ing the seat in p lace . If you do
not hear a click t he seat is not secu re and
could fly forwa rd and hit the inter ior of
the vehicle, or be ejected from the veh i
cle.
A WARNING
Imp roper installat ion of child restra ints
will increase the r isk of injury i n an acci
dent.
- Always follow the child restraint system
manufac turer' s inst ru cti ons for prope r
i n stalla tion of the c hild res trai nt system
and p roper use of te ther s traps as well as
the lower anchorages or safety belts in
your veh icle .
-A lways read and heed t he important in
formation and WARNINGS about ch ild
safety and the installation of ch ild re
straint systems¢
page 168, Child Safe
ty .
-
Page 187 of 292
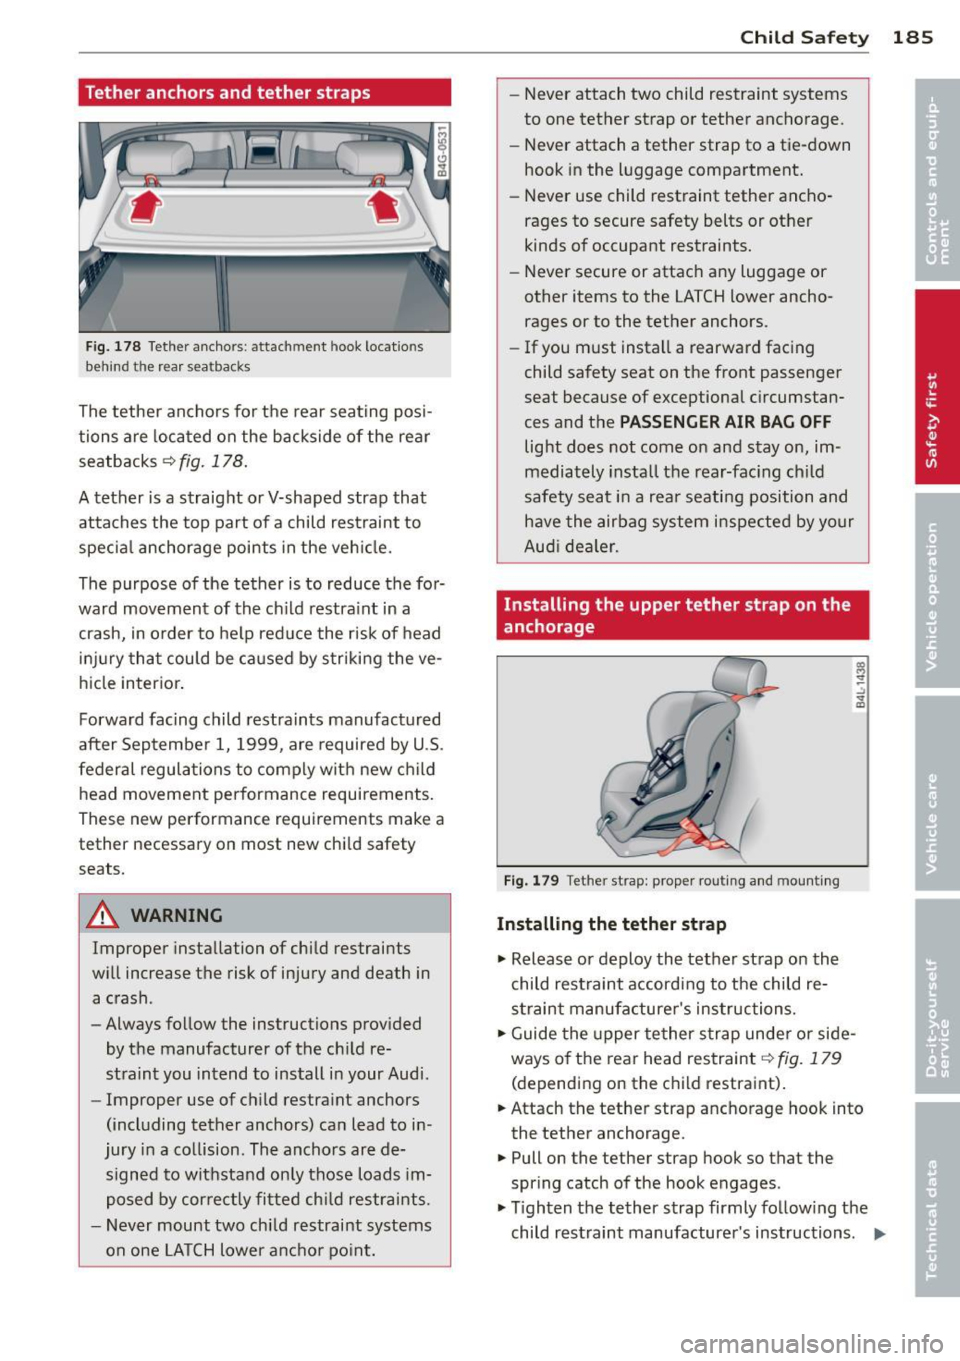
Tether anchors and tether straps
Fig. 178 Tether ancho rs: atta chment hook loc atio ns
behin d the rea r se a tb acks
The tethe r anchors for the rear seating posi
tions are located on the backside of the rear
seatbacks
q fig. 178.
A tether is a straight or V-sha ped strap that
attaches the top part of a child restraint to
specia l anchorage points in the veh icle.
The purpose of the tether is to reduce the for
ward movement of the ch ild restra int in a
crash, in o rder to he lp red uce the risk of head
i nj ury tha t could be ca used by striki ng the ve
hicle interior.
Forward facing child restraints manufactured
after September 1, 1999, a re required by U .S.
federal regulations to comply with new c hild
head movement performance requirements.
Thes e new performance requirements mak e a
tethe r necessary on most new chi ld safety
s eats.
A WARNING
Improper installation of child restraints
will increase the risk of injury and death in a crash .
- Always follow the instructions prov ided
by the manufacturer of the ch ild re
straint you intend to install in your Audi.
- Improper use of ch ild restra int anchors
(including tether anchors) ca n lead to i n
jury in a collision. The ancho rs are de
signed to wit hstand only those loads im
posed by correctly fitted ch ild restraints.
- Never mount two chi ld restraint systems
on one LA TCH lower ancho r po int . Child S
afety 185
- Never attach two child restraint systems
to one tether strap or tether ancho rage .
- Never attach a tether strap to a tie-down
hook in the luggage compartment.
- Never use child restraint tether a ncho
rages to secure safety belts or other
kinds o f occupant restraints.
- Never secure or attach any luggage or
other items to the LATCH lower ancho
rages or to the tether anchors .
- If you must insta ll a rearward fac ing
child safety seat on the front passenger
seat because of exceptional c ircumstan
ces and the
PASSENGER AIR BAG OFF
light does not come on and stay on, im
mediately insta ll the rea r-fac ing ch ild
safety seat i n a rea r seating position and
have the airbag system i nspected by your
Aud i dea ler.
Installing the upper tether strap on the
anchorage
F ig. 179 Tet her stra p: prop er r ou ting and moun ting
Installing the tether strap
.,. Release or deploy the tether strap o n the
child restraint according to the child re
s t raint manufa cture r's instructions.
... Guide the upper te ther s trap unde r or side
ways of the rear head restra int
Q fig . 179
(depending on the child restraint) .
... Attach the tether strap anchorage hook into
the tether anchorage.
.,. Pull on the te ther s trap hook so tha t the
spr ing catch of the hook engages .
.,. Tighten the tether strap firmly follow ing t he
child restraint manufacturer's instructions . .,.
Page 188 of 292
186 Child Saf ety
Re le asin g th e tethe r str ap
.. Loosen the tension following the child re
stra int manufacturer's instructions .
.. Depress the spring catch on the hook and re
lease it from the anchorage .
([) Note
If you leave the child restraint with the
tether strap firmly insta lled for several
days, this cou ld leave a mark on the up
holstery on the seat cushion and backrest
in the area where the tether strap was in
stalled . The upholstery wou ld a lso be per
manently stretched around the tethe r
strap. Th is applies especially to leather
seats.
Using tether straps on rearward-facing
child restraints
Currently, few rear-facing child restraint sys
tems come with a tether. P lease read and
heed the child restraint system manufactur
er's instructions carefully to determine how to
properly install the tether.
A WARNING
-
A child in a rearward-facing child safety
seat insta lled on the front passenger seat
w ill be seriously injured and can be k illed if
the fron t airbag inflates -even with an Ad
vanced Airbag System.
- T he inflating a irbag wi ll hit the child
sa fety seat or infant carrier with g reat
force and w ill smash the ch ild safety seat
and child against the backrest, center
armrest, or door.
- If you must install a rearward facing
child safety seat on the front passenger
seat because of exceptional circ umstan
ces and the
PASSENGER AIR BAG OFF
light does not come on and stay on, im
med iately install the rear-facing child
safety seat in a rear seating posit ion and
have t he a irbag system inspected by you r
Audi dealer.
Additional Information
Sources of information about child
restraints and their use
T he re a re a number o f sources of add itiona l
information about child rest raint selection, in
sta llation and use:
N HT SA advises that the best ch ild safety seat
is the one that fits your chi ld and fits in you r
vehicle, and that yo u will use correct ly and
consistently .
T ry before yo u buy!
U.S Nationa l Highw ay Traffic Safet y Admin
i s tration
T el.: 1-888-3 27-4236 (TIY: 1-800-424-91S3)
www.nhtsa.gov
National SAFE KIDS Campa ign
T el.: (202) 662-0600
www.safe kids.o rg
Saf ety Belt Saf e U.S .A
Tel.: (800) 745-SAFE (English)
T el.: (800) 747-SANO (Span ish)
www.carseat .org
Transport Canad a In formation C entre
Tel.: 1-800-333-0371 or call
1-613-998-86 16 if you are in the Ottawa area
http://www.tc.gc.ca/eng/ roadsafety/
men u.h tm
Audi Cu stom er R elation s
Tel.: (800) 822-2834
Page 226 of 292
224 Check ing and filling
Have the battery checked when you take your
vehicle in for service. You are well advised to replace a battery that is older than 5 years .
W ith certa in types o f airbag deployment, the
battery is disconnected from the vehicle elec
trica l system for safety reasons¢
& in Re
pair, core and disposal of the airbags on
page 158.
Disconn ecting the battery terminal s
Some vehicle functions (power w indow regu
l ators, for example) are lost if the battery ter
minals are disconnected . These functions have
to be re learned after the battery terminals are
connected again. To prevent this, the battery
should only be disconnected from the vehicle
e lectrical system when absolutely necessary
for repairs .
Vehicles not driven for l ong period s
If you do not drive your vehicle over a period
of several days or weeks, electrical compo
nents are gradually cut back or switched off.
This reduces energy consumption and main
tains starting capab il ity over a longer period
¢
page 195. Some of the convenience func
tions may not operate, s uch as the inte rior
lights or power seat adjus tment. The conven
ience f unctions will be available again when
you switch on the ignition and start the en gine.
Winter operation
D uring the winter months, ba tte ry capaci ty
tends to decrease as tempe rat ures d rop . This
is because more powe r is also consumed while
starting , and the headlights, rear window de
fogger, etc., are used more often.
Avoid unnecessary power consumption, par
ticular ly in c ity traffic or when t raveling on ly
short distances. Let you r authorized Audi
dea ler check the capacity of the vehicle bat
tery before winter sets in
¢ page 226. A we ll
charged battery w ill not only prevent starting
prob lems when the weather is cold , but w ill
also last longer .
(D Tips
If your vehicle is left standing for seve ral
weeks at extremely low temperatures, the
vehicle battery sho uld be removed and
stored where it w ill not freeze . This will
prevent it from be ing damaged and having
to be replaced .
Working on the battery
Be especially careful when working on or near
the battery.
The battery is located in the luggage compart
ment under the floor. Before you check any
t hi ng in the luggage compartment,
read and
heed all WARNINGS
¢ ,& .
Always heed the safety warnings , when work
ing on the vehicle battery or the vehicle e lec
trical system to prevent inju ry.
The following WARNINGS are very
important when working on the battery :
Al ways heed the follo wing WARNING SYM -
BOLS and safety precautions when working
on the battery .
®
Always wear eye prote cti on.
&
Battery acid contains sulfuric acid.
Always wear glove s and eye protec-
tion.
@
No
- spa rks
- flames
- smoking.
£
When a battery i s charged, it produ-
ce s hydrogen gas which is e xplosi ve
and could cau se personal injury.
@
Alwa ys k eep the battery well out of
rea ch of children .
_&. WARNING ~
Whenever working on t he battery o r on
the electrical system, there is the risk of
i njury, accident and even fire . Read and
heed the following WARNINGS:
-
Page 279 of 292
A
Accessories . . . . . . . . . . . . . . . . . . . . . . . . 2 7 5
Active lane assist . . . . . . . . . . . . . . . . . . . . 90
Activating and deactivating . .. .. .. .. .. 91
C leaning the camera area .. .. .. .. .. . 204
Description .............. .... .. .... 90
Instrument cluster indicator light . . . . . 91
Messages .. ................ ... .... 91
Notes on instrument cluster display . . . . 91
Setting the steering wheel vibration .. .. 92
AC (automatic climate control) . .. .. .. .. 70
Adaptive air suspension/sport .. .. ... ... 96
Adaptive cruise control ......... ... .... 81
Cleaning the sensor .......... ..... . 204
Messages .. ............. .... .. .... 88
Request for driver intervention . . . . . . . . 86
Stop-and-go traffic . . . . . . . . . . . . . . . . . 85
Adaptive Light (defective) ............. 21
Adding Engine coolant ........... .. .. .. .. . 221
Engine oil .. ............. .... .. ... 218
Windshield washer fluid ............ 227
Additives Engine oil .. ....... ...... .... .. .. . 218
Adjusting Air distribution (automatic climate con-
trol) ..... ... ...... ....... ...... ... 71
Front seats . . . . . . . . . . . . . . . . . . . . . . . . 53
Instrument illumination ... .. .. .. .. .. 47
Steering column e lectrically .. .. .. .. .. 73
Steering column manually . .. .. .. .. .. 73
Temperature (automatic climate control) 71
Airbag system . . . . . . . . . . . . . . . . . 142, 163
Advanced Airbag System . . . . . . . . . . . . 146
Advanced Airbag System components . 150
Care . .. .. .. .... ............. .. .. . 158
Children ... ................ ... ... 170
Child restraints .............. ... ... 170
Components (front airbags) . ... .. .. . 150
Danger of fitting a child seat on the front
passenger seat . . . . . . . . . . . . . . . . . . . . 144
Disposal . .. ............. .... .. .. . 158
Front airbags . . . . . . . . . . . . . . . . 146, 148
How do the front airbags work? . ..... 152
H ow many airbags does my vehicle
have? ... .. .... ............. .. .. . 150
Index 277
How the Advanced Airbag System com-
ponents work together ............ . 152
Important safety instructions on the
knee airbag system ................ 161
Important things to know ......... .. 142
Knee airbags . .. .. .. ............... 159
Monitoring .. .. .. .. . .. .... ........ 154
PASSENGER AIR BAG OFF light ....... 155
Repairs . . . . . . . . . . . . . . . . . . . . . . . . . . 158
Safety instructions .... ......... .. .. 157
Side airbags ... .. .. ............... 162
Side curtain airbags ............... . 165
Warning/indicator lights ............ . 18
Warning/Indicator lights ....... .. .. 154
When must the system be inspected? 154
Aircraft Transporting your vehicle
Alcantara 268
Cleaning .. .. .. .. .... ........... .. 206
All-wheel drive .. .. .. ............... 195
Winter tires . .. .. .... ... .... .... .. 243
Alternator ... ..... .. ................ 16
Ambience lighting ... ... ..... ... .... . 47
Anti-freeze
refer to Engine coolant ............. 220
Anti-lock braking system ............ . 189
Warning/indicator lights . . . . . . . . . 18, 19
Anti-s lip regu lation .... ......... .. .. 189
Warning/indicator lights ........ .. .. . 18
Anti-theft systems Electronic immobilizer ............. .. 33
Ashtray ..... ... .... ................ 59
Audi braking guard
refer to brak ing guard .......... .... . 81
Audi drive select
refer to drive select ... .. ...... .... .. 96
Audi Serv ice Repair Manuals and Litera-
ture ......... .. .. ................. 273
AUTO automatic climate control .......... .. 71
Automatic headlights ............... 44
Auto Lock . . . . . . . . . . . . . . . . . . . . . . . . . . 34
Automatic belt retractor ......... .. .. 136
Automatic climate control
Air vents .. .. .... .. ................ 71
Automatic recirculation ............ .. 72
Operation . . . . . . . . . . . . . . . . . . . . . . . . . 70
•
•