Page 41 of 143

Basic operation41Tone settingsIn the tone settings menu, the tone
characteristics can be set. If adjusted
in one main menu, they are globally
set within all source modes. The
menu may be accessed from each
individual audio main menu.
Notice
A customised set of tone settings
may be stored as a favourite. Find a detailed description 3 28.
To open the tone settings menu, select the MENU screen button in the
respective audio main menu. Select
Tone Settings .Treble
Use this setting to enhance or
attenuate the high frequencies of the
audio sources.
Adjust the setting using the ─ or w
screen buttons.
Midrange Use this setting to enhance or
attenuate the midrange frequencies
of the audio source.
Adjust the settings using the ─ or w
screen buttons.
Bass
Use this setting to enhance or
attenuate the deep frequencies of the
audio sources.
Adjust the settings using the ─ or w
screen buttons.
Balance and fader
In the illustration at the right side of
the menu, define the point within the passenger compartment which is to
have the best sound.
To adjust the settings, use the n,
o , p and q screen buttons.To quickly change between the front
and rear speakers, select the Front or
Rear screen button at the top and
bottom of the vehicle diagram.
Tap on the centre point guideline to
reset the setting to zero.
Surround
(if Surround system equipped)
Use this setting to enhance or
attenuate the surround effect.
Adjust the settings using the ─ or w
screen buttons.
Equaliser modes(if no Surround system equipped)
Select one of the screen buttons in
the interaction selector bar to
optimise the tone for the specific
styles of music.
Select the Custom screen button, if
you wish to define the tone settings yourself.
Surround modes
(if Surround system equipped)
Page 42 of 143

42Basic operation
Select one of the screen buttons in
the interaction selector bar of the
screen to optimise the tone for the
different seating positions.
Select the Normal screen button, if
you wish to provide the best sound for all seating positions.
Volume settings Maximum startup volume
Press the ; button and then select
the SETTINGS icon on the Home
screen.
Scroll through the list and select
Radio and then Maximum Start-Up
Volume .
Tap on the ─ or w screen buttons to
set the desired volume.
Automatic volume adjustment
The volume may be adjusted
automatically relative to the speed of the vehicle. Depending on the vehicle equipment, one of the following
options is available.Auto Volume
Press the ; button and then select
the SETTINGS icon.
Scroll through the list and select Radio and then Auto Volume .
To adjust the degree of volume
adaptation, set Auto Volume to one of
the available options.
Off : no enhancement of volume with
increasing vehicle speed.
High : maximum enhancement of
volume with increasing vehicle
speed.
Bose AudioPilot
This feature automatically adjusts the
volume based on all noises registered within the vehicle. This way, it
assures that also lower volume
passages remain audible.
Press the ; button and then select
the SETTINGS icon.
Scroll through the list and select
Radio and then Bose AudioPilot .
Tap on the Bose AudioPilot menu
item to turn the function on or off.Audible Touch Feedback
If Audible Touch Feedback is
activated, each tap on a screen
button or menu item is indicated by a
beeping sound.
Press the ; button and then select
the SETTINGS icon.
Scroll through the list and select
Radio and then Audible Touch
Feedback .
Select On or Off.
Audio Cue Volume
When the system is turned on or off,
music sounds are played.
Press the ; button and then select
the SETTINGS icon.
Scroll through the list and select
Radio and then Audio Cue Volume .
Select On or Off.
To adjust the startup and shutdown
sounds, select the ─ or w screen
buttons.
Page 43 of 143

Basic operation43
Notice
If the respective source is active, the
volume may be adjusted directly
using the m knob.
System settings Various settings and adaptions for the
Infotainment system can be made via
the SETTINGS application.
Time and Date
Press the ; button and then select
the SETTINGS icon.
Select the Time and Date menu item.
Set time
Select the Set Time menu item to
enter the respective submenu.
Select the Auto Set screen button at
the bottom of the screen. Activate
either On - RDS or Off - Manual .
If Off - Manual is selected, adjust
hours and minutes using the n or
o screen buttons.
Tap on the 12-24 Hr screen button on
the right side of the screen to select a
time mode.
If 12-hour mode is selected, a third
column for AM and PM setting is
displayed. Select the desired option.
Set date
Select the Set Date menu item to
enter the respective submenu.
Notice
If date information is automatically
provided, this menu item is not
available.
Select the Auto Set screen button at
the bottom of the screen. Activate
either On - RDS or Off - Manual .
If Off - Manual is selected, adjust the
date using the n or o screen
buttons.
Clock display
Select the Clock Display menu item to
enter the respective submenu.
To turn off the digital clock display in
the menus, select the Off menu item.
Language
Press the ; button and then select
the SETTINGS icon.
Scroll through the list and select the Language menu item.
Page 44 of 143

44Basic operation
Notice
The language currently active is marked with 9.
Scroll through the list and select the
desired language.
Valet mode
If valet mode is activated, all vehicle
displays are locked and no changes
may be performed within the system.
Notice
Vehicle-related messages and the
rear backup camera remain
enabled.
Locking the system
Press the ; button and then select
the SETTINGS icon.
Scroll through the list and select the
Valet Mode menu item. A keypad is
displayed.
Enter a four-digit code and select the
Enter screen button. The keypad is
redisplayed.
To confirm the first input, reenter the
four-digit code and select the Lock
screen button. The system is locked.
Unlocking the system
Turn the Infotainment system on. A
keypad is displayed.Enter the respective four-digit code
and select the Unlock screen button.
The system is unlocked.
Forgotten PIN Code
To reset the PIN code to the default
setting, contact your Vauxhall
Authorised Repairer.
Display Press the ; button and then select
the SETTINGS icon.
Scroll through the list and select the Display menu item.
Page 45 of 143

Basic operation45
Mode
Select the Mode menu item to enter
the respective submenu.
Depending on the external lighting
conditions, select Day or Night .
If you select Auto, the system
automatically adjusts the display.
Calibrate Touchscreen
Select the Calibrate Touchscreen
menu item to enter the respective
submenu.Follow the instructions on the screen,
tapping on the respective points
indicated. The touch screen is
calibrated.
Turn Display Off
Select the Turn Display Off menu item
to turn off the display.
To turn the display back on, touch the touch screen or press a button on the
instrument panel.
Return to Factory Settings
Press the ; button and then select
the SETTINGS icon.
Scroll through the list and select the
Return to Factory Settings menu item.
Restore Vehicle Settings
Select Restore Vehicle Settings to
restore all vehicle personalisation
settings. A warning message is
displayed.
Select the Restore screen button.
The settings are reset.
Clear All Private Data
Select Clear All Private Data to delete
the following data:
■ Paired Bluetooth devices■ Stored phone books
■ Vehicle contacts list
■ Destination lists
■ Favourites
A warning message is displayed.
Select the Delete screen button. The
data is deleted.
Page 46 of 143

46Basic operation
Restore Radio Settings
Select Restore Radio Settings to
reset the following data:
■ Tone settings
■ Volume settings
■ Speech settings
■ Application tray
■ Contacts sources.
A warning message is displayed.
Select the Restore screen button.
The settings are reset.
Software Information
Press the ; button and select the
SETTINGS icon.
Scroll through the list and select the
Software Information menu item.
A list of version numbers of all items
loaded to the system is displayed.
System update
To update your system software,
contact your Vauxhall Authorised
Repairer.
TouchPad In this menu, you may define the
scrolling direction when operating the touch pad. If you set this function to
Inverted the scrolling direction is
inverted, e.g. if you move upwards
with your fingers you are scrolling downwards on the screen.
Press the ; button and select the
SETTINGS icon.
Scroll through the list and select the
TouchPad menu item. To display the
respective submenu, select Invert
Up / Down or Invert Left / Right .
Select Default or Inverted .
Page 47 of 143
 ............49
Digital")
Radio47RadioUsage.......................................... 47
Station search .............................. 47
Waveband menus ........................48
Radio data system (RDS) ............49
Digital audio broadcasting ...........50Usage
The radio function is part of the
AUDIO application.
Activating the radio function
Press the RADIO button.
Selecting the waveband
Repeatedly press the RADIO button
on the instrument panel to toggle between the different wavebands.
Station search
Automatic station search
Press the t or v buttons to play the
previous or next station.
Manual station search Press and hold the t or v buttons.
Release the respective button when
the desired frequency has almost
been reached.
Station lists
In the station lists, all receivable radio stations within the current reception
area are available for selection.
To display the station list of the
waveband currently active, you may
optionally:
■ Tap anywhere on the screen.
■ Select the BROWSE screen button
on the left side of the screen.
■ Turn the MENU knob.
The station list is displayed.
Page 48 of 143

48Radio
Notice
The currently received station is
highlighted.
Scroll through the list and select the
desired list item.
Categories
To display the categories list of the
waveband currently active, select the Cat screen button in the upper left
corner of the screen.
Select one of the categories. Scroll
through the list (if necessary) and
select the desired station.
All Frequencies
The All AM Frequencies , All FM
Frequencies and All DAB
Frequencies lists allow for manual
station tuning in the respective waveband.
To display all frequencies available
for the waveband currently active,
select the View screen button in the
upper right corner of the screen.
To tune to the desired frequency,
scroll through the list and select the
desired list item.
Favourites
Find a detailed description 3 28.
Waveband menus
The waveband menus allow access
to different settings options. The
following options are available for all
wavebands.
Notice
Find detailed descriptions on FM
and DAB waveband specific settings options in the subsequent chapters.
To open a waveband-specific menu,
activate the radio function and select
the desired waveband. Select the
MENU screen button in the
interaction selector bar.
 1
1 2
2 3
3 4
4 5
5 6
6 7
7 8
8 9
9 10
10 11
11 12
12 13
13 14
14 15
15 16
16 17
17 18
18 19
19 20
20 21
21 22
22 23
23 24
24 25
25 26
26 27
27 28
28 29
29 30
30 31
31 32
32 33
33 34
34 35
35 36
36 37
37 38
38 39
39 40
40 41
41 42
42 43
43 44
44 45
45 46
46 47
47 48
48 49
49 50
50 51
51 52
52 53
53 54
54 55
55 56
56 57
57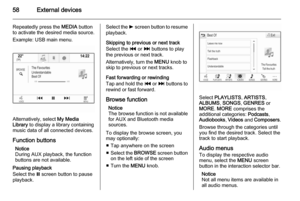 58
58 59
59 60
60 61
61 62
62 63
63 64
64 65
65 66
66 67
67 68
68 69
69 70
70 71
71 72
72 73
73 74
74 75
75 76
76 77
77 78
78 79
79 80
80 81
81 82
82 83
83 84
84 85
85 86
86 87
87 88
88 89
89 90
90 91
91 92
92 93
93 94
94 95
95 96
96 97
97 98
98 99
99 100
100 101
101 102
102 103
103 104
104 105
105 106
106 107
107 108
108 109
109 110
110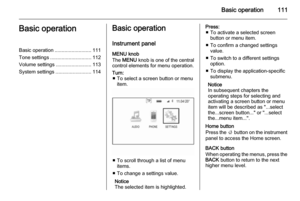 111
111 112
112 113
113 114
114 115
115 116
116 117
117 118
118 119
119 120
120 121
121 122
122 123
123 124
124 125
125 126
126 127
127 128
128 129
129 130
130 131
131 132
132 133
133 134
134 135
135 136
136 137
137 138
138 139
139 140
140 141
141 142
142