Page 25 of 143

Basic operation25
Depending on the application or
function currently active, the
keyboard menu is displayed
differently.
To switch to the symbol keyboard,
select the Sym screen button.
To switch to the letter keyboard,
select the ABC screen button.
Entering characters
To enter a character, tap on the
respective screen button. The
character is entered on release.
If you accidently tapped on the wrong
screen button, slide across the
screen to the desired character and
release.
Tap on and hold a letter screen button to display associated letters in a letter
pop-up menu. Slide to the desired
letter and release.
To confirm the input, select the
respective confirmation button.
Autocomplete function
If a character sequence has been
entered once, it is stored within the
system and may be recalled by the autocomplete function.
As soon as one character (letter or
digit) is entered, the autocomplete
function becomes active. Every
additional character entered is
considered in the matching process,
reducing the list of autocomplete
matches.
Select the o screen button next to
the characters entered to display a list of all autocomplete matches.
Notice
Above the o screen button, the
number of available options is
displayed. It changes according to
the number of matches found.
Select the respective list item. The
keyboard is redisplayed with the
respective list entry shown in the
entry field.
Editing text
To place the cursor, tap at the
respective position within the text.
Enter your changes.
Depending on the application, select
the ╳ or r screen button to delete
one entered character. Tap and hold
the ╳ or r screen button to delete all
characters.
Select the respective confirmation
screen button to confirm an input.
Mixed case characters
In most cases, only capital letters may
be entered.
Page 26 of 143

26Basic operation
If mixed case character recognition isavailable, additional Caps and Shift
screen buttons are displayed.
To activate the caps lock function and
capitalise all letters, select the Caps
screen button.
To deactivate the caps lock function,
the Caps screen button has to be
selected again.
To activate the shift function and
capitalise just one letter, select the
Shift screen button.
The function is automatically
deactivated after one letter has been
entered.
Keypad If only a number or PIN code have to
be entered, a keypad is displayed.
Depending on the application or
function currently active, the keypad
menu is displayed differently.
For a detailed description of how to
enter characters and change entered text, see above.
Character recognition Activating character recognition
Press the h button on the touch pad.
If you are already in a keyboard
menu, select the s screen button.
Entering characters
Draw the desired character (digit or
uppercase letter) on the touch pad. It
appears within the character
recognition pane.The system tries to guess which
character you wish to enter and
displays its guesses in a list placing
its best guess first. The best guess is
announced audibly.
Page 27 of 143
, you may optionally:
■ On the touch pad: Place two fingers
on the touch pad and
simultaneously move them
upw")
Basic operation27
Select the desired character.
To scroll through the list (if
necessary), you may optionally:
■ On the touch pad: Place two fingers
on the touch pad and
simultaneously move them
upwards or downwards.
■ On the touch screen: Tap on the o or n screen buttons at the top
and at the bottom of the scroll bar,
move the slider of the scroll bar with
your finger up and down or place
your finger on the screen and move
it upwards or downwards.
The character selected is entered in
the edit field.
If the best guess of the system was
right, drawing a new character also
serves as confirmation.
To close the character recognition
menu, press two fingers on the pad.
Character modifiers
To draw character modifiers, use the
following gestures. The dot
represents the starting point of the
movement.
Space ― Swipe from left to right:
Delete ― Swipe from right to left:
Settings menu
Tap on the t screen button to display
the character recognition settings menu.
In this menu, you may define the
speed of the character recognition
workflow ( Draw Speed and Character
Selection Speed ). Set the respective
speed to Default, Faster or Slower .
Set Audio Feedback to ON or OFF .
Page 28 of 143

28Basic operationFavouritesA range of different information may
be stored as favourites, e.g.:
■ Radio stations
■ Music tracks
■ Albums or artists
■ Telephone numbers
■ Destinations and routes
■ POIs
■ Contact entries
■ Tone settings
■ Home screen applications.60 individual favourite locations are
available, displayed as five favourites
per row.
They can be displayed in a one-row
view or in a three-row view.
If a favourite location is occupied, the favourite screen button displays the
label text of the respective favourite. If a favourite location is empty, the
position number of the favourite
location (1 to 60) is indicated.
Displaying favourites
The favourites list is accessible from
all menus.
To display one row of favourites when the n screen button is shown on the
screen:
Select the n screen button.
To display three rows of favourites,
see below.
To display one row of favourites when an interaction selector bar is shownon the screen:
■ On the touch screen: Place your finger on the interaction selector
bar and move it upwards until one
row of favourites becomes visible.
Notice
Constant pressure must be applied and the finger must be moved at
constant speed.
Page 29 of 143

Basic operation29
■ On the touch pad: Place threefingers on the pad and move them
upwards until one row of favourites
becomes visible.
To display three rows of favourites,
use one or respectively three fingers
and drag the favourites list up further.
Scrolling through favourites
pages
The favourites page is visible in the
one row or the three row view. To
scroll through the favourites pages,
you may optionally:
■ On the touch screen: Place your finger anywhere on the favourites
page and move it left or right. The
next or previous page of favourites
is displayed.
Notice
Constant pressure must be applied and the finger must be moved at
constant speed.
■ On the touch pad: Place three fingers on the touch pad and move
them left or right. The next or
previous page of favourites is
displayed.
When reaching the beginning or the end of the favourites pages, the whole
list is wrapped.
Notice
At the bottom of the screen,
indication marks designate how
many favourites pages may be
accessed and which page is
currently displayed. The number of
indication marks adapts to the view
chosen (more pages in one-row view, less pages in three-row view).Storing favourites
Favourites may be stored from the
Home screen, the audio application,
the navigation application or the
phone application.
There are two different basic
situations:
■ only one storable item on the screen
■ more than one storable item on the
screen.
Reveal the favourites list and scroll to
the respective favourites page.
Tap and hold the respective favourite screen button.
If there is only one storable item on
the screen, a beeping sound is given
out and the station is stored to the respective screen button.
If there is more than one storable item on the screen, the favourites page is
minimised and the previously shown
menu is redisplayed. Select the item
you wish to store as a favourite. A
beeping sound is given out and the
station is stored to the respective
screen button.
Page 30 of 143

30Basic operation
A few examples for storing favouritesare given below.
Example: Radio station
Repeatedly press the RADIO button
to activate the radio function and the desired waveband.
Seek for the station you wish to store
as a favourite 3 47.
To store this station as a favourite,
reveal the favourites list and scroll to the respective favourites page.
Tap and hold the respective favourite screen button. The station is stored
as a favourite.
Example: Album
Repeatedly press the MEDIA button
and select the desired audio source.
Select the BROWSE screen button to
activate the browse menu and then select the ALBUMS tab 3 57.
To store one of the albums as a
favourite, reveal the favourites list
and scroll to the respective favourites
page.Tap and hold the respective favourite screen button. The favourites page is
minimised and the list of albums is
redisplayed.
Select the album you wish to store as
a favourite. The selected album is
stored as a favourite.
Example: Destination
Press the ; button to display the
Home screen and then select the
NAV icon.
Select DESTINATION in the
interaction selector bar and then
select the RECENT tab 3 70.
To store one of the addresses in the
recent destinations list as a favourite,
reveal the favourites list and scroll to
the respective favourites page.
Tap and hold the respective favourite screen button. The favourites page is
minimised and the recent
destinations menu is redisplayed.
Select the address you wish to store
as a favourite. The selected address
is stored as a favourite.Example: Telephone number
Press the ; button to display the
Home screen and then select the
PHONE icon.
Select the KEYPAD tab and enter the
number you wish to call 3 90.
To store this number as a favourite,
reveal the favourites list and scroll to
the respective favourites page.
Tap and hold the respective favourite screen button. The number is stored
as a favourite.
Retrieving favourites
Display a favourites page (see above)
and scroll to the respective favourites page (if necessary).
Notice
Unavailable favourites are greyed
out.
Select the desired favourite screen
button. Depending on the kind of
favourite selected, a radio station or
track is played, a phone call is
initiated, a route is calculated or an
application is started.
Page 31 of 143

Basic operation31
Notice
The active favourite is highlighted.
Using the right-hand steering wheel
remote control
Repeatedly press the k or l buttons
to select the desired audio favourite.
Alternatively, using the five-way
controller: Press the i button to
display the cluster menu for
application selection. Select the
Audio list item and then Favourites.
Select the desired favourite.
Editing favourites
Select the SETTINGS icon on the
Home screen, the Radio list item and
then Manage Favourites . A three-row
view of the favourites list is displayed
with the editing options shown in the
interaction selector bar.
Renaming favourites
If necessary, scroll to the respective
favourites page.
Select the favourite you wish to edit. Select the RENAME screen button.
A keyboard opens up with the current favourite label text displayed in the
entry field as well as in the label
preview area.
Enter the new label text and select the
Label screen button. You are
returned to the favourites page.
Select the o screen button at the
bottom of the screen to reveal the
interaction selector bar and then
select the DONE screen button to
return to the settings menu.
Deleting favourites
If necessary, scroll to the respective
favourites page.
Select the favourite you wish to
delete.
Select the DELETE screen button.
The favourite and all associated data
are deleted.
Select the DONE screen button to
return to the settings menu.
Moving favourites
If necessary, scroll to the respective
favourites page.
Drag the favourite you wish to move
to its new position.
To store a favourite in a location
beyond the favourites page currently
visible, drag it to the p or q symbols
on top of the favourites page. The list
Page 32 of 143

32Basic operation
starts scrolling. To stop scrolling,
navigate back to the favourites page
area.
Select the DONE screen button to
confirm the action and return to the settings menu.
Defining the number of
favourites shown Press the ; button and then select
the SETTINGS icon. Select the
Radio menu item and then Number of
Favourites Shown .
Activate the desired number of
favourites to be displayed.
Notice
If the number of favourites stored
exceeds the number of favourites
activated in the settings menu, the
additionally stored favourites are not
deleted but just hidden from the
view. They may be reactivated by
increasing the number of viewable favourites.
Contacts
Two different types of contacts lists
may be accessed from the
Infotainment system:
■ Contacts lists downloaded from Bluetooth devices or other external
sources.
■ Vehicle contacts list.
Notice
A maximum of 1000 contacts may
be stored in the vehicle contacts list.
There is no limit for downloaded
contacts lists.Selecting the contacts source
The contacts list first displayed upon
access differs depending on the
application currently active and the
devices connected.
Changing the source
Select the screen button Change
Contacts List on the right side of the
screen. A list of all available contact
sources is displayed. The currently
active contacts list is marked with 9.
Select the desired contacts list. The
respective list is displayed.
 1
1 2
2 3
3 4
4 5
5 6
6 7
7 8
8 9
9 10
10 11
11 12
12 13
13 14
14 15
15 16
16 17
17 18
18 19
19 20
20 21
21 22
22 23
23 24
24 25
25 26
26 27
27 28
28 29
29 30
30 31
31 32
32 33
33 34
34 35
35 36
36 37
37 38
38 39
39 40
40 41
41 42
42 43
43 44
44 45
45 46
46 47
47 48
48 49
49 50
50 51
51 52
52 53
53 54
54 55
55 56
56 57
57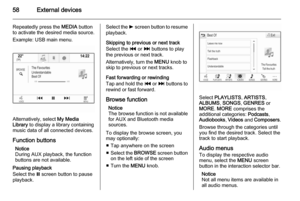 58
58 59
59 60
60 61
61 62
62 63
63 64
64 65
65 66
66 67
67 68
68 69
69 70
70 71
71 72
72 73
73 74
74 75
75 76
76 77
77 78
78 79
79 80
80 81
81 82
82 83
83 84
84 85
85 86
86 87
87 88
88 89
89 90
90 91
91 92
92 93
93 94
94 95
95 96
96 97
97 98
98 99
99 100
100 101
101 102
102 103
103 104
104 105
105 106
106 107
107 108
108 109
109 110
110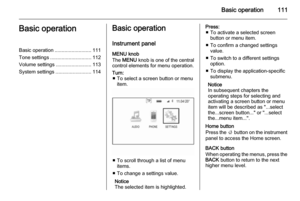 111
111 112
112 113
113 114
114 115
115 116
116 117
117 118
118 119
119 120
120 121
121 122
122 123
123 124
124 125
125 126
126 127
127 128
128 129
129 130
130 131
131 132
132 133
133 134
134 135
135 136
136 137
137 138
138 139
139 140
140 141
141 142
142