Page 97 of 231

Instruments and controls95Stop watch
Select menu item Stop Watch from
the Board Computer menu.
To start, select menu item Start. To
stop, select menu item Stop.
To reset, select menu item Reset.
The relevant stop watch display can
be selected in the Options menu:
Driving Time excl. Stops
The time the vehicle is in motion is
recorded. Stationary time is not
included.
Driving Time incl. Stops
The time the vehicle is in motion is
recorded. The time the vehicle is
stationary with the ignition switched
on is included.
Travel Time Measurement of the time from
manual activation via Start to manual
deactivation via Reset.Vehicle personalisation
The vehicle-specific functions P1 to
P7 can be activated and deactivated.
The setting selected is automatically
stored depending on the vehicle key
used.
Different settings are stored for each
vehicle key. Use of a specific vehicle
key will activate the settings
associated with it.
A total of up to five vehicle keys can
be programmed separately.
Programming permits the technical
prerequisite of the relevant function.
To activate and deactivate the
functions and set the functions,
please see the relevant sections.
Programming ■ Turn the ignition off, the key must be in the ignition switch.
Page 98 of 231

96Instruments and controls
■Pull turn signal stalk and wiper stalk
simultaneously to the steering
wheel until you hear a confirmation
signal (approx. 3 seconds).
■ The miles display shows P1.■ Push the turn signal stalk (left) up
or down and select the desired
function P1 - P7 .
■ Push the wiper stalk (right) up or
down and select status On or OFF ,
or input a value for speed ( P6) or
value for volume ( P7).
■ Pull turn signal stalk (left) and wiper
stalk (right) simultaneously to the
steering wheel until you hear a
confirmation signal (approx.
3 seconds).
The selected settings are now stored
for the key in the ignition switch. To
activate and deactivate the functions
and set the functions selected, please see the relevant sections.
Repeat the procedure to programme
additional keys.
Programmable functions P1 : Switch on the external lighting
using the remote control (Entry
lighting). Entry lighting 3 105.
P2 : Automatic rear windscreen wiper
when reverse gear is selected. Rear
window wiperwasher 3 73.
P3 : Lane change indication: three
flashes when the lever is moved
slightly. Turn and lane-change
signals 3 101.
Page 99 of 231
Instruments and controls97
P4: Automatic locking 3 24.
P5 : Selective unlocking 3 21.
P6 : Speed warning 3 76.
P7 : Volume of the acoustic turn signal
3 101.
Page 100 of 231
98LightingLightingExterior lighting............................ 98
Interior lighting ........................... 103
Lighting features ........................105Exterior lighting
Light switch
Turn light switch:
AUTO=Automatic light control:
Exterior lighting is
switched on and off
automatically depending
on external lighting
conditions.m=Activation or deactivation
of the automatic light
control. Switch turns back
to AUTO8=sidelights9=low beam
When switching on the ignition,
automatic light control is active.
Control indicator 8 3 85.
Tail lights
Tail lights are illuminated together
with low beam and sidelights.
Automatic light control
Page 101 of 231

Lighting99
Automatic light control functionWhen the automatic light control
function is switched on and the
engine is running, the system
switches between daytime running
light and low beam depending on
external lighting conditions.
Daytime running light
Daytime running light increases
visibility of the vehicle during daylight.
Tail lights are not on.
Automatic low beam activation
During poor lighting conditions the
low beam is switched on.
Tunnel detection
When a tunnel is entered the low
beam is switched on.
Adaptive forward lighting 3 100.High beam
To switch from low to high beam,
push lever.
To switch to low beam, push lever
again or pull.
Headlight flash To activate the headlight flash, pull
lever.
Headlight range
adjustment
Manual headlight range
adjustment
To adapt headlight range to the
vehicle load to prevent dazzling: Turn
thumb wheel ? until the required
setting is shown on the miles display.
0=Front seats occupied1=All seats occupied2=All seats occupied and load
compartment laden3=Driver's seat occupied and load
compartment laden
Page 102 of 231

100LightingHeadlights when driving
abroad The asymmetrical headlight beam
extends visibility at the edge of the
road at the passenger side.
However, when driving in countries
where traffic drives on the opposite
side of the road, adjust the headlights
to prevent dazzling of oncoming
traffic.
Vehicles with halogen headlight system Have the headlights adjusted by aworkshop.
Vehicles with adaptive forward lighting
Adapting the aim of the headlight beam:
1. Pull headlight flash lever.
2. Switch on ignition.
3. Hold headlight flash lever. After approx. 5 seconds the control
indicator B starts flashing and an
acoustic signal sounds.Control indicator B 3 85.
Every time the ignition is switched on,
B illuminates for approx. 8 seconds.
For deactivation, operate the same
procedure as described above.
Control indicator B will illuminate for
approx. 4 seconds when the function is deactivated.
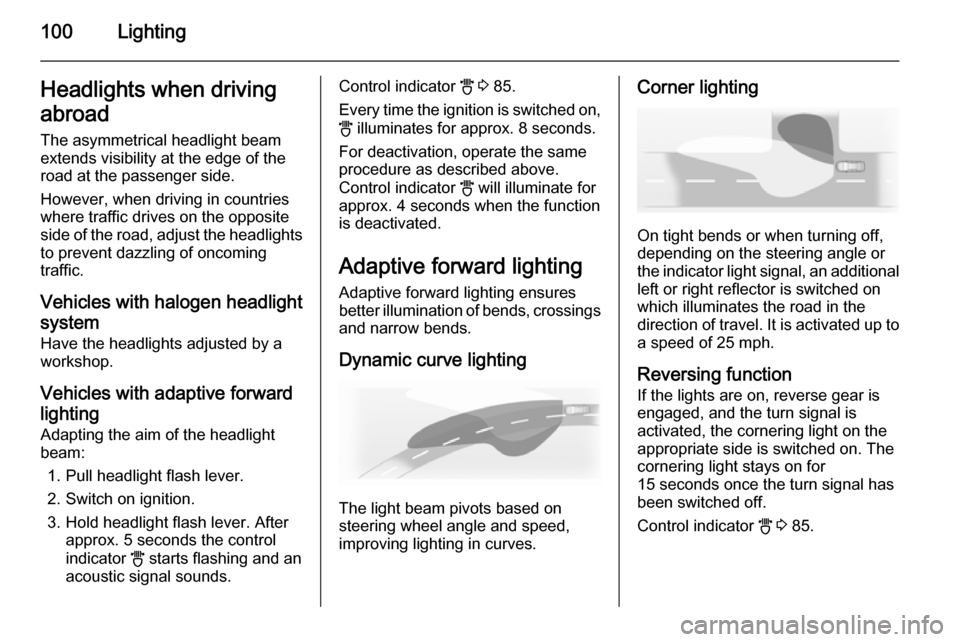
Adaptive forward lighting
Adaptive forward lighting ensures
better illumination of bends, crossings
and narrow bends.
Dynamic curve lighting
The light beam pivots based on
steering wheel angle and speed,
improving lighting in curves.
Corner lighting
On tight bends or when turning off,
depending on the steering angle or
the indicator light signal, an additional left or right reflector is switched on
which illuminates the road in the
direction of travel. It is activated up to
a speed of 25 mph.
Reversing function If the lights are on, reverse gear is
engaged, and the turn signal is
activated, the cornering light on the
appropriate side is switched on. The cornering light stays on for
15 seconds once the turn signal has
been switched off.
Control indicator B 3 85.
Page 103 of 231
Lighting101Hazard warning flashers
Operated with the ¨ button.
The hazard warning flashers activate
automatically if the airbags deploy.
Turn and lane-change
signalsLever up=right turn signalLever down=left turn signal
The lever always springs back to its
original position.
If the lever is moved past the
resistance point, the turn signal is
switched on constantly. When the
steering wheel moves back, the turn
signal is automatically deactivated.
For three flashes, e.g. when changing lanes, press the lever until resistance
is felt and then release. This function
can be activated or deactivated
depending on the key used 3 95.
Move the lever to the resistance point
and hold for longer indication.
Switch the turn signal off manually by moving the lever slightly.
Acoustic turn signal The volume of the acoustic turn signal
can be adjusted. This function can be programmed depending on the key
used 3 95.
Page 104 of 231
102LightingFront fog lights
Operated with the > button.
Light switch in position AUTO:
switching on front fog lights will switch the low beam on automatically.
Rear fog lights
Operated with the r button.
Light switch in position AUTO:
switching on front fog lights will switch the low beam on automatically.
The rear fog light can only be
switched on when both the ignition and the low beam or sidelights (with
front fog lights) are on.
The vehicle rear fog light is
deactivated when towing.
Parking lights
When parked, the parking lights on
one side can be activated:
1. Set light switch to m or AUTO .
2. Ignition off.
3. Move turn signal lever all the way up (right parking lights) or down
(left parking lights).
Confirmed by a signal and the
corresponding turn signal control
indicator.
To switch it off, switch on the ignition
or move the turn signal lever in the
opposite direction.