Page 81 of 192
79
Modular vertical grille
Operations:3.
Lift the catch, located at the lower part of
the grille.
4.
Pivot the grille and insert the catch in the
space provided on the passenger seat
back.
1.
Place the passenger seat in the folded
position.
2.
Lift the catch, located at the upper part of
the grille.
A two-part partition grille is available.
Associated with the folding front passenger
seat, the grille increases the driver's safety
by separating them from the front load.
4
EASE OF USE and COMFORT
Practical information
Page 82 of 192
80
REAR FITTINGS
Stowing rings
There are 4 stowing rings on the rear floor to
secure your luggage.
Luggage retaining net
Hooked onto the stowing rings, this enables
you to secure your luggage.
Rear shelf
Unfold the shelf to conceal the contents of
the boot from view.
Fold the shelf back on itself for easier
access to the contents of the boot.
Stow the shelf behind the rear bench seat
when loading bulky items vertically.Removing the shelf
Fold the shelf back on itself.
Lift the shelf to approximately 60°.
Unclip the shelf's side fixings from its
supports.
Remove the shelf.
Stow the folded shelf in the location behind
the rear bench seat.
To refit the shelf, carry out these operations
in reverse order.
Practical information
Page 83 of 192
81
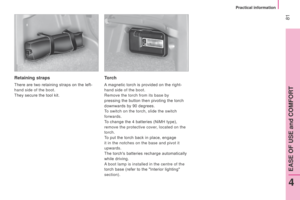
Retaining straps
There are two retaining straps on the left-
hand side of the boot.
They secure the tool kit.
Torch
A magnetic torch is provided on the right-
hand side of the boot.
Remove the torch from its base by
pressing the button then pivoting the torch
downwards by 90 degrees.
To switch on the torch, slide the switch
forwards.
To change the 4 batteries (NiMH type),
remove the protective cover, located on the
torch.
To put the torch back in place, engage
it in the notches on the base and pivot it
upwards.
The torch's batteries recharge automatically
while driving.
a boot lamp is installed in the centre of the
torch base (refer to the "Interior lighting"
section).
4
EASE OF USE and COMFORT
Practical information
Page 84 of 192

82
INTERIOR LIGHTING
Front courtesy lamp
This is located in the centre of the roof.
It is switched on by:
-
tilting the lens,
-
opening or closing a door
,
-
locking or unlocking the vehicle.
It switches of
f automatically, after a few
minutes, if the doors remain open, or when
the ignition is switched on.
The courtesy lamp unit may be fitted with an
alarm sensor, a microphone for the hands-
free kit and reading lamps.
The reading lamps have right-hand and left-
hand switches.
Rear courtesy lamp
This is located on the upper part of the rear
right side.
Press the side of the courtesy lamp lens to
switch it on or off.
It comes on automatically when a door is
opened (Combi).
It comes on automatically when opening
a sliding side door or the side-hinged rear
doors (light vans).
Good practice
It switches off automatically:
- if the switch is not pressed down,
-
in all cases within approximately
15 minutes if the doors remain open,
-
on closing the doors, after a timed period,
-
when the ignition is switched on,
-
when locking.
Boot lamp
This is located in the centre of the torch
base.
The lamp operates in accordance with the
three positions of the switch below. Permanently on.
In this "AUTO"
position, it comes
on gradually when the vehicle is
unlocked and when a rear door or
the tailgate is opened.
It switches off automatically, after a few
minutes, if a rear door or the tailgate
remains open, or when the ignition is
switched on.
Permanently off.
When closing the doors, the time
before the front and rear courtesy
lamps go out may not be same.
Practical information
Page 85 of 192
83
TRIP COMPUTER
If TRIP b is activated in the vehicle
configuration menu: -
T
rip B,
-
A
verage fuel consumption B,
-
A
verage speed B,
-
T
rip duration B.
Zero reset
Press the TRIP button for more than two
seconds to reset the displayed data to zero.
Using the TRIP button, located at the end of
the wiper stalk, you can display the following
information in succession:
-
Ambient temperature,
-
Range,
-
T
rip A,
-
A
verage fuel consumption A,
-
Current fuel consumption
A,
-
A
verage speed A,
-
T
rip duration A. Press the SET / Back button for more than
two seconds to return to the home screen.
5
TECHNOLOGY on BOARD
Trip computer
Page 86 of 192
84
Level 1 screen
- Speed (speed beep).
-
T
ime (Setting the time).
-
Buzz (V
olume for announcements).
-
Unit (Units of measurement).
-
Bag p (Passenger's airbag).
Refer to the corresponding line of the
configuration - personalisation table on the
following pages.
CONFIGURATION /
P ERSONALISATION OF THE VEHICLE
Level 2 screen
Refer to the corresponding line of the
configuration - personalisation table on the
following pages.
Control panel
The side control panel located beside the
steering wheel provides access to screen
menus allowing personalisation of some of
your systems.
Eight languages are available: Italian,
English, German, French, Spanish,
Portuguese, Dutch and Turkish.
a
s a safety precaution, the menus can
only be accessed when the ignition is
off (engine off).
Vehicle configuration
Page 87 of 192
85
Menu...Press...Sub-
menu...Press... Select... Confirm
and exitEnables you to...
1 Speed beep
onIncrease
Activate/Deactivate the audible
signal indicating exceeding of the
programmed speed.
Modify the speed setting.
d
ecrease
o
FF
2
a
ctivate Trip
b on
a
ctivate
d
isplay a second trip, "Trip b ".
o
FF
d
eactivate
3 Set time Hours
Increase
Adjust the clock
d
ecrease
Format 24 h
Select the display mode for the
clock.
12 h
4 Set date Year /
Month /
d
ayIncrease
Adjust the date.
d
ecrease
This button enables
you to:
-
access the menus and
sub-menus, This button enables you to:
-
scroll up through a menu,
-
increase a value.
This button enables you to: -
scroll down through a menu,
-
decrease a value.
-
confirm your selections within a menu,
-
exit from the menus.
A
long press enables you to return to the
home screen.
5
TECHNOLOGY on BOARD
Vehicle configuration
Page 88 of 192
86Menu...Press... Sub-menu... Press... Select... Confirm
and exitEnables you to...
5 See radio
on
d
isplay the name of the station.
Display the CD track number.
o
FF
6
a utoclose While moving
onActivate/Deactivate the
automatic locking of the doors
above 12
mph (20 km/h).
o
FF
7
Measurement
unit
d
istances
k
mSelect the distance display
unit.
Mi(les)
Temperature °C
Select the temperature display
unit.
°F
Consumption km/l
Select the fuel consumption
display unit.
l/100 km
8 Language List of
languages
availableSelect the display language.
9
Volume of
announcements
Increase Increase/Decrease the volume
of the signals and warnings
(the change is immediate when
the button is pressed).
d
ecrease
10
b
utton
volume Increase
Increase/Decrease the volume
for the buttons.
d
ecrease
Vehicle configuration