2013 VOLVO V60 steering
[x] Cancel search: steeringPage 319 of 422

08 Wheels and tyres
Tyre pressure
08
317
Tyre pressure
G021830
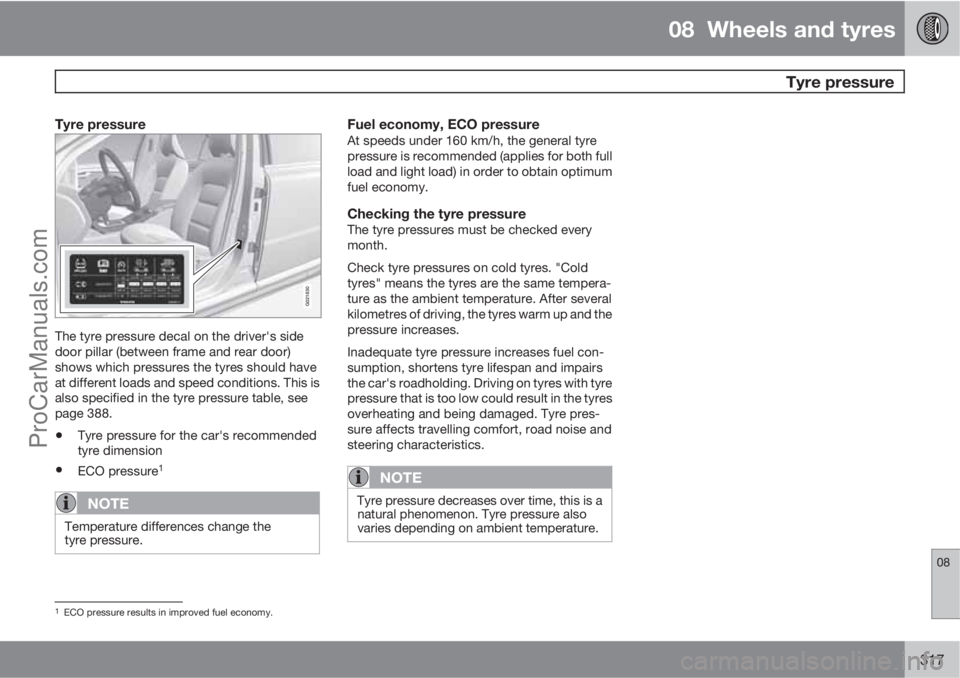
The tyre pressure decal on the driver's side
door pillar (between frame and rear door)
shows which pressures the tyres should have
at different loads and speed conditions. This is
also specified in the tyre pressure table, see
page 388.
•Tyre pressure for the car's recommended
tyre dimension
•ECO pressure1
NOTE
Temperature differences change the
tyre pressure.
Fuel economy, ECO pressureAt speeds under 160 km/h, the general tyre
pressure is recommended (applies for both full
load and light load) in order to obtain optimum
fuel economy.
Checking the tyre pressureThe tyre pressures must be checked every
month.
Check tyre pressures on cold tyres. "Cold
tyres" means the tyres are the same tempera-
ture as the ambient temperature. After several
kilometres of driving, the tyres warm up and the
pressure increases.
Inadequate tyre pressure increases fuel con-
sumption, shortens tyre lifespan and impairs
the car's roadholding. Driving on tyres with tyre
pressure that is too low could result in the tyres
overheating and being damaged. Tyre pres-
sure affects travelling comfort, road noise and
steering characteristics.
NOTE
Tyre pressure decreases over time, this is a
natural phenomenon. Tyre pressure also
varies depending on ambient temperature.
1ECO pressure results in improved fuel economy.
ProCarManuals.com
Page 324 of 422

08 Wheels and tyres
Emergency puncture repair (TMK)
08
322
Pressure reducing valve
Air hose
Sealing fluid bottle
Pressure gauge
Sealing punctured tyres
G014338
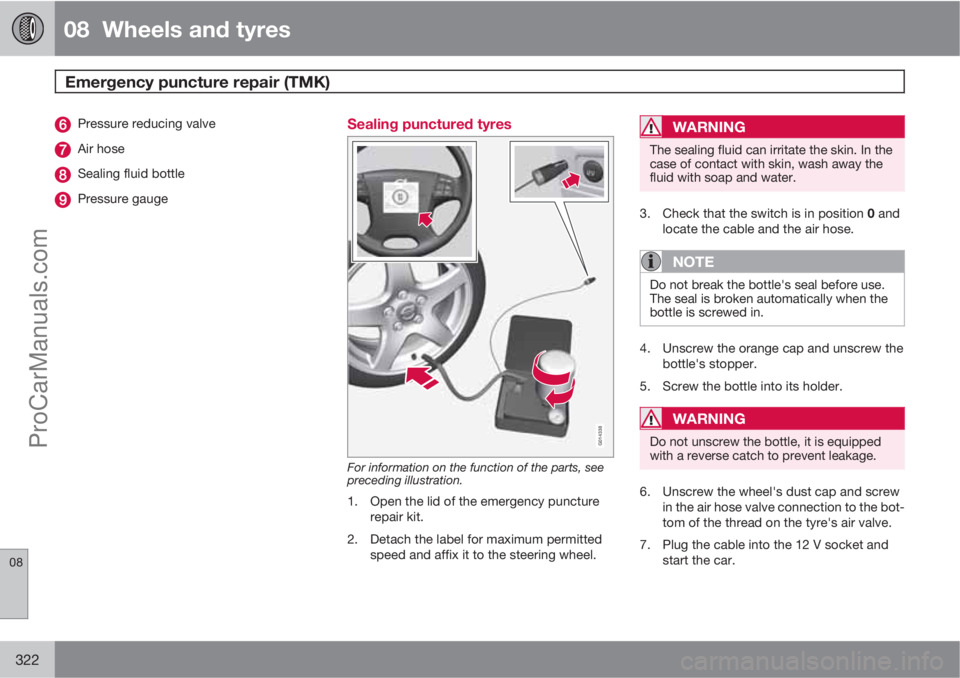
For information on the function of the parts, see
preceding illustration.
1. Open the lid of the emergency puncture
repair kit.
2. Detach the label for maximum permitted
speed and affix it to the steering wheel.
WARNING
The sealing fluid can irritate the skin. In the
case of contact with skin, wash away the
fluid with soap and water.
3.
Check that the switch is in position 0 and
locate the cable and the air hose.
NOTE
Do not break the bottle's seal before use.
The seal is broken automatically when the
bottle is screwed in.
4. Unscrew the orange cap and unscrew the
bottle's stopper.
5. Screw the bottle into its holder.
WARNING
Do not unscrew the bottle, it is equipped
with a reverse catch to prevent leakage.
6. Unscrew the wheel's dust cap and screw
in the air hose valve connection to the bot-
tom of the thread on the tyre's air valve.
7. Plug the cable into the 12 V socket and
start the car.
ProCarManuals.com
Page 330 of 422

09 Maintenance and service
Engine compartment 09
328
General
Volvo service programmeTo keep the car as safe and reliable as possi-
ble, follow the Volvo service programme as
specified in the Service and Warranty Booklet.
Volvo recommends engaging an authorised
Volvo workshop to perform the service and
maintenance work. Volvo workshops have the
personnel, special tools and service literature
to guarantee the highest quality of service.
IMPORTANT
For the Volvo warranty to apply, check and
follow the instructions in the Service and
Warranty Booklet.
Check regularlyCheck the following oils and fluids at regular
intervals, e.g. when refuelling:
•Coolant
•Engine oil
•Power steering fluid
•Washer fluid
WARNING
Remember that the radiator fan (located at
the front of the engine compartment, behind
the radiator) may start automatically some
after the engine has been switched off.
Always have the engine cleaned by a work-
shop. There is a risk of fire if the engine is
hot.
Raising the car
NOTE
Volvo recommends only using the jack that
belongs to the car model in question. If a
jack is selected other than the one recom-
mended by Volvo, follow the instructions for
use supplied with the equipment.
If the car is raised with a workshop jack; posi-
tion the jack against the front edge on the
engine's subframe.
Do not damage the splashguard under the
engine. Ensure that the workshop jack is posi-
tioned so that the car cannot slide off the jack.
Always use axle stands or similar.
If you raise the car using a two-pillar workshop
lift, ensure that the front and rear lift arms are
fixed under the lifting points. See preceding
illustration.
Opening and closing the bonnet
The handle for bonnet opening is always on the
left-hand side.
ProCarManuals.com
Page 331 of 422

09 Maintenance and service
Engine compartment09
329
Turn the handle about 20-25 degrees
clockwise. You will hear when the catch
releases.
Move the catch to the left and open the
bonnet. (The catch hook is located
between the headlamp and grille, see illus-
tration.)
WARNING
Check that the bonnet locks properly when
closed.
Engine compartment, overview
The appearance of the engine compartment may
vary depending on engine variant.
Coolant expansion tank
Power steering fluid reservoir
Engine oil dipstick1
Radiator
Filling engine oil
Reservoir for brake and clutch fluid
(located on the driver's side)
Battery
Relay and fuse box
Filling washer fluid
Air filter
WARNING
The ignition system has very high voltage
and output. The voltage in the ignition sys-
tem is highly dangerous. The remote control
key must always be in 0 position when work
is being done in the engine compartment,
see page 78.
Do not touch the spark plugs or ignition coil
when the remote control key is in II position
or when the engine is hot.
Checking the engine oil
1Engines with electronic oil level sensor have no dipstick (5-cyl. diesel).
ProCarManuals.com
Page 336 of 422

09 Maintenance and service
Engine compartment 09
334
Filling
Brake fluid reservoir location.
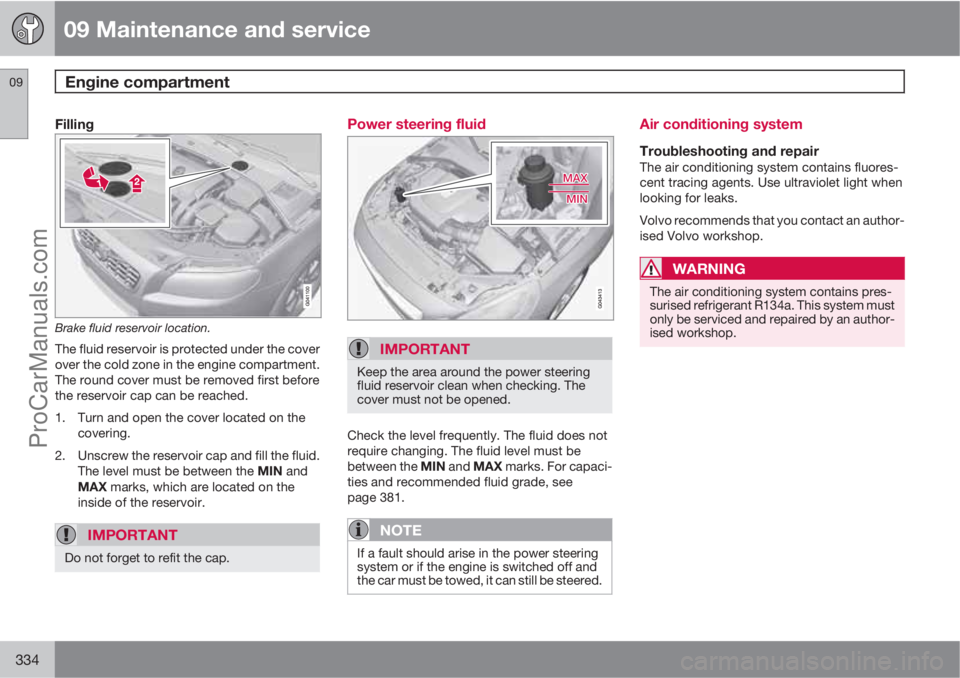
The fluid reservoir is protected under the cover
over the cold zone in the engine compartment.
The round cover must be removed first before
the reservoir cap can be reached.
1. Turn and open the cover located on the
covering.
2. Unscrew the reservoir cap and fill the fluid.
The level must be between the MIN and
MAX marks, which are located on the
inside of the reservoir.
IMPORTANT
Do not forget to refit the cap.
Power steering fluid
IMPORTANT
Keep the area around the power steering
fluid reservoir clean when checking. The
cover must not be opened.
Check the level frequently. The fluid does not
require changing. The fluid level must be
between the MIN and MAX marks. For capaci-
ties and recommended fluid grade, see
page 381.
NOTE
If a fault should arise in the power steering
system or if the engine is switched off and
the car must be towed, it can still be steered.
Air conditioning system
Troubleshooting and repairThe air conditioning system contains fluores-
cent tracing agents. Use ultraviolet light when
looking for leaks.
Volvo recommends that you contact an author-
ised Volvo workshop.
WARNING
The air conditioning system contains pres-
surised refrigerant R134a. This system must
only be serviced and repaired by an author-
ised workshop.
ProCarManuals.com
Page 354 of 422

09 Maintenance and service
Fuses 09
352* Option/accessory, for more information, see Introduction.
General fuses, engine compartmentOn the inside of the cover there are tweezers
that facilitate the procedure for the removal
and fitting of fuses.
Positions (see preceding illustration)Engine compartment, upper
Engine compartment, front
Engine compartment, lower
These fuses are all located in the engine com-
partment box. The fuses in (C) are located
under (A).
On the inside of the cover is a label that shows
the location of the fuses.
•Fuses 1-7 and 42-44 are of the "Midi Fuse"
type and must only be replaced by a work-
shop
1.
•Fuses 8-15 and 34 are of the "JCASE" type
and should be replaced by a workshop1.
•Fuses 16-33 and 35-41 are of the "Mini
Fuse" type.
FunctionA
Primary fuse for the central elec-
tronic module (CEM) with fuse
box B under the glovebox
A
50
Primary fuse for the central elec-
tronic module (CEM) with fuse
box B under the glovebox50
Primary fuse for central electri-
cal unit in cargo areaA60
Primary fuse for central electri-
cal unit in passenger compart-
ment with fuse box A under the
glovebox
A
60
Primary fuse for central electri-
cal unit in passenger compart-
ment with fuse box A under the
glovebox
A
60
--
PTC element, air preheater*A100
Headlamp washers*20
Windscreen wipers30
FunctionA
Parking heater*25
Ventilation fanA40
--
ABS pump40
ABS valves20
--
Headlamp levelling*; Active
Xenon headlamps - ABL*10
Primary fuse for the central elec-
tronic module (CEM) with fuse
box B under the glovebox20
ABS5
Speed related power steering*5
Engine control module; Trans-
mission control module; Air-
bags10
Heated washer nozzles*10
1An authorised Volvo workshop is recommended.
ProCarManuals.com
Page 358 of 422

09 Maintenance and service
Fuses 09
356* Option/accessory, for more information, see Introduction.
Box AFunctionA
--
Infotainment control module5
Audio control unit (ampli-
fier)*
Digital radio*; TV*10
Audio15
Telematics*; Bluetooth*5
--
Sunroof*; Interior lighting
roof; Climate sensor*;
Damper motors, air intake5
12 V socket, tunnel console15
Seat heating, rear right*15
Seat heating, rear left*15
--
Seat heating (passenger
side)15
Seat heating (driver's side)15
Box AFunctionA
Parking assistance*; Park-
ing camera*; Towbar control
module *
BLIS*5
AWD control module*15
Active chassis Four-C*10
Box BFunctionA
Rear window wiper15
--
Interior lighting; Driver's
door control panel, power
windows; Power seats,
front*; Remote controlled
garage door opener*7.5
Information display (DIM)5
Adaptive cruise control,
ACC*; collision warning sys-
tem*10
Interior lighting; Rain sensor7.5
Steering wheel module7.5
Box BFunctionA
Central locking system, fuel
filler flap10
Rear window washer15
Windscreen washers15
Unlocking, tailgate10
Folding head restraint*10
Fuel pump20
Movement detector alarm*;
Climate panel5
Steering lock15
Siren alarm*; Data link con-
nector OBDII5
--
Airbags10
Collision warning system*5
Accelerator pedal sensor,
PTC element air preheater*;
Dimming, interior rearview
mirror*; Seat heating, rear*7.5
ProCarManuals.com
Page 366 of 422

09 Maintenance and service
Car care 09
364
To achieve best results Volvo recommends
cleaning and the application of protective
cream once to four times per year (or more if
necessary). The Volvo Leather Care kit is avail-
able from your Volvo dealer.
IMPORTANT
•Certain items of coloured clothing (for
example, jeans and suede garments)
may stain the upholstery.
•Never use strong solvents. Such prod-
ucts may damage fabric, vinyl and
leather upholstery.
Washing instructions for leather
upholstery
1. Pour the leather cleaner on the dampened
sponge and squeeze out a strong foam.
2. Work the dirt away with gentle circular
movements.
3. Dab accurately with the sponge on the
stains. Allow the sponge to absorb the
stain. Do not rub.
4. Wipe off with soft paper or a cloth and
allow the leather to dry completely.
Protective treatment of leather
upholstery
1. Pour a small amount of the protective
cream on the felted cloth and massage in
a thin layer of cream with gentle circular
movements on the leather.
2. Allow the leather to dry for 20 minutes
before use.
The leather has now been given improved pro-
tection against stains and improved UV pro-
tection.
Washing instructions for the leather
steering wheel
•Remove dirt and dust with a soft pre-mois-
tened sponge and neutral soap.
•Leather needs to breathe. Never cover the
leather steering wheel with protective plas-
tic.
•Use natural oils. Volvo's leather care
agents are recommended for best results.
If the steering wheel has stains:
Group 1 (ink, wine, coffee, milk, sweat and
blood)
–Use a soft cloth or sponge. Mix a 5%
ammonia solution. (For blood stains, use a
solution of 2 dl water and 25g salt.)Group 2 (fats, oils, sauces and chocolate)
1. Same procedure as group 1.
2. Polish with an absorbent paper or cloth.
Group 3 (dry dirt, dust)
1. Use a soft brush to remove the dirt.
2. Same procedure as group 1.
Treating stains on interior plastic, metal
and wood parts
A fibrillated fibre or microfibre cloth, lightly
moistened with water, available from Volvo
dealers, is recommended for cleaning interior
parts and surfaces.
Do not scrape or rub stains. Never use strong
stain removers. A special cleaning agent avail-
able from Volvo dealers can be used for more
difficult cleaning.
Cleaning seatbeltsUse water and a synthetic detergent. A special
textile cleaning agent is available from your
Volvo dealer. Make sure the seatbelt is dry
before allowing it to retract.
ProCarManuals.com