Page 313 of 422

08 Wheels and tyres
General
08
* Option/accessory, for more information, see Introduction.311
Wear and maintenanceThe correct tyre pressure results in more even
wear, see page 317. Driving style, tyre pres-
sure, climate and road condition affect how
quickly your tyres age and wear. To avoid dif-
ferences in tread depth and to prevent wear
patterns arising, the front and rear wheels can
be switched with each other. A suitable dis-
tance for the first change is approx. 5000 km
and then at 10 000 km intervals. Volvo recom-
mends that you contact an authorised Volvo
workshop for checking if you are uncertain
about tread depth. If significant differences in
wear (>1 mm difference in tread depth)
between tyres have already occurred, the least
worn tyres must always be placed on the rear.
Understeer is normally easier to correct than
oversteer, and leads to the car continuing for-
wards in a straight line rather than having the
rear end skidding to one side, resulting in pos-
sible complete loss of control over the car. This
is why it is important for the rear wheels never
to lose grip before the front wheels.
Wheels should be stored lying down or hanging
up - and not standing up.
WARNING
A damaged tyre can lead to loss of control
of the car.
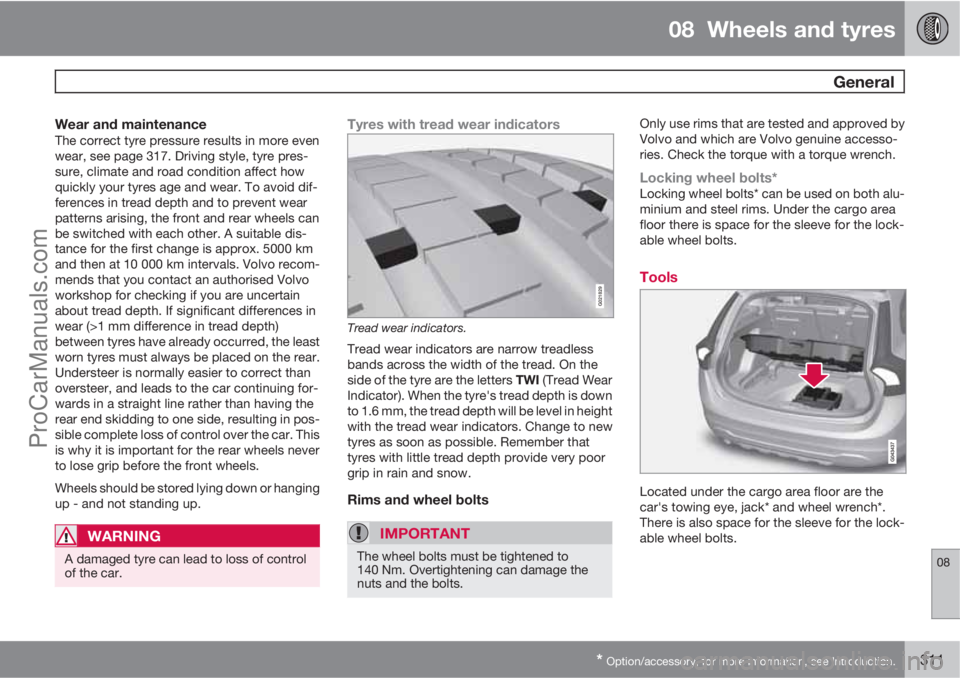
Tyres with tread wear indicators
G021829
Tread wear indicators.
Tread wear indicators are narrow treadless
bands across the width of the tread. On the
side of the tyre are the letters TWI (Tread Wear
Indicator). When the tyre's tread depth is down
to 1.6 mm, the tread depth will be level in height
with the tread wear indicators. Change to new
tyres as soon as possible. Remember that
tyres with little tread depth provide very poor
grip in rain and snow.
Rims and wheel bolts
IMPORTANT
The wheel bolts must be tightened to
140 Nm. Overtightening can damage the
nuts and the bolts.
Only use rims that are tested and approved by
Volvo and which are Volvo genuine accesso-
ries. Check the torque with a torque wrench.
Locking wheel bolts*Locking wheel bolts* can be used on both alu-
minium and steel rims. Under the cargo area
floor there is space for the sleeve for the lock-
able wheel bolts.
Tools
Located under the cargo area floor are the
car's towing eye, jack* and wheel wrench*.
There is also space for the sleeve for the lock-
able wheel bolts.
ProCarManuals.com
Page 315 of 422

08 Wheels and tyres
General
08
313
16Rim diameter in
inches
50Off-set in mm (dis-
tance from wheel
centre to wheel con-
tact surface against
the hub)
Tyre dimensionsThe dimensions are stated on all car tyres.
Example of designation: 215/55R16 97W.
215Tyre width (mm)
55Ratio between tyre wall height and
tyre width (%)
RRadial ply
16Rim diameter in inches (")
97Codes for the maximum permitted
tyre load, tyre load index (LI)
WSpeed rating for maximum permitted
speed, speed rating (SS). (In this case
270 km/h).
Load indexEach tyre has a certain capacity to carry a load,
a load index (LI). The car's weight determines
the load capacity required of the tyres. Mini-mum permitted index is specified in the table,
see page 388.
Speed ratingsEach tyre can withstand a certain maximum
speed, a speed rating (Speed Symbol; SS).
Tyre speed class must at least correspond with
the car's top speed. Minimum permitted speed
rating is specified in the table, see page 388.
The only exception to these conditions is win-
ter tyres (both those with metal studs and those
without), where a lower speed rating may be
used. If such a tyre is chosen, the car must not
be driven faster than the speed rating of the
tyre (for example, class Q can be driven at a
maximum of 160 km/h).
Traffic regulations determine how fast a car
can be driven, not the speed rating of the tyres.
NOTE
It is the maximum permitted speed that is
stated in the table.
Q160 km/h (used only on winter tyres)
T190 km/h
H210 km/h
V240 km/h
W270 km/h
Y300 km/h
WARNING
The car must be fitted with tyres which have
the same or a higher load index (LI) and
speed rating (SS) than specified. If a tyre
with too low a load index or speed rating is
used, it may overheat.
ProCarManuals.com
Page 317 of 422

08 Wheels and tyres
Changing wheels
08
* Option/accessory, for more information, see Introduction.315 Removing
Set up the warning triangle, see page 318 if a
wheel must be replaced at a busy location. The
car and jack* must be on a firm horizontal sur-
face.
1. Apply the parking brake and engage
reverse gear, or position P if the car has an
automatic gearbox.
WARNING
Check that the jack is not damaged, that the
threads are thoroughly lubricated and that it
is free from dirt.
NOTE
Volvo recommends only using the jack* that
belongs to the car model in question, which
is indicated on the jack's label.
The label also indicates the jack's maximum
lift capacity at a specified minimum lifting
height.
2. Take out the jack*, wheel wrench* and
removal tool for wheel covers* located
under the cargo floor in the cargo area. If
another jack is selected, see page 328.
3. Place chocks in front of and behind the
wheels which will remain on the ground.Use heavy wooden blocks or large stones
for example.
4. Cars with steel rims have removable wheel
covers. Use the removal tool to hook in and
pull off any full-wheel wheel covers. Alter-
natively, the wheel covers can be pulled
away by hand.
5. Screw together the towing eye with the
wheel wrench* until the stop position as
illustrated below.
IMPORTANT
The towing eye must be screwed into all
threads in the wheel bolt wrench.
6. Loosen the wheel bolts ½-1 turn anticlock-
wise with the wheel wrench.
WARNING
Never position anything between the
ground and the jack, nor between the jack
and the car's jacking point.
7. There are two jacking points on each side
of the car. There is a recess in the plastic
cover at each point. Crank the foot of the
ProCarManuals.com
Page 374 of 422
10 Specifications
Dimensions and weights
10
372
Dimensions
Dimensionsmm
AWheelbase2776
BLength4628
CLoad length, floor, folded rear
seat1749
DLoad length, floor978
EHeight1484
FLoad height658
Dimensionsmm
GFront track1588A
1578B
HRear track1585A
1575B
ILoad width, floor1082
JWidth1865
Dimensionsmm
KWidth including door mirrors2097
LWidth including folded-in door
mirrors1899
Awith 16" wheelBwith 17" wheel
ProCarManuals.com
Page 393 of 422

10 Specifications
Electrical system
10
* Option/accessory, for more information, see Introduction.391 Electrical system
The car has a voltage-regulated AC alternator.
The electrical system is single-pole and uses
the chassis and engine casing as a conductor.The battery capacity is dependent upon the
equipment level in the vehicle.IMPORTANT
If the battery is replaced, replace it with a
battery of the same cold start capacity and
reserve capacity as the original (see the
decal on the battery).
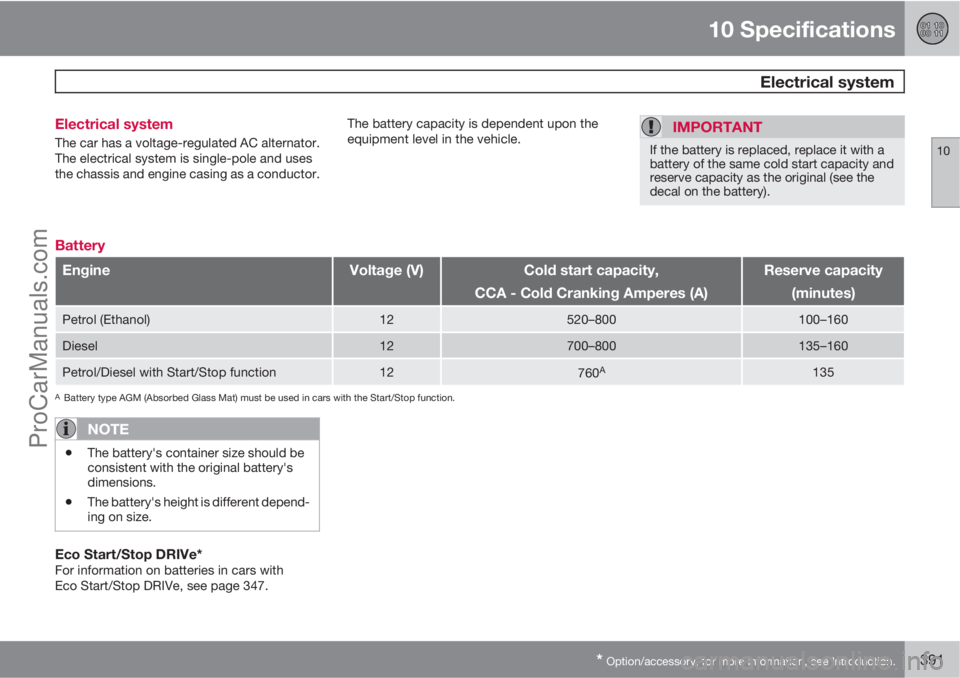
Battery
EngineVoltage (V)Cold start capacity,
CCA - Cold Cranking Amperes (A)Reserve capacity
(minutes)
Petrol (Ethanol)12520–800100–160
Diesel12700–800135–160
Petrol/Diesel with Start/Stop function12760A135
ABattery type AGM (Absorbed Glass Mat) must be used in cars with the Start/Stop function.
NOTE
•The battery's container size should be
consistent with the original battery's
dimensions.
•The battery's height is different depend-
ing on size.
Eco Start/Stop DRIVe*For information on batteries in cars with
Eco Start/Stop DRIVe, see page 347.
ProCarManuals.com