2013 VOLVO V60 height
[x] Cancel search: heightPage 18 of 422
01 Safety
Seatbelts 01
16
General information
Heavy braking can have serious consequences
if the seatbelts are not used. Ensure that all
passengers use their seatbelts.
It is important that the seatbelt lies against the
body so it can provide maximum protection.
Do not lean the backrest too far back. The
seatbelt is designed to protect in a normal
seating position.
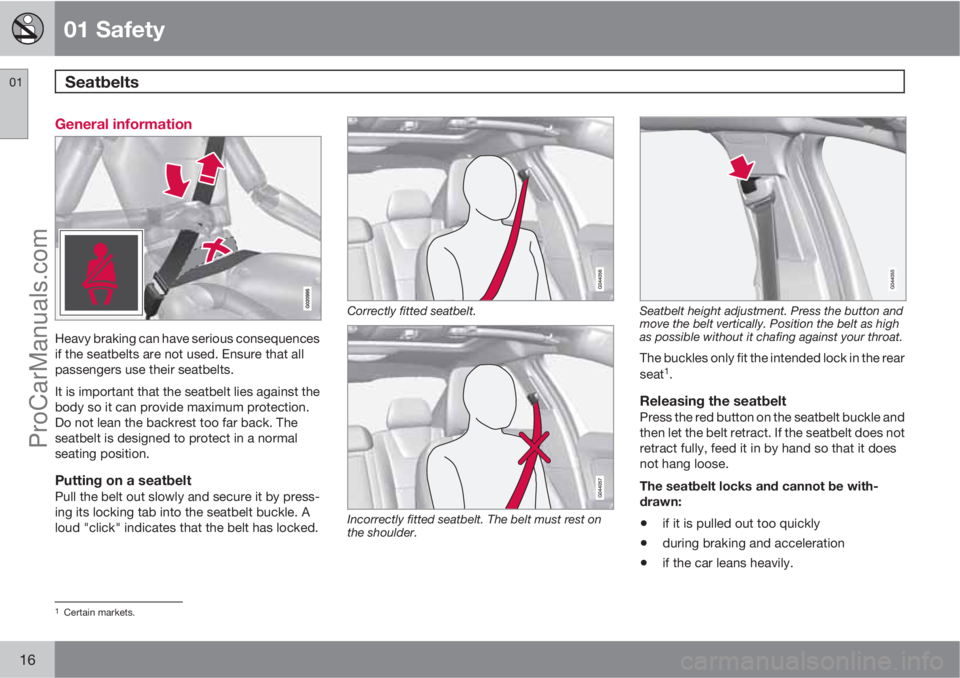
Putting on a seatbeltPull the belt out slowly and secure it by press-
ing its locking tab into the seatbelt buckle. A
loud "click" indicates that the belt has locked.
Correctly fitted seatbelt.
Incorrectly fitted seatbelt. The belt must rest on
the shoulder.
Seatbelt height adjustment. Press the button and
move the belt vertically. Position the belt as high
as possible without it chafing against your throat.
The buckles only fit the intended lock in the rear
seat1.
Releasing the seatbeltPress the red button on the seatbelt buckle and
then let the belt retract. If the seatbelt does not
retract fully, feed it in by hand so that it does
not hang loose.
The seatbelt locks and cannot be with-
drawn:
•if it is pulled out too quickly
•during braking and acceleration
•if the car leans heavily.
1Certain markets.
ProCarManuals.com
Page 38 of 422
01 Safety
Child safety 01
36* Option/accessory, for more information, see Introduction.
Integrated two-stage booster
cushions*
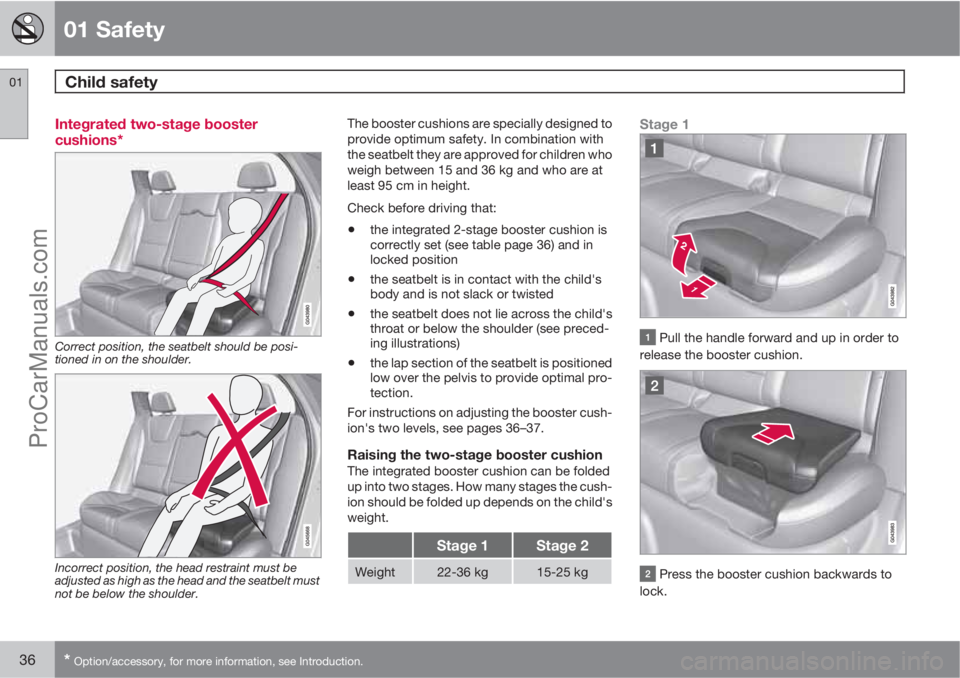
Correct position, the seatbelt should be posi-
tioned in on the shoulder.
Incorrect position, the head restraint must be
adjusted as high as the head and the seatbelt must
not be below the shoulder.
The booster cushions are specially designed to
provide optimum safety. In combination with
the seatbelt they are approved for children who
weigh between 15 and 36 kg and who are at
least 95 cm in height.
Check before driving that:
•the integrated 2-stage booster cushion is
correctly set (see table page 36) and in
locked position
•the seatbelt is in contact with the child's
body and is not slack or twisted
•the seatbelt does not lie across the child's
throat or below the shoulder (see preced-
ing illustrations)
•the lap section of the seatbelt is positioned
low over the pelvis to provide optimal pro-
tection.
For instructions on adjusting the booster cush-
ion's two levels, see pages 36–37.
Raising the two-stage booster cushionThe integrated booster cushion can be folded
up into two stages. How many stages the cush-
ion should be folded up depends on the child's
weight.
Stage 1Stage 2
Weight22-36 kg15-25 kg
Stage 1
Pull the handle forward and up in order to
release the booster cushion.
Press the booster cushion backwards to
lock.
ProCarManuals.com
Page 84 of 422
03 Your driving environment
Seats
03
82
use. This stores the positions of the seat
and door mirrors in the remote control
key's memory
4.
•Unlock the car (by pressing the unlock but-
ton on the same remote control key) and
open the driver's door. The driver's seat
and door mirrors will automatically adopt
the positions that are stored in the remote
control key's memory (if the seat has been
moved since you locked the car).
The key memory can be activated/deactivated
in the menu system MY CAR under Settings
Car settingsCar key memory. For a
description of the menu system, see
page 202.
Emergency stopIf the seat accidentally begins to move, press
one of the setting buttons for the seat or mem-
ory buttons in order to stop the seat.
Restarting to reach the seat position stored in
the key memory is performed by pressing the
unlock button on the remote control key. The
driver's door must then be open.
WARNING
Risk of crushing! Make sure that children do
not play with the controls. Check that there
are no objects in front of, behind or under
the seat during adjustment. Ensure that
none of the backseat passengers will be
trapped.
Heated seatsFor heated seats, see page 215.
Rear seats
Head restraint, centre seat, rear
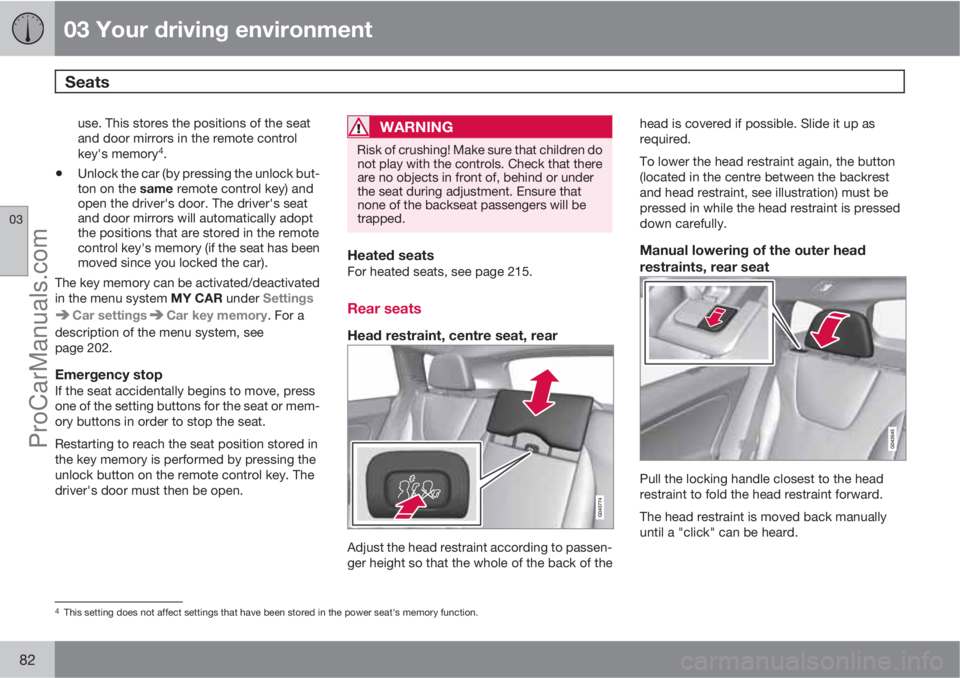
Adjust the head restraint according to passen-
ger height so that the whole of the back of thehead is covered if possible. Slide it up as
required.
To lower the head restraint again, the button
(located in the centre between the backrest
and head restraint, see illustration) must be
pressed in while the head restraint is pressed
down carefully.
Manual lowering of the outer head
restraints, rear seat
Pull the locking handle closest to the head
restraint to fold the head restraint forward.
The head restraint is moved back manually
until a "click" can be heard.
4This setting does not affect settings that have been stored in the power seat's memory function.
ProCarManuals.com
Page 87 of 422
03 Your driving environment
Steering wheel
03
* Option/accessory, for more information, see Introduction.85 Adjusting
G021138
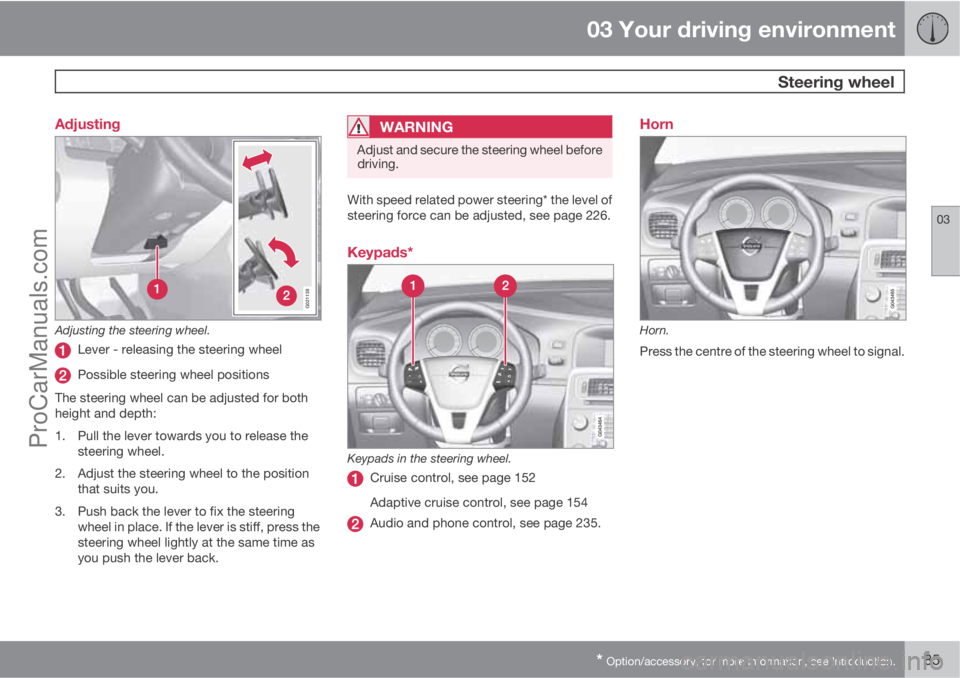
Adjusting the steering wheel.
Lever - releasing the steering wheel
Possible steering wheel positions
The steering wheel can be adjusted for both
height and depth:
1. Pull the lever towards you to release the
steering wheel.
2. Adjust the steering wheel to the position
that suits you.
3. Push back the lever to fix the steering
wheel in place. If the lever is stiff, press the
steering wheel lightly at the same time as
you push the lever back.
WARNING
Adjust and secure the steering wheel before
driving.
With speed related power steering* the level of
steering force can be adjusted, see page 226.
Keypads*
Keypads in the steering wheel.
Cruise control, see page 152
Adaptive cruise control, see page 154
Audio and phone control, see page 235.
Horn
Horn.
Press the centre of the steering wheel to signal.
ProCarManuals.com
Page 88 of 422

03 Your driving environment
Lighting
03
86* Option/accessory, for more information, see Introduction.
Headlamp control
Overview, headlamp control.
Thumbwheel for adjusting display and
instrument lighting
Rear fog lamp
Headlamp control
Thumbwheel1 for headlamp levelling
Headlamp control with AUTO mode
Overview, headlamp control.
Thumbwheel for adjusting display and
instrument lighting
Rear fog lamp
Headlamp control
Thumbwheel1 for headlamp levelling
Instrument lightingDifferent display and instrument lighting is
switched on depending on key position, see
page 78.
The display lighting is automatically subdued
in darkness - the sensitivity is set with the
thumbwheel.The intensity of the instrument lighting is
adjusted with the thumbwheel.
Headlamp levellingThe load in the car changes the vertical align-
ment of the headlamp beam, which could daz-
zle oncoming motorists. Avoid this by adjusting
the height of the beam. Lower the beam if the
car is heavily laden.
1. Leave the engine running, or have the car's
electrical system in key position I.
2. Roll the thumbwheel up/down to raise/
lower beam alignment.
Cars with active Xenon headlamps* have auto-
matic headlamp levelling and are therefore not
equipped with the thumbwheel.
1Not available for cars equipped with active Xenon headlamps*.
ProCarManuals.com
Page 172 of 422

04 Driver support
City Safety™
04
170
When City Safety™ has prevented a collision
with a stationary object the car remains sta-
tionary for a maximum of 1.5 seconds. If the car
is braked for a vehicle in front that is moving,
then speed is reduced to the same speed as
that maintained by the vehicle in front.
On a car with manual gearbox the engine stops
when City Safety™ has stopped the car, unless
the driver manages to depress the clutch pedal
beforehand.
NOTE
•Keep the windscreen surface in front of
the laser sensor free from ice, snow and
dirt (see the illustration for sensor loca-
tion, page 168).
•Do not affix or mount anything on the
windscreen in front of the laser sensor
•Remove ice and snow from the bonnet
- snow and ice must not exceed a height
of 5 cm.
Fault tracing and action
If the message Windscreen Sensors
blocked is shown on the instrument panel dis-
play, it indicates that the laser sensor is
blocked and cannot detect vehicles in front of
the car. This means that City Safety™ is not
operational.The
Windscreen Sensors blocked message
is not shown for all situations in which the laser
sensor is blocked. The driver must therefore be
diligent about keeping the windscreen and
area in front of the laser sensor clean.
The following table presents possible causes
for the message being shown, along with sug-
gestions for appropriate action.
CauseAction
The windscreen sur-
face in front of the
laser sensor is dirty
or covered with ice
or snow.Clean the wind-
screen surface in
front of the sensor
from dirt, ice and
snow.
The laser sensor
field of vision is
blocked.Remove the block-
ing object.
IMPORTANT
If there are cracks, scratches or stone chips
in the windscreen in front of either of the
laser sensor's "windows" and they cover a
surface of approx. 0.5 x 3.0 mm (or larger),
then a workshop must be contacted for
repair or replacement of the windscreen
(see the illustration for sensor location, page
168) - an authorised Volvo workshop is rec-
ommended.
Failure to take action may result in reduced
performance for City Safety™.
To avoid the risk of reducing City Safety™
performance the following also applies:
•Before replacing a windscreen, contact
an authorised Volvo workshop to verify
that the correct windscreen is ordered
and fitted. Using the wrong windscreen
may result in the City Safety function
failing to operate or operating incor-
rectly.
•The same type or Volvo-approved
windscreen wipers must be fitted during
replacement.
ProCarManuals.com
Page 177 of 422
04 Driver support
Collision Warning with Auto Brake & Pedestrian Protection*
04
* Option/accessory, for more information, see Introduction.175 Detection of pedestrians
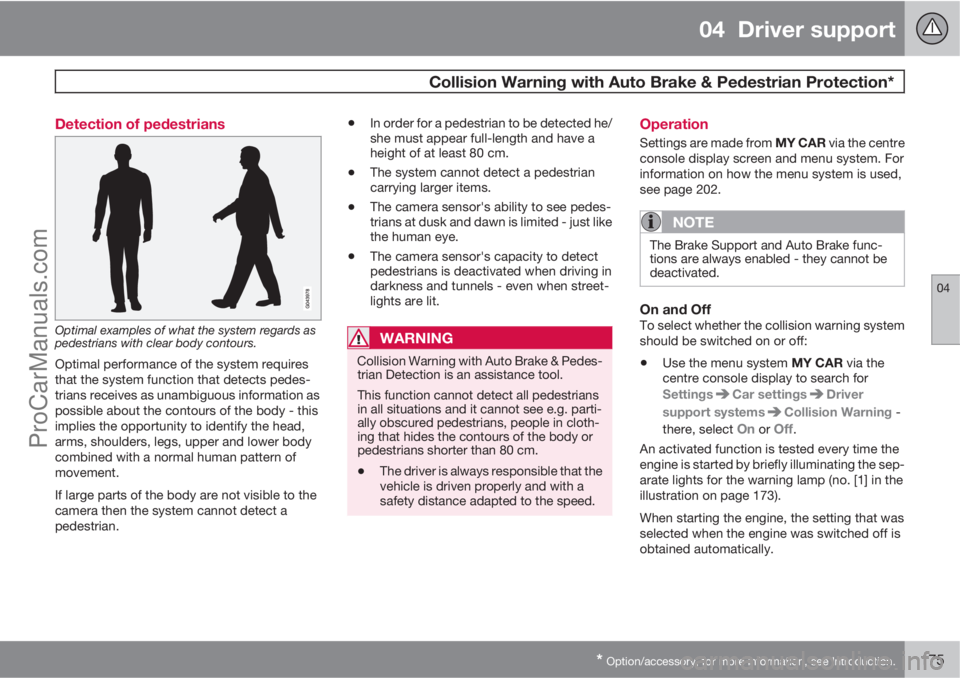
Optimal examples of what the system regards as
pedestrians with clear body contours.
Optimal performance of the system requires
that the system function that detects pedes-
trians receives as unambiguous information as
possible about the contours of the body - this
implies the opportunity to identify the head,
arms, shoulders, legs, upper and lower body
combined with a normal human pattern of
movement.
If large parts of the body are not visible to the
camera then the system cannot detect a
pedestrian.
•In order for a pedestrian to be detected he/
she must appear full-length and have a
height of at least 80 cm.
•The system cannot detect a pedestrian
carrying larger items.
•The camera sensor's ability to see pedes-
trians at dusk and dawn is limited - just like
the human eye.
•The camera sensor's capacity to detect
pedestrians is deactivated when driving in
darkness and tunnels - even when street-
lights are lit.
WARNING
Collision Warning with Auto Brake & Pedes-
trian Detection is an assistance tool.
This function cannot detect all pedestrians
in all situations and it cannot see e.g. parti-
ally obscured pedestrians, people in cloth-
ing that hides the contours of the body or
pedestrians shorter than 80 cm.
•The driver is always responsible that the
vehicle is driven properly and with a
safety distance adapted to the speed.
Operation
Settings are made from MY CAR via the centre
console display screen and menu system. For
information on how the menu system is used,
see page 202.
NOTE
The Brake Support and Auto Brake func-
tions are always enabled - they cannot be
deactivated.
On and OffTo select whether the collision warning system
should be switched on or off:
•Use the menu system MY CAR via the
centre console display to search for
Settings
Car settingsDriver
support systems
Collision Warning -
there, select
On or Off.
An activated function is tested every time the
engine is started by briefly illuminating the sep-
arate lights for the warning lamp (no. [1] in the
illustration on page 173).
When starting the engine, the setting that was
selected when the engine was switched off is
obtained automatically.
ProCarManuals.com
Page 300 of 422

07 During your journey
Driving with a trailer
07
298* Option/accessory, for more information, see Introduction.
General
Payload depends on the car's kerb weight. The
total of the weight of the passengers and all
accessories, e.g. towbar, reduces the car's
payload by a corresponding weight. For more
detailed information on weights, see
page 373.
If the towing bracket is mounted by Volvo, then
the car is delivered with the necessary equip-
ment for driving with a trailer.
•The car's towing bracket must be of an
approved type.
•If the towbar is retrofitted, check with your
Volvo dealer that the car is fully equipped
for driving with a trailer.
•Distribute the load on the trailer so that the
weight on the towing bracket complies
with the specified maximum towball load.
•Increase the tyre pressure to the recom-
mended pressure for a full load. For tyre
pressure label location, see page 317.
•The engine is loaded more heavily than
usual when driving with a trailer.
•Do not tow a heavy trailer when the car is
brand new. Wait until it has been driven at
least 1000 km.
•The brakes are loaded much more than
usual on long and steep downhill slopes.
Downshift to a lower gear and adjust your
speed.
•For safety reasons, the maximum permit-
ted speed for the car when coupled with a
trailer should not be exceeded. Follow the
regulations in force for the permitted
speeds and weights.
•Maintain a low speed when driving with a
trailer up long, steep ascents.
•Avoid driving with a trailer on inclines of
more than 12%.
Trailer cableAn adapter is required if the car's towing
bracket has 13 pin electrics and the trailer has
7 pin electrics. Use an adapter cable approved
by Volvo. Make sure the cable does not drag
on the ground.
Direction indicators and brake lights on
the trailer
If any of the trailer's lamps for direction indica-
tors are broken, then the combined instrument
panel's symbol for direction indicators flashes
faster than normal and the display shows the
text
Bulb fail - Ind. signal trailer.
If any of the trailer's lamps for the brake light
are broken then the
Bulb fail - Stop lamp
trailer text is shown.
Level control*The rear shock absorbers maintain a constant
height irrespective of the car's load (up to the
maximum permissible weight). When the car isstationary the rear of the car lowers slightly,
which is normal.
Trailer weightsFor information on Volvo's permitted trailer
weights, see page 374.
NOTE
The stated maximum permitted trailer
weights are those permitted by Volvo.
National vehicle regulations can further limit
trailer weights and speeds. Towbars can be
certified for higher towing weights than the
car can actually tow.
WARNING
Follow the stated recommendations for
trailer weights. Otherwise, the car and trailer
may be difficult to control in the event of
sudden movement and braking.
Manual gearbox
OverheatingWhen driving with a trailer in hilly terrain in a hot
climate there may be a risk of overheating.
•Do not run the engine at higher revolutions
than 4500 rpm (diesel engines: 3500 rpm)
- otherwise the oil temperature may
become too high.
ProCarManuals.com