2013 VOLKSWAGEN TOUAREG ignition
[x] Cancel search: ignitionPage 13 of 440

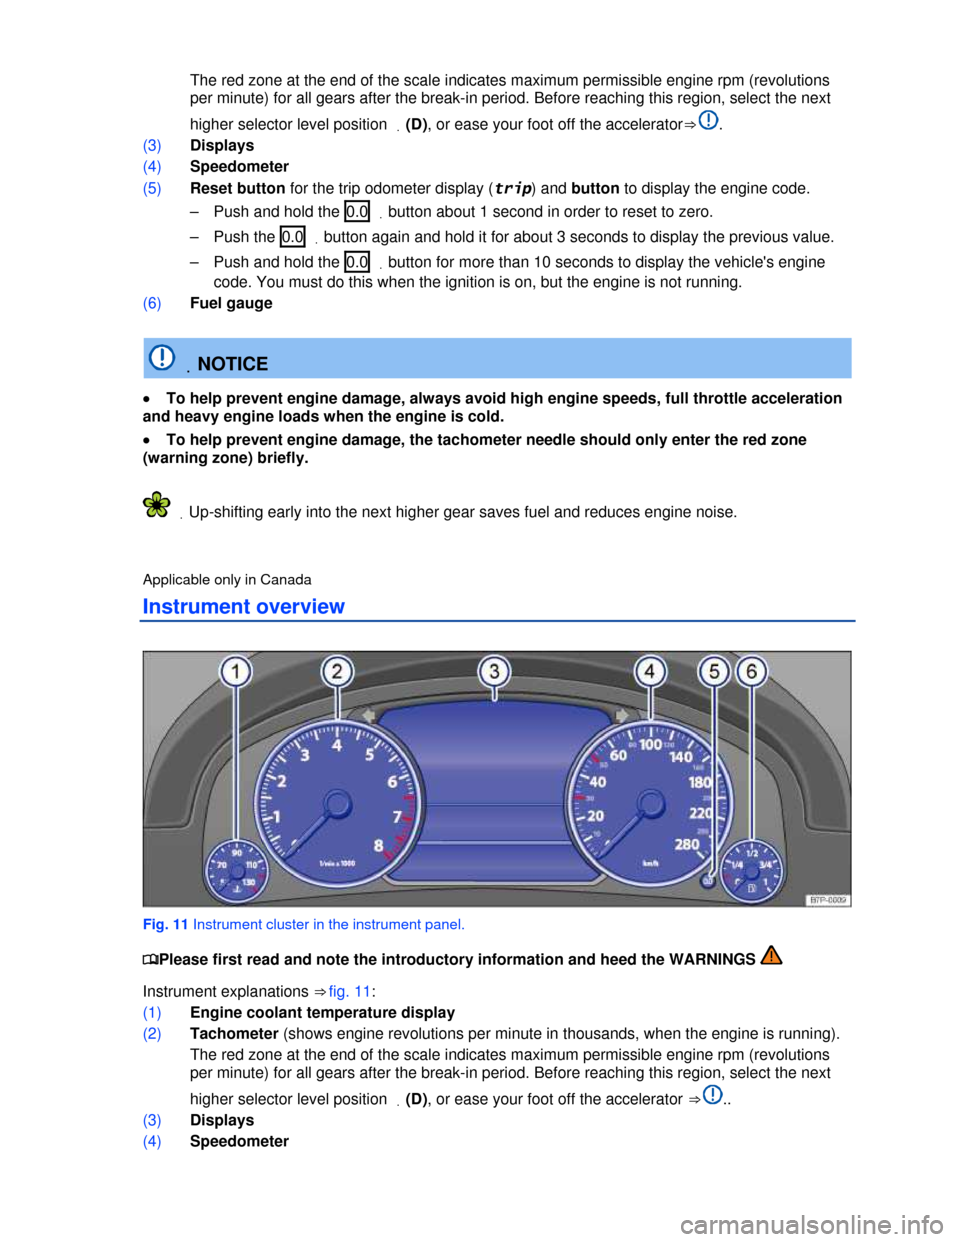
The red zone at the end of the scale indicates maximum permissible engine rpm (revolutions
per minute) for all gears after the break-in period. Before reaching this region, select the next
higher selector level position .(D), or ease your foot off the accelerator⇒ .
(3) Displays
(4) Speedometer
(5) Reset button for the trip odometer display (trip) and button to display the engine code.
– Push and hold the 0.0 .button about 1 second in order to reset to zero.
– Push the 0.0 .button again and hold it for about 3 seconds to display the previous value.
– Push and hold the 0.0 .button for more than 10 seconds to display the vehicle's engine
code. You must do this when the ignition is on, but the engine is not running.
(6) Fuel gauge
.NOTICE
�x To help prevent engine damage, always avoid high engine speeds, full throttle acceleration
and heavy engine loads when the engine is cold.
�x To help prevent engine damage, the tachometer needle should only enter the red zone
(warning zone) briefly.
.Up-shifting early into the next higher gear saves fuel and reduces engine noise.
Applicable only in Canada
Instrument overview
Fig. 11 Instrument cluster in the instrument panel.
�
Page 14 of 440

(5) Reset button for the trip odometer display (trip) and button to display the engine code.
– Push and hold the 0.0 .button about 1 second in order to reset to zero.
– Push the 0.0 .button again and hold it for about 3 seconds to display the previous value.
– Push and hold the 0.0 .button for more than 10 seconds to display the vehicle's engine
code. You must do this when the ignition is on, but the engine is not running.
(6) Fuel gauge
.NOTICE
�x To help prevent engine damage, always avoid high engine speeds, full throttle acceleration
and heavy engine loads when the engine is cold.
�x To help prevent engine damage, the tachometer needle should only enter the red zone
(warning zone) briefly.
.Up-shifting early into the next higher gear saves fuel and reduces engine noise.
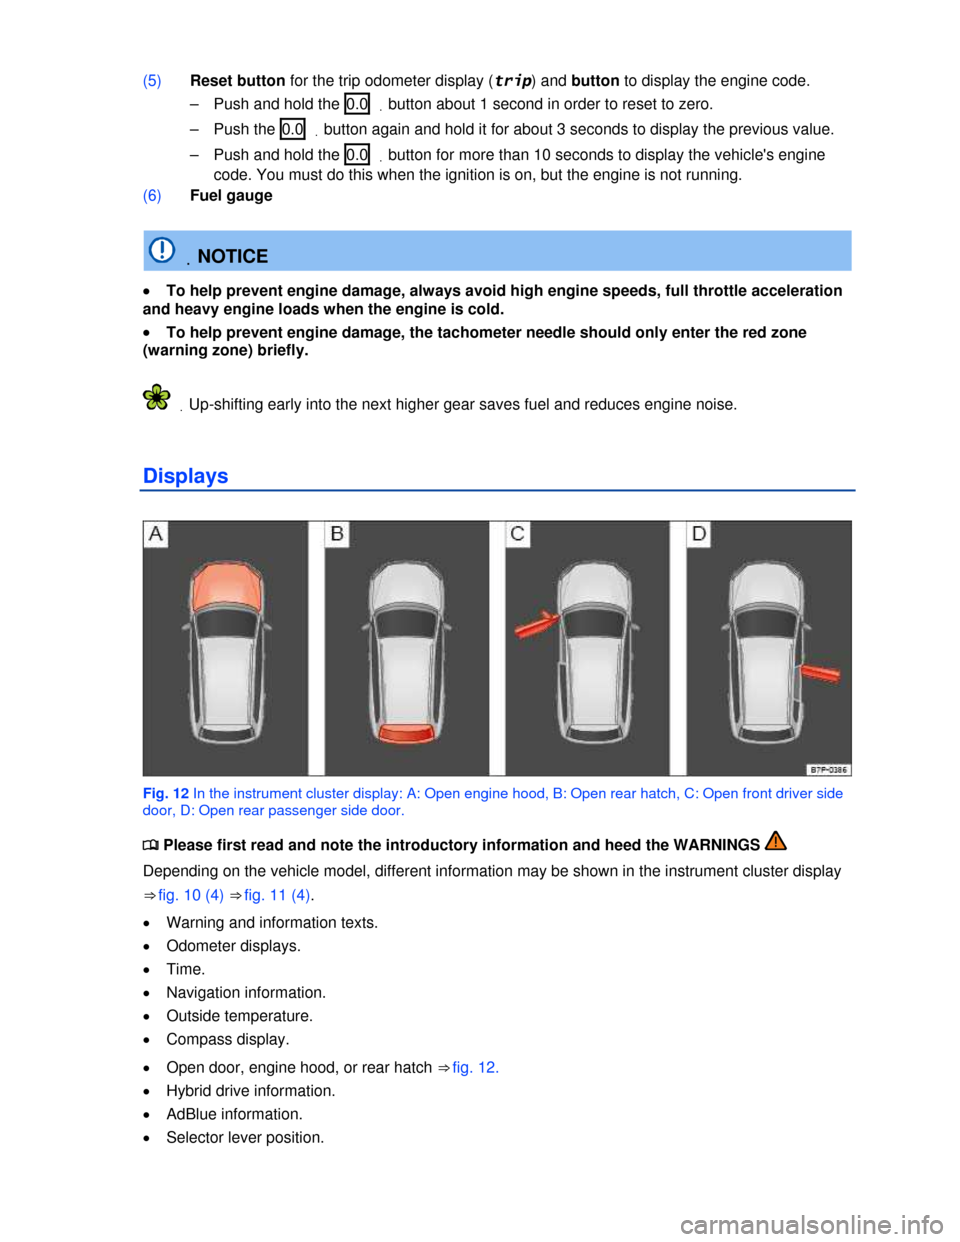
Displays
Fig. 12 In the instrument cluster display: A: Open engine hood, B: Open rear hatch, C: Open front driver side
door, D: Open rear passenger side door.
�
Page 21 of 440

Menu Function
Tire pressure Display of current tire pressures in vehicles with direct Tire Pressure Moni-
toring System.
Display since
start
Display and storage of the driving and fuel consumption data compiled from
the time the ignition is switched on to the time it is switched off.
If the journey is continued within two hours after the ignition is switched off,
the information from the new leg of the journey is counted as well. The
memory is automatically cleared if the vehicle is not driven for more than
two hours.
Display since
refuel
Display and storage of driving and fuel consumption data. The memory is
automatically cleared when the vehicle is fueled again.
Display long-
term
Display and storage of the accumulated driving and fuel consumption data
of any number of single trips up to a total driving time of either 19 hours and
59 minutes or 99 hours and 59 minutes, and up to a total distance of either
1,999.9 miles (1,999.9 km) or 9,999 miles (9,999 km), depending on the
instrument cluster version. If one of the stored values is exceeded, then the
memory is automatically cleared and starts again from 0.
Digital speed Switch the digital speed on or off.
Shows the current vehicle speed in digital form.
Alt. speed
display
Switch the second speed on or off.
Shows the current vehicle speed in digital form.
Back The display switches back to the main menu.
Possible displays
Submenu Function
Travel time Driving time in hours (h) and minutes (min) corresponding to trip
memories 1 and 2 (toggle).
Current consumption Current fuel consumption in miles per gallon (l/100 km) while
driving. When units are set to miles, dashes appear instead of a
number when the engine is running and the vehicle is standing
still. When units are set to kilometers, the display shows liters
consumed per hour when the engine is running and the vehicle is
standing still.
Average consumption Average fuel consumption in miles per gallon (l/100 km) on trips
per trip memories 1 and 2 (toggle) is displayed once the vehicle
has been driven about 330 feet (100 m). Until then, dashes appear
instead of a number. The value displayed is updated every 5
seconds.
Range Estimated distance in miles (km) that the vehicle can go with the
fuel left in the tank the way you are currently driving. Takes ac-
count of the current fuel consumption, among other things.
Distance Distance driven in miles (km) from the time the ignition was
switched on.
Average speed The average speed is displayed after the ignition is switched on
and the vehicle has been driven about 300 feet (100 m). Up to this
point, dashes appear instead of a number. The value displayed is
updated every 5 seconds.
Page 38 of 440

Locking the vehicle after airbag inflation
If the airbags are activated during a collision, the entire vehicle is unlocked. Depending on the severity
of the damage, the vehicle can be locked after a collision when the airbags have deployed as follows:
Function Action
Locking the vehicle with the
power locking switch:
– Switch the ignition off.
– Open a door once.
– Press power locking switch �1
Locking the vehicle with the
remote control vehicle key:
– Switch the ignition off and on again.
OR: Remove the remote control vehicle key from the ignition.
– Open a door once.
– Lock the vehicle with the remote control vehicle key.
Indicator light in the driver door
After the vehicle is locked: Meaning
The red LED light flashes for about 2 seconds in short
intervals, then slower.
The vehicle is locked.
Red LED light lights up continuously for about 30 se-
conds.
Locking system malfunction. See an
authorized Volkswagen dealer or an
authorized Volkswagen Service Facility.
.If the remote control vehicle key buttons or one of the power locking buttons are pushed repeat-
edly in quick succession, the power locking system is switched off for a brief period to help keep it
from being overloaded. The vehicle is then unlocked for about 30 seconds. Unless a door or the rear
hatch is opened during this time, the vehicle is automatically locked afterwards.
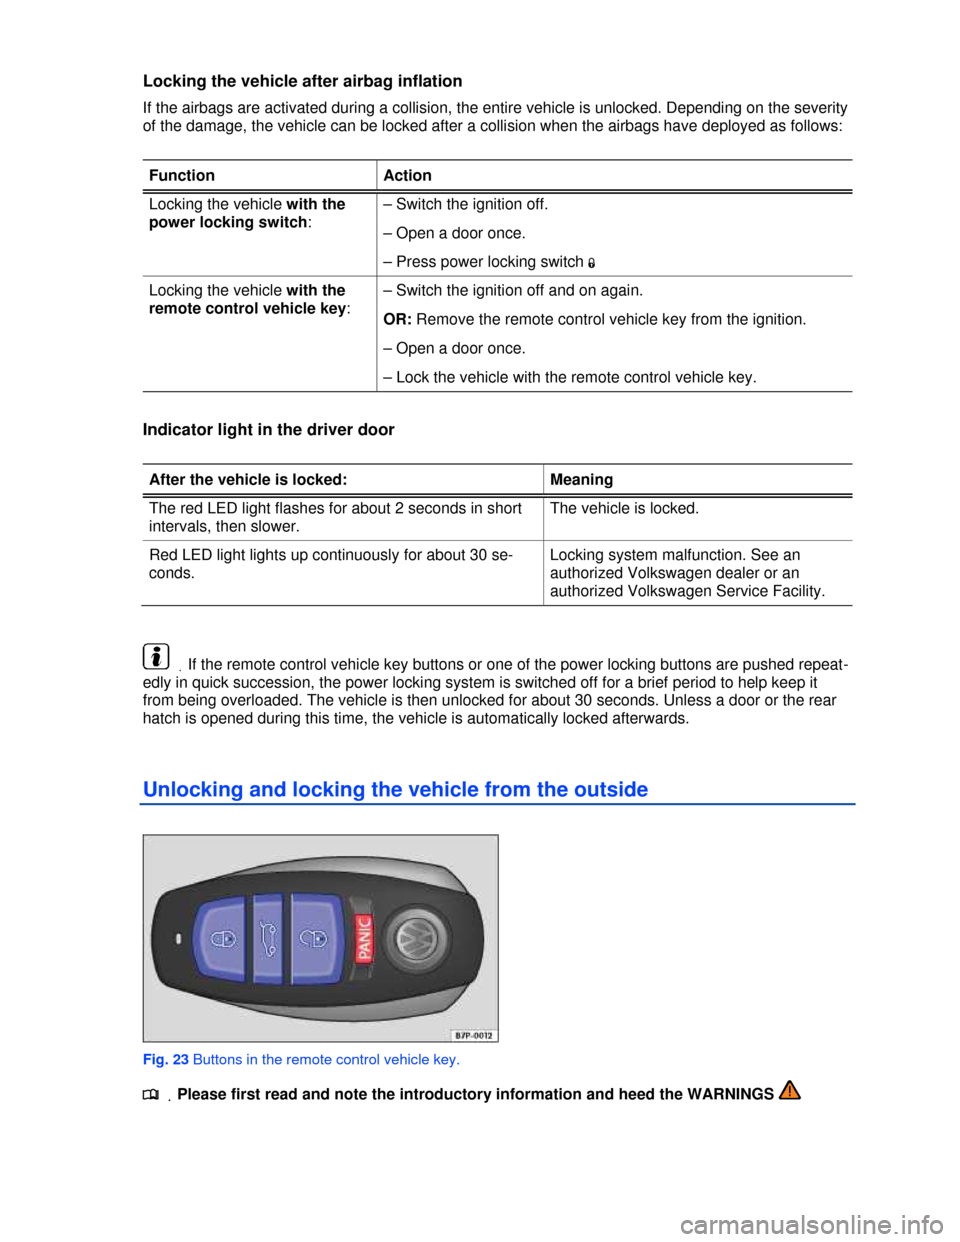
Unlocking and locking the vehicle from the outside
Fig. 23 Buttons in the remote control vehicle key.
.�
Page 40 of 440

Press button ⇒ fig. 24:
�0 Unlock the vehicle.
�1 Lock the vehicle.
The power locking switch works whether the ignition is switched on or off, but only when all doors are
closed.
If the vehicle is locked with the remote control vehicle key, the power locking switch is deactivated.
If the vehicle is locked with the power locking switch:
The indicator light �1 in the power locking switch comes on to indicate that all doors and the rear hatch
are locked.
�x The anti-theft alarm system is not turned on.
�x Opening doors or the rear hatch from the outside is not possible, at a traffic light, for example.
�x Doors can be unlocked and opened separately from inside the vehicle by pulling the door handle to
open the door. The indicator light �1 goes out. The unopened doors and rear hatch remain locked and
cannot be opened from the outside.
�x An open driver door will not be locked. This helps keep the driver from being locked out of the
vehicle.
The vehicle is unlocked if you push the �0 button while the vehicle is standing still. Depending on the
settings in the Convenience sub-menu, it may also be unlocked when you take the vehicle key out of
the ignition or, on vehicles with Keyless Access, when you open the driver door (Auto. open).
Unlocking or locking vehicles with Keyless Access
Fig. 25 (A) Ranges of the Keyless Access locking and starting system. Outside the vehicle: Unlocking range.
Inside the vehicle: starting range. (B) Keyless Access locking and starting system: Sensor 1 for unlocking on
the inside of the front door handles. Sensor for locking on the outside of the door handles 2.
Page 42 of 440

Unlocking and locking the rear hatch (Keyless Entry for the rear hatch)
If the vehicle is locked and a valid vehicle key is within range A of the rear hatch, it unlocks automati-
cally when opened.
�x Open and close the rear hatch as you would a standard rear hatch.
The rear hatch locks automatically when it is closed except in the following situations:
�x The vehicle is completely unlocked.
�x When an authorized vehicle key is inside the vehicle.
Sensor-controlled rear hatch opener (Easy Open)
When a valid vehicle key is within range A of the rear hatch, the rear hatch can be unlocked and
opened by moving your foot within the sensor’s range ⇒ fig. 26 below the rear bumper.
�x Switch off the ignition and remove any vehicle key in the ignition.
�x Stand in front of the middle of the rear bumper.
�x Quickly move the side of your body, your foot and shin as close to the bumper as possible. Your
shin must be in the upper part of the sensor’s range and your foot in the lower part (1).
�x Quickly move your shin out of range (2). The rear hatch opens automatically.
The high-mounted brake light and the turn signals flash once to show that the Easy Open feature is
opening the rear hatch.
The rear hatch locks automatically after closing if the vehicle was locked before and a valid vehicle key
is not inside the vehicle. If the vehicle key used to open the vehicle is inside the vehicle, the rear hatch
opens again.
Easy Open may not work properly or at all in the following situations (examples):
�x If the rear bumper is very dirty.
�x If the rear bumper has salty water on it after driving on salted roads.
�x If a trailer hitch has been retrofit on the vehicle.
Easy Open may be automatically deactivated in heavy rain to help prevent unintentional deployment
caused by water running down the vehicle, for example.
Locking with a second vehicle key
If a remote control vehicle key is inside the passenger compartment, the vehicle can be locked from
the outside only if a second valid key is within range.
A key that was inside the vehicle when it was locked from the outside is reactivated:
�x By pressing a button on the deactivated key.
�x By pressing a door handle sensor when the deactivated key is outside of the vehicle, but within
range.
�x By starting the engine with the starter button on the front center console.
Automatic deactivation of sensors
If the vehicle has not been unlocked or locked for a longer period of time, the proximity sensors in the
passenger door are automatically deactivated.
If a sensor on the door handle of a locked vehicle is activated too often, for instance by a bush or
hedge that rubs against the vehicle, the sensors in the door handle on that side of the vehicle are
switched off for 30 minutes.
The sensors become active again when the vehicle is locked with the vehicle key and the ignition is
switched on one time.
The sensors become active again if one of the following events occurs:
�x 30 minutes have passed.
�x OR: The vehicle is unlocked using the V button in the remote control vehicle key.
Page 54 of 440

Switches in the driver door
Key to fig. 32:
(1) For the windows in the front doors.
(2) For the windows in the rear doors.
(3) Safety switch.
Opening or closing windows
Function Action
Opening: Press the � switch.
Closing: Pull the switch �
Stopping automatic
movement:
Press/pull the switch again.
�v
The safety switch (left/right) (3) deactivate the left
hand and right hand power windows in the rear
doors. The yellow indicator light in the switch lights
up when activated. The electric child safety locks
also prevent the rear doors from being opened from
the inside.
The power windows operate only when the ignition is switched on.
You can still use the power windows for several minutes after the ignition is switched off as long as the
driver or front passenger door has not been opened. When the vehicle key has been removed from
the ignition and the driver door has been opened, the power windows cannot be opened or closed.
.A separate button for controlling the window is located in the front passenger door.
Power windows – features
�
Page 55 of 440

Function Using the remote control vehicle key
Convenience
opening Press and hold the unlock button on the remote control vehicle key.
Convenience closing Press and hold the lock button on the remote control vehicle key.
From outside the vehicle (vehicles with Keyless Access), hold your finger on the lock sensor surface
on the outside of the door handle for a few seconds until the windows close.
Convenience closing closes the windows first and then the power sunroof.
The Infotainment System can be used to set various convenience opening options.
Setting convenience opening options in the Infotainment System
�x Switch on the ignition.
�x Press the CARInfotainment button.
�x Tap the Settingsfunction key on the screen.
�x Select Remote control keyfrom the list.
If the check box in a function key is checked �=, the feature is switched on.
Function key: supplementary information
�= Front windows: Convenience opening opens front windows. Tap the function key to deactivate the
feature.
�= Rear windows: Convenience opening opens rear windows. Tap the function key to deactivate the
feature.
.WARNING
Improper use of power windows can result in serious personal injury.
�x Never let anyone get in the way of a power window when closing it.
�x When locking the vehicle from the outside, make sure that no one, especially children,
remains in the vehicle. The windows will not open in case of an emergency.
�x Always take the key with you when you leave the vehicle. You can still use the power
windows for several minutes after the ignition is switched off as long as the driver or front
passenger door has not been opened.
�x Always use the safety switch when children are in the back seat to disable the rear power
windows and keep them from being opened and closed.
.If the power windows malfunction, the one-touch feature, as well as pinch protection will not
work properly. See an authorized Volkswagen dealer or an authorized Volkswagen Service Facility
right away.
.Convenience closing of the power windows from the outside requires removing the cover cap of
the lock cylinder on the driver door. The cover cap must be reinstalled after the vehicle is locked.