Page 2 of 356
Front view
Fig. 2 Vehicle front overview.
Key to fig. 2:
(1) Sensor on mirror base for:
– Low-light sensor
(2) Front windshield
(3) Windshield wipers .
(4) Engine Hood .
(5) Headlights , .
(6) Fog lights/static cornering lights , .
(7) Front license plate bracket
(8) Threaded hole for the front towing eye (behind cover) .
(9) Engine hood release .
Page 22 of 356
▪ Av. consumption ø --- mpg (average fuel consumption)
▪ Range
▪ Route
▪ Av. speed ø (average speed)
▪ Digit. speed (digital speed display)
▪ Speed warn.
Audio ⇒ Booklet Radio or ⇒ Booklet Navigation system
Navigation ⇒ Booklet Navigation system
Phone ⇒ Booklet Mobile phone package
Vehicle status
Settings
▪ Language
▪ MFI data
– Travel time
– Curr. consum. (current fuel consumption)
– Av. consum. (average fuel consumption)
– Route
– Av. speed
– Digit. speed (digital speed display)
– Speed warn. (speed warning)
▪ Compass (vehicles without navigation system)
▪ Convenience
– ATA confirm
Single door
Auto. close
– Central locking
Auto unlock
Unlock doors
– Window op. (window operation)
OFF
All
Driver
– Mirror down (vehicles with memory seats)
– Mirror adjust
Individually
Both mirrors
– Factory setting
▪ Lights & Vision
– Coming home
– Leaving home
– Footwell light
– Conv. turn sig. (convenience turn signal)
– Factory setting
▪ Time
– Hours
– Minutes
Page 24 of 356
– Speed warn. (speed warning)
▪ Compass (vehicles without )
▪ Convenience
– ATA confirm
Single door
Auto. close
– Central locking
Auto unlock
Unlock doors
– Window op. (window operation)
OFF
All
Driver
– Mirror down (vehicles with memory seats)
– Mirror adjust
Individually
Both mirrors
– Factory setting
▪ Lights & Vision
– Coming home
– Leaving home
– Footwell light
– Conv. turn sig. (convenience turn signal)
– Factory setting
▪ Time
– Hours
– Minutes
– 24 hr. mode
– Daylight save
▪ Snow tires (winter tires)
– On
– + 5 mph
– - 5 mph
▪ Units
– Temperature
– Consump./ dist.
▪ Tire pressure , Tire pressure monitoring system (TPMS)
▪ Alt. speed dsp (alternative speed display On/Off)
▪ Service
– Info
– Reset
▪ Factory setting
Page 108 of 356
Background lighting in the outside mirrors
The background lighting in the outside mirrors lights up the area close to the doors while you are
getting into or out of the vehicle. It is switched on when the vehicle is unlocked, a vehicle door is
opened, or the “Coming home” or “Leaving home” feature is activated. If the vehicle is equipped with a
light sensor, the background lighting in the outside mirrors is only switched on in darkness.
The delay period can be adjusted and the feature can be switched on and off in the Lights &
Vision menu
If the “Coming home” feature is switched on and the driver door is opened, no acoustic chime will
sound to alert you that the lights are still on.
Instrument panel lighting , headlight range adjustment
Fig. 84 Next to the headlight switch: control for instrument cluster lighting.
�
Page 118 of 356

The auto-dimming feature can be switched on and off with the switch on the inside mirror (2). When
auto-dimming is activated, the indicator light (1) is on.
If the ignition is switched on, the sensor (3) automatically darkens the inside mirror depending on the
amount of light shining into the vehicle from the rear.
The auto-dimming feature is deactivated when you shift the transmission into reverse or switch on the
interior lights or the reading light.
Do not attach external navigation devices to the windshield or in the vicinity of the auto-dimming inside
mirror ⇒ .
WARNING
The illuminated display on an external navigation device can cause the auto-dimming inside
mirror to malfunction, which can result in crashes and serious injuries.
�x Malfunctions in the auto-dimming function can result in the rearview mirror being unable
to evaluate the exact distance of vehicles in the rear or other objects.
If the light striking the sensor is filtered or blocked (such as by a sunshade), the auto-dimming
inside mirror will not work properly or may not work at all.
Outside mirrors
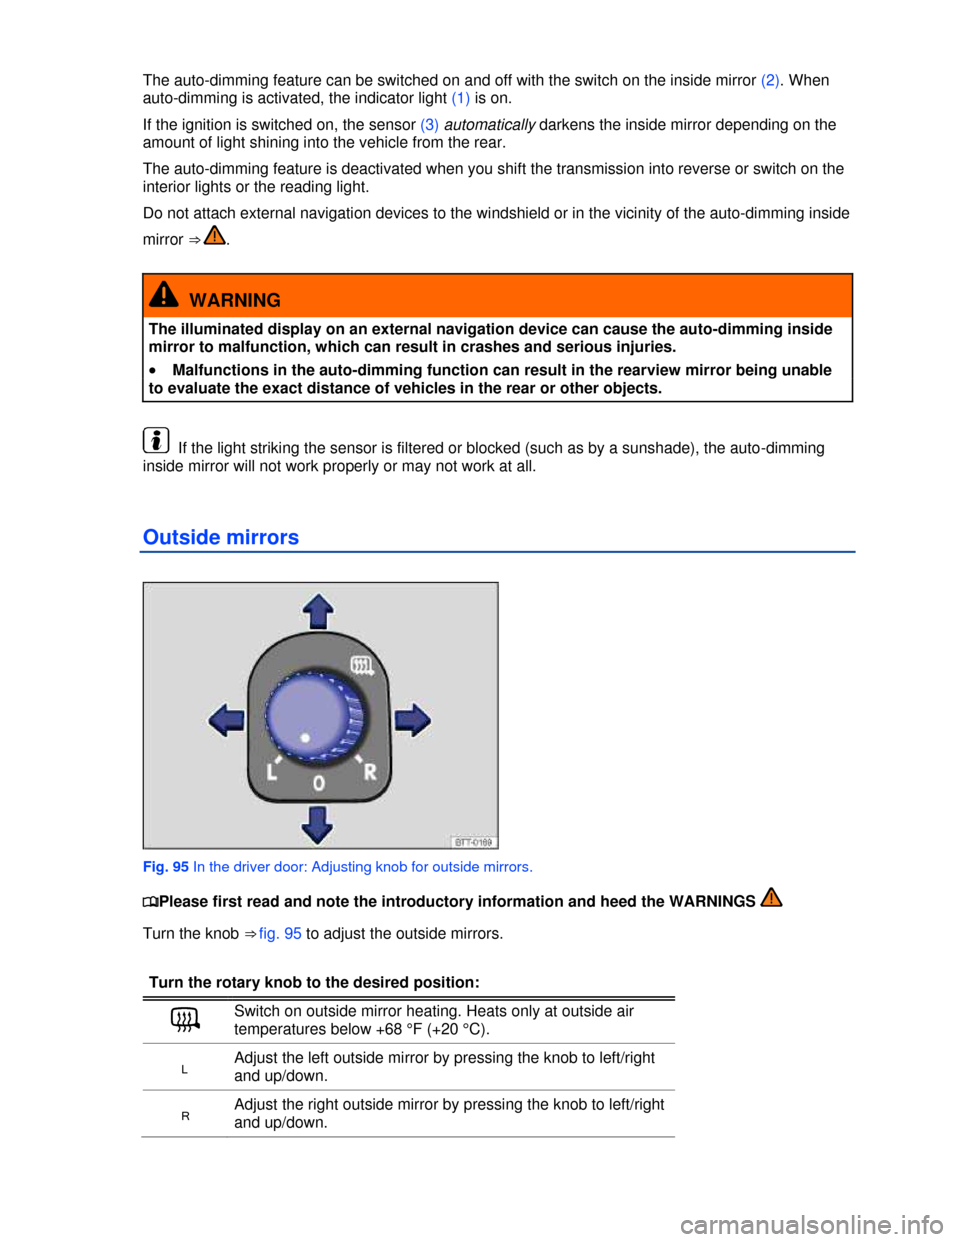
Fig. 95 In the driver door: Adjusting knob for outside mirrors.
�
Page 322 of 356

Frequently asked questions
If you suspect a malfunction or vehicle damage, read and follow the following advice before contacting
an authorized Volkswagen dealer or an authorized Volkswagen Service Facility. You may also find
helpful information under “Characteristics” and “Checklist” in the index.
Description Possible causes among
others Possible remedy
Engine does not start.
Vehicle battery dead. – Perform jump start
– Charge vehicle battery
The wrong remote control
vehicle key is used.
Use a valid remote control vehicle key
Fuel level too low. Refuel
Vehicle cannot be locked
or unlocked using remote
control vehicle key.
– Battery in remote control
vehicle key dead.
– Too far away from vehicle.
– Buttons pressed outside
operating range.
– Replace battery in the remote control
key
– Move closer to vehicle.
– Synchronize remote control vehicle
key
– Lock or unlock vehicle manually
Unusual noises.
Cold engine, braking support
systems, electronic parking
brake.
Check the “Noises” entry in the
keyword index.
Driver seat and outside
mirrors when vehicle is
unlocked.
Convenience settings are
stored. Correct convenience settings
Memory-seat settings are
stored.
– Reassign seat setting
– Clear memory-seat memory
Front seats cannot be
adjusted with power
controls.
Vehicle battery dead. Charge vehicle battery
Fuse blown. Check fuse and replace if necessary
Features do not work as
described in this manual.
Settings were adjusted in the
Volkswagen Information
System.
Check and reset to factory settings if
necessary
Headlights do not light up
the road as they should.
– Headlights incorrectly
adjusted.
– Light bulbs burned out.
– Low beams not switched on.
Have the headlight range adjusted by
an authorized Volkswagen dealer or an
authorized Volkswagen Service
Facility. Adjust headlight range .
– Change light bulbs
– Switch on low beams
Electrical consumers do
not work.
Vehicle battery charge too low. Charge vehicle battery
Remaining fuel level too low. Refuel .
Fuse blown. Check fuse and replace if necessary
Fuel consumption higher
than indicated.
– Short hauls.
– “Jumpy gas pedal”.
– Avoid short distance driving.
– Drive defensively.
– Accelerate smoothly.
Electrical loads switched on. Switch off unnecessary loads.
Engine control malfunctioning. Have the malfunction corrected
Page 344 of 356

Only perform these steps in the specified order:
fig. Low beam
headlight
Parking light Turn signal High beam
headlight or
daytime running
light
5. If necessary, press the locking mechanism on the bulb holder
and pull the bulb straight out of the bulb holder.
6. Replace the burned out light bulb with a new bulb of the same type.
7. Reinsert the bulb
holder (3) B into
the headlight and
turn it clockwise
until it stops.
Reinsert the bulb
holder (4) B into
the headlight and
clip it into the
guide.
Reinsert the turn
signal bulb holder
(5) B into the
headlight and turn it
clockwise until it
stop.
Insert the parking
light bulb holder (4)
B into the headlight
and clip it into the
guide.
Reinsert the bulb (6)
B into the headlight
and turn it clockwise
until it stops.
8.
Install the cover (1)
A on the back of
the headlight
(retainer vertical)
and turn it
clockwise until it
stops.
Install the rubber cover (2) A.
The illustrations show the left headlight assembly from the rear. The right headlight assembly is
the mirror image of the left headlight assembly.
Different models may have different lights, and the location and design of covers, bulb holders,
and bulbs may be in a different location than shown in the illustrations.
Replacing light bulbs in the Xenon headlight
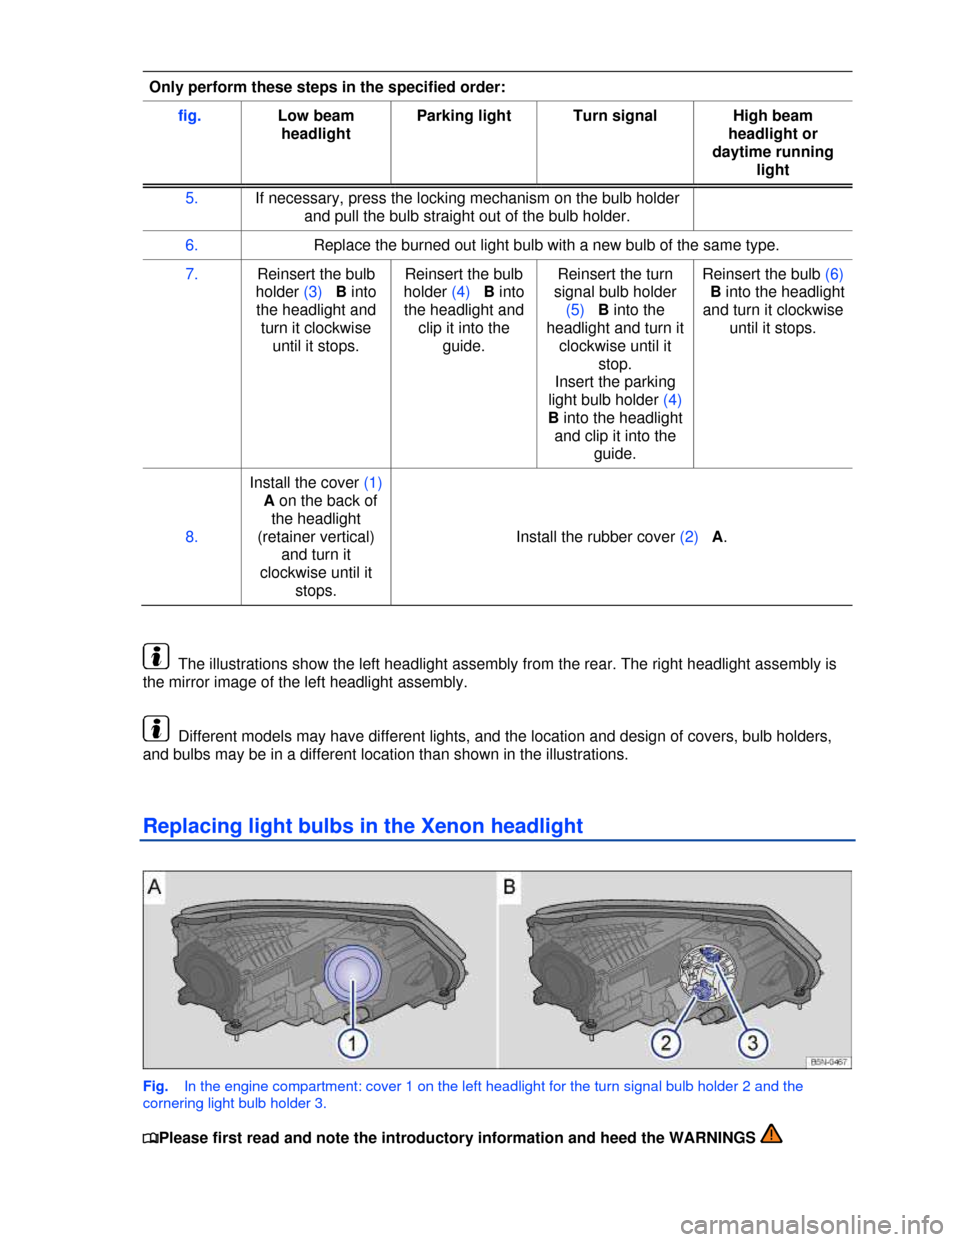
Fig. In the engine compartment: cover 1 on the left headlight for the turn signal bulb holder 2 and the
cornering light bulb holder 3.
�