Page 67 of 720

67 1-3. Adjustable components (seats, mirrors, steering wheel)
1
Before driving
LC200_OM_OM60F57U_(U)
CAUTION
■Seat adjustment
Do not recline the seat more than necessary when the vehicle is in motion,
to reduce the risk of sliding under the lap belt.
If the seat is too reclined, during an accident the lap belt may slide past the
hips and apply restraint forces directly to the abdomen or your neck may
contact the shoulder belt, increasing the risk of death or serious injury.
■When the seatback is folded
●Do not sit on or place anything on the seatback while driving.
●Be sure to install the seat hook covers on the seat hooks, or you may get
burned when they become hot.
■When returning the seatbacks to their original position
Observe the following precautions. Failure to do so may result in death or
serious injury.
●Be careful not to get your hands or feet pinched in the seat.
●Make sure the seats are securely locked. Failure to do so will prevent the
seat belt from operating properly.
●Check that the seat belts are not twisted or caught under the seat.
●Arrange the seat belts in the proper positions for ready use.
■Avoiding damage to seat components
Do not hang or attach anything on the seatback striker.
NOTICE
■Before tumbling, folding up the seats
The seat belts and buckles must be stowed.
■After returning the third seat
Make sure that the handle on the rear of the seatback has been secured.
Page 68 of 720
68
1-3. Adjustable components (seats, mirrors, steering wheel)
LC200_OM_OM60F57U_(U)
Driving position memor y system
Your preferred driving position (the position of the driver’s seat,
steering wheel and outside rear view mirrors) can be entered into the
computer’s memory and recalled with the touch of a button. It is also
possible to set this function to activate automatically when the
doors are unlocked.
Three different driving positions can be entered into memory.
■Entering a position to memory
Turn the “ENGINE START STOP” switch to IGNITION ON
mode.
Adjust the driver’s seat, steering wheel, and outside rear
view mirrors to the desired positions.
While pressing the “SET” but-
ton, or within 3 seconds after
the “SET” button is pressed,
press and hold button “1”, “2”
or “3” until the signal beeps.
If the selected button has
already been preset, the previ-
ously recorded position will be
overwritten.
STEP1
STEP2
1S
E
T23
1SET23
ITY13C036
STEP3STEP3
Page 71 of 720

71 1-3. Adjustable components (seats, mirrors, steering wheel)
1
Before driving
LC200_OM_OM60F57U_(U)
■Canceling the linked door unlock operation
Turn the “ENGINE START STOP” switch to OFF after closing the
driver’s door.
Using the wireless remote control: While pressing “SET” button,
press button on the wireless remote control until the signal
beeps.
Using the door lock switch: While pressing “SET” button, press the
lock or unlock side on the door lock switch until the signal beeps.
■Retained accessory power
●Each memorized position (except for the steering wheel position) can be
activated within 3 minutes after the driver’s door is opened, even if the
“ENGINE START STOP” switch is turned off.
●Each memorized position (except for the steering wheel position) can be
activated within 60 seconds after the driver’s door is closed, even if the
“ENGINE START STOP” switch is turned off.
■To cancel seat position recall
Perform any one of the following operations.
●Press the “SET” button
●Press button “1”, “2” or “3”.
●Adjust the seat using the switches (only cancels seat position recall)
●Adjust the steering wheel using the tilt and telescopic steering control
switch (only cancels steering wheel position recall)
■If the battery is disconnected
The memorized positions must be reset because the computer’s memory is
erased when the battery is disconnected.
CAUTION
■Seat adjustment caution
Take care during seat adjustment that the seat does not strike the rear pas-
senger or squeeze your body against the steering wheel.
STEP1
STEP2
Page 79 of 720
79 1-3. Adjustable components (seats, mirrors, steering wheel)
1
Before driving
LC200_OM_OM60F57U_(U)
Seat belt pretensioners (front and second outboard seats)
The pretensioner helps the seat
belt to quickly restrain the occu-
pant by retracting the seat belt
when the vehicle is subjected to
certain types of severe frontal
collision or a vehicle rollover.
The pretensioner may not acti-
vate in the event of a minor frontal
impact, a side impact or a rear
impact.
■Adjusting the height of the belt (front and second outboard
seats)
Down
Up
Move the height adjuster up
and down as needed until you
hear a click.
1
2
ITY13C055
Page 82 of 720

82 1-3. Adjustable components (seats, mirrors, steering wheel)
LC200_OM_OM60F57U_(U)
CAUTION
Observe the following precautions to reduce the risk of injury in the event of
sudden braking, sudden swerving or an accident.
Failing to do so may cause death or serious injury.
■Wearing a seat belt
●Ensure that all passengers wear a seat belt.
●Always wear a seat belt properly.
●Each seat belt should be used by one person only. Do not use a seat belt
for more than one person at the same time, including children.
●Children should be seated in the rear seat and always use a seat belt and/
or an appropriate child restraint system.
●Do not recline the seat any more than necessary to achieve a proper seat-
ing position. The seat belt is most effective when the occupants are sitting
up straight and well back in the seats.
●Do not wear the shoulder belt under your arm.
●Always wear your seat belt low and snug across your hips.
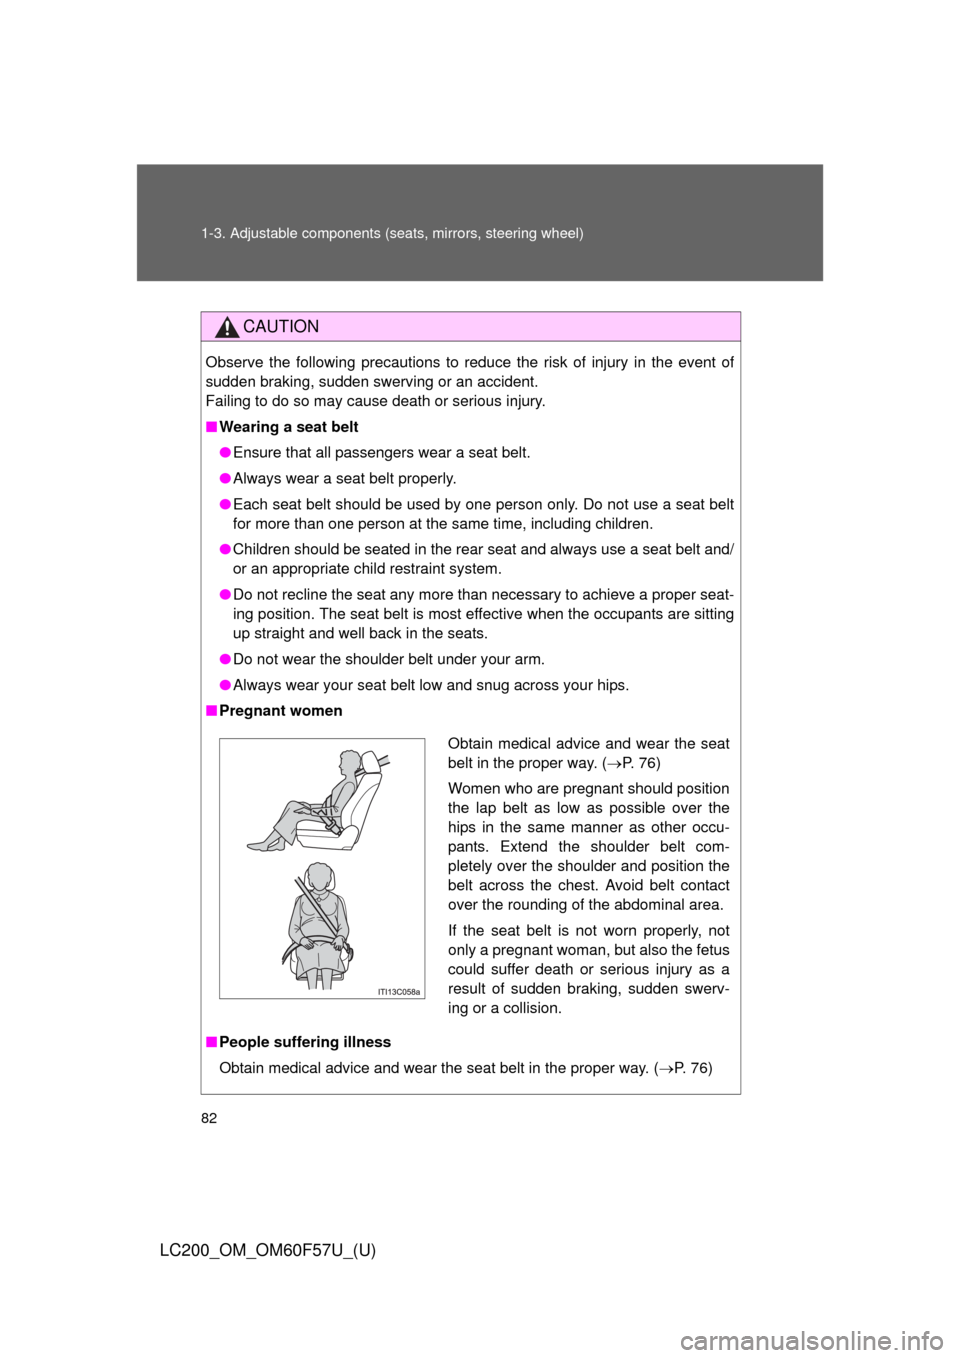
■Pregnant women
■People suffering illness
Obtain medical advice and wear the seat belt in the proper way. (P. 76)
Obtain medical advice and wear the seat
belt in the proper way. (P. 76)
Women who are pregnant should position
the lap belt as low as possible over the
hips in the same manner as other occu-
pants. Extend the shoulder belt com-
pletely over the shoulder and position the
belt across the chest. Avoid belt contact
over the rounding of the abdominal area.
If the seat belt is not worn properly, not
only a pregnant woman, but also the fetus
could suffer death or serious injury as a
result of sudden braking, sudden swerv-
ing or a collision.
Page 88 of 720
88
1-3. Adjustable components (seats, mirrors, steering wheel)
LC200_OM_OM60F57U_(U)
Inside rear view mirror
Adjusting the height of the rear view mirror
Adjust the height of the rear view
mirror by moving it up and down.
Automatic anti-glare function
Responding to the level of brightness of the headlights of vehicles
behind, the reflected light is automatically reduced.
Changing automatic anti-glare
function mode ON/OFF
ON
OFF
When the automatic anti-glare
function is in ON mode, the indi-
cator illuminates.
The function will be set to ON
mode each time the “ENGINE
START STOP” switch is turned to
IGNITION ON mode.
Pressing the button turns the
function to OFF mode. (The indi-
cator also turns off.)
The rear view mirror’s position can be adjusted to enable sufficient
confirmation of the rear view in accordance with the driver’s seating
posture.
Page 90 of 720
90
1-3. Adjustable components (seats, mirrors, steering wheel)
LC200_OM_OM60F57U_(U)
Outside rear view mirrors
Folding back the mirrors
Press the switch
Pressing again will extended the
mirrors.
Mirror angle can be adjusted.
Select a mirror to adjust
Left
Right
Adjust the mirror
Up
Right
Down
LeftSTEP1
STEP2
Page 91 of 720

91 1-3. Adjustable components (seats, mirrors, steering wheel)
1
Before driving
LC200_OM_OM60F57U_(U)
■Mirror angle can be adjusted when
The “ENGINE START STOP” switch is in ACCESSORY or IGNITION ON
mode.
■When the mirrors are fogged up
The outside rear view mirrors can be cleared using the mirror defoggers.
Turn on the rear window defogger to turn on the outside rear view mirror
defoggers. (P. 351)
■Auto anti-glare function
When the anti-glare inside rear view mirror is set to auto mode, the outside
rear view mirrors will activate in conjunction with the anti-glare inside rear
view mirror to reduce reflected light. (P. 88)
■Linked mirror function when reversing
When the mirror select switch is in the “L” or “R” position, the outside rear
view mirrors will automatically angle downwards when the vehicle is revers-
ing in order to give a better view of the ground. To disable this function, move
the mirror select switch to the neutral position (between “L” and “R”).
■One-touch adjustment of the mirror angle
A desired mirror face angle can be entered to memory and adjusted with the
touch of a button. (P. 68)