2013 SUZUKI ERTIGA automatic
[x] Cancel search: automaticPage 111 of 207

Downloaded from www.Manualslib.com manuals search engine 5-16
OTHER CONTROLS AND EQUIPMENT
60MK0-14E
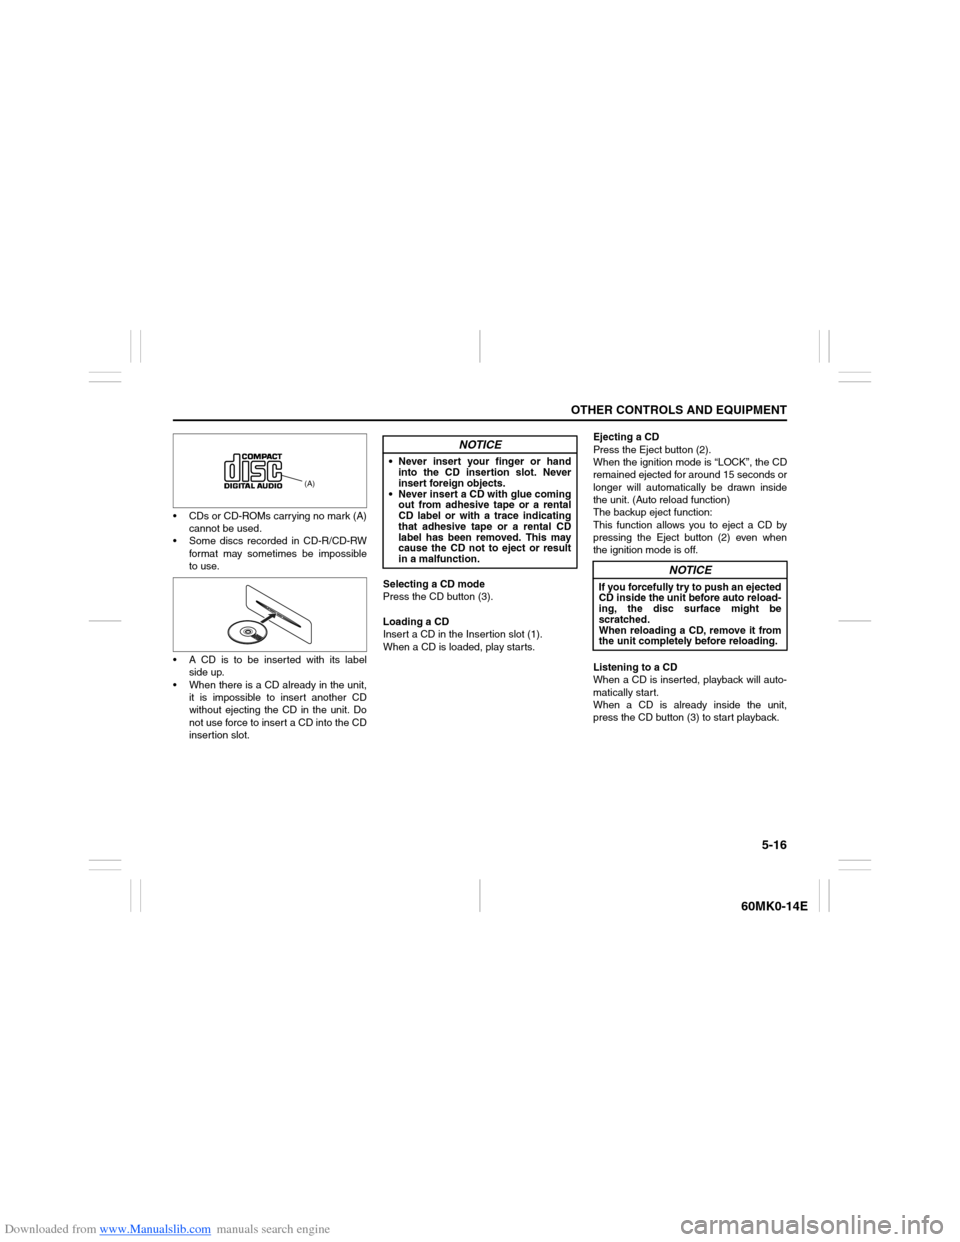
CDs or CD-ROMs carrying no mark (A)
cannot be used.
Some discs recorded in CD-R/CD-RW
format may sometimes be impossible
to use.
A CD is to be inserted with its label
side up.
When there is a CD already in the unit,
it is impossible to insert another CD
without ejecting the CD in the unit. Do
not use force to insert a CD into the CD
insertion slot.Selecting a CD mode
Press the CD button (3).
Loading a CD
Insert a CD in the Insertion slot (1).
When a CD is loaded, play starts.Ejecting a CD
Press the Eject button (2).
When the ignition mode is “LOCK”, the CD
remained ejected for around 15 seconds or
longer will automatically be drawn inside
the unit. (Auto reload function)
The backup eject function:
This function allows you to eject a CD by
pressing the Eject button (2) even when
the ignition mode is off.
Listening to a CD
When a CD is inserted, playback will auto-
matically start.
When a CD is already inside the unit,
press the CD button (3) to start playback.
(A)
NOTICE
Never insert your finger or hand
into the CD insertion slot. Never
insert foreign objects.
Never insert a CD with glue coming
out from adhesive tape or a rental
CD label or with a trace indicating
that adhesive tape or a rental CD
label has been removed. This may
cause the CD not to eject or result
in a malfunction.
NOTICE
If you forcefully try to push an ejected
CD inside the unit before auto reload-
ing, the disc surface might be
scratched.
When reloading a CD, remove it from
the unit completely before reloading.
Page 128 of 207

Downloaded from www.Manualslib.com manuals search engine 5-33OTHER CONTROLS AND EQUIPMENT
60MK0-14E
Confirming the Personal Identification
Number (PIN)
When the main power source is discon-
nected such as when the battery is
replaced, etc, it is required to enter the PIN
to make the unit operable again.
1) Set the ignition switch to the “ACC”
position.
“SECURITY” will be displayed.
2) Press the Up button (3) and the button
numbered [1] of the Preset buttons (2)
simultaneously.
3) Enter a 4-digit number to be registered
as PIN using the buttons numbered [1] -
[4] of the Preset buttons (2).
4) Hold down TUNE FOLDER PUSH
SOUND knob (4) for 1 second or
longer.
When the PIN same as registered is
entered, the power of the audio system
will be turned off automatically and it
will become operable again.
NOTE:
If an incorrect PIN is entered, “ERROR”
and the total number of incorrect entry
attempts will be displayed.
If an incorrect PIN is entered 10 times or
more, “HELP” will be displayed and the
audio system will become inoperable.
Page 138 of 207

Downloaded from www.Manualslib.com manuals search engine 5-43OTHER CONTROLS AND EQUIPMENT
60MK0-14E
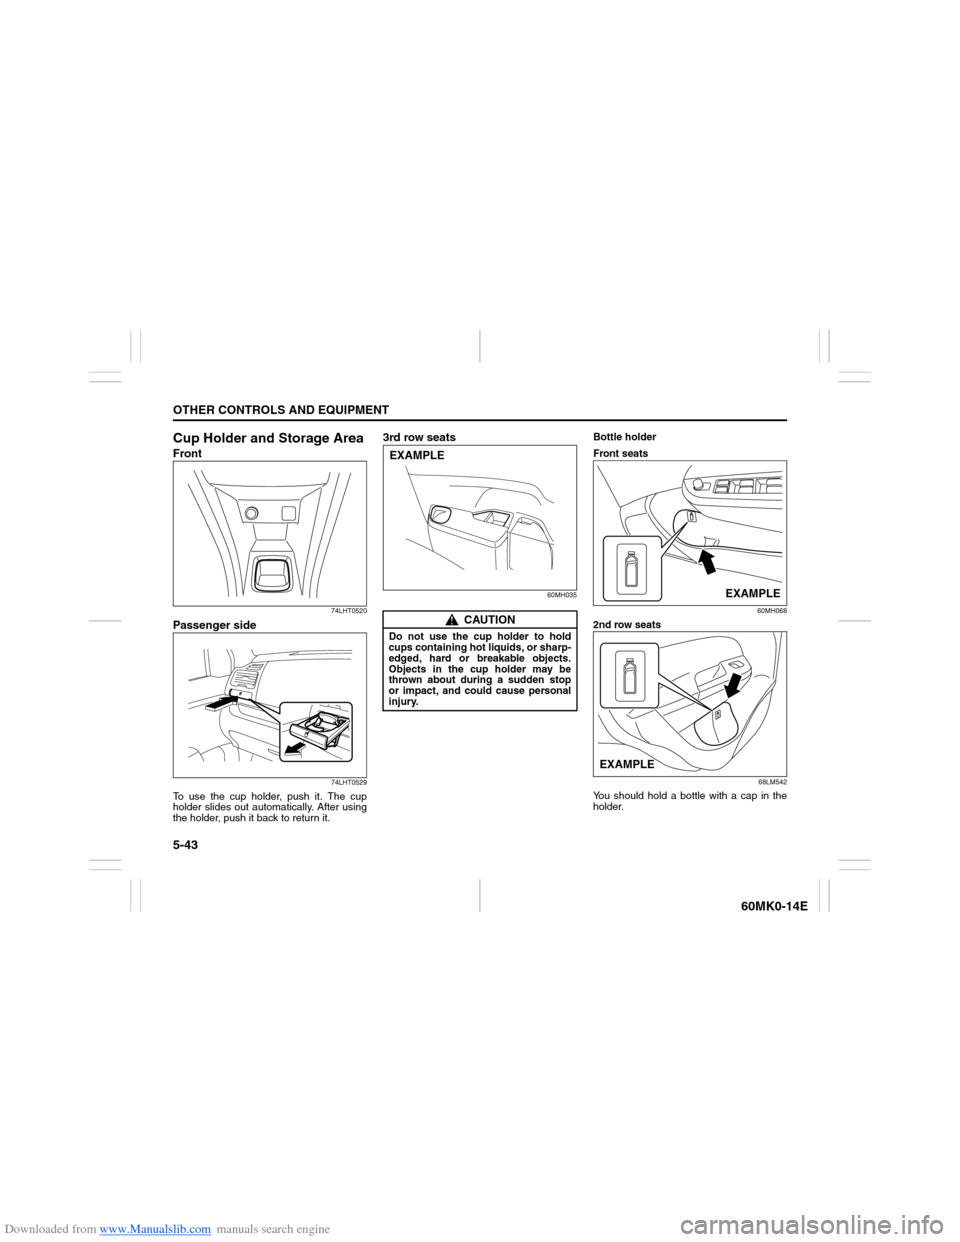
Cup Holder and Storage AreaFront
74LHT0520
Passenger side
74LHT0529
To use the cup holder, push it. The cup
holder slides out automatically. After using
the holder, push it back to return it.
3rd row seats
60MH035
Bottle holder
Front seats
60MH068
2nd row seats
68LM542
You should hold a bottle with a cap in the
holder.
CAUTION
Do not use the cup holder to hold
cups containing hot liquids, or sharp-
edged, hard or breakable objects.
Objects in the cup holder may be
thrown about during a sudden stop
or impact, and could cause personal
injury.EXAMPLE
EXAMPLE
EXAMPLE
Page 145 of 207

Downloaded from www.Manualslib.com manuals search engine INSPECTION AND MAINTENANCE
7
60MK0-14E
60G410
INSPECTION AND MAINTENANCEMaintenance Schedule ....................................................... 7-2
Periodic Maintenance Schedule ........................................ 7-2
Maintenance Recommended under Severe
Driving Conditions .............................................................. 7-5
Drive Belt ............................................................................. 7-7
Engine Oil and Filter ........................................................... 7-7
Engine Coolant .................................................................... 7-11
Air Cleaner ........................................................................... 7-13
Spark Plugs ......................................................................... 7-13
Gear Oil ................................................................................ 7-15
Clutch Pedal ........................................................................ 7-16
Automatic Transaxle (AT) Fluid ......................................... 7-16
Brakes .................................................................................. 7-17
Steering ................................................................................ 7-19
Tires ...................................................................................... 7-20
Battery .................................................................................. 7-22
Fuses .................................................................................... 7-23
Headlight Aiming ................................................................. 7-26
Bulb Replacement ............................................................... 7-26
Wiper Blades ....................................................................... 7-31
Windshield Washer Fluid ................................................... 7-35
Air Conditioning System .................................................... 7-35
Page 146 of 207

Downloaded from www.Manualslib.com manuals search engine 7-1INSPECTION AND MAINTENANCE
60MK0-14E
60B128S
WARNING
You should take extreme care when
working on your vehicle to prevent
accidental injury. Here are a few pre-
cautions that you should be espe-
cially careful to observe:
To prevent damage or unintended
activation of the air bag system or
seat belt pretensioner system, be
sure the battery is disconnected and
the ignition switch has been in the
“LOCK” position for at least 90 sec-
onds before performing any electri-
cal service work on your SUZUKI. Do
not touch air bag system compo-
nents, seat belt pretensioner system
components or wires.
The wires are wrapped with yellow
tape or yellow tubing, and the cou-
plers are yellow for easy identifica-
tion.
Do not leave the engine running in
garages or other confined areas.
(Continued)
WARNING
(Continued)
When the engine is running, keep
hands, clothing, tools, and other
objects away from the fan and drive
belt. Even though the fan may not
be moving, it can automatically
turn on without warning.
When it is necessary to do service
work with the engine running, make
sure that the parking brake is set
fully and the transaxle is in Neutral
(for manual transaxle vehicles) or
Park (for automatic transaxle vehi-
cles). Do not touch ignition wires or
other ignition system parts when
starting the engine or when the
engine is running, or you could
receive an electric shock.
Be careful not to touch a hot
engine, exhaust manifold and
pipes, muffler, radiator and water
hoses.
Do not allow smoking, sparks, or
flames around fuel or the battery.
Flammable fumes are present.
Do not get under your vehicle if it is
supported only with the portable
jack provided in your vehicle.
Be careful not to cause accidental
short circuits between the positive
and negative battery terminals.
(Continued)
WARNING
(Continued)
Keep used oil, coolant, and other
fluids away from children and pets.
Dispose of used fluids properly;
never pour them on the ground,
into sewers, etc.
Page 149 of 207

Downloaded from www.Manualslib.com manuals search engine 7-4
INSPECTION AND MAINTENANCE
60MK0-14E
*Interval: This interval should be judged by odome-
ter reading or months, whichever comes first.km (x1000) 15 30 45 60 75 90
miles (x1000)9 1827364554
months 12 24 36 48 60 72BRAKE
*5-1. Brake discs and pads (front)IIIIII
Brake drums and shoes (rear)
–
I
–
I
–
I
*5-2. Brake hoses and pipes–I–I–I
5-3.
Brake fluid
Check, *Replacement
–
R
–
R
–
R
5-4. Brake lever and cable Check, *Adjustment (1st 15000 km only) I–––––
CHASSIS AND BODY
*6-1. Clutch (pedal and fluid level)IIIIII6-2.
Tires/Wheels
I
I
I
I
I
I
*6-3. Drive axle boots–– I –– I
*6-4.
Suspension system
–
I
–
I
–
I
*6-5. Steering system–I–I–I
*6-6.
Manual transaxle oil
(I: 1st 15000 km only)
I
–
R
–
–
R
6-7. Automatic transaxle Fluid level – I – I – I
* Fluid change
Replace every 165000 km (99000 miles)
* Fluid hose – – – I – –
6-8.
All latches, hinges and locks
–
I
–
I
–
I
*6-9. Air conditioner filter element (if equipped) – I R – I R
WARNING
The shock absorbers are filled with high pressure gas. Never attempt to disassemble them or throw them into a fire. Avoid
storing them near a heater or heating device. When scrapping the absorber, the gas must be released from the absorber
safely. Ask your dealer for assistance.
Page 151 of 207

Downloaded from www.Manualslib.com manuals search engine 7-6
INSPECTION AND MAINTENANCE
60MK0-14E
NOTE:
I – Inspect, clean, adjust, lubricate or replace as necessary
R – Replace or change
T – Tighten to the specified torque
*1 Inspect or replace more frequently if necessary.Severe
Condition CodeMaintenanceMaintenance
OperationMaintenance Interval
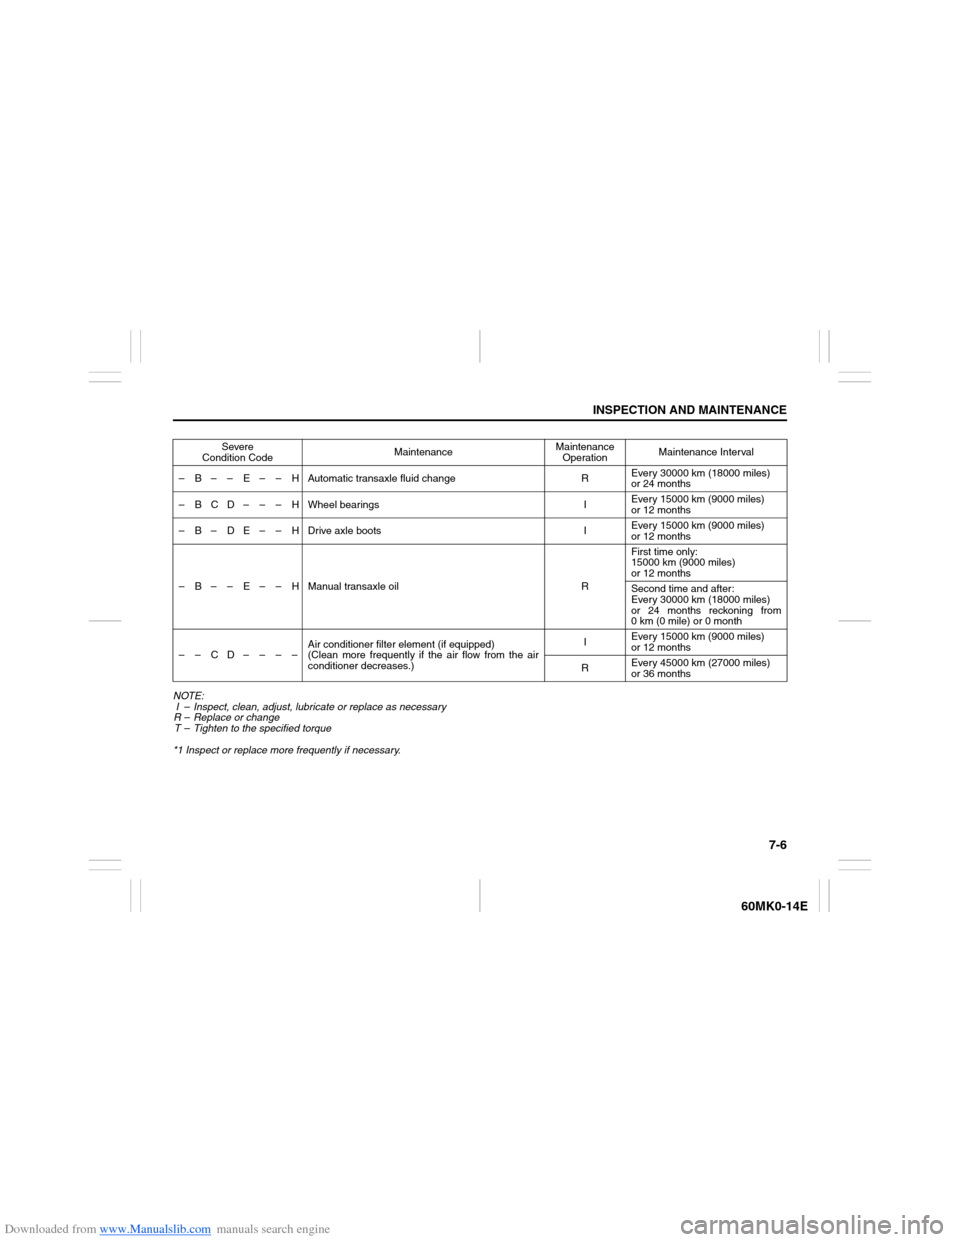
– B – – E – – H Automatic transaxle fluid change REvery 30000 km (18000 miles)
or 24 months
– B C D – – – H Wheel bearings IEvery 15000 km (9000 miles)
or 12 months
– B – D E – – H Drive axle boots IEvery 15000 km (9000 miles)
or 12 months
– B – – E – – H Manual transaxle oil RFirst time only:
15000 km (9000 miles)
or 12 months
Second time and after:
Every 30000 km (18000 miles)
or 24 months reckoning from
0 km (0 mile) or 0 month
– – CD– – – –Air conditioner filter element (if equipped)
(Clean more frequently if the air flow from the air
conditioner decreases.)IEvery 15000 km (9000 miles)
or 12 months
REvery 45000 km (27000 miles)
or 36 months
Page 156 of 207

Downloaded from www.Manualslib.com manuals search engine 7-11INSPECTION AND MAINTENANCE
60MK0-14E
Refill with Oil and Check for Leaks1) Pour oil through the filler hole and
install the filler cap.
For the approximate capacity of the oil,
refer to the “Capacities” item in the
“SPECIFICATIONS” section.
2) Start the engine and look carefully for
leaks at the oil filter and drain plug. Run
the engine at various speeds for at least
5 minutes.
3) Stop the engine and wait about 5 min-
utes. Check the oil level again and add
oil if necessary. Check for leaks again.
Engine CoolantSelection of CoolantTo maintain optimum performance and
durability of your engine, use SUZUKI
Genuine Coolant or equivalent.
This type of coolant is best for your cooling
system as it:
Helps maintain proper engine tempera-
ture.
Gives proper protection against freezing
and boiling.
Gives proper protection against corro-
sion and rust.Failure to use the proper coolant can dam-
age your cooling system. Your authorized
SUZUKI dealer can help you select the
proper coolant.
NOTICE
When replacing the oil filter, it is
recommended that you use a genu-
ine SUZUKI replacement filter. If
you use an aftermarket filter, make
sure it is of equivalent quality and
follow the manufacturer’s instruc-
tions.
Oil leaks from around the oil filter
or drain plug indicate incorrect
installation or gasket damage. If
you find any leaks or are not sure
that the filter has been properly
tightened, have the vehicle
inspected by your SUZUKI dealer.
NOTICE
To avoid damaging your cooling sys-
tem:
Always use a high quality ethylene
glycol base non-silicate type cool-
ant diluted with distilled water at
the correct mixture concentration.
Make sure that the proper mix is 50/
50 coolant to distilled water and in
no case higher than 70/30. Concen-
trations greater than 70/30 coolant
to distilled water will cause over-
heating conditions.
Do not use straight coolant nor
plain water.
Do not add extra inhibitors or addi-
tives. They may not be compatible
with your cooling system.
Do not mix different types of base
coolants. Doing so may result in
accelerated seal wear and/or the
possibility of severe overheating
and extensive engine/automatic
transaxle damage.