Page 185 of 207
Downloaded from www.Manualslib.com manuals search engine 8-4
EMERGENCY SERVICE
60MK0-14E
60MH073
(1)
(1)
(2)(2)
(3)(4)
(5)
(6)(7)
(6)
(6)
(4)
(3)
(1) Front
(2) Jack stand
(3) Jacking point for onboard jack
(4) Rear
(5) Front suspension frame
(6) Jacking point for garage jack
(7) Application point for two-column lift
and jack stand
NOTE:
For more details, please contact an autho-
rized SUZUKI dealer.
NOTICE
Never apply a garage jack to the
exhaust pipe or engine undercover
and rear torsion beam.
When you apply a garage jack to
the rear jacking point, it may inter-
fere with the rear bumper depend-
ing on the shape of the garage jack.
Page 186 of 207
 Remove the jack, tools and spare wheel
from")
Downloaded from www.Manualslib.com manuals search engine 8-5EMERGENCY SERVICE
60MK0-14E
Changing WheelsTo change a wheel, use the following pro-
cedure:
1) Remove the jack, tools and spare wheel
from the vehicle.
2) Loosen, but do not remove the wheel
nuts.
3) Jack up the vehicle (follow the jacking
instructions in this section).
4) Remove the wheel nuts and wheel.
5) Before installing the new wheel, clean
any mud or dirt off from the surface of
the wheel and hub with a clean cloth.
Clean the hub carefully; it may be hot
from driving.
6) Install the new wheel and replace the
wheel nuts with their cone shaped end
facing the wheel. Tighten each nuts
snugly by hand until the wheel is
securely seated on the hub.
81A057
Tightening torque for wheel nuts
100 Nm (10.0 kg-m, 72.3 lb-ft)
7) Lower the jack and fully tighten the nuts
in a crisscross fashion with a wrench as
shown in the illustration.
Full Wheel Cover (if equipped)
60MK038
(1) or (2) Flat end tool
Your vehicle includes two tools, a lug
wrench and a jack crank, one of which has
a flat end.
Use the tool with the flat end to remove the
full wheel cap, as shown above.
60MH074
When installing the cover, make sure that it
is positioned so that it does not cover or
foul the air valve.
WARNING
Be sure to shift into “P” (Park) in
automatic transaxle, or shift into
“R” (Reverse) in manual transaxle
when you jack up the vehicle.
Never jack up the vehicle with the
transaxle in “N” (Neutral). Other-
wise, unstable jack may cause an
accident.
WARNING
Use genuine wheel nuts and tighten
them to the specified torque as soon
as possible after changing wheels.
Incorrect wheel nuts or improperly
tightened wheel nuts may come
loose or fall off, which can result in
an accident. If you do not have a
torque wrench, have the wheel nuts
torque checked by an authorized
SUZUKI dealer.
EXAMPLE
EXAMPLEEXAMPLE
Page 187 of 207
 in place. Also,
stow the")
Downloaded from www.Manualslib.com manuals search engine 8-6
EMERGENCY SERVICE
60MK0-14E
After Changing Wheels
Stow the tire changing tools (jack, jack
handle and lug wrench) in place. Also,
stow the flat tire in the spare tire stowed
position. Refer to “Tire Changing Tool” in
this section.
Jump Starting Instructions
When Jump Starting Your Vehicle,
Use the Following Procedure:1) Use only a 12-volt battery to jump start
your vehicle. Position the good 12-volt
battery close to your vehicle so that the
jump leads will reach both batteries.
When using a battery installed on
another vehicle, DO NOT LET THE
VEHICLES TOUCH. Set the parking
brakes fully on both vehicles.
2) Turn off all vehicle accessories, except
those necessary for safety reasons (for
example, headlights or hazard lights).
NOTICE
Repair or replace the flat tire immedi-
ately. If the flat tire is placed in the
spare tire stowed position for long
time, it can cause vehicle shakiness,
noise, or scratches.
WARNING
Never attempt to jump start your
vehicle if the battery appears to be
frozen. Batteries in this condition
may explode or rupture if jump
starting is attempted.
When making jump lead connec-
tions, be certain that your hands
and the jump leads remain clear
from pulleys, belts, or fans.
Batteries produce flammable
hydrogen gas. Keep flames and
sparks away from the battery or an
explosion may occur. Never smoke
when working in the vicinity of the
battery.
If the booster battery you use for
jump starting is installed in another
vehicle, make sure the two vehicles
are not touching each other.
If your battery discharges repeat-
edly, for no apparent reason, have
your vehicle inspected by an autho-
rized SUZUKI dealer.
To avoid harm to yourself or dam-
age to your vehicle or battery, fol-
low the jump starting instructions
below precisely and in order.
If you are in doubt, call for qualified
road service.
NOTICE
Your vehicle should not be started by
pushing or towing. This starting
method could result in permanent
damage to the catalytic converter.
Use jump leads to start a vehicle with
a weak or flat battery.
Page 188 of 207
 Make jump lead connections as follows:
1. Connect one end of the first jump
lead to the positive (+")
Downloaded from www.Manualslib.com manuals search engine 8-7EMERGENCY SERVICE
60MK0-14E
71LST0802
3) Make jump lead connections as follows:
1. Connect one end of the first jump
lead to the positive (+) terminal of
the flat battery (1).
2. Connect the other end to the positive
(+) terminal of the booster battery
(2).
3. Connect one end of the second jump
lead to the negative (–) terminal of
the booster battery (2).
4. Make the final connection to an
unpainted, heavy metal part (i.e.
engine hook (3)) of the engine of the
vehicle with the flat battery (1).4) If the booster battery you are using is
fitted to another vehicle, start the
engine of the vehicle with the booster
battery. Run the engine at moderate
speed.
5) Start the engine of the vehicle with the
flat battery.
6) Remove the jump leads in the exact
reverse order in which you connected
them.
TowingIf you need to have your vehicle towed,
contact a professional service. Your dealer
can provide you with detailed towing
instructions.2-Wheel Drive (2WD) Automatic
TransaxleAutomatic transaxle vehicles may be towed
using either of the following methods.
1) From the front, with the front wheels
lifted and the rear wheels on the
ground. Before towing, make sure that
the parking brake is released.
2) From the rear, with the rear wheels
lifted and a dolly under the front wheels.
(2)
(1)
(3)
1
2
3 4
EXAMPLE
WARNING
Never connect the jump lead directly
to the negative (–) terminal of the dis-
charged battery, or an explosion may
occur.
NOTICE
To help avoid damage to your vehicle
during towing, proper equipment and
towing procedures must be used.
NOTICE
Towing your vehicle with the front
wheels on the ground can result in
damage to the automatic transaxle.
Page 189 of 207
 Manual Tran-
saxleManual transaxle vehicles may be towed
using either of the following meth")
Downloaded from www.Manualslib.com manuals search engine 8-8
EMERGENCY SERVICE
60MK0-14E
2-Wheel Drive (2WD) Manual Tran-
saxleManual transaxle vehicles may be towed
using either of the following methods.
1) From the front, with the front wheels
lifted and the rear wheels on the
ground. Before towing, make sure that
the parking brake is released.
2) From the rear, with the rear wheels
lifted and the front wheels on the
ground, provided the steering and driv-
etrain are in operational condition.
Before towing, make sure that transaxle
is in neutral, the steering wheel is
unlocked (the ignition key should be in
the “ACC” position), and the steering
wheel is secured with a clamping
device designed for towing service.
If the Starter Does Not
Operate1) Try turning the ignition switch to the
“START” position with the headlights
turned on to determine the battery con-
dition. If the headlights go excessively
dim or go off, it usually means that
either the battery is flat or the battery
terminal contact is poor. Recharge the
battery or correct battery terminal con-
tact as necessary.
2) If the headlights remain bright, check
the fuses. If the reason for failure of the
starter is not obvious, there may be a
major electrical problem. Have the vehi-
cle inspected by your authorized
SUZUKI dealer.
If the Engine is FloodedIf the engine is flooded with gasoline, it
may be hard to start. If this happens, press
the accelerator pedal all the way to the
floor and hold it there while cranking the
engine. (Do not operate the starter motor
for more than 15 seconds).
NOTICE
The steering column is not strong
enough to withstand shocks trans-
mitted from the front wheels during
towing. Always unlock the steering
wheel before towing.
Page 190 of 207

Downloaded from www.Manualslib.com manuals search engine 8-9EMERGENCY SERVICE
60MK0-14E
If the Engine OverheatsThe engine could overheat temporarily
under severe driving conditions. If the
engine coolant temperature gauge indi-
cates overheating during driving:
1) Turn off the air conditioner, if equipped.
2) Take the vehicle to a safe place and
park.
3) Let the engine run at the normal idle
speed for a few minutes until the indica-
tor is within the normal, acceptable
temperature range between “H” and
“C”.If the temperature indication does not
come down to within the normal, accept-
able range:
1) Turn off the engine and check that the
water pump belt and pulleys are not
damaged or slipping. If any abnormality
is found, correct it.
2) Check the coolant level in the reservoir.
If it is found to be lower than the “LOW”
line, look for leaks at the radiator, water
pump, and radiator and heater hoses. If
you locate any leaks that may have
caused the overheating, do not run the
engine until these problems have been
corrected.
3) If you do not find a leak, carefully add
coolant to the reservoir and then the
radiator, if necessary. (Refer to “Engine
Coolant” in the “INSPECTION AND
MAINTENANCE” section.)
NOTE:
If your engine overheats and you are
unsure what to do, contact your SUZUKI
dealer.
79J007
WARNING
If you see or hear escaping steam,
stop the vehicle in a safe place and
immediately turn off the engine to let
it cool. Do not open the hood when
steam is present. When the steam
can no longer be seen or heard, open
the hood to see if the coolant is still
boiling. If it is, you must wait until it
stops boiling before you proceed.
WARNING
It is hazardous to remove the radia-
tor cap (or degassing tank cap for a
diesel engine) when the water tem-
perature is high, because scalding
fluid and steam may be blown out
under pressure. The cap should
only be taken off when the coolant
temperature has lowered.
To help prevent personal injury,
keep hands, tools and clothing
away from the engine cooling fan
and air-conditioner fan (if
equipped). These electric fans can
automatically turn on without warn-
ing.
Page 191 of 207
Downloaded from www.Manualslib.com manuals search engine APPEARANCE CARE
9
60MK0-14E
60G412
APPEARANCE CARECorrosion Prevention ......................................................... 9-1
Vehicle Cleaning ................................................................. 9-2
Page 192 of 207

Downloaded from www.Manualslib.com manuals search engine 9-1APPEARANCE CARE
60MK0-14E
Corrosion PreventionIt is important to take good care of your
vehicle to protect it from corrosion. Listed
below are instructions for how to maintain
your vehicle to prevent corrosion. Please
read and follow these instructions carefully.Important Information About Corro-
sionCommon causes of corrosion
1) Accumulation of road salt, dirt, mois-
ture, or chemicals in hard-to-reach
areas of the vehicle underbody or
frame.
2) Chipping, scratches and any damage to
treated or painted metal surfaces
resulting from minor accidents or abra-
sion by stones and gravel.
Environmental conditions which accel-
erate corrosion
1) Road salt, dust control chemicals, sea
air or industrial pollution will all acceler-
ate the corrosion of metal.
2) High humidity will increase the rate of
corrosion particularly when the temper-
ature range is just above the freezing
point.
3) Moisture in certain areas of a vehicle
for an extended period of time may pro-
mote corrosion even though other body
sections may be completely dry.
4) High temperatures will cause an accel-
erated rate of corrosion to parts of thevehicle which are not well ventilated to
permit quick drying.
This information illustrates the necessity of
keeping your vehicle (particularly the
underbody) as clean and dry as possible. It
is equally important to repair any damage
to the paint or protective coatings as soon
as possible.
How to Help Prevent CorrosionWash your vehicle frequently
The best way to preserve the finish on your
vehicle and to help avoid corrosion is to
keep it clean with frequent washing.
Wash your vehicle at least once during the
winter and once immediately after the win-
ter. Keep your vehicle, particularly the
underside, as clean and dry as possible.
If you frequently drive on salted roads, your
vehicle should be washed at least once a
month during the winter. If you live near the
ocean, your vehicle should be washed at
least once a month throughout the year.
For washing instructions, refer to the “Vehi-
cle Cleaning” section.
Remove foreign material deposits
Foreign material such as salts, chemicals,
road oil or tar, tree sap, bird droppings and
industrial fall-out may damage the finish of
your vehicle if it is left on painted surfaces.
Remove these types of deposits as quickly
as possible. If these deposits are difficult to
wash off, an additional cleaner may berequired. Be sure that any cleaner you use
is not harmful to painted surfaces and is
specifically intended for your purposes.
Follow the manufacturer’s directions when
using these special cleaners.
Repair finish damage
Carefully examine your vehicle for damage
to the painted surfaces. Should you find
any chips or scratches in the paint, touch
them up immediately to prevent corrosion
from starting. If the chips or scratches have
gone through to the bare metal, have a
qualified body shop make the repair.
Keep passenger and luggage compart-
ments clean
Moisture, dirt or mud can accumulate
under the floor mats and may cause corro-
sion. Occasionally, check under these
mats to ensure that this area is clean and
dry. More frequent checks are necessary if
the vehicle is used off road or in wet
weather.
Certain cargos such as chemicals, fertiliz-
ers, cleaners, salts, etc. are extremely cor-
rosive by nature. These products should
be transported in sealed containers. If a
spill or leak does occur, clean and dry the
area immediately.
 1
1 2
2 3
3 4
4 5
5 6
6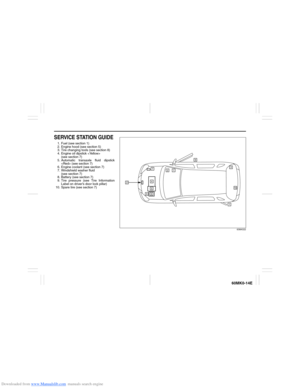 7
7 8
8 9
9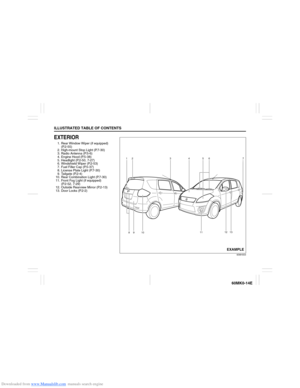 10
10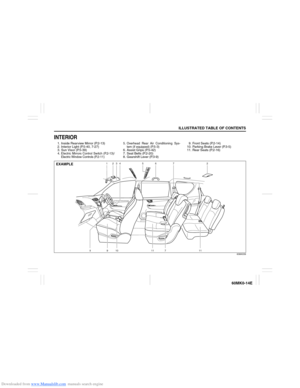 11
11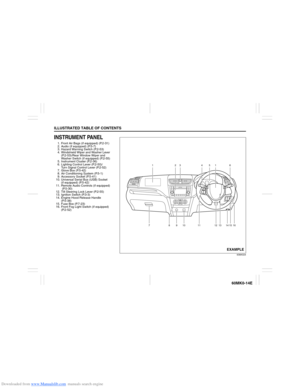 12
12 13
13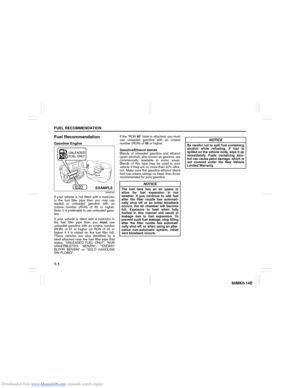 14
14 15
15 16
16 17
17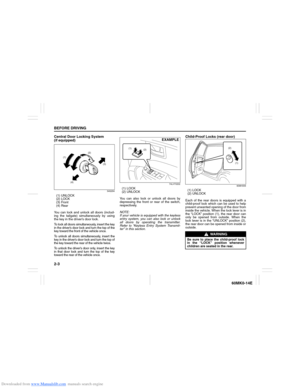 18
18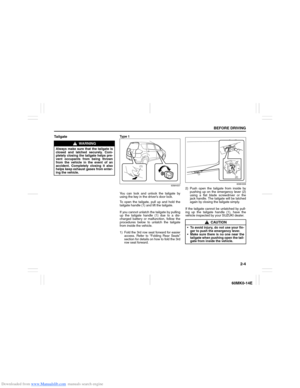 19
19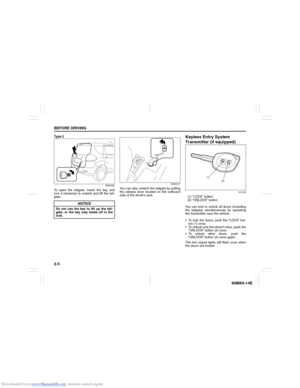 20
20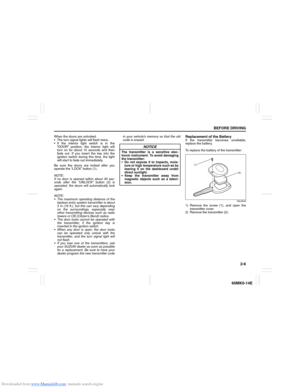 21
21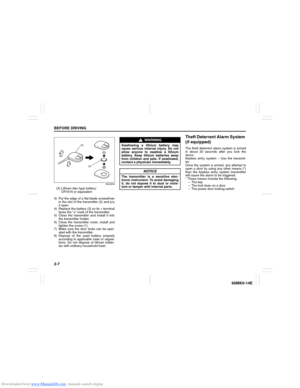 22
22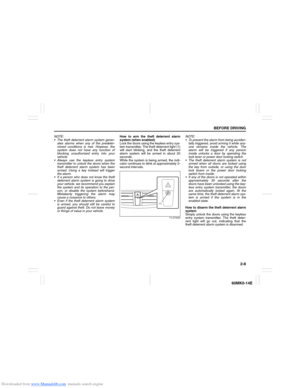 23
23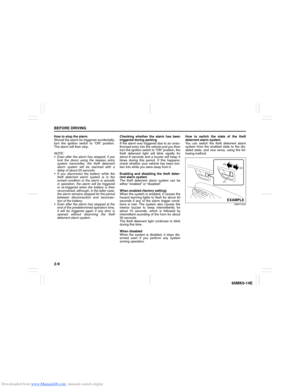 24
24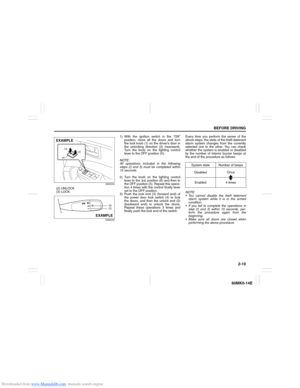 25
25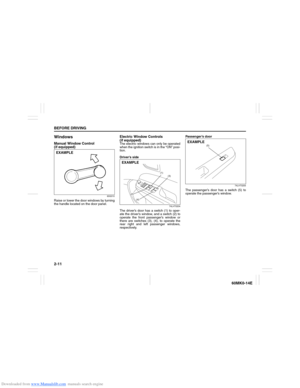 26
26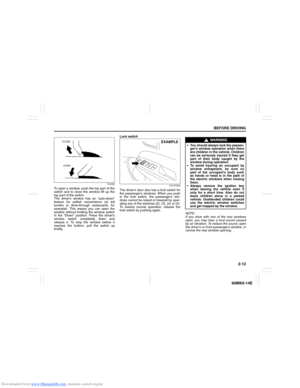 27
27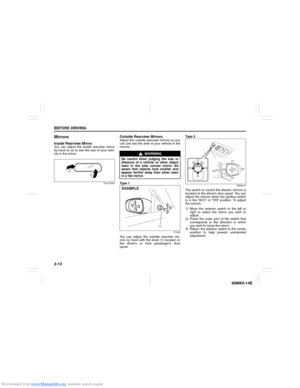 28
28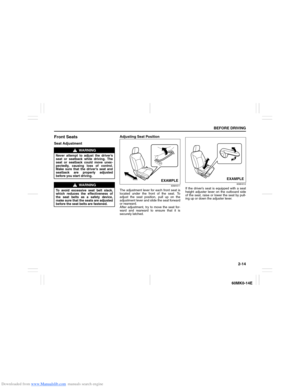 29
29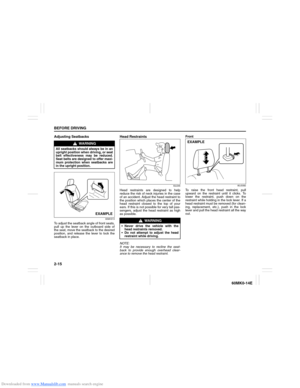 30
30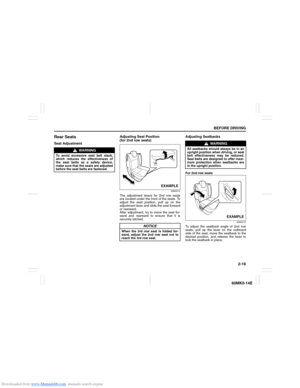 31
31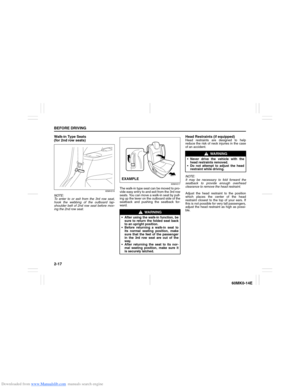 32
32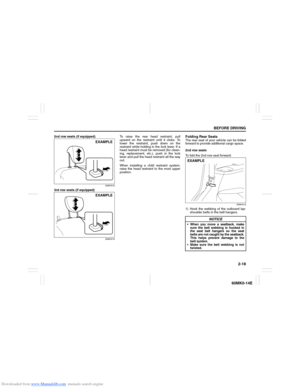 33
33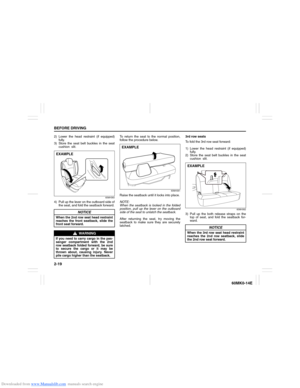 34
34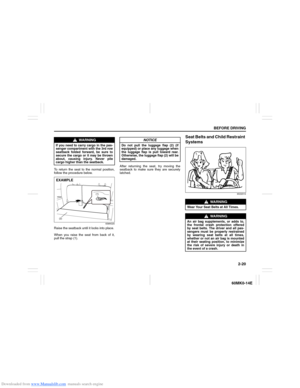 35
35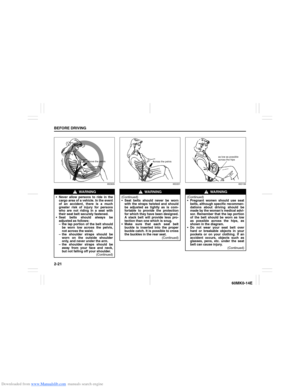 36
36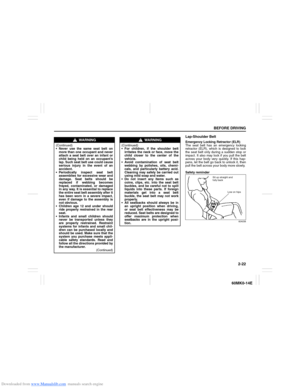 37
37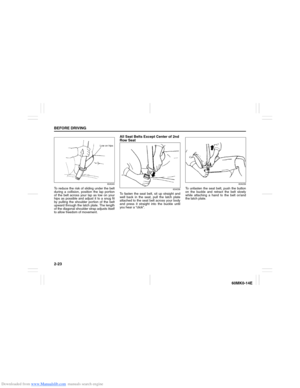 38
38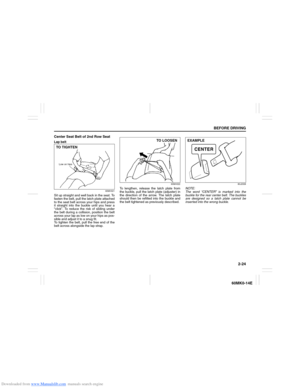 39
39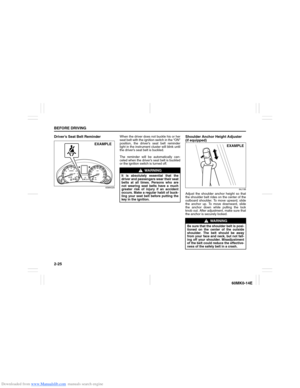 40
40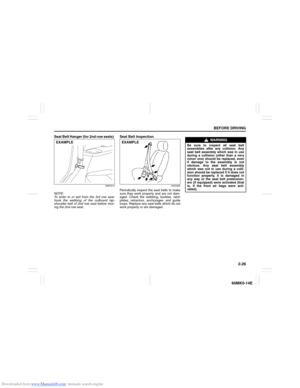 41
41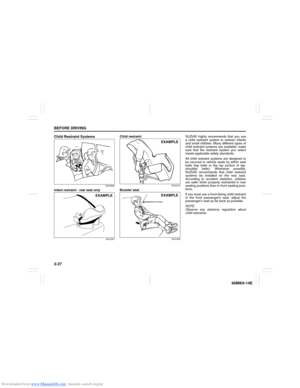 42
42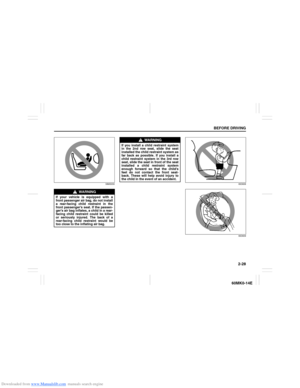 43
43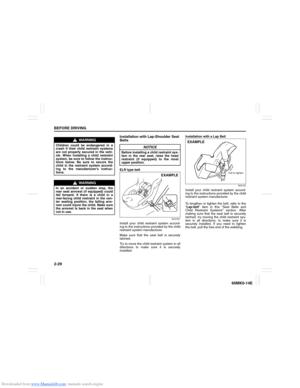 44
44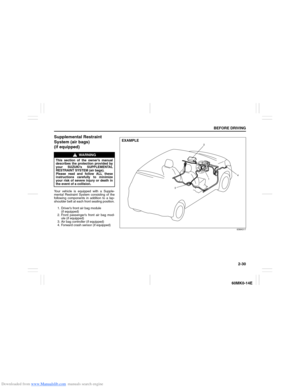 45
45 46
46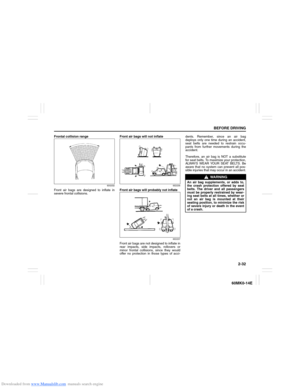 47
47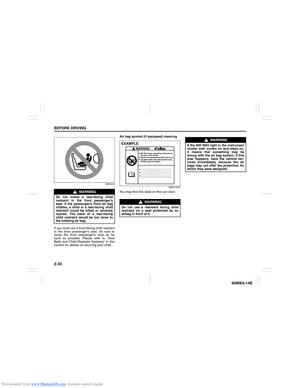 48
48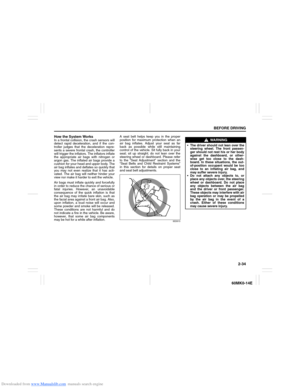 49
49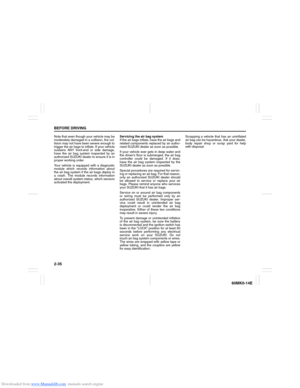 50
50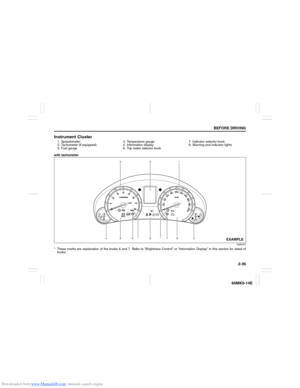 51
51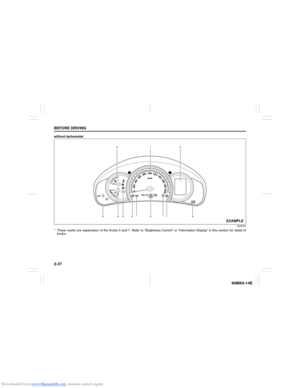 52
52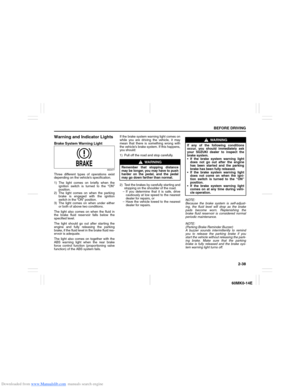 53
53 54
54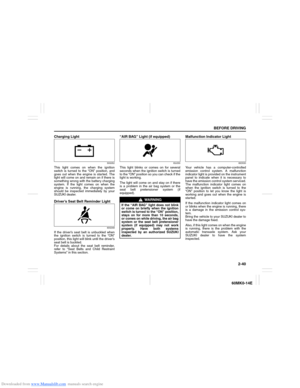 55
55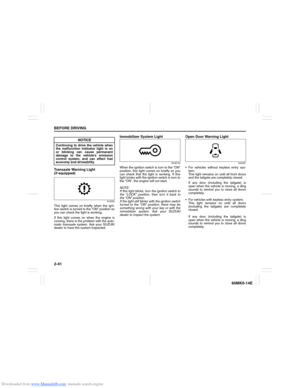 56
56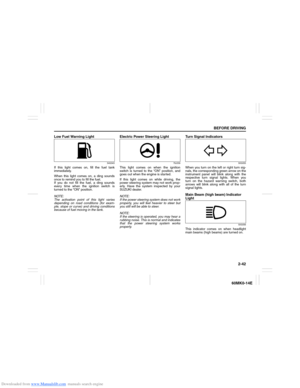 57
57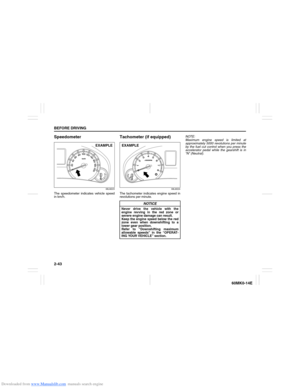 58
58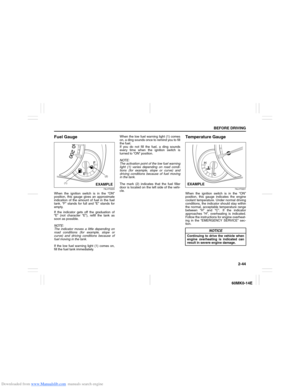 59
59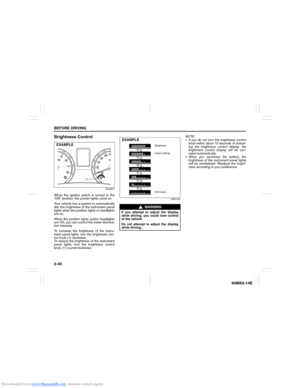 60
60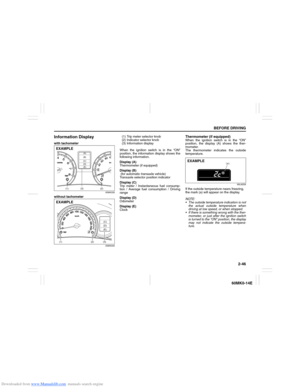 61
61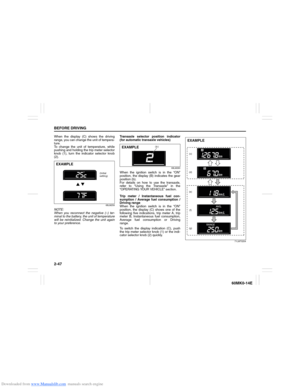 62
62 63
63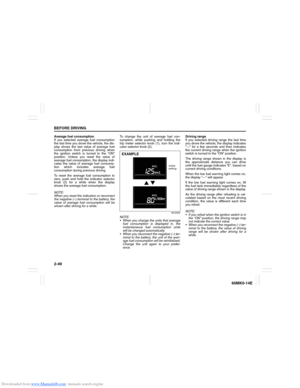 64
64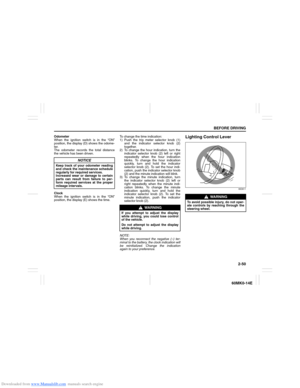 65
65 66
66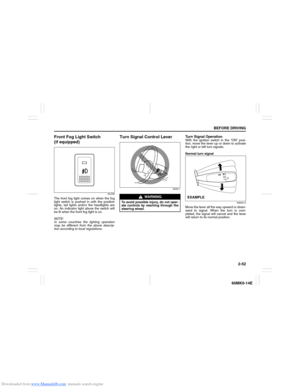 67
67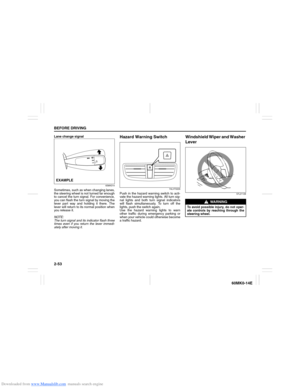 68
68 69
69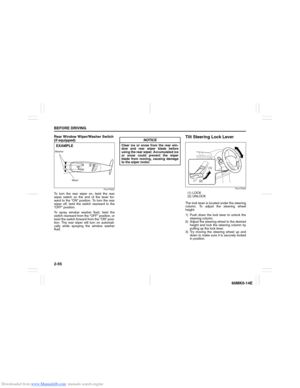 70
70 71
71 72
72 73
73 74
74 75
75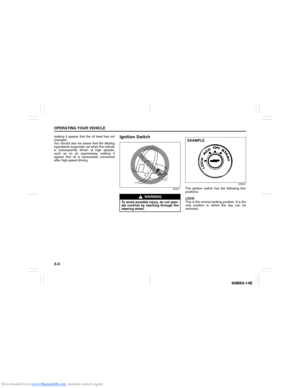 76
76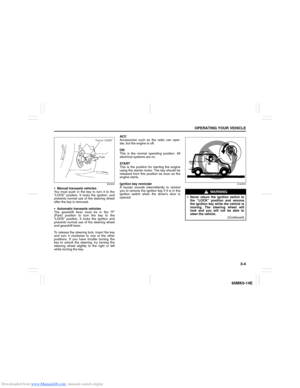 77
77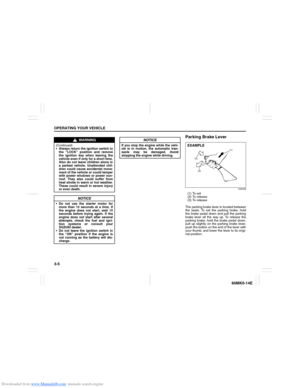 78
78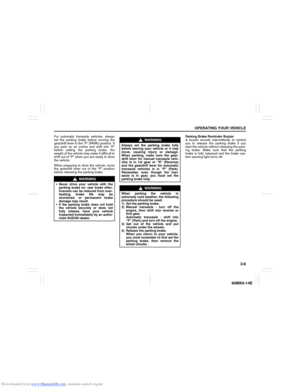 79
79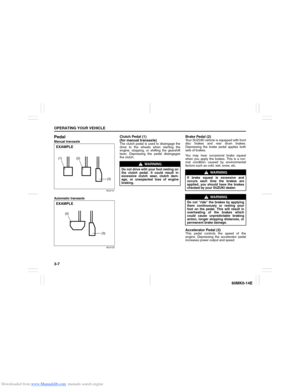 80
80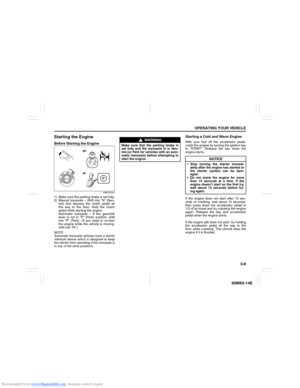 81
81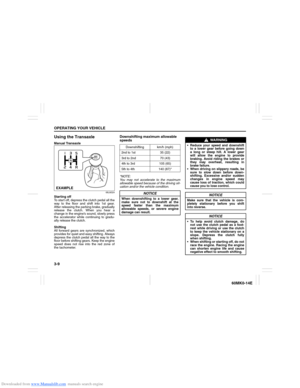 82
82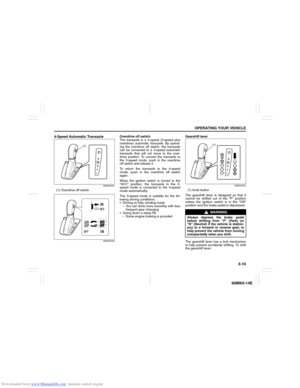 83
83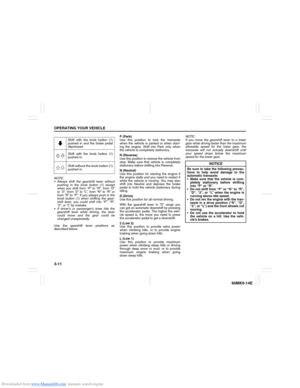 84
84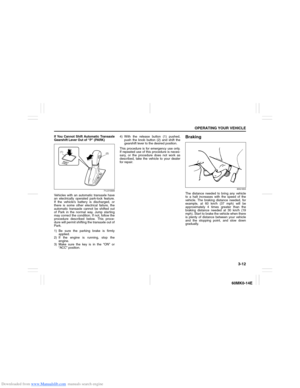 85
85 86
86 87
87 88
88 89
89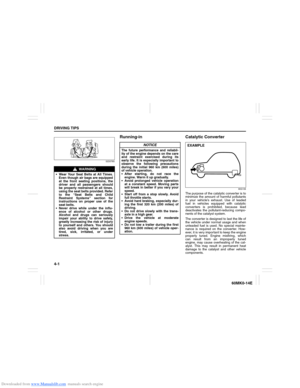 90
90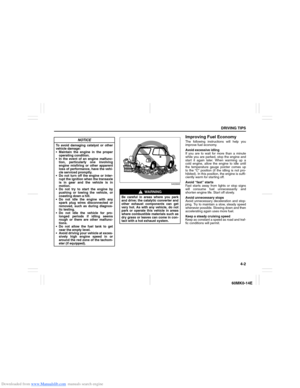 91
91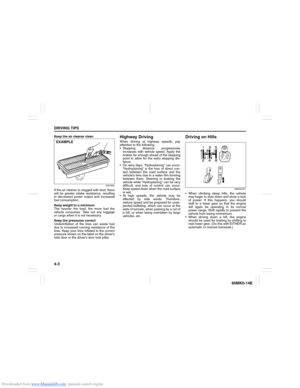 92
92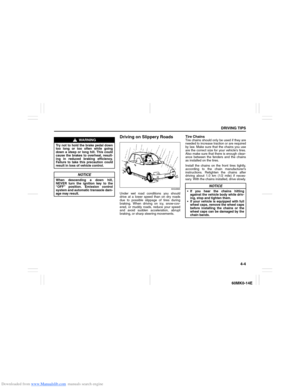 93
93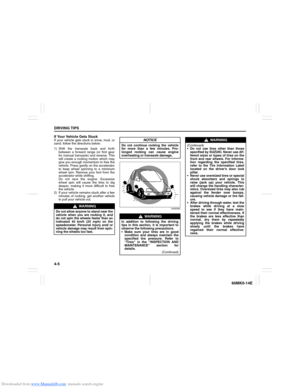 94
94 95
95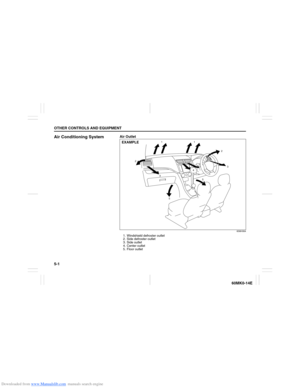 96
96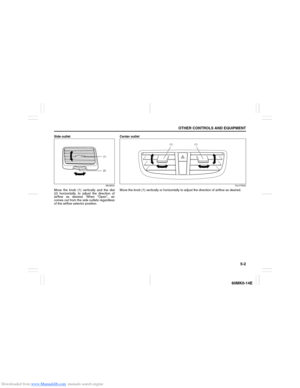 97
97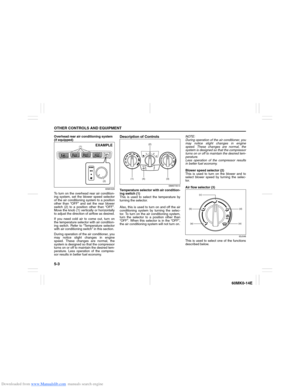 98
98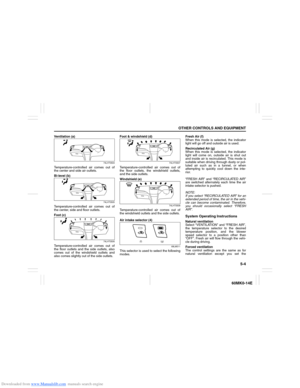 99
99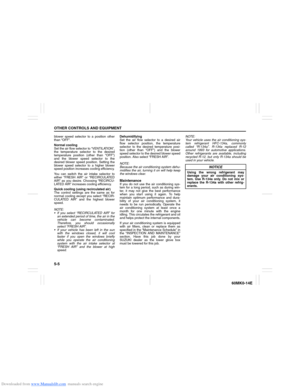 100
100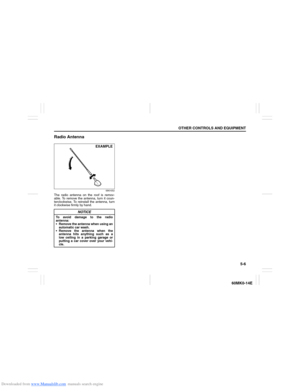 101
101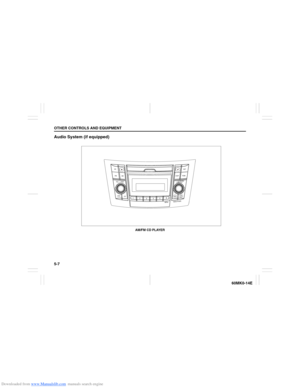 102
102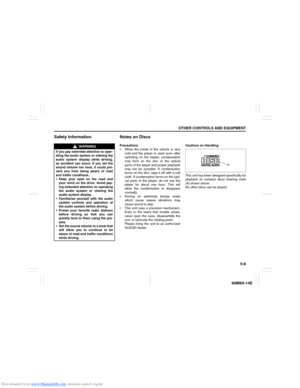 103
103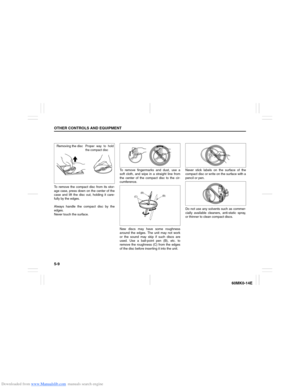 104
104 105
105 106
106 107
107 108
108 109
109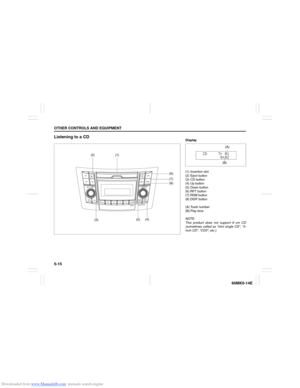 110
110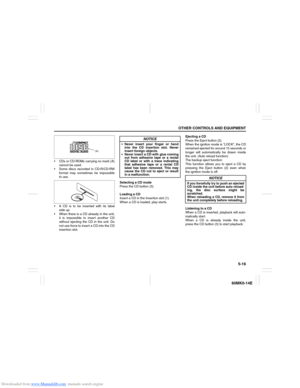 111
111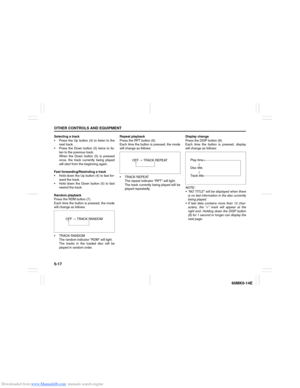 112
112 113
113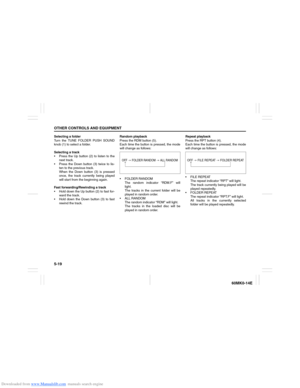 114
114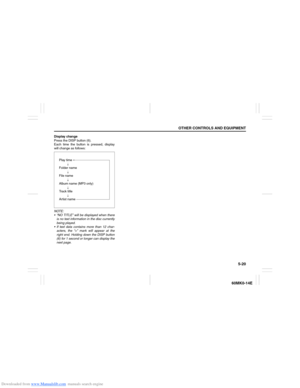 115
115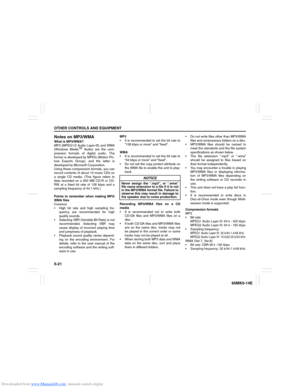 116
116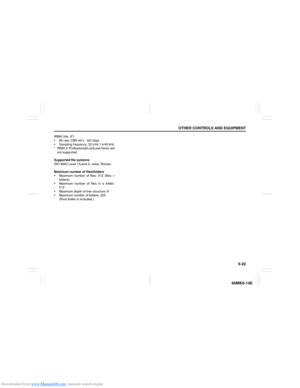 117
117 118
118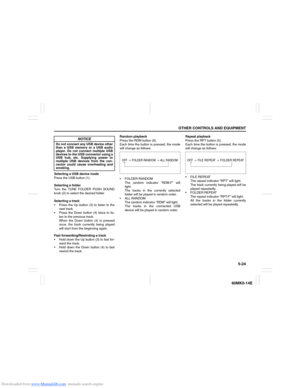 119
119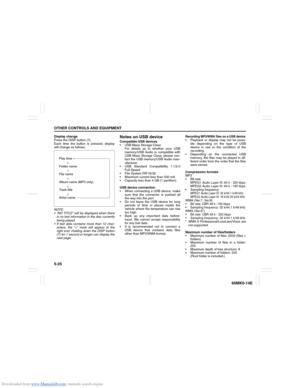 120
120 121
121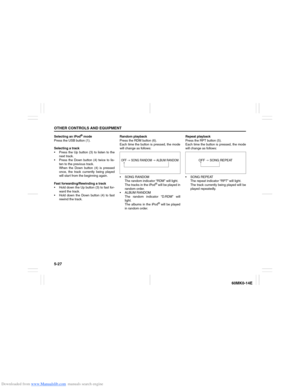 122
122 123
123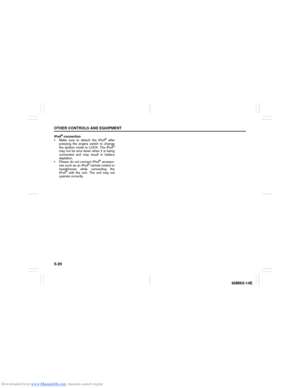 124
124 125
125 126
126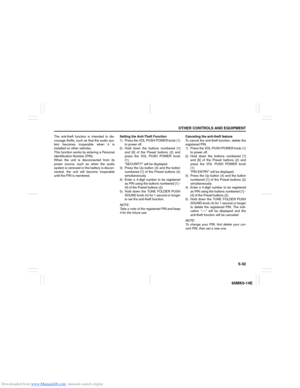 127
127 128
128 129
129 130
130 131
131 132
132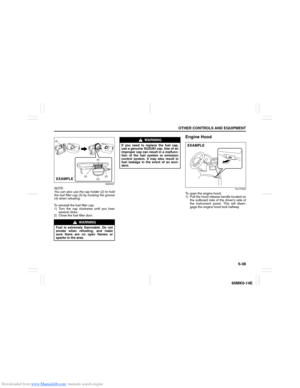 133
133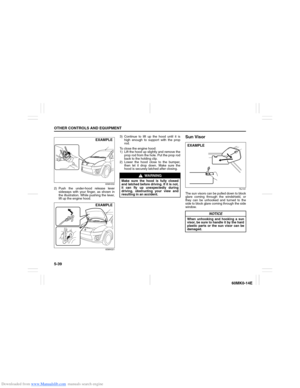 134
134 135
135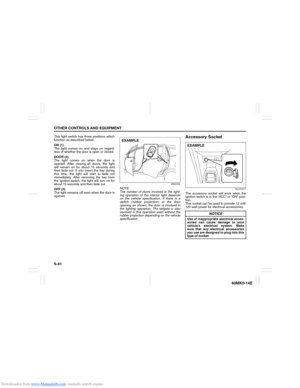 136
136 137
137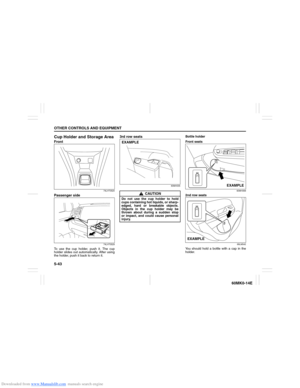 138
138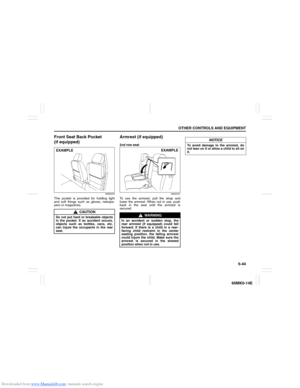 139
139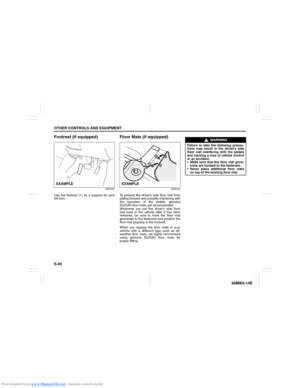 140
140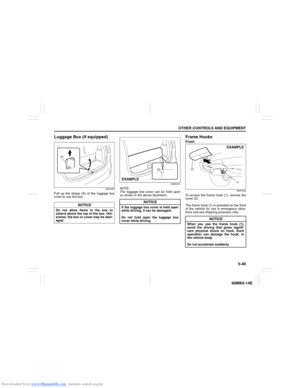 141
141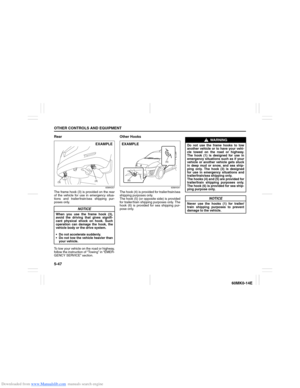 142
142 143
143 144
144 145
145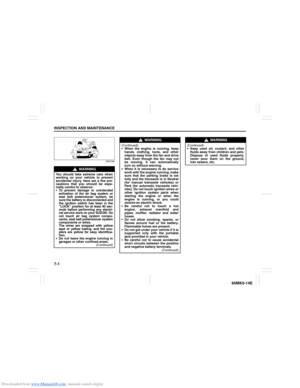 146
146 147
147 148
148 149
149 150
150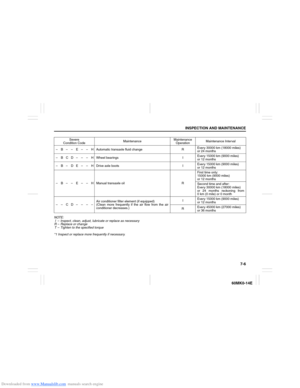 151
151 152
152 153
153 154
154 155
155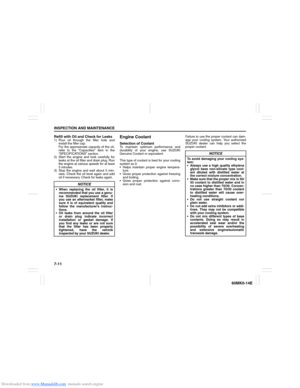 156
156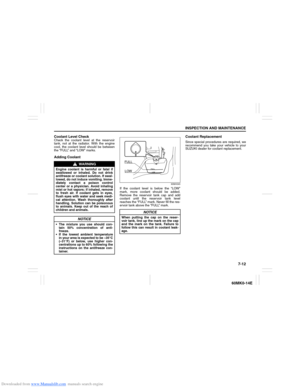 157
157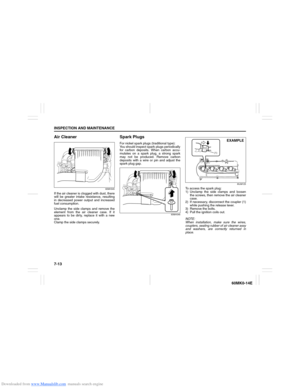 158
158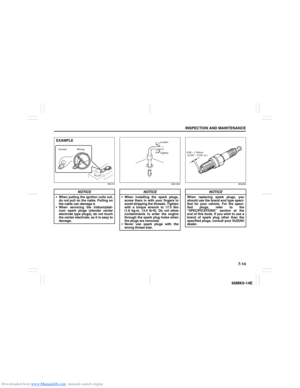 159
159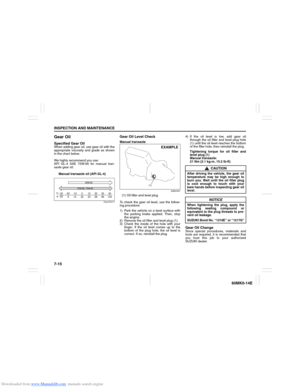 160
160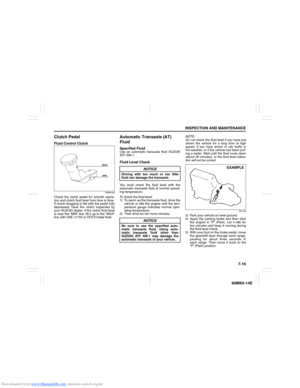 161
161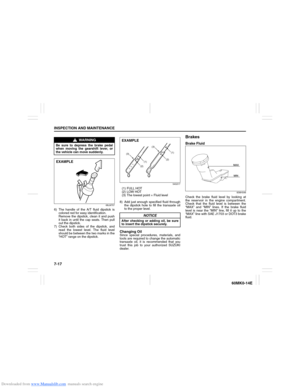 162
162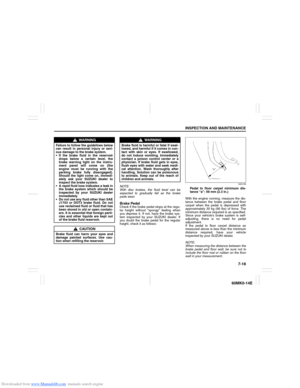 163
163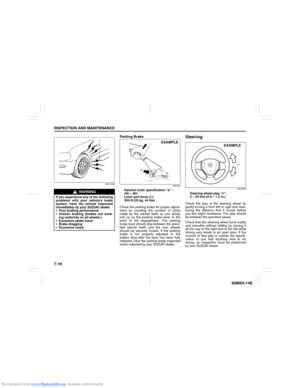 164
164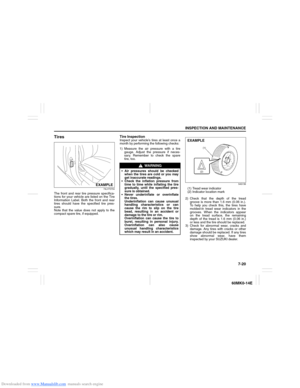 165
165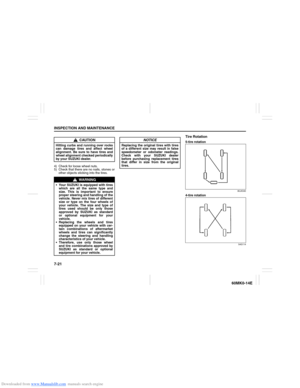 166
166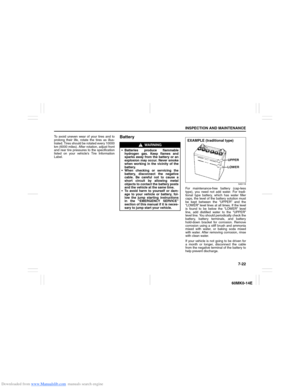 167
167 168
168 169
169 170
170 171
171 172
172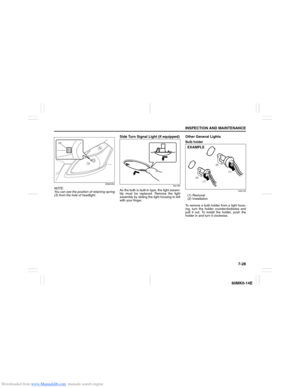 173
173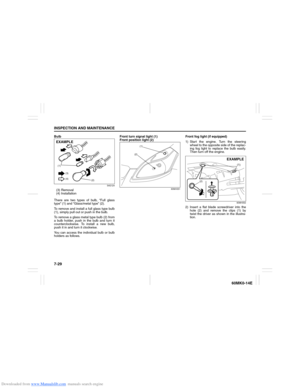 174
174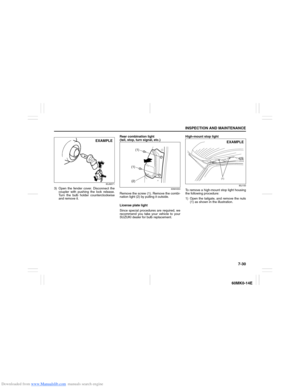 175
175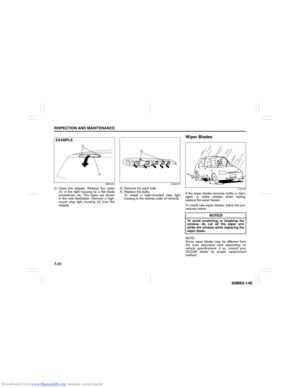 176
176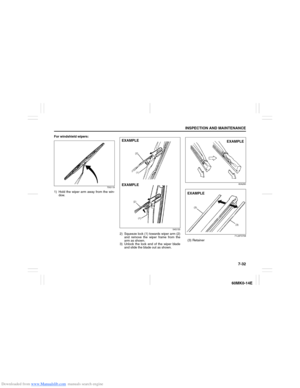 177
177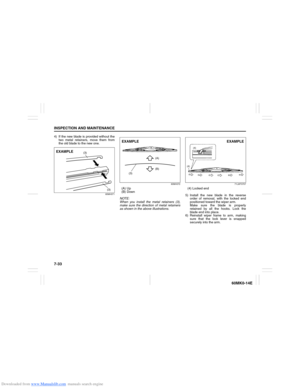 178
178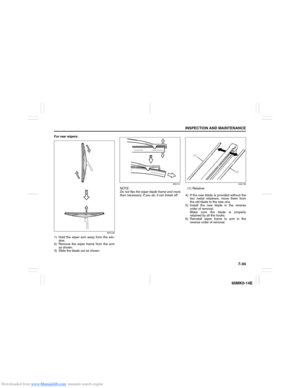 179
179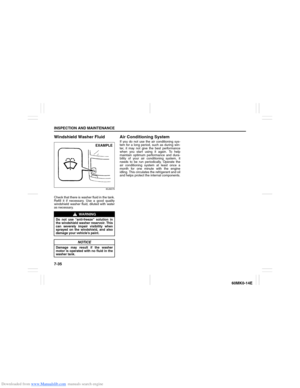 180
180 181
181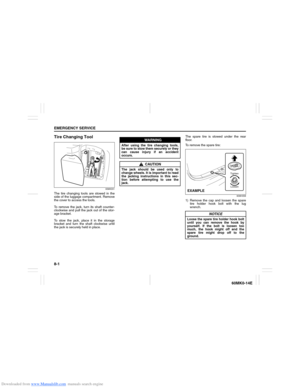 182
182 183
183 184
184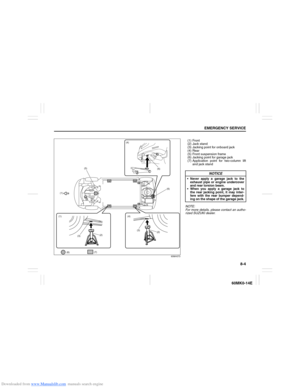 185
185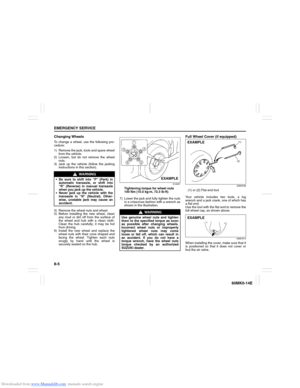 186
186 187
187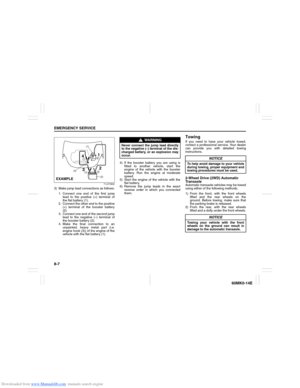 188
188 189
189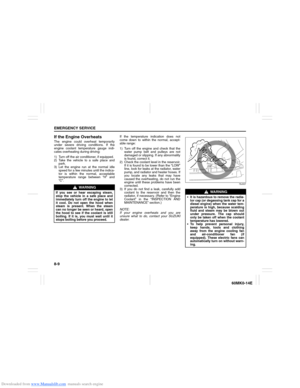 190
190 191
191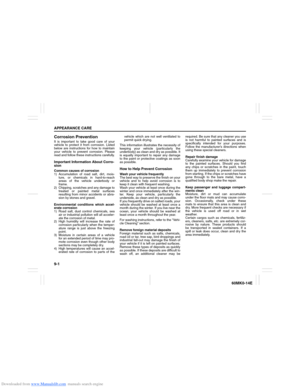 192
192 193
193 194
194 195
195 196
196 197
197 198
198 199
199 200
200 201
201 202
202 203
203 204
204 205
205 206
206
(1)
(2)(2)
(3)(4)
(5)
(6)(7)
(6)
(6)
(4)
(3)
(1) Front
(2) Jack stand
(3) Jacking point for onboard")
