2013 SUBARU FORESTER wiper
[x] Cancel search: wiperPage 146 of 436

!Mist (for a single wipe)
For a single wipe of the wipers, pull the
lever toward you. The wipers also operate
until you release the lever. !
WasherTo wash the windshield, push the washer
button at the end of the wiper control lever.
The washer fluid sprays until you release
the washer button. The wipers also
operate while you push the button. &
Rear window wiper and
washer switch
The wiper and washer operate when the
ignition switch is in the “ON ”or “Acc ”
position.
: Washer (accompanied by wiper operation)
ON: Continuous
INT: Intermittent
OFF: Off
: Washer
! Rear wiper
To turn the rear wiper on, turn the knob at
the end of the wiper control lever upward
to the “INT ”or “ON ”position.
To turn the wiper off, return the knob to the“ OFF ”position.
With the switch turned to the “INT ”
position, the rear wiper will operate inter- Instruments and controls
3-35
– CONTINUED –
Page 147 of 436

3-36Instruments and controls
mittently at intervals corresponding to the
vehicle speed (longer when the vehicle
speed is low; shorter when the vehicle
speed is high).
When you subsequently shift the trans-
mission into reverse, the rear wiper will
automatically switch to continuous opera-
tion. When the transmission is shifted to a
position other than reverse, the rear wiper
will return to intermittent operation. !Washer
To wash the rear window while the rear
wiper is operating, turn the knob upward tothe “
”position. The washer fluid sprays
until you release the knob.
To wash the rear window when the rear
wiper is not in use, turn the knob down-
ward to the “
”position. The washer fluid
sprays, and 2 seconds later the rear wiper
operates. Releasing the knob stops the
washer fluid spray, and 3 seconds later
the rear wiper stops. Mirrors
Always check that the inside and outside
mirrors are properly adjusted before you
start driving. &
Inside mirror
The inside mirror has a day and night
position. Pull the tab at the bottom of the
mirror toward you for the night position.
Push it away for the day position. The
night position reduces glare from head-
lights of vehicles behind you. &
Auto-dimming mirror/com-
pass (if equipped)
1) Auto dimming indicator
2) Left (mirror) button
3) Photosensor
4) Right (compass) button
5) Compass display
The auto-dimming mirror has an anti-glare
feature which automatically reduces glare
coming from headlights of vehicles behind
you. It also contains a built-in compass. . By pressing and releasing the left
button, the automatic dimming function is
toggled on or off. When the automatic
dimming function is on, the auto dimming
indicator light (green) located on the left
button will illuminate. . By pressing and releasing the right
Page 155 of 436

3-44Instruments and controls
when the ignition switch is in the “ON ”or
“ Acc ”position.
1. Press either end of the selection switch, “L ” for the left, “R ”for the right.
2. Move the direction control switch in the
direction you want to move the mirror.
3. Return the selection switch to the
neutral position to prevent unintentionaloperation.
The mirrors can also be adjusted manu-
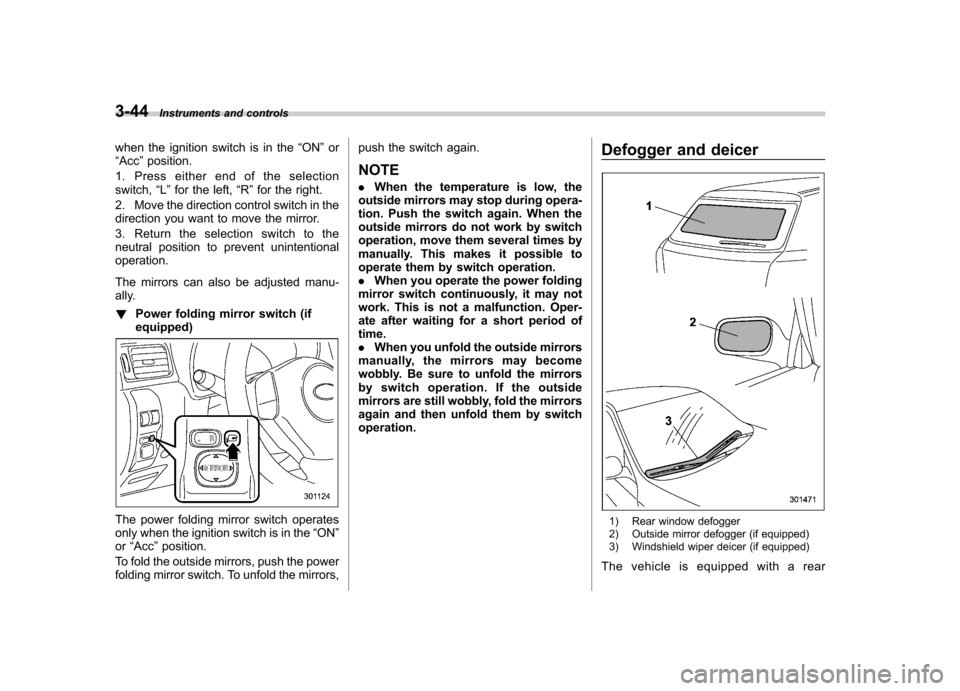
ally. ! Power folding mirror switch (if equipped)
The power folding mirror switch operates
only when the ignition switch is in the “ON ”
or “Acc ”position.
To fold the outside mirrors, push the power
folding mirror switch. To unfold the mirrors, push the switch again.
NOTE . When the temperature is low, the
outside mirrors may stop during opera-
tion. Push the switch again. When the
outside mirrors do not work by switch
operation, move them several times by
manually. This makes it possible to
operate them by switch operation.. When you operate the power folding
mirror switch continuously, it may not
work. This is not a malfunction. Oper-
ate after waiting for a short period oftime.. When you unfold the outside mirrors
manually, the mirrors may become
wobbly. Be sure to unfold the mirrors
by switch operation. If the outside
mirrors are still wobbly, fold the mirrors
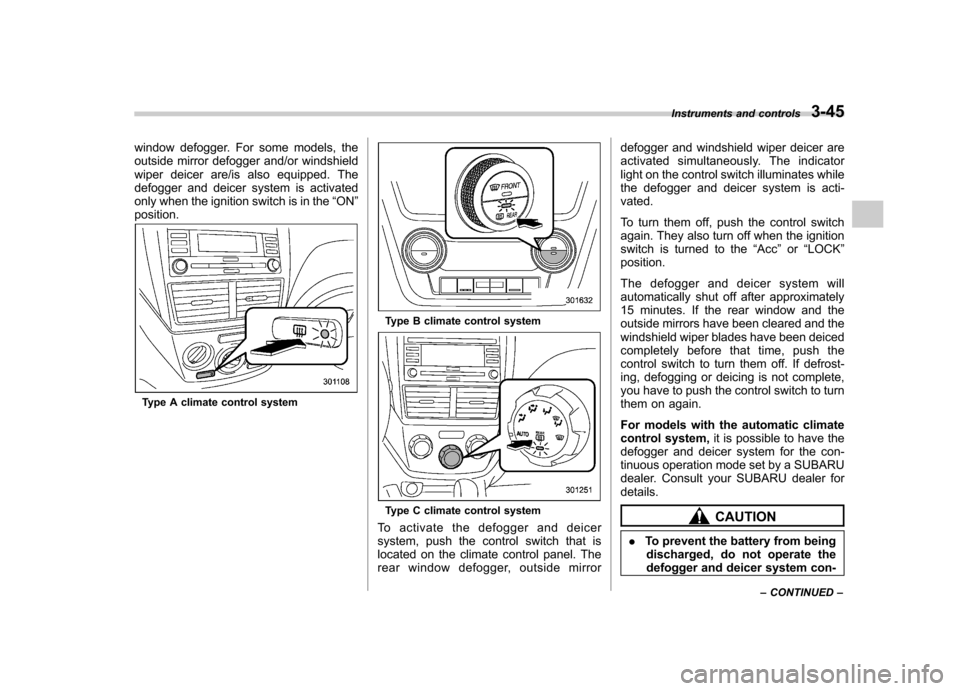
again and then unfold them by switchoperation. Defogger and deicer1) Rear window defogger
2) Outside mirror defogger (if equipped)
3) Windshield wiper deicer (if equipped)
The vehicle is equipped with a rear
Page 156 of 436

window defogger. For some models, the
outside mirror defogger and/or windshield
wiper deicer are/is also equipped. The
defogger and deicer system is activated
only when the ignition switch is in the“ON ”
position.
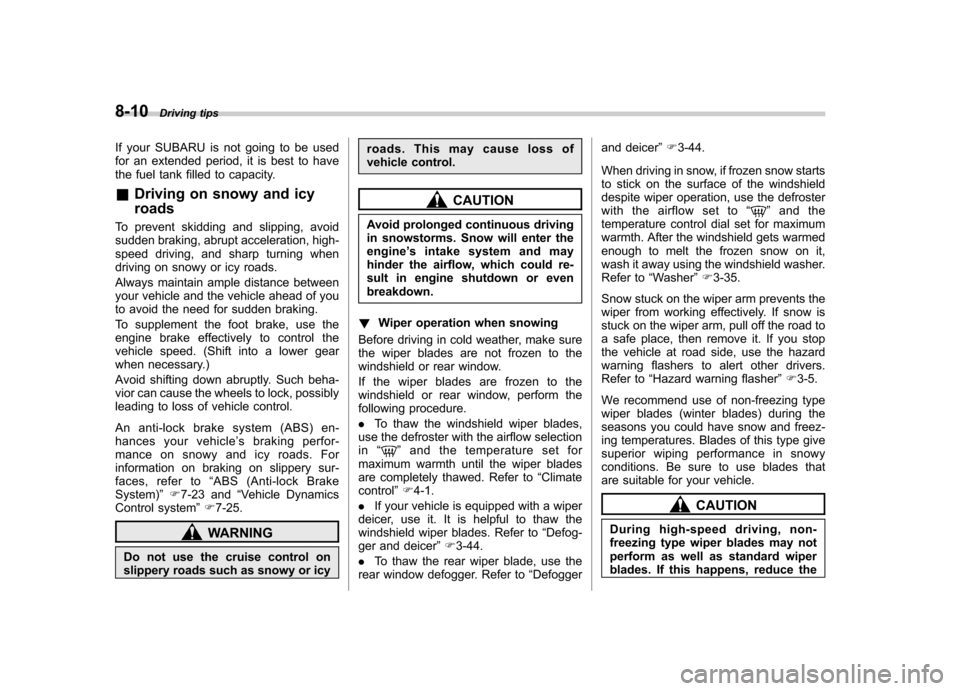
Type A climate control system
Type B climate control system
Type C climate control system
To activate the defogger and deicer
system, push the control switch that is
located on the climate control panel. The
rear window defogger, outside mirror defogger and windshield wiper deicer are
activated simultaneously. The indicator
light on the control switch illuminates while
the defogger and deicer system is acti-vated.
To turn them off, push the control switch
again. They also turn off when the ignition
switch is turned to the
“Acc ”or “LOCK ”
position.
The defogger and deicer system will
automatically shut off after approximately
15 minutes. If the rear window and the
outside mirrors have been cleared and the
windshield wiper blades have been deiced
completely before that time, push the
control switch to turn them off. If defrost-
ing, defogging or deicing is not complete,
you have to push the control switch to turn
them on again.
For models with the automatic climate
control system, it is possible to have the
defogger and deicer system for the con-
tinuous operation mode set by a SUBARU
dealer. Consult your SUBARU dealer fordetails.CAUTION
. To prevent the battery from being
discharged, do not operate the
defogger and deicer system con- Instruments and controls
3-45
– CONTINUED –
Page 157 of 436

3-46Instruments and controls
tinuously for any longer than
necessary.
. Do not use sharp instruments or
window cleaner containing abra-
sives to clean the inner surface
of the rear window. They may
damage the conductors printed
on the window.
NOTE . Turn on the defogger and deicer
system if the wipers are frozen to the windshield.. If the windshield is covered with
snow, remove the snow so that the
windshield wiper deicer works effec-
tively.. While the defogger and deicer sys-
tem is in the continuous operation
mode, if the vehicle speed remains at
9 mph (15 km/h) or less for 15 minutes,
the windshield wiper deicer automati-
cally stops operating, though the rear
window defogger and outside mirror
defogger maintain continuous opera-
tion in this condition.. While the defogger and deicer sys-
tem is in the continuous operation
mode, if the battery voltage drops
below the permissible level, continu-
ous operation of the defogger and deicer system is canceled and the
system stops operating.
Tilt/telescopic steering wheel
WARNING
. Do not adjust the steering wheel
tilt/telescopic position while driv-
ing. This may cause loss of
vehicle control and result in
personal injury.
. If the lever cannot be raised to
the fixed position, adjust the
steering wheel again. It is dan-
gerous to drive without locking
the steering wheel. This may
cause loss of vehicle control
and result in personal injury.
Page 296 of 436

previously, purge the old fluid from the
piping between the washer tank and
washer nozzles by operating the washer
for a certain period of time. Otherwise, if
the concentration of the fluid remaining in
thepipingistoolowfortheoutside
temperature, it may freeze and block thenozzles.
CAUTION
. Adjust the washer fluid concen-
tration appropriately for the out-
side temperature. If the concen-
tration is inappropriate, sprayed
washer fluid may freeze on the
windshield and obstruct your
view, and the fluid may freeze in
the washer tank.
. State or local regulations on
volatile organic compounds may
restrict the use of methanol, a
common windshield washer anti-
freeze additive. Washer fluids
containing non-methanol anti-
freeze agents should be used
only if they provide cold weather
protection without damaging
your vehicle ’s paint, wiper blades
or washer system. !
Before driving your vehicle
Before entering the vehicle, remove any
snow or ice from your shoes because that
could make the pedals slippery and
driving dangerous.
While warming up the vehicle before
driving, check that the accelerator pedal,
brake pedal, and all other controls operate
smoothly.
Clear away ice and snow that has
accumulated under the fenders to avoid
making steering difficult. During severe
winter driving, stop when and where it is
safe to do so and check under the fenders
periodically. ! Parking in cold weather
Do not use the parking brake when
parking for long periods in cold weather
since it could freeze in that position.
Instead, observe the following.
1. Place the shift lever in the “1 ” or “R ”
position for manual transmission models,
or place the select lever in the “P ”position
for automatic transmission models.
2. Use chocks under the tires to prevent
the vehicle from moving.
When the vehicle is parked in snow or
when it snows, raise the wiper blades off
the glass to prevent damage to them. When the vehicle has been left parked
after use on roads heavily covered with
snow, or has been left parked during a
snowstorm, icing may develop on the
brake system, which could cause poor
braking action. Check for snow or ice
buildup on the suspension, disc brakes
and brake hoses underneath the vehicle.
If there is caked snow or ice, remove it,
being careful not to damage the disc
brakes and brake hoses and ABS har-ness.
WARNING
Snow can trap dangerous exhaust
gases under your vehicle. Keep
snow clear of the exhaust pipe and
from around your vehicle if you park
the vehicle in snow with the enginerunning.
! Refueling in cold weather
To help prevent moisture from forming in
the fuel system and the risk of its freezing,
use of an antifreeze additive in the fuel
tank is recommended during cold weather.
Use only additives that are specifically
designed for this purpose. When an
antifreeze additive is used, its effect lasts
longer if the tank is refilled whenever the
fuel level reaches half empty. Driving tips
8-9
– CONTINUED –
Page 297 of 436

8-10Driving tips
If your SUBARU is not going to be used
for an extended period, it is best to have
the fuel tank filled to capacity. &Driving on snowy and icy roads
To prevent skidding and slipping, avoid
sudden braking, abrupt acceleration, high-
speed driving, and sharp turning when
driving on snowy or icy roads.
Always maintain ample distance between
your vehicle and the vehicle ahead of you
to avoid the need for sudden braking.
To supplement the foot brake, use the
engine brake effectively to control the
vehicle speed. (Shift into a lower gear
when necessary.)
Avoid shifting down abruptly. Such beha-
vior can cause the wheels to lock, possibly
leading to loss of vehicle control.
An anti-lock brake system (ABS) en-
hances your vehicle ’s braking perfor-
mance on snowy and icy roads. For
information on braking on slippery sur-
faces, refer to “ABS (Anti-lock Brake
System) ”F 7-23 and “Vehicle Dynamics
Control system ”F 7-25.
WARNING
Do not use the cruise control on
slippery roads such as snowy or icy roads. This may cause loss of
vehicle control.
CAUTION
Avoid prolonged continuous driving
in snowstorms. Snow will enter theengine ’sintakesystemandmay
hinder the airflow, which could re-
sult in engine shutdown or evenbreakdown.
! Wiper operation when snowing
Before driving in cold weather, make sure
the wiper blades are not frozen to the
windshield or rear window.
If the wiper blades are frozen to the
windshield or rear window, perform the
following procedure. . To thaw the windshield wiper blades,
use the defroster with the airflow selection in “
”and the temperature set for
maximum warmth until the wiper blades
are completely thawed. Refer to “Climate
control ”F 4-1.
. If your vehicle is equipped with a wiper
deicer, use it. It is helpful to thaw the
windshield wiper blades. Refer to “Defog-
ger and deicer ”F 3-44.
. To thaw the rear wiper blade, use the
rear window defogger. Refer to “Defogger and deicer
”F 3-44.
When driving in snow, if frozen snow starts
to stick on the surface of the windshield
despite wiper operation, use the defroster
with the airflow set to “
”and the
temperature control dial set for maximum
warmth. After the windshield gets warmed
enough to melt the frozen snow on it,
wash it away using the windshield washer.
Refer to “Washer ”F 3-35.
Snow stuck on the wiper arm prevents the
wiper from working effectively. If snow is
stuck on the wiper arm, pull off the road to
a safe place, then remove it. If you stop
the vehicle at road side, use the hazard
warning flashers to alert other drivers.
Refer to “Hazard warning flasher ”F 3-5.
We recommend use of non-freezing type
wiper blades (winter blades) during the
seasons you could have snow and freez-
ing temperatures. Blades of this type give
superior wiping performance in snowy
conditions. Be sure to use blades that
are suitable for your vehicle.
CAUTION
During high-speed driving, non-
freezing type wiper blades may not
perform as well as standard wiper
blades. If this happens, reduce the
Page 298 of 436

vehicle speed.
NOTE
When the season requiring non-freez-
ing type wiper blades is over, replace
them with standard wiper blades. & Corrosion protection
Refer to “Corrosion protection ”F 10-4.
& Snow tires
WARNING
. When replacing original tires with
winter (snow) tires, make sure
you use only tires of the same
size, circumference, construc-
tion, brand (tread pattern), speed
symbol and load index as the
original tires listed on the tire
placard. Using tires of other sizes
and constructions may affect
speedometer/odom eter calibra-
tion and clearance between the
body and tires. It also may be
dangerous and lead to loss of
vehicle control.
. You must install four winter tires
that are of the same size, circum- ference, construction, manufac-
turer, brand (tread pattern), de-
gree of wear, speed symbol and
load index. Mixing tires of other
sizes or constructions may result
in severe mechanical damage to
the drive train of your vehicle and
may affect ride, handling, braking
and speedometer/odometer cali-
bration. It also may be dangerous
and lead to loss of vehicle con-trol.
. Do not use a combination of
radial, belted bias or bias tires
since it may cause dangerous
handling characteristics and lead
to an accident.
Your vehicle is equipped with “all season
tires ”as original equipment, which are
designed to provide an adequate measure
of traction, handling and braking perfor-
mance in year-round driving. In winter, it
may be possible to enhance performance
through use of tires designed specifically
for winter driving conditions.
When you choose to install winter tires on
your vehicle, be sure to use the correct tire
size and type. You must install four winter
tires that are of the same size, construc-
tion, brand and load range and you should
never mix radial, belted bias or bias tires since this may result in dangerous hand-
ling characteristics. When you choose a
tire, make sure that there is enough
clearance between the tire and vehicle
body.
Remember to drive with care at all times
regardless of the type of tires on yourvehicle.
& Tire chains
CAUTION
Tire chains cannot be used on your
vehicle because of the lack of
clearance between the tires and
vehicle body.
NOTE
Use of another type of traction device
(such as spring chains) may be accep-
table if use on your vehicle is recom-
mended by the device manufacturer,
taking into account tire size and road
conditions. Follow the device manufac-turer ’s instructions, especially regard-
ing maximum vehicle speed.
To help avoid damage to your vehicle,
drive slowly, readjust or remove the
device if it is contacting your vehicle,
and do not spin your wheels. Damage Driving tips
8-11
– CONTINUED –