2013 SUBARU FORESTER wiper
[x] Cancel search: wiperPage 333 of 436
10-2Appearance care
Exterior care &Washing
CAUTION
. When washing the vehicle, the
brakes may get wet. As a result,
the brake stopping distance will
be longer. To dry the brakes,
drive the vehicle at a safe speed
while lightly pressing the brake
pedal to heat up the brakes.
. Do not wash the engine compart-
ment and area adjacent to it. If
water enters the engine air in-
take, electrical parts or the power
steering fluid reservoir, it will
cause engine trouble or a mal-
function of power steering.
. Do not use organic solvents
when washing the surface of the
bulb assembly cover. If a deter-
gent with organic solvents is
mistakenly used to wash the
surface, completely rinse off the
detergent with water. Otherwise,
the surface may be damaged.
. Since your vehicle is equipped
with a rear wiper, automatic car-
wash brushes could become
tangled around it, damaging the wiper arm and other compo-
nents. Ask the automatic car-
wash operator not to let the
brushes touch the wiper arm or
to fix the wiper arm on the rear
window glass with adhesive tape
before operating the machine.
NOTE
When having your vehicle washed in
an automatic car wash, make sure
beforehand that the car wash is of
suitable type.
The best way to preserve your vehicle ’s
beauty is frequent washing. Wash the
vehicle at least once a month to avoid
contamination by road grime.
Wash dirt off with a wet sponge and plenty
of lukewarm or cold water. Do not wash
the vehicle with hot water and in directsunlight.
Salt, chemicals, insects, tar, soot, tree
sap, and bird droppings should be washed
off by using a light detergent, as required.
If you use a light detergent, make certain
that it is a neutral detergent. Do not use
strong soap or chemical detergents. All
cleaning agents should be promptly
flushed from the surface and not allowed
to dry there. Rinse the vehicle thoroughly with plenty of lukewarm water. Wipe the
remaining water off with a chamois or softcloth. !
Washing the underbody
Chemicals, salts and gravel used for
deicing road surfaces are extremely cor-
rosive, accelerating the corrosion of un-
derbody components, such as the exhaust
system, fuel and brake lines, brake
cables, floor pan and fenders, and sus-pension.
Thoroughly flush the underbody and in-
side of the fenders with lukewarm or cold
water at frequent intervals to reduce the
harmful effects of such agents.
Mud and sand adhering to the underbody
components may accelerate their corro-sion.
After driving off-road or on muddy or
sandy roads, wash the mud and sand off
the underbody. Carefully flush the suspen-
sion and axle parts, as they are particu-
larly prone to mud and sand buildup. Do
not use a sharp-edged tool to remove
caked mud.
CAUTION
. Be careful not to damage brake
hoses, sensor harnesses, and
other parts when washing sus-
Page 339 of 436

Maintenance and serviceTires and wheels .............................................. 11-29
Types of tires ................................................... 11-29
Tire pressure monitoring system (TPMS) (U.S.-spec. models) ........................................ 11-29
Tire inspection ................................................. 11-31
Tire pressures and wear ................................... 11-31
Wheel balance .................................................. 11-33
Wear indicators ................................................ 11-34
Tire rotation direction mark .............................. 11-34
Tire rotation ..................................................... 11-35
Tire replacement .............................................. 11-35
Wheel replacement ........................................... 11-36
Wheel covers (if equipped) ............................... 11-36
Aluminum wheels ............................................. 11-37
Windshield washer fluid .................................. 11-37 Replacement of wiper blades
......................... 11-39
Windshield wiper blade assembly.. ................... 11-39
Windshield wiper blade rubber ......................... 11-40
Rear window wiper blade assembly .................. 11-41
Rear window wiper blade rubber ... ................... 11-41
Battery .............................................................. 11-43
Fuses ................................................................ 11-44
Installation of accessories .............................. 11-45
Replacing bulbs ............................................... 11-45
Headlights (models with HID headlights) ........... 11-45
Headlights (models without HID headlights) ...... 11-46
Parking light .................................................... 11-48
Front turn signal light ...................................... 11-48
Rear combination lights ................................... 11-48
License plate light ........................................... 11-49
Dome light, map light, cargo area light and door step light ............................................... 11-50
Other lights on the vehicle ............................... 11-51
Page 342 of 436
the engine has stopped.
& When checking or servicing
in the engine compartment
while the engine is running
WARNING
A running engine can be dangerous.
Keep your fingers, hands, clothing,
hair and tools away from the cooling
fan, belts and any other moving
engine parts. Removing rings,
watches and ties is advisable. Engine hood
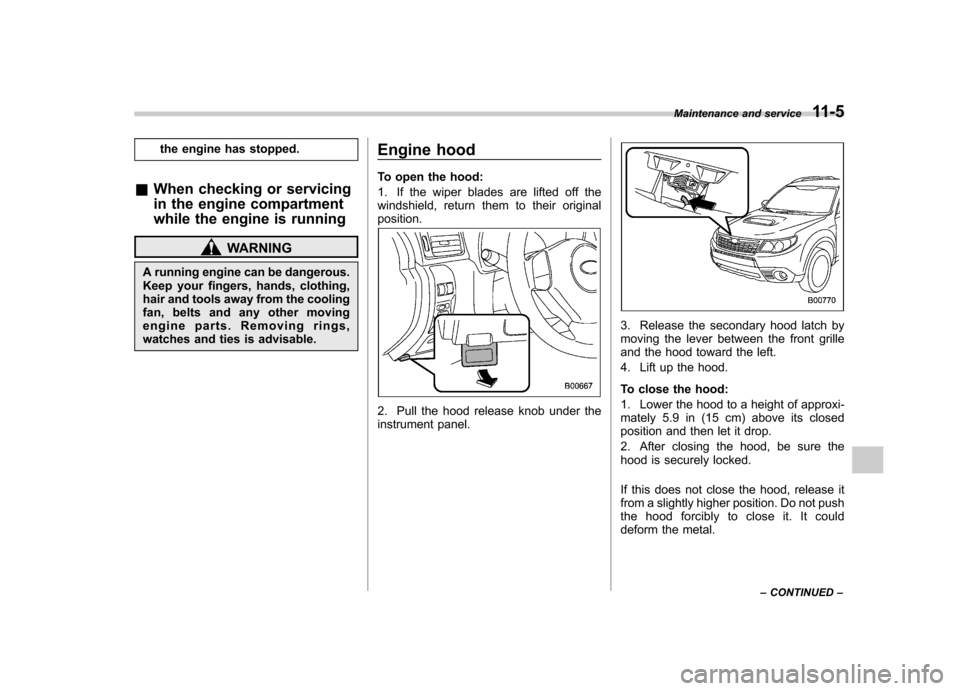
To open the hood:
1. If the wiper blades are lifted off the
windshield, return them to their originalposition.
2. Pull the hood release knob under the
instrument panel.
3. Release the secondary hood latch by
moving the lever between the front grille
and the hood toward the left.
4. Lift up the hood.
To close the hood:
1. Lower the hood to a height of approxi-
mately 5.9 in (15 cm) above its closed
position and then let it drop.
2. After closing the hood, be sure the
hood is securely locked.
If this does not close the hood, release it
from a slightly higher position. Do not push
thehoodforciblytocloseit.Itcould
deform the metal.Maintenance and service
11-5
– CONTINUED –
Page 375 of 436
11-38Maintenance and service
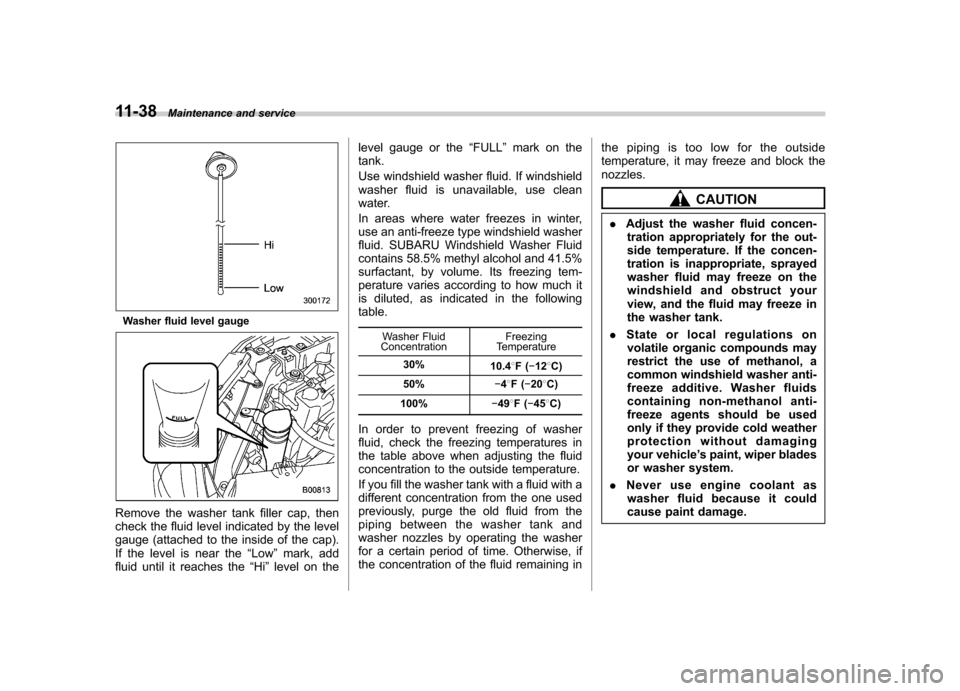
Washer fluid level gauge
Remove the washer tank filler cap, then
check the fluid level indicated by the level
gauge (attached to the inside of the cap).
If the level is near the “Low ”mark, add
fluid until it reaches the “Hi ”level on the level gauge or the
“FULL ”mark on the
tank.
Use windshield washer fluid. If windshield
washer fluid is unavailable, use clean
water.
In areas where water freezes in winter,
use an anti-freeze type windshield washer
fluid. SUBARU Windshield Washer Fluid
contains 58.5% methyl alcohol and 41.5%
surfactant, by volume. Its freezing tem-
perature varies according to how much it
is diluted, as indicated in the followingtable.
Washer Fluid
Concentration Freezing
Temperature
30% 10.48F( �12 8C)
50% �48F( �20 8C)
100% �49 8F( �45 8C)
In order to prevent freezing of washer
fluid, check the freezing temperatures in
the table above when adjusting the fluid
concentration to the outside temperature.
If you fill the washer tank with a fluid with a
different concentration from the one used
previously, purge the old fluid from the
piping between the washer tank and
washer nozzles by operating the washer
for a certain period of time. Otherwise, if
the concentration of the fluid remaining in the piping is too low for the outside
temperature, it may freeze and block thenozzles.
CAUTION
. Adjust the washer fluid concen-
tration appropriately for the out-
side temperature. If the concen-
tration is inappropriate, sprayed
washer fluid may freeze on the
windshield and obstruct your
view, and the fluid may freeze in
the washer tank.
. State or local regulations on
volatile organic compounds may
restrict the use of methanol, a
common windshield washer anti-
freeze additive. Washer fluids
containing non-methanol anti-
freeze agents should be used
only if they provide cold weather
protection without damaging
your vehicle ’s paint, wiper blades
or washer system.
. Never use engine coolant as
washer fluid because it could
cause paint damage.
Page 376 of 436
Replacement of wiper blades
Grease, wax, insects, or other material on
the windshield or the wiper blade results in
jerky wiper operation and streaking on the
glass. If you cannot remove the streaks
after operating the windshield washer or if
the wiper operation is jerky, clean the
outer surface of the windshield (or rear
window) and the wiper blades using a
sponge or soft cloth with a neutral
detergent or mild abrasive cleaner. After
cleaning, rinse the windshield and wiper
blades with clean water. The windshield is
clean if beads do not form when you rinse
the windshield with water.
CAUTION
. Do not clean the wiper blades
with gasoline or a solvent, such
as paint thinner or benzine. This
will cause deterioration of the
wiper blades.
. While removing the wiper blades
from the wiper arms, do not
return the wiper arms to the
original positions. Otherwise,
the windshield surface may bescratched.
. When returning the raised wiper
arms to the original positions, carefully return the wiper arms
on the windshield while support-
ing them with your hands. You
should not return the wiper arms
to the windshield only by the
return spring. Otherwise, the wi-
per arms may be deformed and/
or the windshield surface may bescratched.
If you cannot eliminate the streaking even
after following this method, replace the
wiper blades using the following proce-dures. &
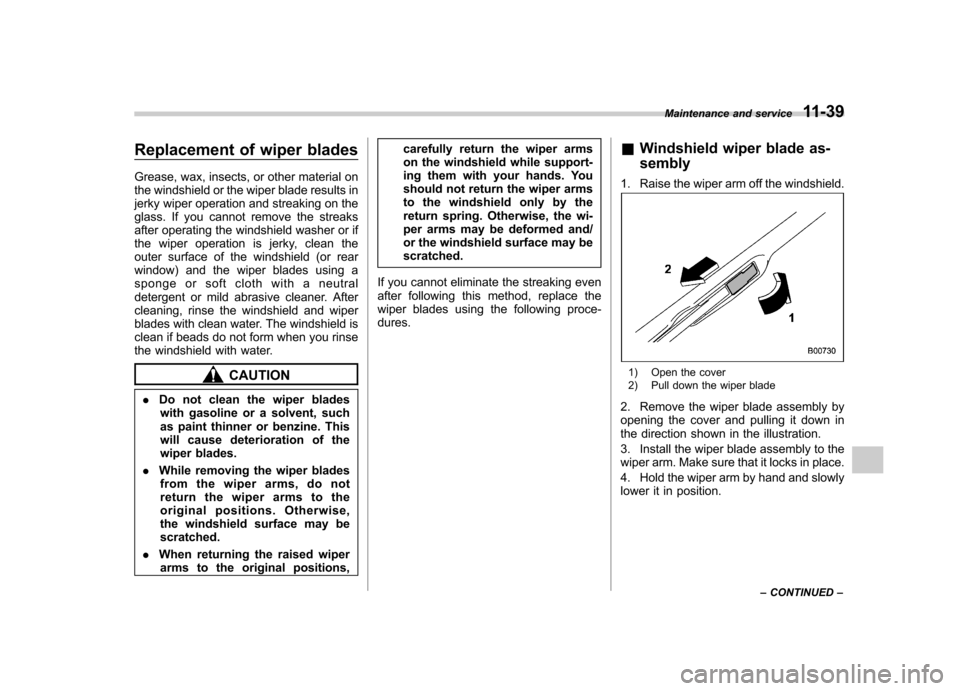
Windshield wiper blade as- sembly
1. Raise the wiper arm off the windshield.1) Open the cover
2) Pull down the wiper blade
2. Remove the wiper blade assembly by
opening the cover and pulling it down in
the direction shown in the illustration.
3. Install the wiper blade assembly to the
wiper arm. Make sure that it locks in place.
4. Hold the wiper arm by hand and slowly
lower it in position. Maintenance and service
11-39
– CONTINUED –
Page 377 of 436
11-40Maintenance and service
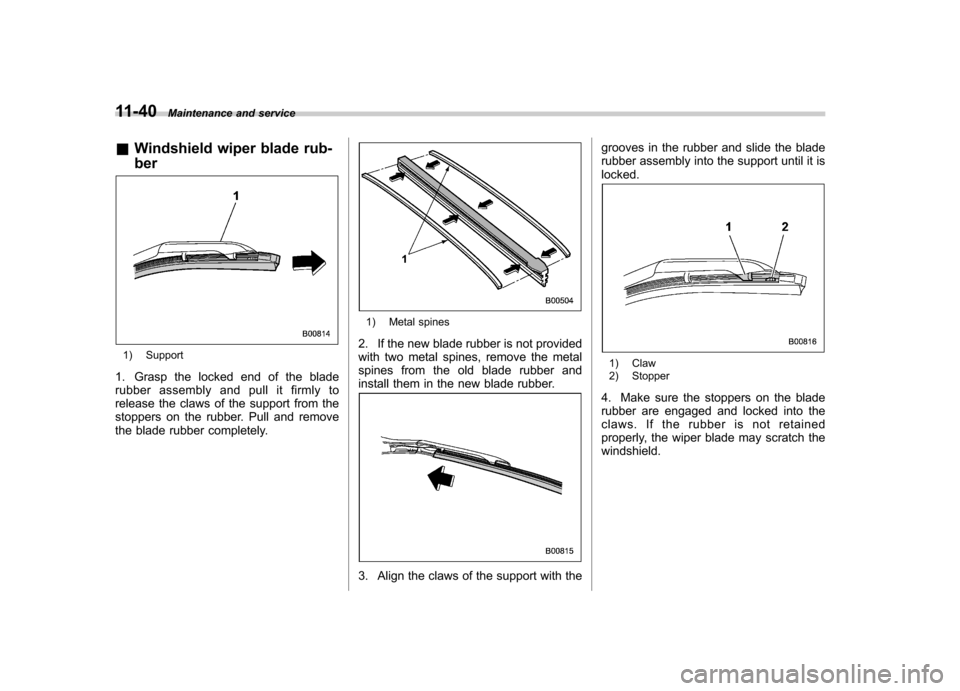
& Windshield wiper blade rub- ber
1) Support
1. Grasp the locked end of the blade
rubber assembly and pull it firmly to
release the claws of the support from the
stoppers on the rubber. Pull and remove
the blade rubber completely.
1) Metal spines
2. If the new blade rubber is not provided
with two metal spines, remove the metal
spines from the old blade rubber and
install them in the new blade rubber.
3. Align the claws of the support with the grooves in the rubber and slide the blade
rubber assembly into the support until it islocked.
1) Claw
2) Stopper
4. Make sure the stoppers on the blade
rubber are engaged and locked into the
claws. If the rubber is not retained
properly, the wiper blade may scratch thewindshield.
Page 378 of 436

&Rear window wiper blade assembly
1. Raise the wiper arm off the rear
window.
2. Turn the wiper blade assembly coun- terclockwise.
3. Pull the wiper blade assembly toward
you to remove it from the wiper arm.
4. Install the wiper blade assembly to the
wiper arm. Make sure that it locks in place.
5. Hold the wiper arm by hand and slowly
lower it in position. &
Rear window wiper blade rubber
1. Pull out the end of the blade rubber
assembly to unlock it from the plasticsupport.
Maintenance and service 11-41
– CONTINUED –
Page 379 of 436
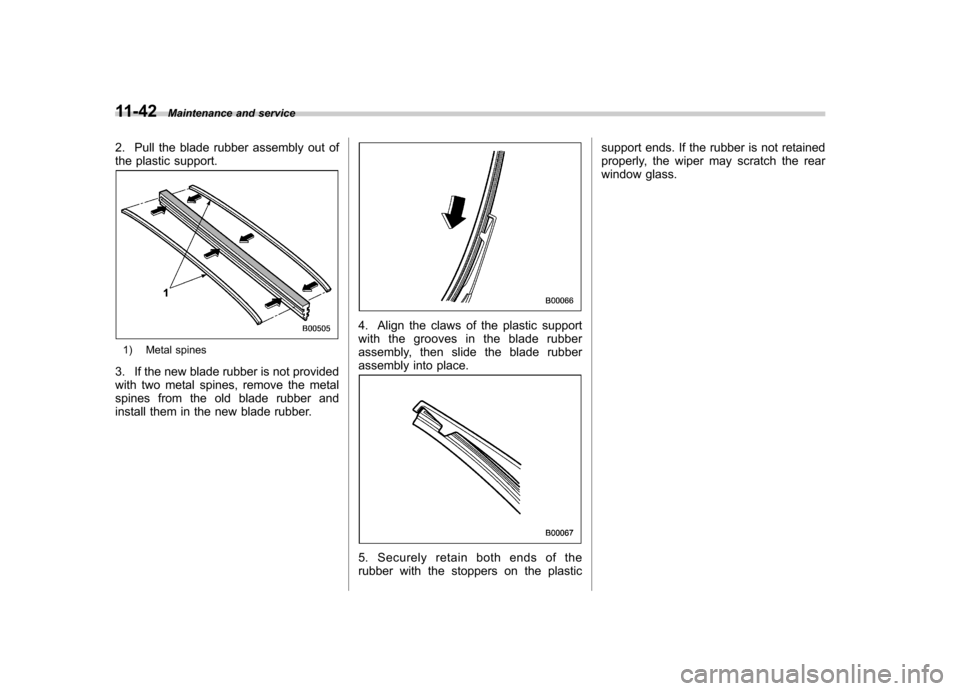
11-42Maintenance and service
2. Pull the blade rubber assembly out of
the plastic support.
1) Metal spines
3. If the new blade rubber is not provided
with two metal spines, remove the metal
spines from the old blade rubber and
install them in the new blade rubber.
4. Align the claws of the plastic support
with the grooves in the blade rubber
assembly, then slide the blade rubber
assembly into place.
5. Securely retain both ends of the
rubber with the stoppers on the plastic support ends. If the rubber is not retained
properly, the wiper may scratch the rear
window glass.